Spring --- IoC相关笔记
概述
spring 是分层的java se/ee 应用 full-stack 轻量级开源框架,以IoC (Inverse Of Control : 反转控制)和AOP(Aspect Oriented Programming:面向切面编程)为内核,提供了展示层Spring MVC 和吃阶层 Spring JDBC 以及业务层是事务管理层 等众多 企业级应用技术,还能整合世界开源众多的第三方框架 和类库,逐渐成为使用最多的Java EE企业集应用开源框架。
Spring 的优点
方便解耦,简化开发
通过spring 提供的IoC容器,可以将对象之间的依赖关系交由Spring来管理,避免硬编码所造成的过度程序耦合。
AOP编程的支持
通过Spring 的AOP(Aspect Oriented Programming)功能,方便进行切面的编程,许多不容易用传统OOP(Object Oriented Programming)实现的功能可以通过AOP应付。
声明式事务的支持
声明式 其实就是通过配置的方式实现事务声明。
方便程序的测试
方便继承各种优秀的框架
降低javaEE API的使用难度
入门案例 – IoC (解决程序间的依赖关系)
提要
程序的耦合
耦合:程序间的依赖关系,包括类之间的依赖关系,和方法之间的依赖关系
解耦 :降低程序间的依赖关系,实际开发中,应该做到:编译期不依赖,运行时才依赖
解耦思路:
第一步:使用反射来创建对象,从而避免new 关键字
第二部:通过读取配置文件来获取要创建文件的全限定类名
Bean : 在计算机英语中,有可重用组件的含义
JavaBean 用java语言编写的 可重归于组件
javaBean > 实体类
他就是创建我们的service 和 dao 对象的。
第一步:需要一个配置文件来配置我们的service 和 dao。
- 配置的内容:唯一标志 = 全限定类名(key = value)
IoC : 控制反转(Inverse Of Control )。把创建对象的权力交给框架,是框架的重要特征,并非面向对象的专用术语。它包括依赖注入(Dependency Injection,简称DI)和依赖查找(Dependency LookUp)
明确 IoC 在计算机程序中的作用:削减程序之间的耦合(解除我们代码之间的依赖关系)。
spring 中的 IoC就是为了是这些代码变得简单,简化这些代码
搭建步骤
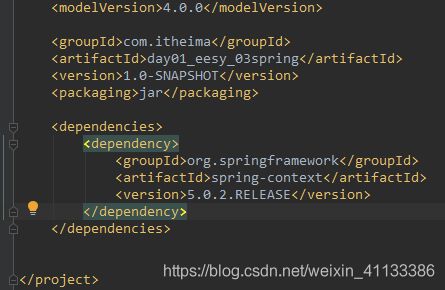
第一步:建立maven工程,导入坐标

第二步:创建配置文件、导约束、配置资源

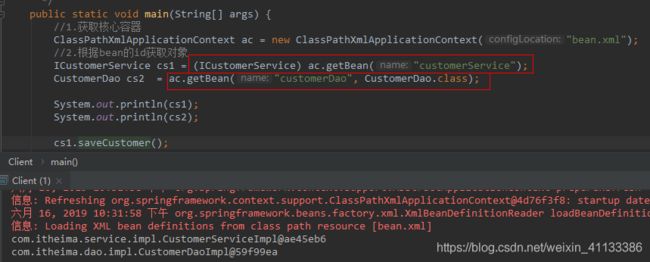
第三步:直接获取对象,两种方式
public class Client {
    /*
     ClassPathXmlApplicationContext : 它是只能加载类路径下的配置文件  我们用这个
     FileSystemXmlApplicationContext : 它是可以加载磁盘任意位置的配置文件

     Bean创建的两种规则:
         BeanFactory:       单例对象适用
             提供的是一种延迟加载思想来创建bean对象。bean对象什么时候用什么时候创建
         ApplicationContext     多例对象适用
             提供的是一种立即加载思想来创建bean对象。只要一解析完配置文件,就立即创建配置文件

     bean 的三种创建方式
         第一种方式:调用无参构造函数创建     (此种方式用的最多)
                 默认情况下,如果类中没有无参构造函数,则创建失败,会报异常
         第二种方式:使用工厂中的方法创建对象
                 需要使用bean标签中的factory-method属性,指定静态工厂中创建对象的方法
         第三种方式:使用实例工厂中的方法创建

     bean 的作用范围:
         它是可以通过配置的方式来调整作用范围。
         配置的属性:bean标签的scope属性
         属性的取值:
             singleton:单例的(默认值)
             prototype:多例的(当我们让spring接管structs2的action创建时,action必须配置此值)
             request:作用范围是一次请求,和当前请求的转发
             session:作用范围是一次会话
             globalsession:作用范围是一次全局会话

     bean的生命周期:
         涉及两个属性:
             init-method
             destroy-method
         单例:
             出生:容器创建,对象就出生了
             活着:只要容器在,对象就一直存在
             死亡:容器销毁,对象消亡
         多例:
             出生:每次使用时创建对象
             活着:只要对象在使用中就一直活着
             死亡:当对象长时间不使用,并且也没有别的对象引用是时,有java的垃圾回收器回收
      */
    public static void main(String[] args) {
        //1.获取核心容器
        ClassPathXmlApplicationContext ac = new ClassPathXmlApplicationContext("bean.xml");
        //2.根据bean的id获取对象
        ICustomerService cs1 = (ICustomerService) ac.getBean("customerService");
        CustomerDao cs2  = ac.getBean("customerDao", CustomerDao.class);

        System.out.println(cs1);
        System.out.println(cs2);

        cs1.saveCustomer();

    }

   /* public static void main(String[] args) {
        //1.获取容器
        ClassPathResource resource = new ClassPathResource("bean.xml");
        BeanFactory factory = new XmlBeanFactory(resource);
        //2.根据bean的id获取对象
        ICustomerService cs = (ICustomerService) factory.getBean("customerService");

        CustomerDao dao = (CustomerDao) factory.getBean("customerDao");

        cs.saveCustomer();

    }*/
}
bean.xml 注入
<?xml version="1.0" encoding="UTF-8"?>
<beans xmlns="http://www.springframework.org/schema/beans"
       xmlns:xsi="http://www.w3.org/2001/XMLSchema-instance"
       xsi:schemaLocation="
       http://www.springframework.org/schema/beans http://www.springframework.org/schema/beans/spring-beans.xsd">
<!-- spring 的依赖注入:
        注入的方式有三种:
            第一种:使用构造函数注入
            第二种:使用set方法注入
            第三种:使用注解注入
        注入的数据类型有三种:
            第一类:基本类型和String类型
            第二类:其他Bean类型(必须在spring配置文件出现过的bean)
            第三类:复杂类型(集合类型)

-->
    <!-- 配构造函数注入
        涉及的标签:constructor-arg
        标签的属性:
                type:指定参数的类型
                index:指定参数的索引位置
                name:指定参数的名称        一般用它
              ===================上面三个参数是指定给哪个参数赋值,下面两个属性是指定赋什么值======================
                value:指定基本数据类型或String类型的数据
                ref:指定其他bean类型数据
               标签出现的位置:
                    写在bean标签的内部
    -->
    <bean id = "customerService" class="itheima.service.impl.CustomerServiceImpl" >
        <constructor-arg name = "driver" value = "com.mysql.cj.jdbc.Driver"></constructor-arg>
        <constructor-arg name = "port" value = "3306"></constructor-arg>
        <constructor-arg name = "today" ref = "now"></constructor-arg>
    </bean>

    <bean id = "now" class = "java.util.Date"></bean>

    <!-- set方法注入
                涉及的标签:property
                标签的属性:
                name:指定参数的set方法名称        一般用它
 ===================上面三个参数是指定给哪个参数赋值,下面两个属性是指定赋什么值======================
                value:指定基本数据类型或String类型的数据
                ref:指定其他bean类型数据
               标签出现的位置:
                    写在bean标签的内部
    -->
    <bean id = "customerService2" class="itheima.service.impl.CustomerServiceImpl2" >
        <property name="driver" value = "com.mysql.cj.jdbc.Driver"></property>
        <property name="port" value = "3307"></property>
        <property name="today" ref = "now"></property>
    </bean>

    <!-- 复杂类型注入
    	用于给list结构注入的标签有
    		list array set
    	用于map结构注入的标签
    		map props
        结构相同,标签可以互换
    -->
    <bean id = "customerService3" class = "itheima.service.impl.CustomerServiceImpl3">
        <property name="myStrs" >
            <set >
                <value>AAA</value>
                <value>BBB</value>
                <value>CCC</value>
            </set>
        </property>

        <property name="myList">
            <list>
                <value>AAA</value>
                <value>BBB</value>
                <value>CCC</value>
            </list>
        </property>

        <property name="mySet">
            <array>
                <value>AAA</value>
                <value>BBB</value>
                <value>CCC</value>
            </array>
        </property>

        <property name="myMap">
            <map>
                <entry key = "testD" value="DDD"></entry>
                <entry key = "testE">
                    <value>EEE</value>
                </entry>
            </map>
        </property>

        <property name="myProps">
            <props>
                <prop key="prop1">111</prop>
                <prop key="prop2">222</prop>
            </props>
        </property>
    </bean>


</beans>
注解注入
有四种注解
1.用于创建bean对象,和 标签作用一样
@Component
作用:相当于配置了bean标签
它能出现的位置:类上面
属性:value。含义是指定bean的id。当不写时,它有默认值,默认值是:当前类的短名首字母该小写。
(全限定名:com.itheima.service.impl.CustomerServiceImpl)
(短名:customerServiceImpl)
由此注解衍生的三个注解:
@Controller 一般用于表现层的注解
@Service 一般用于业务层
@Repository 一般用于持久层
它们和@Component的作用及属性一模一样2.用于注入数据的,和标签的作用一样
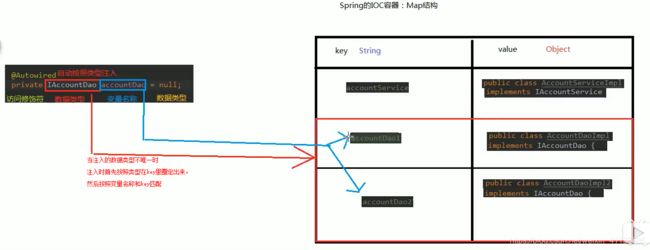
@AutoWired
作用:自动按照类型注入。只要有唯一类型匹配就能注入成功。
当我们使用注解方法注入时,set方法不是必须的
如果注入的bean在容器中类型不唯一时,他会把变量名称作为bean的id,在容器中查找,找到后也能注入
如果没有找到一致的bean的id,则报错
@Qualifier
作用:在自动按照类型注入的基础之上,在按照bean的id注入。
在给类成员注入数据时,不能独立使用。但是在给方法的形参注入数据时,可以独立使用
属性:
value:用于指定bean的id
@Resource
作用:直接按照bean的id注入
属性:
name:用于指定bean的id。
以上三个注解都是用于注入bean类型的。用于与注入基本类型和String类型注入需要使用Value
@Value
作用:用于注入基本类型和String类型数据。它可以借助spring的el表达式读取properties文件中的配置。
属性:
value:用于指定要注入的数据3.用于改变作用范围的,和属性功能一样
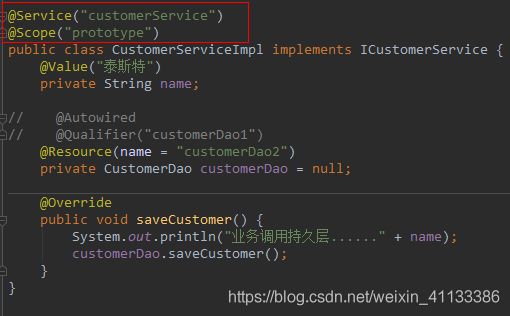
@Scope
作用:用于改变bean的作用范围
属性:
value:用于指定范围的取值
取值和xml中scope属性的取值是一样的。singleton prototype request session globalsession4.和生命周期相关的
PreDestory 用于指定销毁方法
PostConstruct 用于指定初始化方法5.spring的新注解
@Bean 它是把方法的返回值存入到spring容器中。
该注解有一个属性:name用于指定bean的id。当不指定时,它有默认值,默认值是方法名称。
@Configuration 把当前类看做spring的配置类
@ComponentScan 指定要扫描的包
@PropertySource(value={“classpath:config/jdbcConfig.properties”})说明这个是类路径
@Import 导入其他配置类
使用纯注解
public class JdbcTemplateDemo2 {

    public static void main(String[] args) {
        //1.获取容器
//        ApplicationContext ac = new ClassPathXmlApplicationContext("bean.xml");
        ApplicationContext ac = new AnnotationConfigApplicationContext(SpringConfiguration.class);
        //2.跟id获取bean对象
        JdbcTemplate jt = (JdbcTemplate) ac.getBean("jdbcTemplate");
        //3.执行操作
        jt.execute("insert into account(name,money)values('eee',2345)");


    }
}
@Configuration //指定当前类是一个配置类
@ComponentScan("com.itheima") //用于通过注解指定spring再创建容器时要扫描的包
public class SpringConfiguration {

    @Bean(name="jdbcTemplate")//用于把当前方法的返回值作为bean对象存入spring容器中。属性name用于指定bean的id,默认值是当前方法的名称
    public JdbcTemplate createJdbcTemplate(DataSource dataSource){
        return new JdbcTemplate(dataSource);
    }

    /**
     * 创建数据源对象
     */
    @Bean(name="dataSource")
    @Scope("prototype")//datasource 有必要配置成为多例
    public DataSource createDataSource(){
        DriverManagerDataSource ds = new DriverManagerDataSource();
        //jdbc也可以配置为注解,要用PropertySource注解,不过这种方法属于杀敌一千自损八百
        ds.setDriverClassName("com.mysql.jdbc.Driver");
        ds.setUrl("jdbc:mysql://localhost:3306/eesy");
        ds.setUsername("root");
        ds.setPassword("123");
        return  ds;
    }


}
spring整合junit
问题 当测试方法执行时,没有IoC容器,就算写了AutoWired注解,也无法注入
整合步骤:
第一步:拷贝spring提供的整合jar包 (再pom文件中直接导入坐标)
        spring-test-4.2.4RELEASE.jar
第二步:使用junit提供的一个注解,把原有的main函数替换掉,换成spring提供的
        @RunWith
        要换的类:SpringJunit4ClassRunner
第三部:使用spring提供的注解告知spring,配置文件或者注解所在位置
        @ContextConfiguration(locations={"classpath:bean.xml"})//配置文件
        @ContextConfiguration(classes={SpringConfiguration.class})//注解所在位置
------------------------------------------------------------------------
    @RunWith(SpringJUnit4ClassPathRunner.class)
    @ContextConfiguration(classes={SpringConfiguration.class})
    public class CustomerServiceTest{

        @Resource(name = "customerService")或者@Autowired
        private ICustomerService cs;

        @Test
        public void testFindAllCustomer(){
            List<Customer> list = cs.findAllCustomer();
            for(Customer c : list)
                System.out.println(c);
        }
    }


