SpringBoot——错误处理机制 & 定制错误页面 (源码分析)
目录
- 一、错误处理机制
- 二、ErrorPageCustomizer
- 三、BasicErrorController
- 四、DefaultErrorViewResolver
- 五、如何定制错误响应页面
- 六、DefaultErrorAttributes(错误信息)
- 七、defaultErrorView(默认错误视图)
- 八、如何定制JSON数据
![]()
一、错误处理机制
跳转到目录
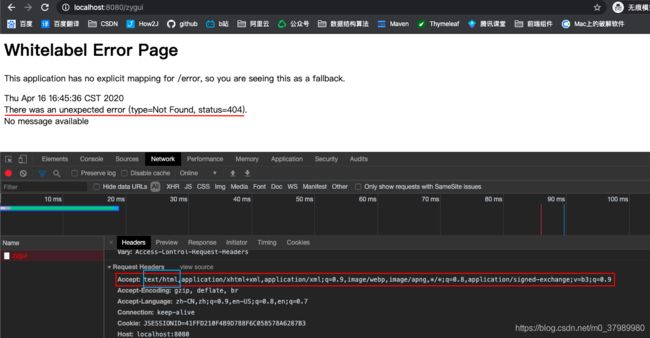
当访问一个不存在的页面,或者程序抛出异常时
1、默认效果
原理:
查看org.springframework.boot.autoconfigure.web.servlet.error.ErrorMvcAutoConfiguration源码,
这里是springboot错误处理的自动配置信息
主要给容器中注册了以下组件:
- ErrorPageCustomizer 系统出现错误以后来到
error请求进行处理;相当于(web.xml注册的错误页面规则) - BasicErrorController : 处理
/error请求 - DefaultErrorViewResolver : 默认的错误视图解析器
- DefaultErrorAttributes : 错误信息
- defaultErrorView : 默认错误视图
二、ErrorPageCustomizer
跳转到目录
- 系统出现错误以后来到
error请求进行处理;相当于(web.xml注册的错误页面规则) - 也就是说系统出现
4xx或者5xx的之类状态码的错误; ErrorPageCustomizer就会生效(定制错误的想赢规则), 就会来到/error请求
在ErrorMvcAutoConfiguration中找到ErrorPageCustomizer
@Bean
public ErrorMvcAutoConfiguration.ErrorPageCustomizer errorPageCustomizer(DispatcherServletPath dispatcherServletPath) {
    return new ErrorMvcAutoConfiguration.ErrorPageCustomizer(this.serverProperties, dispatcherServletPath);
}
进入ErrorPageCustomizer
private static class ErrorPageCustomizer implements ErrorPageRegistrar, Ordered {
        private final ServerProperties properties;
        private final DispatcherServletPath dispatcherServletPath;

        protected ErrorPageCustomizer(ServerProperties properties, DispatcherServletPath dispatcherServletPath) {
            this.properties = properties;
            this.dispatcherServletPath = dispatcherServletPath;
        }
		//注册错误页面
        public void registerErrorPages(ErrorPageRegistry errorPageRegistry) {
            ErrorPage errorPage = new ErrorPage(this.dispatcherServletPath.getRelativePath(this.properties.getError().getPath()));
            errorPageRegistry.addErrorPages(new ErrorPage[]{errorPage});
        }

        public int getOrder() {
            return 0;
        }
    }
进入getPath()方法
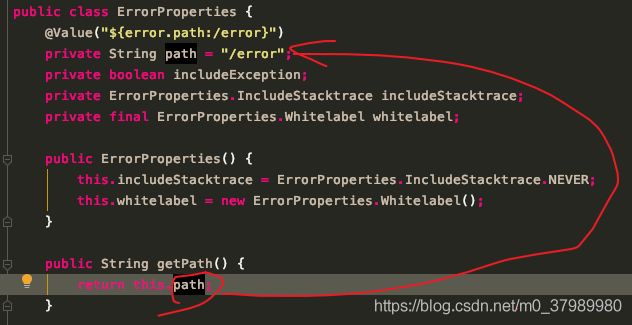
当请求出现错误后就会转发到/error; 然后这个error请求就会被BasicErrorController处理;
三、BasicErrorController
跳转到目录
- 处理
/error请求
@Bean
@ConditionalOnMissingBean(
    value = {ErrorController.class},
    search = SearchStrategy.CURRENT
)
public BasicErrorController basicErrorController(ErrorAttributes errorAttributes, ObjectProvider<ErrorViewResolver> errorViewResolvers) {
    return new BasicErrorController(errorAttributes, this.serverProperties.getError(), (List)errorViewResolvers.orderedStream().collect(Collectors.toList()));
}
进入BasicErrorController类
@Controller
/**
  * 使用配置文件中server.error.path配置
  * 如果server.error.path没有配置使用error.path
  * 如果error.path也没有配置就使用/error
  */
@RequestMapping({"${server.error.path:${error.path:/error}}"})
public class BasicErrorController extends AbstractErrorController {
这个类下面的方法
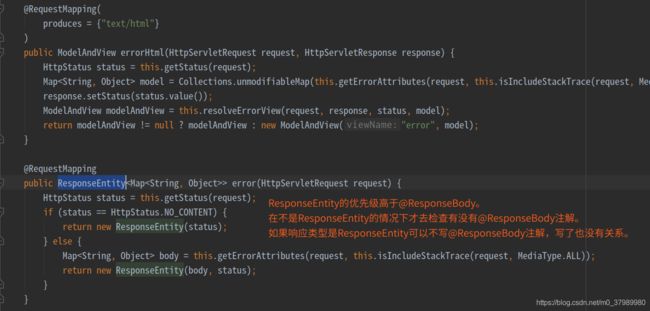
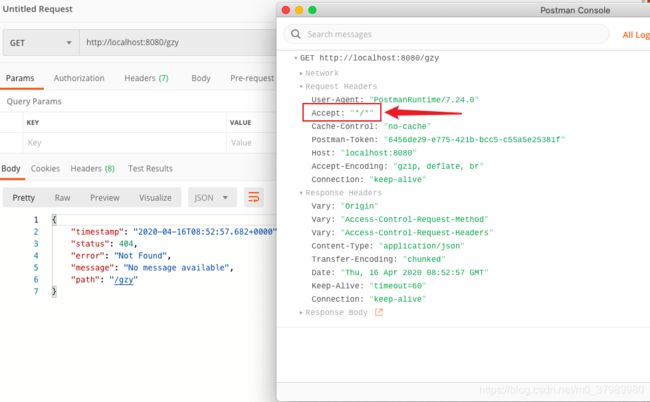
上面两个方法一个用于浏览器请求响应html页面,一个用于其他客户端请求响应json数据
- 处理浏览器请求的方法中,modelAndView存储到哪个页面的页面地址和页面内容数据
点进resolveErrorView方法
protected ModelAndView resolveErrorView(HttpServletRequest request, HttpServletResponse response, HttpStatus status, Map<String, Object> model) {
        Iterator var5 = this.errorViewResolvers.iterator();

        ModelAndView modelAndView;
        do {
            if (!var5.hasNext()) {
                return null;
            }
			//所有的ErrorViewResolver得到ModelAndView
            ErrorViewResolver resolver = (ErrorViewResolver)var5.next();
            modelAndView = resolver.resolveErrorView(request, status, model);
        } while(modelAndView == null);

        return modelAndView;
    }
ErrorViewResolver从哪里来的呢?
已经在容器中注册了一个DefaultErrorViewResolver
四、DefaultErrorViewResolver
跳转到目录
- 响应错误页面, 去哪个页面是由
DefaultErrorViewResolver解析得到的
@Configuration(
    proxyBeanMethods = false
)
static class DefaultErrorViewResolverConfiguration {
    private final ApplicationContext applicationContext;
    private final ResourceProperties resourceProperties;

    DefaultErrorViewResolverConfiguration(ApplicationContext applicationContext, ResourceProperties resourceProperties) {
        this.applicationContext = applicationContext;
        this.resourceProperties = resourceProperties;
    }

    //注册默认错误视图解析器
    @Bean
    @ConditionalOnBean({DispatcherServlet.class})
    @ConditionalOnMissingBean({ErrorViewResolver.class})
    DefaultErrorViewResolver conventionErrorViewResolver() {
        return new DefaultErrorViewResolver(this.applicationContext, this.resourceProperties);
    }
}
进入DefaultErrorViewResolver然后调用ErrorViewResolver的resolveErrorView()方法
public ModelAndView resolveErrorView(HttpServletRequest request, HttpStatus status, Map<String, Object> model) {
    //把状态码和model传过去获取视图
    ModelAndView modelAndView = this.resolve(String.valueOf(status.value()), model);

    //上面没有获取到视图就使用把状态吗替换再再找,以4开头的替换为4xx,5开头替换为5xx,见下文(如果定制错误响应)
    if (modelAndView == null && SERIES_VIEWS.containsKey(status.series())) {
        modelAndView = this.resolve((String)SERIES_VIEWS.get(status.series()), model);
    }

    return modelAndView;
}

private ModelAndView resolve(String viewName, Map<String, Object> model) {
    //viewName传过来的是状态码,例:/error/404
    String errorViewName = "error/" + viewName;
    TemplateAvailabilityProvider provider = this.templateAvailabilityProviders.getProvider(errorViewName, this.applicationContext);
    //模板引擎(thymeleaf)可以解析这个页面地址就用模板引擎解析
    return provider != null ? new ModelAndView(errorViewName, model) : this.resolveResource(errorViewName, model);
}
如果模板引擎不可用,就调用resolveResource方法获取视图
这里通过 getStaticLocations 可以发现在这里地方也可以获取视图, 有模板引擎在templates中获取

private ModelAndView resolveResource(String viewName, Map<String, Object> model) {
    //获取的是静态资源文件夹
    String[] var3 = this.resourceProperties.getStaticLocations();
    int var4 = var3.length;

    for(int var5 = 0; var5 < var4; ++var5) {
        String location = var3[var5];

        try {
            Resource resource = this.applicationContext.getResource(location);
            //例:static/error.html
            resource = resource.createRelative(viewName + ".html");
            //存在则返回视图
            if (resource.exists()) {
                return new ModelAndView(new DefaultErrorViewResolver.HtmlResourceView(resource), model);
            }
        } catch (Exception var8) {
        }
    }
    // 静态资源文件夹中没有,返回空
    return null;
}
五、如何定制错误响应页面
跳转到目录
- 有模板引擎(thymeleaf等)的情况下;将错误页面命名为
错误状态码.html放在模板引擎文件夹(templates)里面的error文件夹下发生此状态码的错误就会来到这里找对应的页面; - 比如我们在
templates文件夹下创建error/404.html当浏览器请求是404错误,就会使用我们创建的404.html页面响应,如果是其他状态码错误,还是使用默认的视图,但是如果404.html没有找到就会替换成4xx.html再查找一次

- 看DefaultErrorViewResolver中的静态代码块
static {
     Map<Series, String> views = new EnumMap(Series.class);
     views.put(Series.CLIENT_ERROR, "4xx");
     views.put(Series.SERVER_ERROR, "5xx");
     SERIES_VIEWS = Collections.unmodifiableMap(views);
}
 //再看解析方法
//把状态码和model传过去
ModelAndView modelAndView = this.resolve(String.valueOf(status.value()), model);

//上面没有获取到视图就把状态码替换再找,以4开头的替换为4xx,5开头替换为5xx,见下文(如果定制错误响应)
if (modelAndView == null && SERIES_VIEWS.containsKey(status.series())) {
    modelAndView = this.resolve((String)SERIES_VIEWS.get(status.series()), model);
}
页面可以获取哪些数据?
六、DefaultErrorAttributes(错误信息)
跳转到目录
再看一下BasicErrorController的errorHtml方法
 public ModelAndView errorHtml(HttpServletRequest request, HttpServletResponse response) {
     HttpStatus status = this.getStatus(request);

     //model的数据
     Map<String, Object> model = Collections.unmodifiableMap(this.getErrorAttributes(request, this.isIncludeStackTrace(request, MediaType.TEXT_HTML)));
     response.setStatus(status.value());
     ModelAndView modelAndView = this.resolveErrorView(request, response, status, model);
     return modelAndView != null ? modelAndView : new ModelAndView("error", model);
 }
看一下调用的this.getErrorAttributes()方法
protected Map<String, Object> getErrorAttributes(HttpServletRequest request, boolean includeStackTrace) {
    WebRequest webRequest = new ServletWebRequest(request);
    return this.errorAttributes.getErrorAttributes(webRequest, includeStackTrace);
}
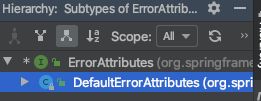
再看 this.errorAttributes.getErrorAttributes()方法, this.errorAttributes是接口类型ErrorAttributes,实现类就一个DefaultErrorAttributes,看一下DefaultErrorAttributes的 getErrorAttributes()方法
public Map<String, Object> getErrorAttributes(WebRequest webRequest, boolean includeStackTrace) {
    Map<String, Object> errorAttributes = new LinkedHashMap();
    errorAttributes.put("timestamp", new Date());
    this.addStatus(errorAttributes, webRequest);
    this.addErrorDetails(errorAttributes, webRequest, includeStackTrace);
    this.addPath(errorAttributes, webRequest);
    return errorAttributes;
}
- timestamp:时间戳
- status:状态码
- error:错误提示
- exception:异常对象
- message:异常消息
- errors:JSR303数据校验的错误都在这里
2.0以后默认是不显示exception的,需要在配置文件中开启
server.error.include-exception=true
- 没有模板引擎(模板引擎找不到这个错误页面),就会在静态资源文件夹下找;
- 如果以上都没有找到错误页面,就是默认来到SpringBoot默认的错误提示页面
七、defaultErrorView(默认错误视图)
跳转到目录
再看一下BasicErrorController的errorHtml方法

在ErrorMvcAutoConfiguration中
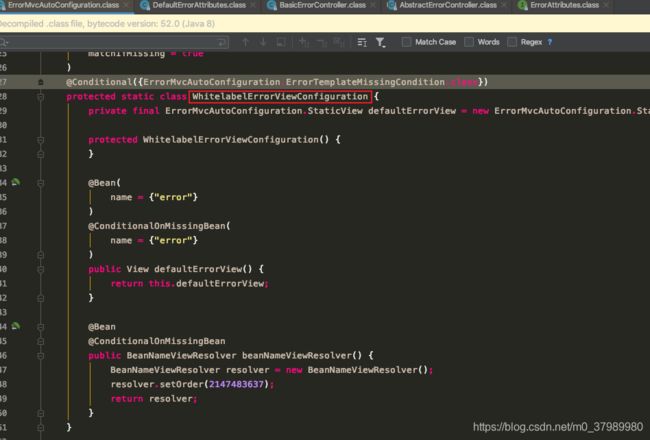
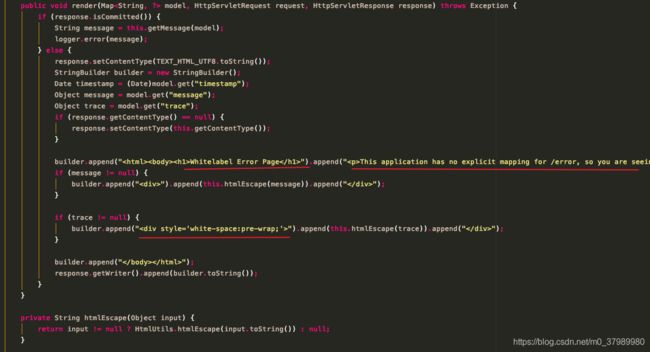
SpringBoot默认的错误页面, 下面是拼接页面内容(部分)
八、如何定制JSON数据
跳转到目录
- SpringBoot做了自适应效果,浏览器访问响应错误页面。客户端访问响应错误信息的json数据
第一种方法,定义全局异常处理器类注入到容器中,捕获到异常返回json格式的数据
/**
 * Description: 定义一个全局异常处理器
 *
 * @author zygui
 * @date 2020/4/16 14:55
 */
@ControllerAdvice
public class MyExceptionHandler {

    //1. 这样的操作, 在浏览器还是客户端访问返回的都是JSON数据
    @ResponseBody
    @ExceptionHandler(UserNotExistException.class) // 来处理我们定义的异常类
    public Map<String, Object> handlerException(Exception e) {
        Map<String, Object> map = new HashMap<>();
        map.put("code", "user.notexist");
        map.put("message", e.getMessage());
        return map;
    }
}
这样的话,不管是浏览器访问还是客户端访问都是响应json数据,就没有了自适应效果;
第二种方法,捕获到异常后转发到/error
@ControllerAdvice
public class MyExceptionHandler {

    @ExceptionHandler(Exception.class)
    public String handleException(Exception e) {
        Map<String, Object> map = new HashMap<>();
        map.put("code", "100011");
        map.put("msg", e.getMessage());
        return "forward:/error";
    }
}
但这样异常被我们捕获然后转发,显示的状态码就是200,所以在转发之前还要设置一下状态码
 @ExceptionHandler(Exception.class)
 public String handleException(Exception e, HttpServletRequest request) {
     Map<String, Object> map = new HashMap<>();
     map.put("code", "100011");
     map.put("msg", e.getMessage());

     //设置状态码
     request.setAttribute("javax.servlet.error.status_code", 500);
     return "forward:/error";
 }
但是设置的数据就没有用了,只能使用默认的
将我们的定制数据携带出去
由上面我们已经知道数据的来源是调用DefaultErrorAttributes的getErrorAttributes方法得到的,而这个DefaultErrorAttributes是在ErrorMvcAutoConfiguration配置类中注册的,并且注册之前会检查容器中是否已经拥有;
 @Bean
 @ConditionalOnMissingBean(
     value = {ErrorAttributes.class},
     search = SearchStrategy.CURRENT
 )
 public DefaultErrorAttributes errorAttributes() {
     return new DefaultErrorAttributes(this.serverProperties.getError().isIncludeException());
 }
所以我们可以只要实现ErrorAttributes接口或者继承DefaultErrorAttributes类,然后注册到容器中就行了
自定义ErrorAttributes
/**
 * Description: 给容器加入自己定义的错误属性
 *
 * @author zygui
 * @date 2020/4/16 15:40
 */
@Component
public class MyErrorAttributes extends DefaultErrorAttributes{
    @Override
    public Map<String, Object> getErrorAttributes(WebRequest webRequest, boolean includeStackTrace) {
        Map<String, Object> map = super.getErrorAttributes(webRequest, includeStackTrace);
        Throwable error = getError(webRequest);
        if (error != null) {
            map.put("exception", error.getClass().getName());
        }
        map.put("company", "zygui");
        // 我们的异常处理器携带的数据
        Map<String, Object> ext = (Map<String, Object>) webRequest.getAttribute("ext", webRequest.SCOPE_REQUEST);
        map.put("ext", ext);
        return map;
    }
}
/**
 * Description: 定义一个全局异常处理器
 *
 * @author zygui
 * @date 2020/4/16 14:55
 */
@ControllerAdvice
public class MyExceptionHandler {

    @ExceptionHandler(UserNotExistException.class) // 来处理我们定义的异常类
    public String handlerException(Exception e, HttpServletRequest request) {
        Map<String, Object> map = new HashMap<>();
        // 系统获取状态码的方法
        // Integer statusCode = (Integer)request.getAttribute("javax.servlet.error.status_code");
        // 传入我们自己的状态码
        request.setAttribute("javax.servlet.error.status_code", 500);
        map.put("code", "user.notexist");
        map.put("message", "用户出错啦");
        request.setAttribute("ext", map);
        // 转发到/error(使用SpringBoot默认的error视图)
        return "forward:/error";
    }
}
