Android进阶主要知识总结下版
Android进阶
- 第五章
- Fragment(碎片)的静态
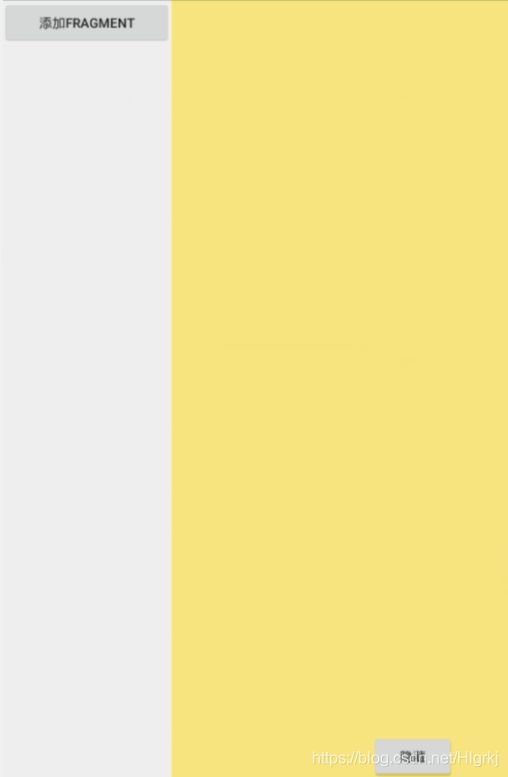
- Fragment(碎片)的动态用法
- Toolbar的使用
- Textinput Layout(增强型文本输入)
- Navigationview(导航抽屉)
- 第六章
- Tablayout实现顶部滑动数果
- Palette(颜色选择器)
- AppBarLayout(程序栏布局)
- FloatingActionButton与SnackBar
- BottomNavigationView(与底部导航)
- 第七章
- 线程
- 异步任务(AsyncTask)
- Service的启动和停止
- 绑定Service
- InterService的使用
第五章
Fragment(碎片)的静态
用法:Fragment是 Activity中用户界面的一个行为或者是一部,主要是为了便于大屏U的设计和实现。可以将 activity拆分成几个完全独立封装的可重用的组件,每个组件有自己的生命周期和ui布局。
展示:使用一个静态碎片
案例 :如图

.xml文件:
<?xml version="1.0" encoding="utf-8"?>
<LinearLayout xmlns:android="http://schemas.android.com/apk/res/android"
    xmlns:app="http://schemas.android.com/apk/res-auto"
    xmlns:tools="http://schemas.android.com/tools"
    android:layout_width="match_parent"
    android:layout_height="match_parent"
    tools:context=".UserOneFragmentActivity">

    <LinearLayout
        android:layout_width="0dp"
        android:layout_height="match_parent"
        android:layout_weight="1"
        android:orientation="vertical">

        <TextView
            android:id="@+id/textView28"
            android:layout_gravity="center"
            android:layout_width="wrap_content"
            android:layout_height="30dp"
            android:text="TextView"/>

        <ListView
            android:id="@+id/listView"
            android:layout_width="match_parent"
            android:layout_height="match_parent"/>
    </LinearLayout>
    <!--注意fragment必须给id要不然会出现错误-->
    <fragment
        android:id="@+id/myFragment"
        android:layout_width="0dp"
        android:layout_weight="3"
        android:name="com.hl.android004.MyFragment"
        android:layout_height="match_parent"/>
</LinearLayout>
java代码:
//1.给ListView添加数据2.给碎片的的textView添加数据
public class UserOneFragmentActivity extends AppCompatActivity {
    //1.声明
    ListView listView;
    //数据(列表的数据)
    String[] data={"人工智能","大数据","云计算","物联网","AR","人工智能","大数据","云计算","物联网","AR"};
    //碎片里的数据
    String[] content={"人工智能知识","大数据知识","云计算知识","物联网知识","AR知识",
            "人工智能知识","大数据知识","云计算知识","物联网知识","AR知识"};
    @Override
    protected void onCreate(Bundle savedInstanceState) {
        super.onCreate(savedInstanceState);
        setContentView(R.layout.activity_user_one_fragment);
        //2.赋值
        listView=findViewById(R.id.listView);
        //3.创建一个数组适配器(去放数据)
        ArrayAdapter arrayAdapter=new ArrayAdapter(
                UserOneFragmentActivity.this,
                R.layout.list_item,
                data
        );
        //4.为listView添加数据
        listView.setAdapter(arrayAdapter);

        //2.给碎片的的textView添加数据
        //(1)找到碎片
        FragmentManager manager=getSupportFragmentManager();//碎片管理者
        MyFragment myFragment=(MyFragment)manager.findFragmentById(R.id.myFragment);
        //(2)找碎片的textView
        final TextView textView = myFragment.getView().findViewById(R.id.textView29);
        //(3)添加
        listView.setOnItemClickListener(new AdapterView.OnItemClickListener() {
            @Override
            public void onItemClick(AdapterView<?> adapterView, View view, int position, long id) {
                textView.setText(content[position]);
            }
        });
    }
}
list_item自定义布局:
<TextView xmlns:android="http://schemas.android.com/apk/res/android"
    android:orientation="vertical"
    android:layout_width="match_parent"
    android:layout_height="60dp"
    android:gravity="center">
</TextView>
使用到碎片,要新建一个Java类并且这个Java类还要继续Fragment,
下面要重写一个方法:
public View onCreateView
	(@NonNull LayoutInflater inflater, @Nullable ViewGroup container,
@Nullable Bundle savedInstanceState){
}
参数1:你创建的这个视图的布局方式(一般就是你自己定义的碎片布局)
参数2:你创建的这个视图充当的角色,一般都是ViewGroup的名字(container)
参数3:你创建的这个视图是不是最外层的(根元素)【目前都是写false】
在重写的方法里,如果要为.xml里面的控件赋值,写的方式是,如下:
textView =view.findViewById(R.id.textView);Fragment(碎片)的动态用法
.xml文件:
<?xml version="1.0" encoding="utf-8"?>
<LinearLayout xmlns:android="http://schemas.android.com/apk/res/android"
    xmlns:app="http://schemas.android.com/apk/res-auto"
    xmlns:tools="http://schemas.android.com/tools"
    android:layout_width="match_parent"
    android:layout_height="match_parent"
    tools:context=".DTFragmentActivity"
    android:orientation="horizontal"
    android:id="@+id/main">

    <LinearLayout
        android:layout_width="match_parent"
        android:layout_height="match_parent"
        android:orientation="horizontal"
        android:id="@+id/left">

        <Button
            android:id="@+id/button23"
            android:layout_width="wrap_content"
            android:layout_height="wrap_content"
            android:layout_weight="1"
            android:text="添加fragment" />
    </LinearLayout>
</LinearLayout>
java代码:
public class DTFragmentActivity extends AppCompatActivity {
    Button button;
    LinearLayout linearLayout;
    FragmentManager manager;
    @Override
    protected void onCreate(Bundle savedInstanceState) {
        super.onCreate(savedInstanceState);
        setContentView(R.layout.activity_dtfragment);
        //赋值
        button=findViewById(R.id.button23);
        linearLayout=findViewById(R.id.left);
        manager=getSupportFragmentManager();//获取碎片管理器
        //给按钮设置点击事件
        button.setOnClickListener(new View.OnClickListener() {
            @Override
            public void onClick(View view) {
                //1.要把放按钮的线性布局的宽度变成1/3
                Resources resources=getResources();
                linearLayout.setLayoutParams(
                        new LinearLayout.LayoutParams(
                                //拿到了原本的宽度/3,虽然高度不变但也得拿高度
                                resources.getDisplayMetrics().widthPixels/3,
                                resources.getDisplayMetrics().heightPixels
                        )
                    );
                //2.添加fragment
                //获取碎片事务类
                FragmentTransaction transaction=manager.beginTransaction();
                //添加(参数一:你要添加到的布局的id 参数二:你要添加的碎片)
                transaction.replace(R.id.main,new DtFragment());
                //设置手机回退键,移除fragment
                transaction.addToBackStack(null);
                //提交
                transaction.commit();
            }
        });
    }
}
只要用到碎片就要新建一个Java类并且继承Fragment,还要重写一个方法
DtFragment java代码:
public class DtFragment extends Fragment {
    FragmentManager manager;
    @Nullable
    @Override
    public View onCreateView(@NonNull LayoutInflater inflater, @Nullable ViewGroup container, @Nullable Bundle savedInstanceState) {
        View view=inflater.inflate(R.layout.dt_fragment,container,false);
        manager=getFragmentManager();
        Button button=view.findViewById(R.id.button24);
        button.setOnClickListener(new View.OnClickListener() {
            @Override
            public void onClick(View view) {
                //移除
                FragmentTransaction transaction=manager.beginTransaction();
                transaction.remove(DtFragment.this);
                //提交
                transaction.commit();
            }
        });
        return view;
   }
}
Toolbar的使用
Action Bar是 Activity开发的标配,但是从5.0开始逐由 Toolbar取代,主要因为Toolbar使用方式更加简单也更容易定制。
案例 :如图一

图二:

使用Toolbar步骤:
1.在资源文件中找到styles.xml文件
将:<style name="AppTheme" parent="Theme.AppCompat.Light.DarkActionBar">
改成:<style name="AppTheme" parent="Theme.AppCompat.Light.NoActionBar">
.xml文件:
<?xml version="1.0" encoding="utf-8"?>
<LinearLayout xmlns:android="http://schemas.android.com/apk/res/android"
    xmlns:app="http://schemas.android.com/apk/res-auto"
    xmlns:tools="http://schemas.android.com/tools"
    android:layout_width="match_parent"
    android:layout_height="match_parent"
    tools:context=".ToolBarActivity"
    android:orientation="vertical">

    <androidx.appcompat.widget.Toolbar
        android:id="@+id/toolbar"
        android:layout_width="match_parent"
        android:layout_height="wrap_content"
        android:background="?attr/colorPrimary"
        android:minHeight="?attr/actionBarSize"
        android:theme="?attr/actionBarTheme">

        <Button
            android:id="@+id/button25"
            android:layout_width="wrap_content"
            android:layout_height="wrap_content"
            android:text="Button" />

        <TextView
            android:id="@+id/textView31"
            android:layout_width="wrap_content"
            android:layout_height="wrap_content"
            android:text="TextView" />

    </androidx.appcompat.widget.Toolbar>

    <LinearLayout
        android:layout_width="match_parent"
        android:layout_height="match_parent"
        android:orientation="horizontal"
        android:gravity="center"
        android:background="#F1D686">

        <TextView
            android:id="@+id/textView30"
            android:layout_width="wrap_content"
            android:layout_height="wrap_content"
            android:text="TextView" />
    </LinearLayout>
</LinearLayout>
java代码:
public class ToolBarActivity extends AppCompatActivity {
    //1.声明
    Toolbar toolbar;
    @Override
    protected void onCreate(Bundle savedInstanceState) {
        super.onCreate(savedInstanceState);
        setContentView(R.layout.activity_tool_bar);
        //2.赋值
        toolbar=findViewById(R.id.toolbar);
        //添加logo
        toolbar.setLogo(R.mipmap.ic_launcher);
        //添加标题
        toolbar.setTitle("主标题");
        toolbar.setSubtitle("子标题");
        //添加左边的图标
        toolbar.setNavigationIcon(R.drawable.back);
        setSupportActionBar(toolbar);//使系统支持toolbar
        //设置回退键的单击事件
        toolbar.setNavigationOnClickListener(new View.OnClickListener() {
            @Override
            public void onClick(View view) {
                finish();
            }
        });
        //给菜单添加点击事件
        toolbar.setOnMenuItemClickListener(new Toolbar.OnMenuItemClickListener() {
            @Override
            public boolean onMenuItemClick(MenuItem item) {
                //item-可以知道你现在点的是哪一个菜单
                Toast.makeText(ToolBarActivity.this,item.getTitle(),Toast.LENGTH_SHORT).show();
                return true;
            }
        });
    }
    //加载自定义菜单【需要在res里面建一个menu资源文件】
    @Override
    public boolean onCreateOptionsMenu(Menu menu) {
        getMenuInflater().inflate(R.menu.menu1,menu);
        return true;
    }
}
menu:
有几个菜单就有几个item,item必须需要标题
<?xml version="1.0" encoding="utf-8"?>
<menu xmlns:android="http://schemas.android.com/apk/res/android"
    xmlns:app="http://schemas.android.com/apk/res-auto">
    <item
        android:id="@+id/item1"
        android:icon="@drawable/img03a"
        android:title="菜单1"
        app:showAsAction="always"/>
    <item
        android:id="@+id/item2"
        android:icon="@drawable/img02"
        android:title="菜单2"
        app:showAsAction="always"/>
    <item
        android:id="@+id/item3"
        android:icon="@drawable/img01"
        android:title="菜单3"
        app:showAsAction="never"/>
</menu>
Textinput Layout(增强型文本输入)
Textlnputlayout=主作为 Edittexti的容器,使用这个组可以得到很好的输入框体验效果,可以显示正确、错误提示信息
语法:
相比传统单独使用 Edittext的做法,新増的容器 Textinputlayout拥有一些独特属性能够实现如下功能:
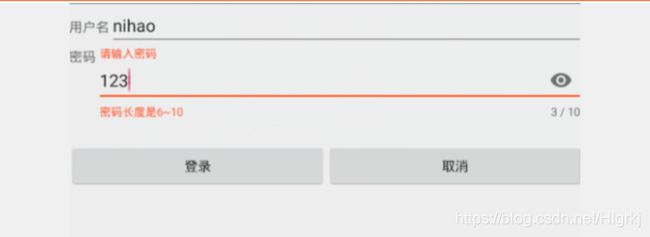
1、hint提示:输入框获取焦点时, Edittext通过hint属性设置的字符串内容将浮动显示在输入框左上方,用户进行输入操作时依旧能够看到提示信息
2、error提示:通常用户输入的内容需要经过验证,可以使用 Textinputlayout类提供的 set Errorenabled (boolean)和 setError( Charsequence)方法控制输入框左下方错误信息的显示与隐酸
3、character counter:通过 counterenabled和 countermaxlength属性可以统计
输入内容的字数,并显示在输入框右下角
4、Password visibility toggling:
当输入框内容为密码类信息时,可以通过 password ToggleEnabled属性或
者 setpasswordvisibilitytoggleenabled(boolean)方法在输入框右侧drawableRight的位置显示一个切换按钮,控制输入内容的显示与隐藏
案例:如图
.xml文件:
<?xml version="1.0" encoding="utf-8"?>
<LinearLayout xmlns:android="http://schemas.android.com/apk/res/android"
    xmlns:app="http://schemas.android.com/apk/res-auto"
    xmlns:tools="http://schemas.android.com/tools"
    android:layout_width="match_parent"
    android:layout_height="match_parent"
    tools:context=".TextInputLayoutActivity"
    android:orientation="vertical">

    <LinearLayout
        android:layout_width="match_parent"
        android:layout_height="wrap_content"
        android:orientation="horizontal">

        <TextView
            android:id="@+id/textView3"
            android:layout_width="wrap_content"
            android:layout_height="wrap_content"
            android:text="用户名" />

        <EditText
            android:id="@+id/editText3"
            android:layout_width="wrap_content"
            android:layout_height="wrap_content"
            android:layout_weight="1"
            android:ems="10"
            android:hint="请输入账号"
            android:inputType="textPersonName" />

    </LinearLayout>

    <LinearLayout
        android:layout_width="match_parent"
        android:layout_height="100dp"
        android:orientation="horizontal">

        <TextView
            android:id="@+id/textView4"
            android:layout_width="wrap_content"
            android:layout_height="wrap_content"
            android:text="密码" />

        <!--用于显示计数:
            app:counterEnabled="true" 开启计数
            app:counterMaxLength="10"   最大长度
            app:passwordToggleEnabled="true" 开启小眼睛
            android:inputType="textPassword" 密码保密
        -->
        <com.google.android.material.textfield.TextInputLayout
            android:id="@+id/textInputLayout"
            android:layout_width="match_parent"
            android:layout_height="match_parent"
            app:counterEnabled="true"
            app:counterMaxLength="10"
            app:passwordToggleEnabled="true">

            <com.google.android.material.textfield.TextInputEditText
                android:id="@+id/textInputEditText"
                android:layout_width="match_parent"
                android:layout_height="wrap_content"
                android:hint="请输入密码"
                android:inputType="textPassword" />
        </com.google.android.material.textfield.TextInputLayout>
    </LinearLayout>

    <LinearLayout
        android:layout_width="match_parent"
        android:layout_height="wrap_content"
        android:orientation="horizontal">

        <Button
            android:id="@+id/button3"
            android:layout_width="wrap_content"
            android:layout_height="wrap_content"
            android:layout_weight="1"
            android:text="登录" />

        <Button
            android:id="@+id/button4"
            android:layout_width="wrap_content"
            android:layout_height="wrap_content"
            android:layout_weight="1"
            android:text="取消" />
    </LinearLayout>

</LinearLayout>
java代码:
public class TextInputLayoutActivity extends AppCompatActivity {
    TextInputLayout textInputLayout;
    TextInputEditText textInputEditText;
    @Override
    protected void onCreate(Bundle savedInstanceState) {
        super.onCreate(savedInstanceState);
        setContentView(R.layout.activity_text_input_layout);

        textInputLayout=findViewById(R.id.textInputLayout);
        textInputEditText=findViewById(R.id.textInputEditText);
        //文本输入框
        check();
    }
    public void check() {
        //给文本框添加一个文本改变事件
        textInputEditText.addTextChangedListener(new TextWatcher() {
            @Override
            public void beforeTextChanged(CharSequence charSequence, int start, int count, int after) {
                //文本改变前
            }

            @Override
            public void onTextChanged(CharSequence charSequence, int start, int before, int count) {
                //文本改变时
            }

            @Override
            public void afterTextChanged(Editable editable) {
                //文本改变后
                //获取输入的密码

                //获取输入的密码
                String pwd=textInputEditText.getText().toString();
                if (pwd.length()>10||pwd.length()<6){
                    //显示错误信息
                    textInputLayout.setError("密码长度是6~10");
                }else {
                    //取消错误信息
                    textInputLayout.setError("");
                }
            }
        });
    }
}
Navigationview(导航抽屉)
Navigation View在很多App上都已经可以看到其效果图,国内的比如知乎(侧拉菜单滑出来的那一部分属于 Navigation View)
案例:如图
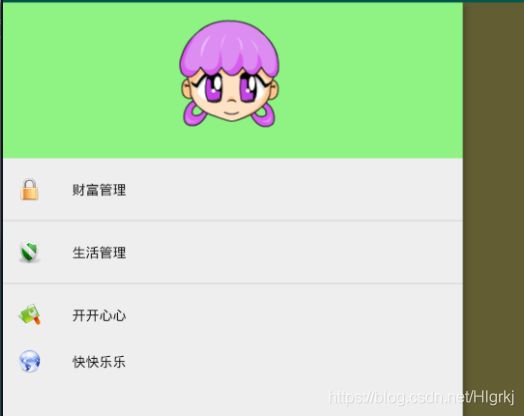
最外层要换成抽屉布局
.xml文件:
<?xml version="1.0" encoding="utf-8"?>
<!--1.抽屉导航【最外层一定是要用抽屉布局】-->
<androidx.drawerlayout.widget.DrawerLayout xmlns:android="http://schemas.android.com/apk/res/android"
    xmlns:app="http://schemas.android.com/apk/res-auto"
    xmlns:tools="http://schemas.android.com/tools"
    android:layout_width="match_parent"
    android:layout_height="match_parent"
    tools:context=".NavigationViewActivity">

    <LinearLayout
        android:layout_width="match_parent"
        android:layout_height="match_parent"
        android:orientation="horizontal"
        android:gravity="center"
        android:background="#F5E87E">

        <TextView
            android:id="@+id/textView32"
            android:layout_width="wrap_content"
            android:layout_height="wrap_content"
            android:text="主界面" />
    </LinearLayout>

    <!--抽屉导航
     android:layout_gravity="抽出来的方向left=start"
     app:headerLayout="@layout/head" 调用自定义布局方式
     app:menu="@menu/menu2" 调用菜单-->
    <com.google.android.material.navigation.NavigationView
        android:id="@+id/nav"
        android:layout_width="match_parent"
        android:layout_height="match_parent"
        android:layout_gravity="left"
        app:headerLayout="@layout/head"
        app:menu="@menu/menu2"/>

</androidx.drawerlayout.widget.DrawerLayout>
java代码:
public class NavigationViewActivity extends AppCompatActivity {
    //1.声明
    NavigationView navigationView;
    @Override
    protected void onCreate(Bundle savedInstanceState) {
        super.onCreate(savedInstanceState);
        setContentView(R.layout.activity_navigation_view);
        navigationView=findViewById(R.id.nav);
        //让导航的菜单图片上色
        navigationView.setItemIconTintList(null);
        //设置抽屉导航的菜单监听事件
        navigationView.setNavigationItemSelectedListener(new NavigationView.OnNavigationItemSelectedListener() {
            @Override
            public boolean onNavigationItemSelected(@NonNull MenuItem item) {
                Toast.makeText(NavigationViewActivity.this,item.getTitle(),Toast.LENGTH_SHORT).show();
                return true;
            }
        });
    }
}
menu2:
<?xml version="1.0" encoding="utf-8"?>
<menu xmlns:android="http://schemas.android.com/apk/res/android">
    <!--一个菜单一个item-->
    <!--下面要有一根线,加一个group组-->
    <group android:id="@+id/g1">
    <item
        android:id="@+id/item1"
        android:title="财富管理"
        android:icon="@drawable/img01"
        />
    </group>
    <group android:id="@+id/g2">
    <item
        android:id="@+id/item2"
        android:title="生活管理"
        android:icon="@drawable/img02"
        />
    </group>
    <item
        android:id="@+id/item3"
        android:title="开开心心"
        android:icon="@drawable/img03a"
        />
    <item
        android:id="@+id/item4"
        android:title="快快乐乐"
        android:icon="@drawable/img04"
        />
</menu>
第六章
Tablayout实现顶部滑动数果
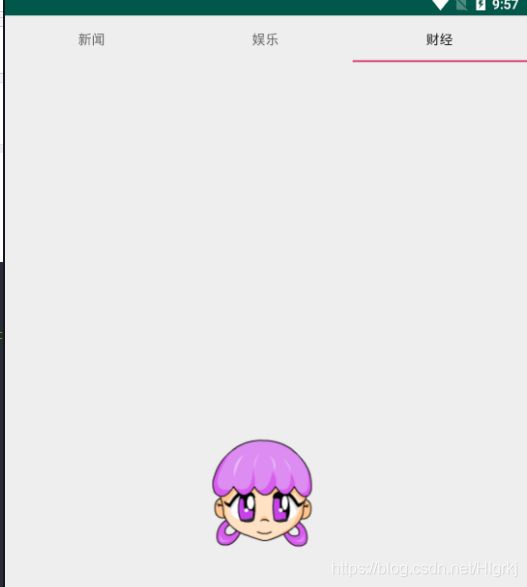
Tablayout主用作用实现顶部滑动效果。用于在一个 Activity上有多个界面的展示
案例:如图

图二:
.xml文件:
<?xml version="1.0" encoding="utf-8"?>
<LinearLayout xmlns:android="http://schemas.android.com/apk/res/android"
    xmlns:app="http://schemas.android.com/apk/res-auto"
    xmlns:tools="http://schemas.android.com/tools"
    android:layout_width="match_parent"
    android:layout_height="match_parent"
    tools:context=".TabLayoutActivity"
    android:orientation="vertical">


    <com.google.android.material.tabs.TabLayout
        android:id="@+id/tabLayout"
        android:layout_width="match_parent"
        android:layout_height="wrap_content">

    </com.google.android.material.tabs.TabLayout>

    <androidx.viewpager.widget.ViewPager
        android:id="@+id/viewPager"
        android:layout_width="match_parent"
        android:layout_height="match_parent" />

</LinearLayout>
建好碎片,将每一个内容放在碎片里,碎片用List集合装起来,自己定义一个内部类的适配器来写方法
java代码:
//1.要把碎片加载到viewPager里,并且给tabLayout设置标题,要关联上
public class TabLayoutActivity extends AppCompatActivity {
    TabLayout tableLayout;
    ViewPager viewPager;
    //准备数据
    String[] titles={"新闻","娱乐","财经"};
    List<Fragment> lists;
    @Override
    protected void onCreate(Bundle savedInstanceState) {
        super.onCreate(savedInstanceState);
        setContentView(R.layout.activity_tab_layout);
        tableLayout=findViewById(R.id.tabLayout);
        viewPager=findViewById(R.id.viewPager);

        lists=new ArrayList<>();
        lists.add(new MyFragment1());
        lists.add(new MyFragment2());
        lists.add(new MyFragment3());
        //给viewPager添加数据
        viewPager.setAdapter(new myAdapter(getSupportFragmentManager(),lists));
        //关联
        tableLayout.setupWithViewPager(viewPager);

    }
    //内部类(创建自定义pagerAdapter)
    private class myAdapter extends FragmentPagerAdapter{
        private List<Fragment> list;

        //(快捷键出来alt+enter)
        public myAdapter(@NonNull FragmentManager fm, List<Fragment> list) {
            super(fm);
            this.list=list;
        }

        @NonNull
        @Override
        public Fragment getItem(int position) {
            //可以获取当前的碎片值
            return list.get(position);
        }

        @Override
        public int getCount() {
            //拿到总数【你有多少个碎片】
            return list.size();
        }
        @Nullable
        @Override
        public CharSequence getPageTitle(int position) {
            return titles[position];
        }
    }
}
Palette(颜色选择器)
这个Palette(颜色选择器) 是让toolbar的颜色根据图片的颜色变化
案例:如图

图二:

步骤:
1.加载Palette(颜色选择器)的依赖
【file-projectstructure-选中app之后点+LibraryDependency然后搜索palette依赖】
.xml文件:
<?xml version="1.0" encoding="utf-8"?>
<LinearLayout xmlns:android="http://schemas.android.com/apk/res/android"
    xmlns:app="http://schemas.android.com/apk/res-auto"
    xmlns:tools="http://schemas.android.com/tools"
    android:layout_width="match_parent"
    android:layout_height="match_parent"
    android:orientation="vertical"
    tools:context=".MainActivity">


    <androidx.appcompat.widget.Toolbar
        android:id="@+id/toolbar"
        android:layout_width="match_parent"
        android:layout_height="wrap_content"
        android:background="?attr/colorPrimary"
        android:minHeight="?attr/actionBarSize"
        android:theme="?attr/actionBarTheme">

        <TextView
            android:id="@+id/textView"
            android:layout_width="wrap_content"
            android:layout_height="wrap_content"
            android:layout_gravity="center"
            android:text="TextView" />

    </androidx.appcompat.widget.Toolbar>

    <ImageView
        android:id="@+id/imageView"
        android:layout_width="match_parent"
        android:layout_height="wrap_content"
        android:scaleType="fitXY"
        app:srcCompat="@drawable/i1" />
</LinearLayout>
java代码:
//1.点击图片实现图片切换,2.切换之后要根据图片的颜色改变toorBar的背景和文字颜色
public class MainActivity extends AppCompatActivity {
    Toolbar toolbar;
    ImageView imageView;
    TextView textView;
    //准备图片【用于做切换的图片资源】
    int[] img={R.drawable.i1,R.drawable.im1,R.drawable.img3,R.drawable.img4};
    //定义图片的初始下标
    int i=0;
    @Override
    protected void onCreate(Bundle savedInstanceState) {
        super.onCreate(savedInstanceState);
        setContentView(R.layout.activity_main);
        imageView=findViewById(R.id.imageView);
        textView=findViewById(R.id.textView);
        toolbar=findViewById(R.id.toolbar);
        //设置点击事件
        imageView.setOnClickListener(new View.OnClickListener() {
            @Override
            public void onClick(View view) {
                i++;
                i=i%img.length;
                imageView.setImageResource(img[i]);
                //把图片转换成二进制图片(Bitmap类型)
                Bitmap bitmap= BitmapFactory.decodeResource(getResources(),img[i]);
                //获取Palette的builder
                Palette.Builder builder=Palette.from(bitmap);
                //获取色板
                Palette.Swatch swatch=builder.generate().getVibrantSwatch();
                if (swatch!=null){
                    toolbar.setBackgroundColor(swatch.getRgb());
                    textView.setTextColor(swatch.getTitleTextColor());
                }
            }
        });
    }
}
AppBarLayout(程序栏布局)
AppBarLayout是一种支持响应滚动手势的布局,用toolbar有收缩和扩展的效果
NestedScrollView(滑动的控件)
案例:如图

.xml文件:
<?xml version="1.0" encoding="utf-8"?>
<androidx.coordinatorlayout.widget.CoordinatorLayout xmlns:android="http://schemas.android.com/apk/res/android"
    xmlns:tools="http://schemas.android.com/tools"
    xmlns:app="http://schemas.android.com/apk/res-auto"

    android:layout_width="match_parent"
    android:layout_height="match_parent">

    <com.google.android.material.appbar.AppBarLayout
        android:id="@+id/appbar"
        android:layout_height="wrap_content"
        android:layout_width="match_parent">

        <androidx.appcompat.widget.Toolbar
            android:layout_height="?attr/actionBarSize"
            android:layout_width="match_parent"
            app:layout_scrollFlags="scroll|enterAlways">

            <ImageView
                android:layout_width="wrap_content"
                android:layout_height="wrap_content"
                android:src="@mipmap/ic_launcher"/>

            <TextView
                android:layout_width="wrap_content"
                android:layout_height="wrap_content"
                android:text="首页"/>

        </androidx.appcompat.widget.Toolbar>

        <com.google.android.material.tabs.TabLayout
            android:id="@+id/tabs"
            android:layout_width="match_parent"
            android:layout_height="wrap_content"
            app:layout_scrollFlags="scroll|exitUntilCollapsed"
            android:minHeight="40dp"
            app:tabMode="scrollable">

        </com.google.android.material.tabs.TabLayout>
    </com.google.android.material.appbar.AppBarLayout>

    <!--  android:clipToPadding="true"  去边距
          android:fillViewport="true"   填充满-->

    <androidx.core.widget.NestedScrollView
        android:layout_width="match_parent"
        android:clipToPadding="true"
        android:fillViewport="true"
        android:layout_height="match_parent"
        app:layout_behavior="com.google.android.material.appbar.AppBarLayout$ScrollingViewBehavior">

        <LinearLayout
            android:layout_width="match_parent"
            android:layout_height="match_parent"
            android:orientation="vertical"
            tools:context=".AppBarLayoutActivity">

            <androidx.viewpager.widget.ViewPager
                android:id="@+id/viewPager"
                android:layout_width="match_parent"
                android:layout_height="match_parent" />

        </LinearLayout>
    </androidx.core.widget.NestedScrollView>

    <com.google.android.material.floatingactionbutton.FloatingActionButton
        android:layout_height="wrap_content"
        android:layout_width="wrap_content"
        android:src="@android:drawable/ic_input_add"
        android:layout_gravity="bottom|end"
        android:layout_margin="16dp" />"
</androidx.coordinatorlayout.widget.CoordinatorLayout>
java代码:
//1.要把三个碎片添加到viewPager里面 2.tabLayout关联viewPager里的页面
public class AppBarLayoutActivity extends AppCompatActivity {
    ViewPager viewPager;
    TabLayout tabLayout;
    //准备三个碎片的数据
    List<Fragment> lists;
    //标题的准备
    String[] titles={"新闻","娱乐","财经"};
    @Override
    protected void onCreate(Bundle savedInstanceState) {
        super.onCreate(savedInstanceState);
        setContentView(R.layout.activity_app_bar_layout);
        viewPager=findViewById(R.id.viewPager);
        tabLayout=findViewById(R.id.tabs);
        lists=new ArrayList<>();
        lists.add(new Fragment1());
        lists.add(new Fragment2());
        lists.add(new Fragment3());
        //把集合的数据添加到viewPager里
        viewPager.setAdapter(new MyAdapter(getSupportFragmentManager(),lists));
        //关联viewPager和taLayout
        tabLayout.setupWithViewPager(viewPager);
    }
    public class MyAdapter extends FragmentPagerAdapter{
        private List<Fragment> list;

        public MyAdapter(FragmentManager fm,List<Fragment> list) {
            super(fm);
            this.list=list;
        }

        @Override
        public Fragment getItem(int position) {
            return list.get(position);
        }

        @Override
        public int getCount() {
            return list.size();
        }

        @Nullable
        @Override
        public CharSequence getPageTitle(int position) {
            return titles[position];
        }
    }
}
FloatingActionButton与SnackBar
悬浮菜单按钮FloatingActionButton主要用于组件的悬浮显示,方便客户进行操作
SnackBar:
SnackBar用来替代Toast,SnackBar与Toast的主要区别是SnackBar可以滑动滚出,也可以处理用户交互(点击)事件而Toast不能
案例:如图

.xml文件:
<?xml version="1.0" encoding="utf-8"?>
<RelativeLayout xmlns:android="http://schemas.android.com/apk/res/android"
    xmlns:app="http://schemas.android.com/apk/res-auto"
    xmlns:tools="http://schemas.android.com/tools"
    android:layout_width="match_parent"
    android:layout_height="match_parent"
    android:background="@drawable/img3"
    tools:context=".FloatingActionBtnActivity">

    <com.google.android.material.floatingactionbutton.FloatingActionButton
        android:id="@+id/floatingActionButton"
        android:layout_width="231dp"
        android:layout_height="337dp"
        android:layout_alignParentEnd="true"
        android:layout_alignParentBottom="true"
        android:layout_marginEnd="330dp"
        android:layout_marginBottom="231dp"
        android:clickable="true"
        android:onClick="show1"
        app:srcCompat="@android:drawable/btn_star_big_on" />

    <com.google.android.material.floatingactionbutton.FloatingActionButton
        android:id="@+id/floatingActionButton2"
        android:layout_width="231dp"
        android:layout_height="337dp"
        android:layout_alignParentEnd="true"
        android:layout_alignParentBottom="true"
        android:layout_marginEnd="22dp"
        android:layout_marginBottom="236dp"
        android:clickable="true"
        android:onClick="show2"
        app:srcCompat="@android:drawable/btn_star_big_on" />
</RelativeLayout>
java代码:
public class FloatingActionBtnActivity extends AppCompatActivity {
    @Override
    protected void onCreate(Bundle savedInstanceState) {
        super.onCreate(savedInstanceState);
        setContentView(R.layout.activity_floating_action_btn);
    }

    public void show1(View view){
        Toast.makeText(FloatingActionBtnActivity.this,"这是Toast的提示!",Toast.LENGTH_SHORT).show();
    }

    public void show2(View view){
        Snackbar.make(view,"这是Snackbar的提示!",Snackbar.LENGTH_SHORT)
                .setAction("确认", new View.OnClickListener() {
                    @Override
                    public void onClick(View view) {
                        Toast.makeText(FloatingActionBtnActivity.this,"点击了确定按钮!",Toast.LENGTH_SHORT).show();
                    }
                })
                .setActionTextColor(getResources().getColor(R.color.colorPrimary))
                .show();
    }
}
BottomNavigationView(与底部导航)
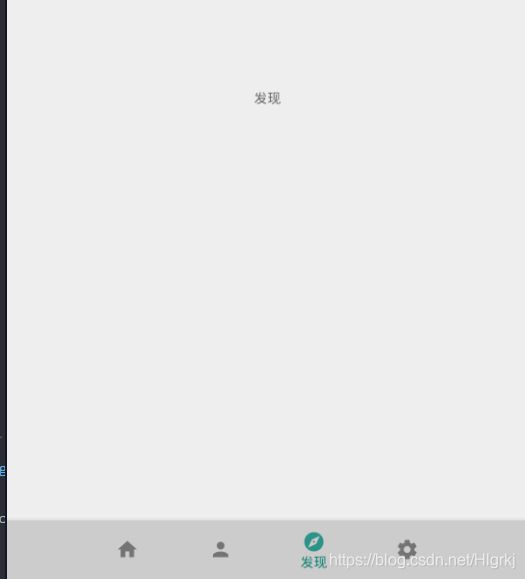
BottomNavigationView实现效果就是常见的app底部导航栏效果
案例:如图
.xml文件:
<?xml version="1.0" encoding="utf-8"?>
<LinearLayout xmlns:android="http://schemas.android.com/apk/res/android"
    xmlns:app="http://schemas.android.com/apk/res-auto"
    xmlns:tools="http://schemas.android.com/tools"
    android:layout_width="match_parent"
    android:layout_height="match_parent"
    android:orientation="vertical"
    tools:context=".BottomNavigationViewActivity">

    <androidx.viewpager.widget.ViewPager
        android:id="@+id/viewPager"
        android:layout_width="match_parent"
        android:layout_weight="1"
        android:layout_height="0dp" />

    <com.google.android.material.bottomnavigation.BottomNavigationView
        android:id="@+id/bottomNavigationView"
        android:layout_width="match_parent"
        android:layout_height="wrap_content"
        android:background="#ccc"
        android:minHeight="60dp"
        app:menu="@menu/menu_main"/>
</LinearLayout>
java代码:
//1.要把四个碎片加载到viewPager 2.关联viewPager和底部导航菜单
public class BottomNavigationViewActivity extends AppCompatActivity {
    ViewPager viewPager;
    BottomNavigationView bottomNavigationView;
    List<Fragment> lists;
   //默认值就是null
    MenuItem menuItem;
    @Override
    protected void onCreate(Bundle savedInstanceState) {
        super.onCreate(savedInstanceState);
        setContentView(R.layout.activity_bottom_navigation_view);
        viewPager=findViewById(R.id.viewPager);
        bottomNavigationView=findViewById(R.id.bottomNavigationView);
        lists=new ArrayList<>();
        lists.add(new Fragment2());
        lists.add(new Fragment3());
        lists.add(new Fragment4());
        lists.add(new Fragment5());
        //要用设配器给viewPage添加界面
        viewPager.setAdapter(new myAdapter(getSupportFragmentManager(),lists));

        //关联
        //第一部分关联:选择底部导航菜单,要对应改变界面
        bottomNavigationView.setOnNavigationItemSelectedListener(new BottomNavigationView.OnNavigationItemSelectedListener() {
            @Override
            public boolean onNavigationItemSelected(@NonNull MenuItem menuItem) {
       		//表示当前选中菜单之后要做的事【MenuItem menuItem:表示当前选中的菜单】
                switch (menuItem.getItemId()){
                    case R.id.item1:
                        //页面设置为第一页
                        viewPager.setCurrentItem(0);
                        break;
                    case R.id.item2:
                        //页面设置为第二页
                        viewPager.setCurrentItem(1);
                        break;
                    case R.id.item3:
                        //页面设置为第三页
                        viewPager.setCurrentItem(2);
                        break;
                    case R.id.item4:
                        //页面设置为第四页
                        viewPager.setCurrentItem(3);
                        break;
                }
                return true;
            }
        });

        //第二部分关联:改变当前的页面后,底部菜单选项也要发生变化
        viewPager.addOnPageChangeListener(new ViewPager.OnPageChangeListener() {
            @Override
            public void onPageScrolled(int position, float positionOffset, int positionOffsetPixels) {
                //页面滚动后(上下)
            }

            @Override
            public void onPageSelected(int position) {
                //页面被选中后
                menuItem=bottomNavigationView.getMenu().getItem(position);
                menuItem.setChecked(true);
            }

            @Override
            public void onPageScrollStateChanged(int state) {
                //页面状态改变
            }
        });
    }
    public class myAdapter extends FragmentPagerAdapter{
        private List<Fragment> list;

        public myAdapter(FragmentManager fm,List<Fragment> list) {
            super(fm);
            this.list=list;
        }

        @Override
        public Fragment getItem(int position) {
            return list.get(position);
        }

        @Override
        public int getCount() {
            return list.size();
        }

    }
}
第七章
线程
在多线程OS中,通常是在一个进程中包括多个线程,每个线程都是作为利用CPU的基本单位,是花费最小开销的实体
比如:说一个人在吃饭的同时可以看电视也可以听歌,这个就要用到多线程
语法:启动
new Thread().start():
执行:
在 Activity中创建 handler对象,调用工作线程执行
案例:如图【时间随系统时间不断改变】

.xml文件:
<?xml version="1.0" encoding="utf-8"?>
<TableLayout xmlns:android="http://schemas.android.com/apk/res/android"
    xmlns:app="http://schemas.android.com/apk/res-auto"
    xmlns:tools="http://schemas.android.com/tools"
    android:layout_width="match_parent"
    android:layout_height="match_parent"
    tools:context=".ThreadActivity">

    <TableRow
        android:layout_width="match_parent"
        android:layout_height="match_parent" >

        <LinearLayout
            android:layout_width="wrap_content"
            android:layout_height="wrap_content"
            android:layout_weight="1"
            android:orientation="horizontal">

            <TextView
                android:id="@+id/textView"
                android:layout_width="wrap_content"
                android:layout_height="wrap_content"
                android:text="2019-09-06 13:50"
                android:textSize="20dp"
                android:textColor="#000"/>

        </LinearLayout>

        <LinearLayout
            android:layout_width="wrap_content"
            android:layout_height="wrap_content"
            android:layout_weight="1"
            android:orientation="horizontal">

          <ImageView
                android:layout_width="80dp"
                android:layout_height="80dp"
            android:src="@drawable/img01"/>

            <ImageView
                android:layout_width="80dp"
                android:layout_height="80dp"
                android:src="@drawable/img02"/>

            <ImageView
                android:layout_width="80dp"
                android:layout_height="80dp"
                android:src="@drawable/img04"/>
        </LinearLayout>
    </TableRow>
</TableLayout>
java代码:
public class ThreadActivity extends AppCompatActivity {
    TextView textView;
    //标志位,定义当前页面是否启动
    boolean flag=false;  //表示未启动

    //用到一个Handler类【要接收信息里面要重写一个方法】
    //新建一个handler,用来接收来自子线程的信息,handler只能接收Message类型的数据,handler能发送也能接收。
    //Handler可以接收多个子线程信息,通过代号来判断。
    Handler handler=new Handler(){
        @Override
        public void handleMessage(Message msg) {
            if (msg.what==0x001){
                textView.setText(msg.obj+"");
            }
        }
    };
    @Override
    protected void onCreate(Bundle savedInstanceState) {
        super.onCreate(savedInstanceState);
        setContentView(R.layout.activity_thread);
        textView=findViewById(R.id.textView);
        flag=true;      //页面启动

        //新建一个线程【里面重写方法】一个线程配一个Handler类
        new Thread(){
            public void run(){
                //你想要在这个线程中完成的事情(每隔一秒获取一次系统时间)【线程只拿系统时间,不是改变时间】
                while (flag==true){
                    //创建一个格式化的类
                    SimpleDateFormat format=new SimpleDateFormat("yyyy-MM-dd HH:mm:ss");
                    //获取系统时间并且格式化
                    String time=format.format(System.currentTimeMillis());
                    //拿到的时间是一个常类型【System.currentTimeMillis()】

                    //发送数据
                    Message msg=new Message();//定义Message用于发送数据
                    msg.what=0x001;         //代号【判断是否要接受它的信息】
                    msg.obj=time;           //数据
                    handler.sendMessage(msg);//发送数据到handler

                    //睡眠一秒
                    try {
                        Thread.sleep(1000);
                    } catch (InterruptedException e) {
                        e.printStackTrace();
                    }
                }
                super.run();
            }
        }.start();
    }

    //重写一个销毁方法
    @Override
    protected void onDestroy() {
        super.onDestroy();
        flag=false;   //页面销毁
    }
}
异步任务(AsyncTask)
1.概念:
AsyncTask是 Handler+Thread的良好封装,是一种较轻量级的步类。
操作简单,方便.因为是已经封装了的,提供一些良好的接口,所以操作起来更为简单;通过某些操作,可以使 Asynctask停止异步任务,所以使于控制。
语法:
实现方法:private class MyTask extends AsyncTask
三个参数:
第一个执行后台任务需要的参数
第二个参数是任务的当前进度一般都是整型
第三个是参数指返回的结果类型
一个异步任务的执行一般包括以下几个步骤
讲解
- execute( Params. params),触发异步任务的执行。
- onpreexecute(),一般用来在执行后台任务前对Ui做一些标记。
- doInBackground( Params. params),用于执行较为费时的操作,在执行过程中可以调用
publishprogress( Progress. values)来更新进度信息 - onprogressupdate( Progress… values),此方法被执行,直将进度信息更新到Ui组件上
- onpostexecute( Result result),当后台操作结東时,此方法将会被调用。
案例:如图

.xml文件:
 <?xml version="1.0" encoding="utf-8"?>
<LinearLayout xmlns:android="http://schemas.android.com/apk/res/android"
    xmlns:app="http://schemas.android.com/apk/res-auto"
    xmlns:tools="http://schemas.android.com/tools"
    android:layout_width="match_parent"
    android:layout_height="match_parent"
    android:orientation="vertical"
    android:layout_marginLeft="60dp"
    tools:context=".AsyncTaskActivity">

    <TextView
        android:id="@+id/textView"
        android:layout_marginTop="130dp"
        android:layout_width="wrap_content"
        android:layout_height="wrap_content"
        android:text="任务还未开启!"/>

    <Button
        android:layout_marginTop="30dp"
        android:layout_width="wrap_content"
        android:layout_height="wrap_content"
        android:text="开启任务"
        android:onClick="startTask"/>
</LinearLayout>
java代码:
public class AsyncTaskActivity extends AppCompatActivity {
    TextView textView;
    @Override
    protected void onCreate(Bundle savedInstanceState) {
        super.onCreate(savedInstanceState);
        setContentView(R.layout.activity_async_task);
        textView=findViewById(R.id.textView);
    }
    //开启任务按钮点击事件
    public void startTask(View view){
        //启动异步类
        MyTask myTask=new MyTask(AsyncTaskActivity.this);
        myTask.execute(new Integer(0));
    }
    //创建一个异步任务类
    //三个参数:第一个执行后台任务需要的参数,第二个参数是任务的当前进度一般都是整型,第三个是参数指返回的结果类型
    //需要下面四个方法,这个类才完整
    private class MyTask extends AsyncTask<Integer,Integer,String>{
        Context context;//进度对话框显示的位置
        ProgressDialog progressDialog;//进度对话框

        //构造防止【progressDialog=new ProgressDialog(context)】报空指针异常
        public MyTask(Context context){
            this.context=context;
        }
        //Integer当前的进度,...表示数组
        @Override
        protected String doInBackground(Integer... integers) {
            //你要执行的任务
            //获取当前的进度值
            int i=integers[0];
            //判断进度是否小于100,小于100进度每秒加1,等于一百更新完成
            while (i<100){
                i++;
                //更新进度
                publishProgress(i);
                //睡眠一秒
                try {
                    Thread.sleep(500);
                } catch (InterruptedException e) {
                    e.printStackTrace();
                }
            }
            //它的返回值类型是根据上面的第三个参数决定
            return "更新完成";
        }
        //执行任务之前的方法
        @Override
        protected void onPreExecute() {
            //创建进度对话框
            progressDialog=new ProgressDialog(context);
            //设置进度对话框的图标
            progressDialog.setIcon(R.mipmap.ic_launcher);
            //设置标题
            progressDialog.setTitle("提示");
            //设置消息内容
            progressDialog.setMessage("任务正在进行中,请稍后");
            //设置进度条最大值
            progressDialog.setMax(100);
            //设置当前进度值
            progressDialog.setProgress(60);
            //设置进度条样式
            progressDialog.setProgressStyle(ProgressDialog.STYLE_HORIZONTAL);
            //显示
            progressDialog.show();
            //更改页面文本
            textView.setText("任务正在进行中...");
        }

        //执行任务之后的方法
        //String s接收的是return "更新完成"的值
        @Override
        protected void onPostExecute(String s) {
           //进度对话框消失
            progressDialog.dismiss();
            //文字要改变
            textView.setText(s);
        }

        //状态更新的方法【进度条的变化】
        //跟protected String doInBackground(Integer... integers)参数意义差不多
        @Override
        protected void onProgressUpdate(Integer... values) {
           //接收publishProgress(i)这个方法的值
            progressDialog.setProgress(values[0]);
        }
    }
}
Service的启动和停止
Android的四大组件:
活动(activity),用于表现功能;
服务(service),后台运行服务,不提供界面呈现;
广播接受者(Broadcast Receive),勇于接收广播;
内容提供者(Content Provider),支持多个应用中存储和读取数据,相当于数据库。
关于四大组件的详情信息链接:https://blog.csdn.net/xchaha/article/details/80398620
现在我们要学的是Service组件,对于Activity之前学的都差不多了
Service运行周期图
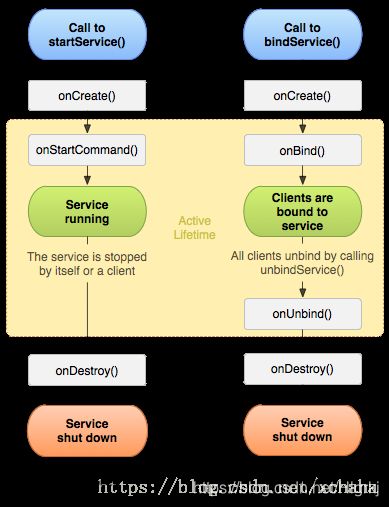
关于建service的步骤,service跟Activity一样建一个都会在配置文件中配置一个东西
今天我们学的是先建普通Service
MyService代码:
//跟Activity不同是service用于后台用于一些复杂的操作,后台数据的处理
//比如:游戏软件,弹出一个版本过低,需更新,这个就是service后台里面写了判断
//普通的service
public class MyService extends Service {
    public MyService() {
    }

    @Override
    public IBinder onBind(Intent intent) {
        // TODO: Return the communication channel to the service.【绑定】
        throw new UnsupportedOperationException("Not yet implemented");
    }

    //服务创建的方法
    @Override
    public void onCreate() {
        //相当java里面的输出语句
        Log.i("=====","创建");
        super.onCreate();
    }

    //服务开始的方法
    @Override
    public int onStartCommand(Intent intent, int flags, int startId) {
        Log.i("=====","开始");
        //接收到activity传过来的数据
        String str=intent.getStringExtra("007");
        Log.i("接收的数据",str);
        return super.onStartCommand(intent, flags, startId);
    }

    //服务销毁的方法
    @Override
    public void onDestroy() {
        Log.i("=====","销毁");
        super.onDestroy();
    }
}
.xml文件:
<?xml version="1.0" encoding="utf-8"?>
<LinearLayout xmlns:android="http://schemas.android.com/apk/res/android"
    xmlns:app="http://schemas.android.com/apk/res-auto"
    xmlns:tools="http://schemas.android.com/tools"
    android:layout_width="match_parent"
    android:layout_height="match_parent"
    android:orientation="horizontal"
    tools:context=".ServiceActivity">

    <Button
        android:id="@+id/button1"
        android:layout_width="wrap_content"
        android:layout_height="wrap_content"
        android:layout_weight="1"
        android:text="启动服务"
        android:onClick="start"/>

    <Button
        android:id="@+id/button2"
        android:layout_width="wrap_content"
        android:layout_height="wrap_content"
        android:layout_weight="1"
        android:text="停止服务"
        android:onClick="stop"/>
</LinearLayout>
Activity的java代码:
//service不跟用户打交道,跟数据打交道
public class ServiceActivity extends AppCompatActivity {
    Intent intent;
    @Override
    protected void onCreate(Bundle savedInstanceState) {
        super.onCreate(savedInstanceState);
        setContentView(R.layout.activity_service);
        //这里不是用于跳转,用于service
        intent=new Intent(ServiceActivity.this,MyService.class);
        //传数据
        intent.putExtra("007","hello service!");
    }
    public void start(View view){
        //启动服务
        startService(intent);
    }

    public void stop(View view){
        //停止服务
        stopService(intent);
    }
}