Dagger2使用
dagger2是一个依赖注入框架,可以用于功能模块的解耦,非常适合于和MVP搭配使用,下面就来介绍一下dagger2一些使用方式
导入项目库
dependencies {
    classpath 'com.neenbedankt.gradle.plugins:android-apt:1.8'
}
apply plugin: 'com.neenbedankt.android-apt'
dependencies {
    compile 'com.google.dagger:dagger:2.4'
    apt 'com.google.dagger:dagger-compiler:2.4'
    compile 'org.glassfish:javax.annotation:10.0-b28'
}
先来看一个简单的例子:
public class MainActivity extends AppCompatActivity {
    @Inject
    B b;
}
在一个Activity中我需要一个B的实例,通常情况下我们直接b=new B();这样来初始化,但是使用了Dagger2之后就只需要添加一个@Inject注解就可以了。
难道这样就可以了吗?
不不不,我们还需要做一些配置
- 创建我们的测试类B
public class B {
    C c;

    @Inject
    public B(C c) {
        this.c = c;
    }

    public String geti() {
        return "result";
    }
}
等等,这里只有一个构造方法,并且要传入C类,这个C类又是什么。
我们一步步来,可以看到在构造方法上有一个@Inject,这个注解和MainActivity中的注解名称一样但是功能是不同的。在MainActivity中放在成员变量上面,是告诉dagger2我需要一个B的实例。在B中放在构造函数上面,是告诉dagger2可以用这个构造函数来创建B的实例。
接下来就需要一个中间类来连接MainActivity和B,提供B的初始化条件C
- 创建MyComponent
 @Component(modules = MyModule.class)
public interface MyComponent {
    void inject(MainActivity a);
}
这里用到了@Component注解,告诉dagger2需要用到哪些Module
- 创建MyModule
public class MyModule {
    @Provides
    public C provideB(){
        return new C();
    }
}
提供了C类的实例
- 在MainActivity中初始化
DaggerMyComponent.builder().myModule(new MyModule()).build().inject(this);DaggerMyComponent如果没有找到,可以build一下项目,这是一个由dagger2创建的实现了MyComponent的类
简单说先dagger2找到类的实例的基本步骤
1. 查找Module中是否存在创建该类的方法。
2. 若存在创建类方法,查看该方法是否存在参数
2.1 若存在参数,则按从步骤1开始依次初始化每个参数
2.2 若不存在参数,则直接初始化该类实例,一次依赖注入到此结束
3. 若不存在创建类方法,则查找Inject注解的构造函数,看构造函数是否存在参数
3.1 若存在参数,则从步骤1开始依次初始化每个参数
3.2 若不存在参数,则直接初始化该类实例,一次依赖注入到此结束
Qualifier(限定符)解决依赖注入迷失
什么是依赖迷失?
public class B {
    C c;

    @Inject
    public B() {
    }

    @Inject
    public B(C c) {
        this.c = c;
    }

    public String geti() {
        return "result";
    }
}
想上面的这种写法,当一个类中有两个或两个以上的构造方法时,dagger2就不知道用哪个构造方法来创建对象,这事就依赖迷失。当出现依赖迷失时项目编译时就会报错。
Qualifier这时就可以发挥他的作用了,关于Qualifier有两种基本的用法
1. 使用@Named注解
在Module中
    @Provides
    @Named("c")
    public B provideB1(C c){
        return new B(c);
    }

    @Provides
    @Named("qualifier")
    public B provideB2(C c){
        return new B();
    }
在MainActivity中
    @Inject
    @Named("qualifier")
B b;- 自定义Qualifier注解
创建注解
@Qualifier
@Documented
@Retention(RUNTIME)
public @interface HasC {
}
在Module中使用
    @Provides
    @HasC
    public B provideB1(C c){
        return new B(c);
    }

    @Provides
    @NoC
    public B provideB2(){
        return new B();
    }
在MainActivity中使用
    @Inject
    @HasC
    B b;
Component组织方式
@Singleton
@Component(modules = CModule.class)
public interface AppComponent {
    C c();
}

@Module
public class CModule {
    @Provides
    public C getc(){
        return new C();
    }
}

@UserScope
@Component(dependencies = AppComponent.class,modules = BModule.class)
public interface MainComponent {
    void infect(MainActivity a);
}

@Module
public class BModule {

    @Provides
    @UserScope
    public B getb(C c){
        return new B(c);
    }
}
在上述案例中MainComponent中的B创建需要依赖与AppComponent中的CModule,所以在MainComponent中添加AppComponent依赖dependencies = AppComponent.class,并在AppComponent中将C暴露出来
初始化,一般将AppComponent的初始化放在Application中
build = DaggerAppComponent.builder().cModule(new CModule()).build();
MainActivity中的初始化
DaggerMainComponent.builder()
    .appComponent(App.build)
    .bModule(new BModule())
    .build()
    .infect(this);
自定义的Scope
@Scope
@Retention(RUNTIME)
public @interface UserScope {
}@UserScope
@Subcomponent(modules = BModule.class)
public interface MainComponent {
void infect(MainActivity a);
}
@Singleton
@Component(modules = CModule.class)
public interface AppComponent {
MainComponent m(BModule b);
}
DaggerAppComponent.builder()
.cModule(new CModule())
.build()
.m(new BModule())
.infect(this);- 继承方式

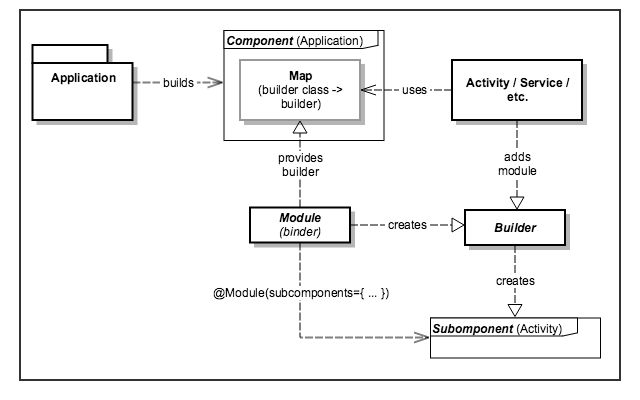
这种方式比较复杂,需要Dagger2版本在2.7及以上,我在实现过程中总是出现一些奇怪的问题,在这里我只把Dependency Injection with Dagger 2中的代码贴上,等过段时间再回来研究
参考博客:
Dependency Injection with Dagger 2
浅析Dagger2的使用
关于依赖注入框架dagger2的使用和理解
Android:dagger2让你爱不释手-基础依赖注入框架篇
Android:dagger2让你爱不释手-重点概念讲解、融合篇
Android:dagger2让你爱不释手-终结篇

