在ubuntu上搭建git-server及android studio使用git

 一、在 Server 端安装 gitosis(在 Server 端进行)
 首先安装 git
  sudo apt-get install git-core
 然后安装 python 工具,因为后面安装 gitosis 要用到 python
  sudo apt-get install python-setuptools
 接着建个文件夹,用来存放 gitosis 安装文件
  mkdir ~/src
 然后
  cd ~/src
 然后把 gitosis 项目 clone 到本机
  git clone  https://github.com/res0nat0r/gitosis.git
 clone 完成后
  cd gitosis/
 然后执行安装命令
  sudo python setup.py install
 接着新增一个用户,用于操作 git 项目
  sudo adduser --system --shell /bin/sh --gecos 'git version control' --group --disabled-password --home /home/git git
 
 二、生成 Client 端的公钥文件(在 Client 端进行的)
 然后在 Client 端,用 ssh-keygen 生成公钥
 在 Linux Clinet 上,如果还没安装 ssh,则先安装它
  sudo apt-get install openssh-client
 然后执行生成公钥的命令
  ssh-keygen
 (注:在 windows 上,可通过安装 cygwin 及其相关插件来获得 openssh-client,然后在 cygwin 终端里执行 ssh-keygen,就可以生成公钥了)

三、把 Client 端的公钥文件添加到 gitosis 上,假设文件名为 id_rsa.pub(在 Server 端进行的)
 在 Client 端生成公钥文件后,把它拷贝到 Server 上,假设我已经把它拷贝到 Server 的 /home/lion/work-dir/client-info/ 目录下
 然后,进入刚才我们安装 gitosis 的目录,执行
  sudo -H -u git gitosis-init < /home/lion/work-dir/client-info/id_rsa.pub 
 这个命令的作用是把 Client 的公钥加入到 gitosis 上,这样 Client 就可以连接到 Server 上的 gitosis 了
 最后修改一个 Server 上一个文件的权限
  sudo chmod 755 /home/git/repositories/gitosis-admin.git/hooks/post-update

四、在 Client 端进行测试
经过上面的步骤,我们已经在 Server 端安装配置好了 git 服务,而且已经把 Client 端的公钥文件加入到 Server 的 gitosis 上了。下面我们就可以在 Client 端访问 Server 上的 git 服务了。
我们在 Client 端创建一个测试目录
 mkdir git-test
 cd git-test
 git init
 然后执行 clone 命令,把 Server 上的项目 clone 到 Client 上(假设 Server 的 ip 是 192.168.0.144)
 git clone [email protected]:gitosis-admin.git

 然后就可以看到下面的信息,一切成功

在ubuntu上搭建git-server及android studio使用git_第1张图片


五、在 Android studio 上使用 git

Android Studio has git plugin, which can make you have a well version control on your project.

In this part, I will show you how to create a new repository at Android Studio on Windows OS.


Prepare :

At the first, you should install Git for Windows.

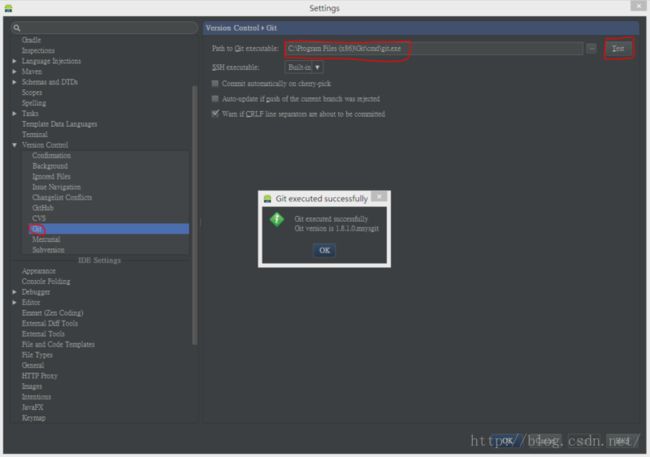
And then, Setting git tools path for Android Studio.

File > Settings > Version Control > Git

You can click Test button to check function. Such as figure below.
在ubuntu上搭建git-server及android studio使用git_第2张图片


Step 1 : Enable Version Control Integration(git init)

VCS > Enable Version Control Integration > select "Git"

And then, you will discovery that your project list changed color. Like figure.

在ubuntu上搭建git-server及android studio使用git_第3张图片

※ build folder & local.properties doesn't added.


Step 2 : Git Add Remote

In this step, Android Studio doesn't provide GUI to work, We should use Git for Windows tool.

Go find Git Bash in git folder.

  1. Git Bash > Go to Project folder

  2. Git Bash > key in add remote command
    Ex: git remote add origin [email protected]:user/android-studio-git.git

在ubuntu上搭建git-server及android studio使用git_第4张图片


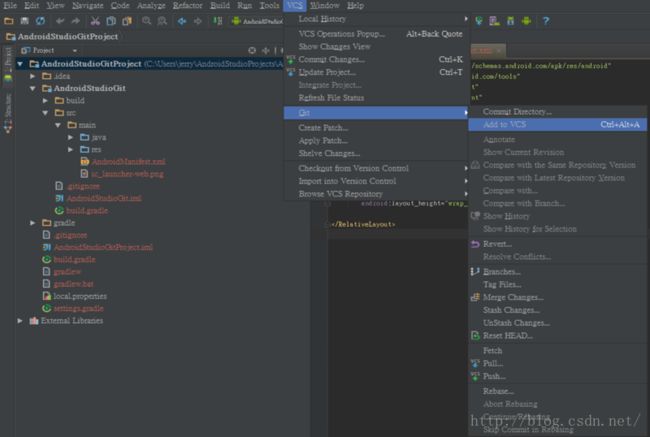
Step 3 : Add to VCS(git add)

Select > VCS > Git > Add to VCS

在ubuntu上搭建git-server及android studio使用git_第5张图片


Step 4 : Commit Changes(git commit)

VCS > Commit Changes...

Write down commit message, then choose commit.

If you select Commit and Push..., the git push window will pop up.

在ubuntu上搭建git-server及android studio使用git_第6张图片


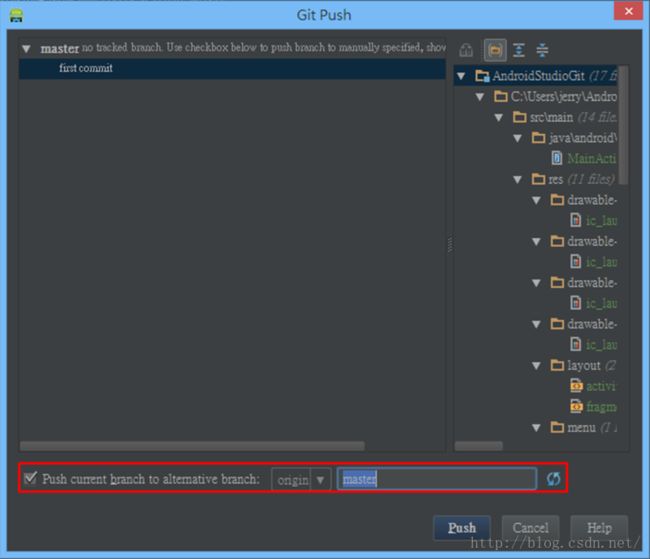
Step 5 : Git Push(git commit)

VCS > Git > Push

If your repository is empty, you must select Push current branch to alternative branch
在ubuntu上搭建git-server及android studio使用git_第7张图片

If push completely, you will see Push Secessfully at the bottom of Android Studio.

This tutorial's git server is private server, not GitHub.

Pushing to GitHub is easier, I will write down later.

Now, enjoy version control at Android Studio with Git.


PS.

I perfer to install tortoise git, addtionally.

Because icons, open on windows, would be more pretty.

Moreover, you can use GUI to do Step 2.


注意:在有些机子上,Android studio 中使用 Git 有些问题,可能会报下面这种错误
git.exe: error while loading shared libraries: ?: cannot open shared object
但是,无论操作是否成功,studio 都会在控制台(console)中打出它要执行的 git 命令,我们可以把这个命令 copy 下来,用自己的操作终端(如 cygwin)来执行这个命令就行了。


如果你对 Gitosis 不熟的话,可以来看一下这篇文档

https://wiki.archlinux.org/index.php/Gitosis


你可能感兴趣的:(开发工具)