IOS 响应者链条
OS开发UI篇—响应者链条
用户点击屏幕后产生的一个触摸事件,经过一些列的传递过程后,会找到最合适的视图控件来处理这个事件
找到最合适的视图控件后,就会调用控件的touches方法来作具体的事件处理
touchesBegan…
touchesMoved…
touchedEnded…
这些touches方法的默认做法是将事件顺着响应者链条向上传递,将事件交给上一个响应者进行处理
二、响应过程
一次完整的触摸事件的传递响应的过程
UIAppliction --> UIWiondw -->递归找到最适合处理事件的控件-->控件调用touches方法-->判断是否实现touches方法-->没有实现默认会将事件传递给上一个响应者-->找到上一个响应者
三、重要说明
1.相关概念
响应者链条:由很多响应者链接在一起组合起来的一个链条称之为响应者链条
响应者:继承UIResponder的对象称之为响应者对象
2.处理原则
默认做法是将事件顺着响应者链条向上传递,将事件交给上一个响应者进行处理
如何判断当前响应者的上一个响应者是谁?
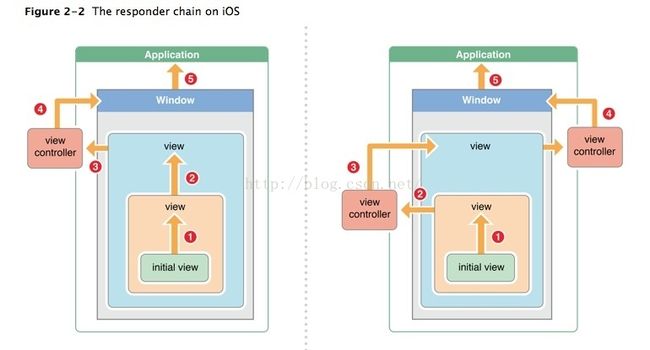
(1)判断当前是否是控制器的View, 如果是控制器的View上一个响应者就是控制器
(2)如果当前不是控制器的View,上一个响应者就是父控件
3.响应者链条有什么用?
可以让一个触摸事件发生的时候让多个响应者同时响应该事件
- (void)touchesBegan:(NSSet*)touches withEvent:(UIEvent*)event
{
[supertouchesBegan:toucheswithEvent:event];
NSLog(@"%@",self.class);
}
四、响应者链的事件传递过程
如果view的控制器存在,就传递给控制器;如果控制器不存在,则将其传递给它的父视图
在视图层次结构的最顶级视图,如果也不能处理收到的事件或消息,则其将事件或消息传递给window对象进行处理
如果window对象也不处理,则其将事件或消息传递给UIApplication对象
如果UIApplication也不能处理该事件或消息,则将其丢弃
我们先从UIButton谈起,UIButton大家使用的太多了,他特殊的地方就在于其内置的普通Default/高亮Highlighted/选择Selected/可用Enable的几个状态(UIControlState)。其次就是SDK内部已经为我们封装了以下用户事件:
最常用的莫过于Touch Up Inside这个事件了,他代表: 用户在按钮区域内按下,并且也在按钮区域内松开。
关键点:按下并且松开 才能触发此方法,也就是正确的操作 按下一次,松开一次只会触发一次此事件。与之不同的Touch Drag Inside等方法不需要松开这个过程,Up变为了Drag,其实大家都能理解,SDK在封装的时候原理跟UITouchEvent是一个道理,第一个单词Touch 代表按下(Began)第二个单词Up代表松开(Ended),Drag代表拖动(Moved)。TouchMoved方法在一次完整的触摸中会被触发很多次,所以Touch Drag Inside方法会在用户手松开之前一直被触发。
这些就是UIButton已封装的事件,而UIButton继承自UIControl。UIControl又继承自UIView。我们平时能用这些已封装的事件的控件都是UIControl的子类。那么父类UIView是没有内部事件的。
我们常常利用UIView来写自己的UITouchEvent。例如在一个View/ViewController中直接实现以下3个方法:
-(void)touchesBegan:(NSSet *)touches withEvent:(UIEvent *)event
{

}
-(void)touchesMoved:(NSSet *)touches withEvent:(UIEvent *)event
{

}

-(void)touchesEnded:(NSSet *)touches withEvent:(UIEvent *)event
{

}
-(void)touchesCancelled:(NSSet *)touches withEvent:(UIEvent *)event
{

}
我们用的非常多,但是大家知道这4个方法是谁的实例方法吗?如果你一下就说出是UIView的,那么为什么我们在UIViewController中也可以用呢,他们不是继承关系。
注意这4个实例方法来自UIView与UIViewController的共同父类:UIResponder。它是我们今天的主角。
基本上我们所能看到的所有图形界面都是继承自UIResponder的,So,它究竟为何方神圣?
UIResponder所谓很多视图的父类,他掌管着用户的操作事件分发大权。如果没有他,我们的电容屏如何将用户的操作传递给我们的视图令其做出反应呢?
我们先看看iOS中的响应者链的概念:
每一个应用有一个响应者链,我们的视图结构是一个N叉树(一个视图可以有多个子视图,一个子视图同一时刻只有一个父视图),而每一个继承UIResponder的对象都可以在这个N叉树中扮演一个节点。当叶节点成为最高响应者的时候,从这个叶节点开始往其父节点开始追朔出一条链,那么对于这一个叶节点来讲,这一条链就是当前的响应者链。响应者链将系统捕获到的UIEvent与UITouch从叶节点开始层层向下分发,期间可以选择停止分发,也可以选择继续向下分发。
例子:
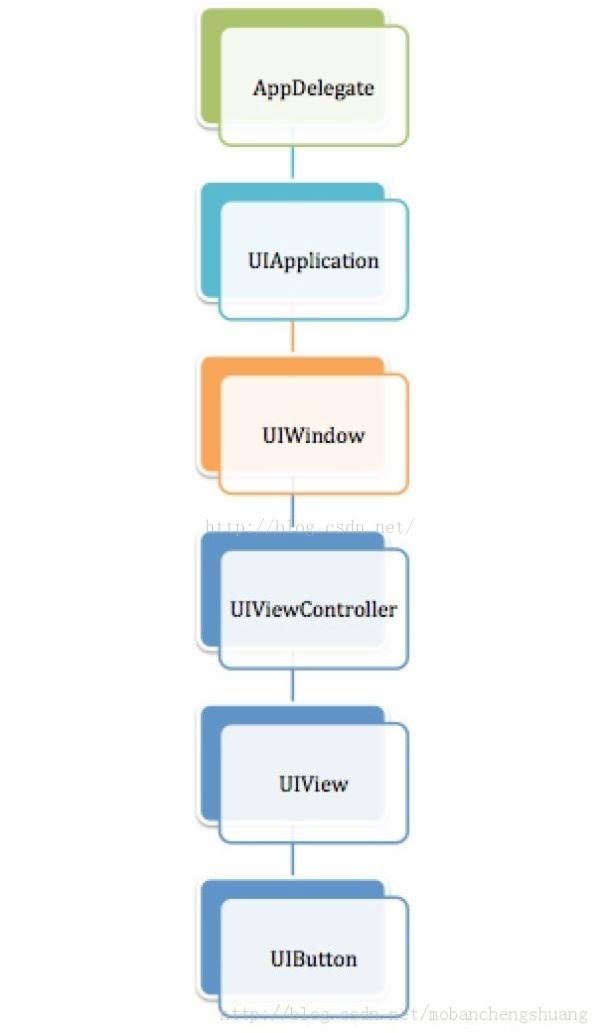
我用SingleView模板创建了一个新的工程,它的主Window上只有一个UIViewController,其View之上有一个Button。这个项目中所有UIResponder的子类所构成的N叉树为这样的结构:
那么他看起来并不像N叉树,但是不代表者不是一颗N叉树,当我们项目复杂之后,这个View可不可以有多个UIButton节点?所以他就是一棵树。
那么我们分析一下这里的响应者链是怎样工作的:
用户手指触摸到了UIView上,由于我们没有重写UIView的UITouchEvent,所以他里面和super执行的一样的,将该事件继续分发到UIViewController;
UIViewController的TouchBegan被我们重写了,如果我们不super,那么我们在这里写响应代码。事件到这里就不继续分发了。可想而知,UIViewController祖先节点:UIWindow,UIApplication,AppDelegate都无权被分发此事件。
如果我们super了TouchBegan,那么此次触摸事件由
ViewController分发给UIWindow,
UIWindow继而分发给UIApplication,
UIApplication再分发给AppDelegate,
于是我们在ViewController和appDelegate的touchBegan方法中都捕获到了这次事件。
#import

@interface MyApplication : UIApplication

@end

#import "MyApplication.h"

@implementation MyApplication
-(void)touchesBegan:(NSSet *)touches withEvent:(UIEvent *)event
{
    NSLog(@"myApplication touch begin");
    //打印当前对象的下一个事件的接受者
    NSLog(@"myApplication Next Respose=%@",self.nextResponder);
    //[super touchesBegan:touches withEvent:event];

}

@end

#import

@interface AppDelegate : UIResponder

@property (strong, nonatomic) UIWindow *window;

@end

#import "AppDelegate.h"
#import "VCRoot.h"
#import "MyWindow.h"
@implementation AppDelegate

- (BOOL)application:(UIApplication *)application didFinishLaunchingWithOptions:(NSDictionary *)launchOptions
{
    //更改自定义的window对象
    self.window = [[MyWindow alloc] initWithFrame:[[UIScreen mainScreen] bounds]];
    // Override point for customization after application launch.

    //创建根视图控制器
    VCRoot*root=[[VCRoot alloc]init];
    self.window.rootViewController=root;

    self.window.backgroundColor = [UIColor whiteColor];
    [self.window makeKeyAndVisible];
    return YES;
}

-(void)touchesBegan:(NSSet *)touches withEvent:(UIEvent *)event
{
    NSLog(@"appDelegate touch begin");
    //打印当前对象的下一个事件的接受者
    NSLog(@"appDelegate Next Respose=%@",self.nextResponder);

    //[super touchesBegan:touches withEvent:event]; 模拟系统的,一般不用自己 写,除非有特殊的需求

}
@interface VCRoot : UIViewController

@end
#import "VCRoot.h"
#import"MainView.h"
#import "SubView.h"
@interface VCRoot ()

@end

@implementation VCRoot

- (id)initWithNibName:(NSString *)nibNameOrNil bundle:(NSBundle *)nibBundleOrNil
{
    self = [super initWithNibName:nibNameOrNil bundle:nibBundleOrNil];
    if (self) {
        // Custom initialization
    }
    return self;
}

- (void)viewDidLoad
{
    [super viewDidLoad];
    // Do any additional setup after loading the view.
    //创建父视图
    MainView*mainView=[[MainView alloc]init];
    mainView.frame=CGRectMake(40, 60, 200, 300);
    mainView.backgroundColor=[UIColor cyanColor];
    //创建子视图
    SubView*subView=[[SubView alloc]init];
    subView.frame=CGRectMake(10, 10, 100, 100);
    subView.backgroundColor=[UIColor blueColor];

    //将子视图添加到父视图中
    [mainView addSubview:subView];

    [self.view addSubview:mainView];
}
//-(void)touchesBegan:(NSSet *)touches withEvent:(UIEvent *)event
//{
//    NSLog(@"vcroot touch begin");
//    //打印当前对象的下一个事件的接受者
//    NSLog(@"root Next Respose=%@",self.nextResponder);
//
//     //[super touchesBegan:touches withEvent:event];
//
//}
#import

@interface SubView : UIView

@end

#import "SubView.h"

@implementation SubView

- (id)initWithFrame:(CGRect)frame
{
    self = [super initWithFrame:frame];
    if (self) {
        // Initialization code
    }
    return self;
}
-(void)touchesBegan:(NSSet *)touches withEvent:(UIEvent *)event
{
    NSLog(@"subView touch begin");
    //打印当前对象的下一个事件的接受者
    NSLog(@"subView Next Respose=%@",self.nextResponder);
    // [super touchesBegan:touches withEvent:event];

} 
