创建一个springboot+mybatis的项目
创建基础的 spring boot项目就不说了,参考上一个文章:
https://blog.csdn.net/puyinggong/article/details/80653014
一、添加对应的pom文件
			mysql
			mysql-connector-java
			runtime


			com.alibaba
			druid
			1.1.0
第一个主要是为了添加mysql的包支持,当然这个也根据项目情况,也可以添加oracle的,等到
第二个主要是为了添加数据库连接池,这个是阿里开发的开源项目,当然还有很多功能
具体参考:https://www.cnblogs.com/niejunlei/p/5977895.html
二、生成对应代码和sql映射文件
然后就是创建对应的实体类啦,这个没什么好说的,大家都知道。
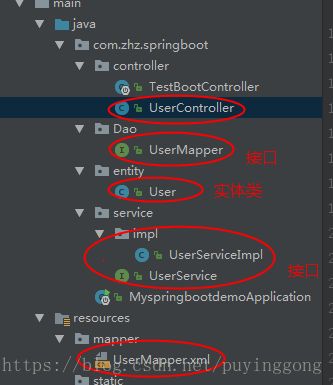
我创建了大概的几个类和sql映射
需要注意的是,UserServiceImpl这个类需要用到类注解
@Service("userService")
控制层代码如下:
package com.zhz.springboot.controller;

import com.zhz.springboot.entity.User;
import com.zhz.springboot.service.UserService;
import org.springframework.stereotype.Controller;
import org.springframework.ui.Model;
import org.springframework.web.bind.annotation.RequestMapping;
import org.springframework.web.bind.annotation.ResponseBody;

import javax.annotation.Resource;
import javax.servlet.http.HttpServletRequest;

@Controller
@RequestMapping("/user")
public class UserController {

    @Resource
    private UserService userService;

    @RequestMapping("/showUser")
    @ResponseBody
    public User toIndex(HttpServletRequest request, Model model){
        int userId = Integer.parseInt(request.getParameter("id"));
        User user = this.userService.getUserById(userId);
        return user;
    }
}
接口层代码如下:
package com.zhz.springboot.Dao;

import java.util.List;

import com.zhz.springboot.entity.User;
import org.apache.ibatis.annotations.Param;


public interface UserMapper {
    int deleteByPrimaryKey(Integer userId);

    int insert(User record);

    int insertSelective(User record);

    User selectByPrimaryKey(Integer userId);

    int updateByPrimaryKeySelective(User record);

    int updateByPrimaryKey(User record);

    /**
     * 查询用户信息并分页
     * @param skip
     * @param size
     * @return
     */
    public List queryUserPager(@Param("skip") int skip,@Param("size") int size);

    /**
     * 查询用户总数
     * @return
     */
    public int queryUserCount();

    /**
     * 删除多个用户
     * @param userIds
     * @return
     */
    public int deleteUsers(int[] userIds);

}
sql映射文件如下:
user_id, user_name, user_sex, user_birthday, user_email, user_edu, user_telephone,
user_address, create_time
delete from tb_user where user_id in
#{item}
delete from tb_user
where user_id = #{userId,jdbcType=INTEGER}
insert into tb_user ( user_name, user_sex,
user_birthday, user_email, user_edu,
user_telephone, user_address, create_time
)
values ( #{userName,jdbcType=VARCHAR}, #{userSex,jdbcType=VARCHAR},
#{userBirthday,jdbcType=DATE}, #{userEmail,jdbcType=VARCHAR}, #{userEdu,jdbcType=VARCHAR},
#{userTelephone,jdbcType=VARCHAR}, #{userAddress,jdbcType=VARCHAR}, #{createTime,jdbcType=TIMESTAMP}
)
insert into tb_user
user_name,
user_sex,
user_birthday,
user_email,
user_edu,
user_telephone,
user_address,
create_time,
#{userId,jdbcType=INTEGER},
#{userName,jdbcType=VARCHAR},
#{userSex,jdbcType=VARCHAR},
#{userBirthday,jdbcType=DATE},
#{userEmail,jdbcType=VARCHAR},
#{userEdu,jdbcType=VARCHAR},
#{userTelephone,jdbcType=VARCHAR},
#{userAddress,jdbcType=VARCHAR},
#{createTime,jdbcType=TIMESTAMP},
update tb_user
user_name = #{userName,jdbcType=VARCHAR},
user_sex = #{userSex,jdbcType=VARCHAR},
user_birthday = #{userBirthday,jdbcType=DATE},
user_email = #{userEmail,jdbcType=VARCHAR},
user_edu = #{userEdu,jdbcType=VARCHAR},
user_telephone = #{userTelephone,jdbcType=VARCHAR},
user_address = #{userAddress,jdbcType=VARCHAR},
create_time = #{createTime,jdbcType=TIMESTAMP},
where user_id = #{userId,jdbcType=INTEGER}
update tb_user
set user_name = #{userName,jdbcType=VARCHAR},
user_sex = #{userSex,jdbcType=VARCHAR},
user_birthday = #{userBirthday,jdbcType=DATE},
user_email = #{userEmail,jdbcType=VARCHAR},
user_edu = #{userEdu,jdbcType=VARCHAR},
user_telephone = #{userTelephone,jdbcType=VARCHAR},
user_address = #{userAddress,jdbcType=VARCHAR},
create_time = #{createTime,jdbcType=TIMESTAMP}
where user_id = #{userId,jdbcType=INTEGER}
方便的,还是建议写个自动生成的,使用
MybatisGenerator
自己写个项目,导入依赖包,平时只要使用的时候,改下配置文件,运行main方法自动生成,然后拷贝到自己项目中,还是很方便的。
这些都完成了,那么下一步就是关键了,就是怎样让这些东西都能生效呢。
三、添加配置文件,使mybatis生效
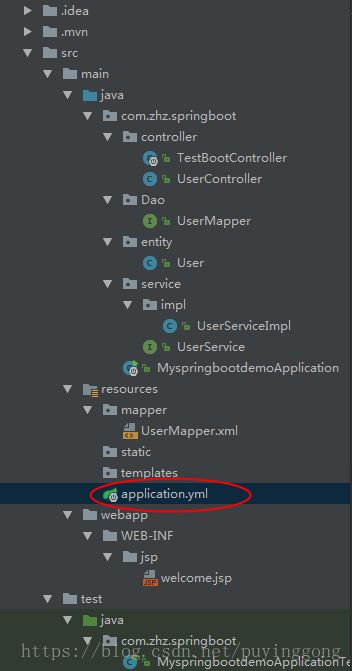
在resources文件夹下面创建配置文件,application.yml,然后里面添加对应的配置信息
#公共配置与profiles选择无关 mapperLocations指的路径是src/main/resources
mybatis:
  typeAliasesPackage: com.zhz.springboot.entity
  mapperLocations: classpath:mapper/*.xml


#开发配置
spring:
  profiles: dev

  datasource:
    url: jdbc:mysql://localhost:3306/test
    username: root
    password: 123456
    driver-class-name: com.mysql.jdbc.Driver
    # 使用druid数据源
    type: com.alibaba.druid.pool.DruidDataSource
  # 连接池设置
  druid:
    initial-size: 5
    min-idle: 5
    max-active: 20
    # 配置获取连接等待超时的时间
    max-wait: 60000
    # 配置间隔多久才进行一次检测,检测需要关闭的空闲连接,单位是毫秒
    time-between-eviction-runs-millis: 60000
    # 配置一个连接在池中最小生存的时间,单位是毫秒
    min-evictable-idle-time-millis: 300000
    # Oracle请使用select 1 from dual
    validation-query: SELECT 'x'
    test-while-idle: true
    test-on-borrow: false
    test-on-return: false
    # 打开PSCache,并且指定每个连接上PSCache的大小
    pool-prepared-statements: true
    max-pool-prepared-statement-per-connection-size: 20
    # 配置监控统计拦截的filters,去掉后监控界面sql无法统计,'wall'用于防火墙
    filters: stat,wall,slf4j
    # 通过connectProperties属性来打开mergeSql功能;慢SQL记录
    connection-properties: druid.stat.mergeSql=true;druid.stat.slowSqlMillis=5000
    # 合并多个DruidDataSource的监控数据
    use-global-data-source-stat: true
  mvc:
    view:
      prefix: /WEB-INF/jsp/
      suffix: .jsp
OK,到这一步,整个配置就完成了,是不是很简单,方便了太多太多,节约了大部分配置。
然后回到man方法,启动整个项目。
输入对应地址
localhost:8080/user/showUser?id=1
浏览器展示从数据获取的值,测试成功。

