Pytest框架学习
Pytest框架知识
本文参考了官方文档和一些乐于分享的大佬的博客,结合自己的理解完成。学习pytest框架的小白,需要按照教程自己敲一遍,配置一遍,摸索一下整个框架的运行逻辑,数据流的走向,文字虽多,请细细看完,有问题欢迎在群里提出,相互学习,互相指正。希望大家有所收获,学有所得。(群:自动化测试-夜行者:816489363)
--成都-阿木木
框架说明
官方文档:https://docs.pytest.org/en/latest/contents.html
感谢慕城南风的博客:https://blog.csdn.net/lovedingd/article/details/98952868
Pytest支持的插件库:https://plugincompat.herokuapp.com/
第三方插件库:https://docs.pytest.org/en/latest/plugins.html
pytest兼容unittest
pytest兼容以前的unittest,只需要少量的更改代码即可,下面就大家熟悉的setup、teardown以及html报告进行说明
- setup和teardown
setup和teardown主要分为:类级、函数级。
运行于测试方法前后:
- #!/user/bin/env python
- # -*- coding: utf-8 -*-
- """
- ------------------------------------
- @Project : pyqt5_study
- @Time : 2020/8/4 9:33
- @Auth : chineseluo
- @Email : [email protected]
- @File : test_setup_teardown.py
- @IDE : PyCharm
- ------------------------------------
- """
- import pytest
- class TestSetupTeardown():
- def setup(self):
- print("运行于测试方法之前")
- def teardown(self):
- print("运行于方法之后")
- def test_01(self):
- print("这是第一个方法")
- def test_02(self):
- print("这是第二个方法")
- if __name__ == '__main__':
- pytest.main("-s test_setup_teardown.py")
运行结果:
- test_setup_teardown.py::TestSetupTeardown::test_01
- 运行于测试方法之前
- PASSED [ 50%]这是第一个方法
- 运行于方法之后
- test_setup_teardown.py::TestSetupTeardown::test_02
- 运行于测试方法之前
- PASSED [100%]这是第二个方法
- 运行于方法之后
运行于测试类的始末:
- #!/user/bin/env python
- # -*- coding: utf-8 -*-
- """
- ------------------------------------
- @Project : pyqt5_study
- @Time : 2020/8/4 9:33
- @Auth : chineseluo
- @Email : [email protected]
- @File : test_setup_teardown.py
- @IDE : PyCharm
- ------------------------------------
- """
- import pytest
- class TestSetupTeardown():
- @classmethod
- def setup_class(self):
- print("运行于测试类之前")
- @classmethod
- def teardown_class(self):
- print("运行于测试类之后")
- def test_01(self):
- print("这是第一个方法")
- def test_02(self):
- print("这是第二个方法")
- if __name__ == '__main__':
- pytest.main(["-s","test_setup_teardown.py"])
- html测试报告
使用pytest的测试报告插件可以替换unittest本身的HTMLTestRunner报告
安装:pip install pytest-html
使用方式:命令行格式:pytest --html=用户路径/report.html
pytest框架使用约束
所有的单测文件名都需要满足test_*.py格式或*_test.py格式。
在单测文件中,测试类以Test开头,并且不能带有 init 方法(注意:定义class时,需要以T开头,不然pytest是不会去运行该class的)
在单测类中,可以包含一个或多个test_开头的函数。
此时,在执行pytest命令时,会自动从当前目录及子目录中寻找符合上述约束的测试函数来执行。可以在pytest.ini中修改测试目录、测试模块、测试类、测试方法扫描进行默认修改。
Pytest Exit Code含义清单
程序运行成功结束控制台输出:Process finished with exit code 0
Exit code 0 所有用例执行完毕,全部通过
Exit code 1 所有用例执行完毕,存在Failed的测试用例
Exit code 2 用户中断了测试的执行
Exit code 3 测试执行过程发生了内部错误
Exit code 4 pytest 命令行使用错误
Exit code 5 未采集到可用测试用例文件
pytest之fixture
- Fixture作用
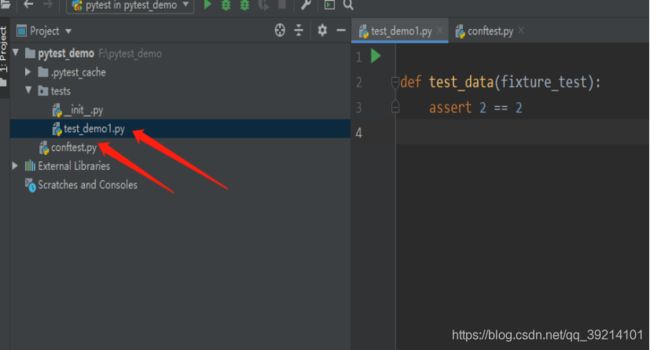
fixture修饰器来标记固定的工厂函数,在其他函数,模块,类或整个工程调用它时会被激活并优先执行,通常会被用于完成预置处理和重复操作。
fixture是在测试函数前后运行,由pytest执行的外壳函数;代码可以定制,满足多变的测试需求,包括定义传入测试中的数据集,配置测试前系统的初始工作,为批量测试提供数据源等等,fixture是pytest用于将测试前后进行预备,清理工作的代码分离出核心测试逻辑的一种机制
- 说明
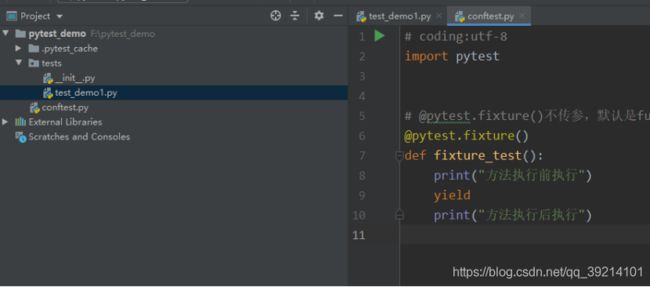
@pytest.fixture()装饰器用于申明函数是一个fixture,如果测试函数的参数列表中包含fixture,那么pytest会检测到,检测顺序是,优先搜索该测试所在的模块,然后搜索conftest.py,并在测试函数运行之前执行该fixture,fixture可以完成测试任务,也可以返回测试数据给测试函数
scope:被标记方法的作用域
function" (default):作用于每个测试方法,每个test都运行一次
"class":作用于整个类,每个class的所有test只运行一次
"module":作用于整个模块,每个module的所有test只运行一次
"session:作用于整个session(慎用),每个session只运行一次
params:(list类型)提供参数数据,供调用标记方法的函数使用
autouse:是否自动运行,默认为False不运行,设置为True自动运行
pytest --setup-show test_example1.py(可以看到执行过程顺序)
3、测试数据返回(参数化)
A.返回测试数据
- # coding:utf-8
- import pytest
- # @pytest.fixture()不传参,默认是function级别的,也就是只在test开头函数前后执行
- @pytest.fixture()
- def fixture_test():
- print("方法执行前执行")
- yield
- print("方法执行后执行")
- def test_data(fixture_test):
- assert 2 == 2
- 返回测试数据
- # coding:utf-8
- import pytest
- # @pytest.fixture()不传参,默认是function级别的,也就是只在test开头函数前后执行;也可以使用fixture返回数据
- @pytest.fixture()
- def fixture_test():
- return [1, 2, 3, 4]
- def test_data(fixture_test):
- print(fixture_test[1])
- assert 2 == fixture_test[1]
4、Fixture函数存放位置
- 单个测试模块文件内,只有该模块文件的类和方法可以访问到该fixture函数
- 如果希望多个测试文件共享fixtrue,可以在某个公共目录下新建一个fixture,将fixture放在里面
- Fixture作用范围
- function级别作用域
function每个函数或方法都会调用(有两种写法,不传递参数,默认就是function,也可以指定scope="function",来进行作用域的指定
- @pytest.fixture()
- def fixture_function():
- print("fixturetest测试1")
- return 1
- @pytest.fixture(scope="function"):
- def fixture_function():
- print("fixture测试2")
- return 2
- def test_fixture(fixture_function1):
- assert 1 == fixture_function1
- Class级别作用域
- # coding:utf-8
- import pytest
- # @pytest.fixture(scope="class")只在类的前后执行一次
- @pytest.fixture(scope="class")
- def fixture_class():
- print("类前执行一次")
- yield
- print("类后执行一次")
- class TestCase:
- def test_1(self, fixture_class):
- print("类方法")
- Module级别作用域
- # coding:utf-8
- import pytest
- @pytest.fixture(scope="module")
- def fixture_module():
- print("模块执行前执行")
- yield
- print("模块执行后执行")
- def test_1(fixture_module):
- print("\n测试方法")
- class TestCase:
- def test_2(self, fixture_module):
- print("\n类方法")
- Session级别作用域
session是多个文件调用一次,可以跨越.py文件调用,每个.py文件都是module
当我们有多个.py文件的用例时,如果多个用例只需要调用一次fixture,可以设置scope="session",并且写入到conftest。py文件里面
- import pytest
- @pytest.fixture(scope="session")
- def fixture_session():
- print("全局前执行一次")
- yield
- print("全局后执行一次")
- # coding:utf-8
- import pytest
- def test_1(fixture_session):
- print("方法")
- class TestCase:
- def test_2(self, fixture_session):
- print("类方法")
pytest之配置文件
- pytest非测试文件介绍
1、pytest.ini:pytest的主配置文件,可以改变pytest的默认行为,其中有很多可以配置的选项,包含日志,命令行的一些参数,控制台输出的信息等等
2、conftest.py:是本地的插件库,其中的hook函数和fixture将作用于该文件所在目录以及所有子目录
- 如何查看pytest.ini选项
使用pytest --help查看pytest.ini所有设置选项
- 如何更改默认命令行选项
pytest -v --verbose 可以输出详细信息
[pytest]
addops = -v --alluredir ./allure-result(addopts增加默认执行的操作步骤,简化命令行参数)(allure测试报告默认在json文件目录下生成,可以使用allure generate jsonpathdir -o allurepathdir更改)
ps:
如何使用allure生成测试报告
1、brew install allure
2、安装allure-pytest
3、运行case时增加命令行选项pytest -v --allure ./allure-results test.py
4、生成测试报告allure generate allure-results -o allure
有哪些常用的命令行选项呢?
-v:输出详细信息,显示具体执行了那些测试用例
--collect-only 展示在给定的配置下那些测试用例会被执行,仅用于展示,不执行
-k 允许使用表达式指定希望运行的测试用例
exp:pytest -v -k 'baidu' test.py(在pytest中查找含有baidu关键字的case执行)
-m marker用于标记测试并分组
--strict 遇到mark拼写错误会检查,与mark配合使用
- 注册标记防范拼写错误
自定义标记可以简化测试工作,但是标记容易拼写错误,默认情况下不会引起错误,pytest以为这是另外一个标记,为了避免拼写错误,可以在pytest.ini文件里进行注册
markers = data_file:a test_data get_and_format marker
通过命令查看:pytest --help(或者pytest --marks)没有注册的标记不会出现在markers列表里面,如果使用--strict选项,遇到拼写错误的标记或者未注册的标记会报错
如果自己增加一个测试函数的标记呢?
@pytest.mark.smoke
pytest -m 'smoke' test.py
- 执行pytest的最低版本号设置
minversion = 6.0
minversion选项可以指定运行测试用例的pytest的最低版本
- 指定pytest忽略某些目录
norecursedirs = .*data config utils
可以使用norecursedirs缩小pytest的搜索范围
指定访问目录
testpath = testsdir
- 配置日志
通过将log_cli配置选项设置为true,pytest将在直接将日志记录发送到控制台时输出日志记录。
您可以指定传递的级别,以将等于或更高级别的日志记录打印到控制台的日志记录级别--log-cli-level。此设置接受python文档中显示的日志记录级别名称,或者接受整数作为日志记录级别num。
此外,您还可以指定--log-cli-format和 --log-cli-date-format哪个镜和默认--log-format和 --log-date-format如果没有提供,但只被应用到控制台日志处理程序。
还可以在配置INI文件中设置所有CLI日志选项。选项名称为:
log_cli_level
log_cli_format
log_cli_date_format
如果您需要将整个测试套件的日志记录记录到一个文件中,则可以传递 --log-file=/path/to/log/file。该日志文件以写模式打开,这意味着它将在每个运行测试会话中被覆盖。
您还可以通过传递日志文件的日志记录级别 --log-file-level。此设置接受python文档中所见的日志记录级别名称(即大写的名称),或者接受整数作为日志记录级别num。
此外,您还可以指定--log-file-format和 --log-file-date-format,它们等于--log-format和 --log-date-format但应用于日志文件日志处理程序。
还可以在配置INI文件中设置所有日志文件选项。选项名称为:
log_file
log_file_level
log_file_format
log_file_date_format
您可以调用set_log_path()以动态自定义log_file路径。此功能被认为是实验性的。
- [pytest]
- testpaths = TestCases
- log_format = %(asctime)s %(levelname)s %(message)s
- log_level = INFO
- log_file_level = debug
- log_file_date_format = %Y-%m-%d %H:%M:%S
- log_file_format = %(asctime)s %(levelname)s %(message)s
- ;log_file = ../../Logs/log.log
- log_cli = True
- log_cli_level = INFO
- log_cli_format = %(asctime)s [%(levelname)1s] %(message)s (%(filename)s:%(lineno)s)
- log_cli_date_format=%Y-%m-%d %H:%M:%S
8、配置例子
#配置pytest命令行运行参数
[pytest]
addopts = -s ... # 空格分隔,可添加多个命令行参数 -所有参数均为插件包的参数配置测试搜索的路径
testpaths = ./scripts # 当前目录下的scripts文件夹 -可自定义
#配置测试搜索的文件名称
python_files = test*.py
#当前目录下的scripts文件夹下,以test开头,以.py结尾的所有文件 -可自定义
配置测试搜索的测试类名
python_classes = Test_*
#当前目录下的scripts文件夹下,以test开头,以.py结尾的所有文件中,以Test开头的类 -可自定义
配置测试搜索的测试函数名
python_functions = test_*
#当前目录下的scripts文件夹下,以test开头,以.py结尾的所有文件中,以Test开头的类内,以test_开头的方法 -可自定义
pytest之数据驱动
- Fixture
- import pytest
- @pytest.fixture(params=[1, 2, 3])
- def need_data(request): # 传入参数request 系统封装参数
- return request.param # 取列表中单个值,默认的取值方式
- class Test_ABC:
- def test_a(self,need_data):
- print("------->test_a")
- assert need_data != 3 # 断言need_data不等于3
- if __name__ == '__main__':
- pytest.main("-s test_abc.py")
- parametrize装饰器
@pytest.mark.parametrize(argnames,argvalues)装饰器可以达到批量传送参数的目的,argvalues里面传递的是元组或者列表里面嵌套元组的方式
pytest插件与hook函数
- 简介
pytest可以通过添加插件可以扩展功能,pytest的代码结构适合定制和扩展插件,可以借助hook函数来实现。把fixture函数或者hook函数添加到conftest文件里,这种方式,就已经创建了一个本地的conftest插件!!!
- pytest plugin加载的几种方式
1、内置plugins:从代码内部的_pytest目录加载;
2、外部插件(第三方插件):通过setuptools entry points机制发现的第三方插件模块;
推荐使用的第三方的pytest插件:https://docs.pytest.org/en/latest/plugins.html
3、conftest.py形式的本地插件:测试目录下的自动模块发现机制
通过pytest --trace-config命令可以查看当前pytest中所有的plugin
在pytest中,所谓的plugin其实就是能被pytest发现的一些带有pytest hook方法的文件或者对象
- 什么是hook方法(钩子函数)
使用的框架提供公用的规则,其他开发者使用这个规则编写的文件或者代码可以被框架识别,框架进行初始化时,会收集满足这个规则的所有代码(文件),然后将这些代码加入到框架中来,在执行时,一并进行初始化。所有这一规则下可以被框架收集到的方法就是hook方法。
- 编写自己的插件
插件可以改变pytest行为,可用的hook函数很多,详细的定义:
http://doc.pytest.org/en/latest/_modules/_pytest/hookspec.html
1、pytest_addoption,基本每个pytest plugin都会有这个hook方法,它的作用是为pytest命令添加自定义的参数
parser:用户命令行参数与ini文件值的解析器
def pytest_addoption(parser):
parser.addoption("--env",##注册一个命令行选项
default="test",#默认值为test
dest="env",
help="set test run env")#说明
pytest_addoption:Hook function,这里创建了一个argparser的group,通过addoption方法添加option,使得显示help信息时相关option显示在一个group下面,更加友好,使用pytest --help可以查看
- def pytest_addoption(parser):
- group = parser.getgroup("chinese auto test")
- group.addoption("--env", default="ggg", dest="env", help="test env")
- group.addoption("--env2", default="ggg", dest="env", help="test env")
- @pytest.fixture(scope="session")
- def cmdopt(request):
- print("获取不同环境变量的配置")
- return request.config.getoption("--env")
2、pytest_collection_modifyitems,是一个完成所有测试项的收集后,pytest调用的钩子
def pytest_collection_modifyitems(items):
pass
测试用例收集完成后,将收集到的item的name和nodeid的中文显示在控制台上,所有的测试用例收集完毕后调用,可以再次过滤或者对它们重新排序
items(收集的测试项目列表)
- def pytest_collection_modifyitems(items):
- print("test hook 函数")
- for item in items:
- item.name = item.name.encode("utf-8").decode("unicode_escape")
- item._nodeid = item._nodeid.encode("utf-8").decode("unicode_escape")
Pytest高级用法
1、跳过测试函数
根据特定的条件,不执行标识的测试函数.
方法:
skipif(condition, reason=None)
参数:
condition:跳过的条件,必传参数
reason:标注原因,必传参数
使用方法:
@pytest.mark.skipif(condition, reason="xxx")
- import pytest
- class Test_ABC:
- def setup_class(self):
- print("------->setup_class")
- def teardown_class(self):
- print("------->teardown_class")
- def test_a(self):
- print("------->test_a")
- assert 1
- @pytest.mark.skipif(condition=2>1,reason = "跳过该函数") # 跳过测试函数test_b
- def test_b(self):
- print("------->test_b")
- assert 0
2、标记为预期失败的函数
标记测试函数为失败函数
方法:
xfail(condition=None, reason=None, raises=None, run=True, strict=False)
常用参数:
condition:预期失败的条件,必传参数
reason:失败的原因,必传参数
使用方法:
@pytest.mark.xfail(condition, reason="xx")
- import pytest
- class Test_ABC:
- def setup_class(self):
- print("------->setup_class")
- def teardown_class(self):
- print("------->teardown_class")
- def test_a(self):
- print("------->test_a")
- assert 1
- @pytest.mark.xfail(2 > 1, reason="标注为预期失败") # 标记为预期失败函数test_b
- def test_b(self):
- print("------->test_b")
- assert 0
- 函数参数化
方便测试函数对测试属于的获取。
方法:
parametrize(argnames, argvalues, indirect=False, ids=None, scope=None)
常用参数:
argnames:参数名
argvalues:参数对应值,类型必须为list
当参数为一个时格式:[value]
当参数个数大于一个时,格式为:[(param_value1,param_value2.....),(param_value1,param_value2.....)]
使用方法:
@pytest.mark.parametrize(argnames,argvalues)
️ 参数值为N个,测试方法就会运行N次
在函数参数化中还可以传递函数,进行参数化
- import pytest
- def return_test_data():
- return [(1,2),(0,3)]
- class Test_ABC:
- def setup_class(self):
- print("------->setup_class")
- def teardown_class(self):
- print("------->teardown_class")
- @pytest.mark.parametrize("a,b",return_test_data()) # 使用函数返回值的形式传入参数值
- def test_a(self,a,b):
- print("test data:a=%d,b=%d"%(a,b))
- assert a+b == 3
4、修改python traceback输出
pytest --showlocals # show local variables in tracebacks
pytest -l # show local variables (shortcut)
pytest --tb=auto # (default) 'long' tracebacks for the first and last
# entry, but 'short' style for the other entries
pytest --tb=long # exhaustive, informative traceback formatting
pytest --tb=short # shorter traceback format
pytest --tb=line # only one line per failure
pytest --tb=native # Python standard library formatting
pytest --tb=no # no traceback at all
python --full-trace 参数会打印更多的错误输出信息,比参数 --tb=long 还多,即使是 Ctrl+C 触发的错误,也会打印出来
5、获取用例执行的性能数据
获取最慢的10个用例的执行耗时
pytest --durations=10
Pytest-xdist进程级并发插件讲解
参考夜行者自动化测试群(群号:816489363)文件:pytest-xdist进程级并发参数化说明--成都-阿木木
Pytest常用插件介绍
- pytest-assume
多重校验插件,可以执行完所有的断言,常规assert断言执行失败后下面的断言便会停止,不在执行,assume插件可以执行完所有断言
安装命令:pip install pytest-assume
使用方式:
- def test_add_case(self):
- pytest.assume(add(1,2)==3)
- pytest.assume(add(1,4)==3)
- pytest.assume(add(2,2)==4)
- pytest-ording
Pytest用例默认执行顺序是和collect的顺序一致,用例收集是按照测试目录开始,由上到下,在测试模块中,测试用例收集也是从上到下,需要调整测试函数的执行顺序可以通过pytest_collection_modifyitems这个hook函数(钩子)进行插件编写。在pytest的第三方插件中,已经有人实现了这个功能,下面介绍pytest-ordering这个插件。
安装命令:pip install pytest-ordering
- @pytest.mark.run(order=2)
- def test_order1():
- print ("first test")
- assert True
- @pytest.mark.run(order=1)
- def test_order2():
- print ("second test")
- assert True
- pytest-rerunfailures
失败重跑插件,使用比较简单,在脚本运行过程中,可能某些原因导致用例执行失败,可能是网络加载等,可以使用该插件,对于失败的用例进行重跑,提高报告的准确性。
安装命令:pip install pytest-rerunfailures
命令行指定:
Pytest -s test_xxx.py --reruns 5 #表示失败用例运行五次
Pytest -s test_xxx.py --reruns-delay 2 #表示失败用例等待2S后在执行
在装饰器中指定:
- @pytest.mark.flaky(reruns=6, reruns_delay=2)
- def test_example(self):
- print(3)
- assert random.choice([True, False])
- pytest-sugar
显示进度条,控制台显示比较好看
显示效果如下:
安装命令:pip install pytest-sugar
(群:自动化测试-夜行者:816489363)


