Linux中的firewalld与iptables
一.firewalld
1.概述;动态防火墙后台程序firewalld提供了一个动态管理的防火墙,用以支持网络“zones”,区分配对一个网络及其相关链接和界面一定程度的信任。它具备对ipv4和ipv6防火墙设置的支持。它支持以太桥接,并有分离运行时间和永久性配置选择,具备一个通向服务或者应用程序以直接增加防火墙规则的接口。
2.配置:系统提供了图像化的配置工具firewall-config(rhel7), 提供命令行客户端firewall-cmd, 用于配置 firewalld永久性或非永久性运行时间的改变:
依次用 iptables工具与执行数据包筛选的内核中的 Netfilter通信。
3.firewalld和iptables service 之间最本质的不同是:
• iptables service 在 /etc/sysconfig/iptables 中储存配置,而 firewalld将配置储存在
/usr/lib/firewalld/ 和 /etc/firewalld/ 中的各种XML文件里.
• 使用 iptables service每一个单独更改意味着清除所有旧有的规则和从
/etc/sysconfig/iptables里读取所有新的规则,然而使用 firewalld却不会再创建任何新的规则;仅仅运行规则中的不同之处。因此,firewalld可以在运行时间内,改变设置而不丢失现行连接。
•基于用户对网络中设备和交通所给与的信任程度,防火墙可以用来将网络分割成不同的区域
firewalld域
网络区名称 默认配置
trusted(信任) 可接受所有的网络连接
home(家庭) 用于家庭网络,仅接受ssh,mdns,ipp-client,samba-client,或dhcpv6-client服务连接
internal(内部) 用于内部网络,仅接受ssh,mdns,ipp-client,ipp-client,samba-client,dhcpv6-client服务连接
work(工作) 用于工作区,仅接受ssh或dhcpb6-client服务连接
public(工作) 在公共区域内使用,仅接受ssh或dhcpv6-client服务连接,为firewalld的默认区域
external(外部) 出去的ipv4网络连接通过此区域伪装和转发,仅接受ssh服务连接
dmz(非军事区) 仅接受ssh服务连接
block(限制) 拒绝所有网络连接
drop(丢弃) 任何接受的网络数据包都被丢弃,没有任何回复
二.管理防火墙
安装防火墙软件:
yum install -y firewalld firewall-config
启动和禁用防火墙:
systemctl start firewalld
systemctl enable firewalld
systemctl disable firewalld #systemctl stop firewalld
使用iptables服务(rhel7中需要自己安装iptables):
yum install -y iptables-services
systemctl start iptables
systemctl enable iptables
三.firewalld图形方式的修改
firewall-config
Runtime:临时修改,重启后失效
Permanent :永久修改,要reload,在options里面选择,永久修改会写入配置文件,必须重新加载![]()
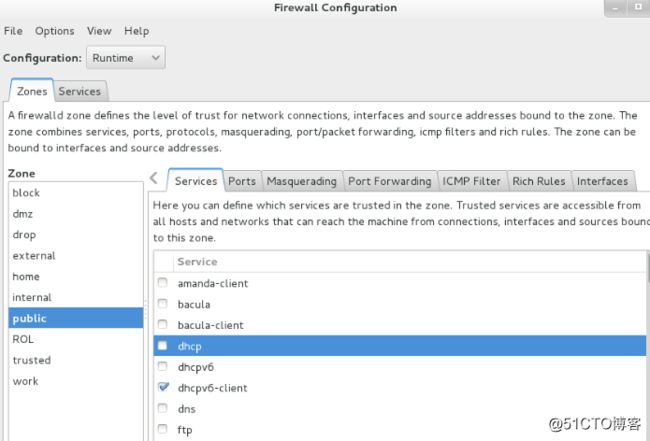
临时修改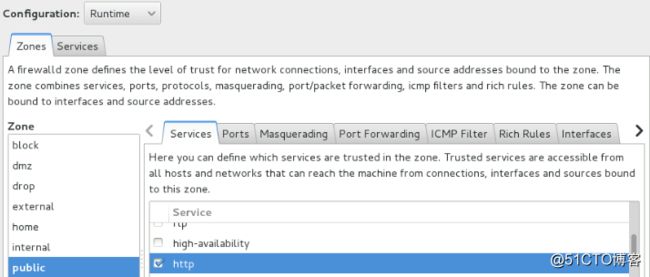
Zone 默认public
测试:Services选择http
用firewall-cmd --list-all可以看出加上了什么火墙策略
[root@localhost ~]# firewall-cmd --list-all
public (default, active)
interfaces: eth0 eth1
sources:
services: dhcpv6-client http ssh
ports:
masquerade: no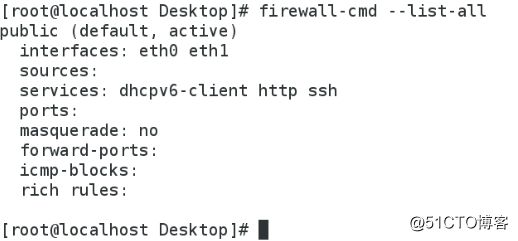
重启后临时修改失效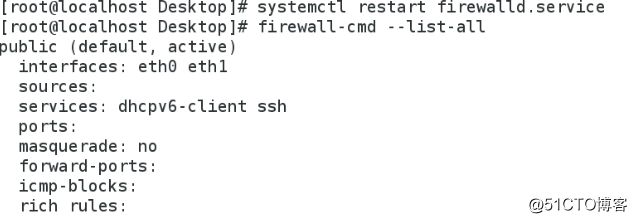
vim /var/www/html/index.xml
![]()
172.25.254.130![]()
测试:输入172.25.254.130
systemctl start httpd![]()

rpm -ql firewalld #软件信息![]()
vim /usr/lib/firewalld/services/http.xml #配置文件
[root@localhost ~]# cd /usr/lib/firewalld/
[root@localhost firewalld]# ls
icmptypes services zones
[root@localhost firewalld]# cd zones/
[root@localhost zones]# ls
block.xml drop.xml home.xml public.xml work.xml
dmz.xml external.xml internal.xml trusted.xml
[root@localhost zones]# vim /etc/firewalld/zones/public.xml #临时文件
添加的http服务文件存放在此![]()

四.使用命令行接口配置防火墙
[root@localhost zones]# firewall-cmd --state #火墙状态
running![]()
[root@localhost zones]# firewall-cmd --get-active-zones #正在生效的区域
ROL
sources: 172.25.0.252/32
public
interfaces: eth0 eth1
[root@localhost zones]# firewall-cmd --get-default-zone #默认区域
public ![]()
[root@localhost zones]# firewall-cmd --get-zones #火墙所有网络区域
ROL block dmz drop external home internal public trusted work![]()
root@localhost zones]# firewall-cmd --zone=public --list-all #指定public区域
public (default, active)
interfaces: eth0 eth1
sources:
services: dhcpv6-client ssh
ports:
masquerade: no
[root@localhost zones]# firewall-cmd --get-services #系统支持的服务
[root@localhost zones]# firewall-cmd --list-all-zones #所有区域网络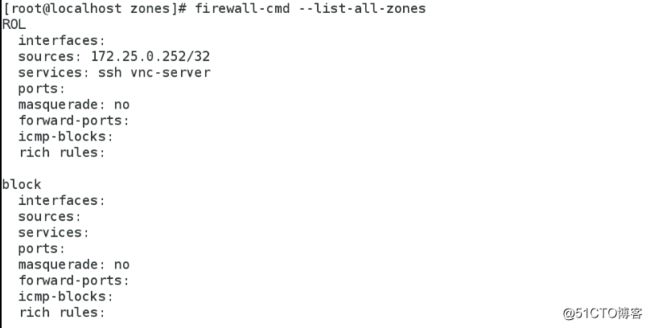
[root@localhost zones]# firewall-cmd --set-default-zone=dmz #设定区域
success![]()
[root@localhost zones]# firewall-cmd --list-all --zone=trusted
trusted![]()
[root@localhost zones]# ss -antlpe | grep httpd
[root@localhost zones]# firewall-cmd --add-service=http
success![]()
[root@localhost zones]# cd /usr/lib/firewalld/services/ #配置文件都是以.xml结尾的可扩展标记语言

[root@localhost services]# mv http.xml httpd.xml #修改文件名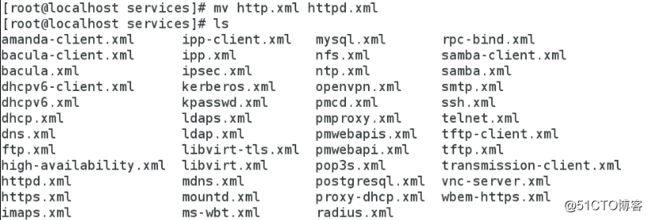
[root@localhost services]# firewall-cmd --permanent --add-port=80/tcp
success #添加80端口
[root@localhost services]# firewall-cmd --reload #重新加载
success
[root@localhost services]# cd /etc/firewalld/zones/
[root@localhost zones]# ls
dmz.xml public.xml ROL.xml
[root@localhost zones]# vim public.xml #删除文件中的写入的内容,重启服务

![]()
[root@localhost zones]# systemctl restart firewalld.service 
[root@localhost services]# firewall-cmd --permanent --add-port=22/tcp
success #添加22端口
[root@localhost services]# firewall-cmd --reload #重新加载
success![]()
firewall-cmd --list-all #端口22添加成功![]()
[root@localhost services]# firewall-cmd --permanent --remove-port=22/tcp
success #移除22端口
[root@localhost services]# firewall-cmd --reload #重新加载
success
vim public.xml #删除文件中所写内容,删除22端口![]()


[root@localhost zones]# firewall-cmd --set-default-zone=public #设置默认区域为public
success
[root@localhost zones]# firewall-cmd --get-active-zones #查看生效区域
ROL
sources: 172.25.0.252/32
public
interfaces: eth0 eth1
[root@localhost zones]# firewall-cmd --change-interface=eth1 --zone=trusted
success #更改eth1firewalld域为trusted![]()
[root@localhost zones]# firewall-cmd --get-active-zones
ROL
sources: 172.25.0.252/32
public
interfaces: eth0
trusted
interfaces: eth1
测试:172.25.60.130 #firewalld域为新任,可以访问http服务

172.25.254.130 #firewalld域为public不能访问http服务
souce
指定源地址,可以是一个ipv4/ipv6的地址或者网段,不支持使用主机名。
destination
指定目的地址,用法和souce相同。
service
服务名称是firewalld提供的其中一种服务。要获得被支持的服务的列表,输入以下命令:
firewall-cmd --get-services 命令为以下形式:
用ssh连接172.25.2.54.130这台主机

连上172.25.254.130可以执行命令![]()
firewall-cmd --permanent --add--source=172.25.254.60 --zone=block #把172.25.254.60加入黑名单

firewall-cmd --reload #重新加载火墙,阻止再次连接
已经连上的服务不终止
172.25.254.60连接失败![]()
firewall-cmd --complete-reload #完全的重新加载,阻止172.25.254.60再次连接,并且中断正在连接我的服务![]()
连接ssh服务失败![]()
正在连接172.25.254.130不能执行任何命令
firewall-cmd --permanent --remove-source=172.25.254.60 --zone=block #把172.25.254.60移出黑名单
firewall-cmd --reload #重新加载
再次连接成功

通过firewall-cmd 工具,可以使用 --direct选项在运行时间里增加或者移出链
[root@localhost ~]# firewall-cmd --direct --add-rule ipv4 filter INPUT 1 -s 172.25.254.60 -p tcp --dport 22 -j REJECT #filter表中插入ipput链第一条源地址是172.25.254.60访问我的22端口是拒绝的
filter表:input,output,forward
-s:来源地址 -d:目的地址 -p:协议 -dport:端口 -j:动作 REJRCT(拒绝)|ACCEPT(接受)|DROP(丢弃)![]()
测试:liks http://172.25.254.130![]()
![]()
irewall-cmd --direct --remove-rule ipv4 filter INPUT 1 -s 172.25.254.60 -p tcp --dport 22 -j REJECT #移除
firewall-cmd --direct --get-all-rules
端口转发:
[root@localhost ~]# firewall-cmd --add-forward-port=port=22:proto=tcp:toport=22:toaddr=172.25.254.60 #当访问我的22端口都转到172.25.254.60的22端口
success![]()

firewall-cmd --add-masquerade #打开规则里的ip伪装。
[root@localhost ~]# firewall-cmd --add-masquerade #打开规则里的ip伪装。用源地址而不是目的地址来把伪装限制在这个区域里。不允许指定动作。
success
[root@localhost ~]# sysctl -p
[root@localhost ~]# sysctl -a | grep ip_forward
net.ipv4.ip_forward = 1![]()

![]()
另一台主机设置ip、网关![]()


源地址伪装成功
[root@localhost ~]# systemctl stop firewalld.service #关闭火墙
[root@localhost ~]# systemctl disable firewalld.service #开机不自启
rm '/etc/systemd/system/basic.target.wants/firewalld.service'
rm '/etc/systemd/system/dbus-org.fedoraproject.FirewallD1.service'
[root@localhost ~]# systemctl mask firewalld #封锁火墙
ln -s '/dev/null' '/etc/systemd/system/firewalld.service'
五.iptables
1.安装:yum install iptables-service -y![]()
2.开启;systemctl start iptables![]()
3.[root@localhost ~]# systemctl enable iptables.service #开机自启![]()
[root@localhost ~]# iptables -nL #列出iptables表不做解析,不加t默认就是filter表 n:不做解析 L:列出
[root@localhost ~]# iptables -t filter -nL #t:table ![]()
[root@localhost ~]# iptables -F #刷新
[root@localhost ~]# iptables -t filter -nL![]()
[root@localhost ~]# service iptables save #保存
iptables: Saving firewall rules to /etc/sysconfig/iptables:[ OK ]![]()
[root@localhost ~]# vim /etc/sysconfig/iptables #配置文件![]()

[root@localhost ~]# systemctl restart iptables.service #重启服务![]()
![]()
[root@localhost ~]# iptables -A INPUT -i lo -j ACCEPT #A:默认在最后一条,i:进来的设备,j:动作 #从回环接口进来的数据接受![]()
[root@localhost ~]# iptables -A INPUT -p tcp --dport 80 -j ACCEPT #p:协议 dport:目的端口 80端口是访问apache 访问我的80端口接受![]()
[root@localhost ~]# iptables -P INPUT DROP #P:更改默认策略 其他的丢弃![]()
测试:
用一台主机访问我的22端口,丢弃![]()
当改为iptables -P INPUT ACCEPT #可访问
![]()
当改为iptables -P INPUT REJECT #拒绝![]()

连接172.25.254.130被拒绝
[kiosk@foundation60 Desktop]$ ssh [email protected]
ssh: connect to host 172.25.254.130 port 22: Connection refused![]()
iptables -A INPUT -p tcp --dport 22 -j ACCEPT #iptables从上往下读,当读到第三条REJUCT ALL就不读下面的了,所以该条不生效![]()

[kiosk@foundation60 Desktop]$ ssh [email protected]
ssh: connect to host 172.25.254.130 port 22: Connection refused![]()
ptables -D INPUT 4 #删除INPUT链第四条![]()

ptables -I INPUT 3 -p tcp --dport 22 -j ACCEPT #I:插入 插入到第三条![]()
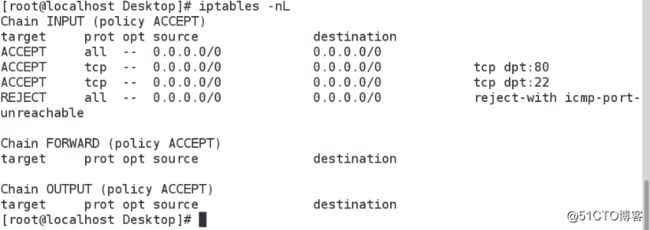
[kiosk@foundation60 Desktop]$ ssh [email protected]
The authenticity of host '172.25.254.130 (172.25.254.130)' can't be established.
ECDSA key fingerprint is eb:24:0e:07:96:26:b1:04:c2:37:0c:78:2d:bc:b0:08.
Are you sure you want to continue connecting (yes/no)?
22可以访问
[root@localhost ~]# service iptables save #保留生成的iptables策略
iptables: Saving firewall rules to /etc/sysconfig/iptables:[ OK ]
[root@localhost ~]# cat /etc/sysconfig/iptables #策略被保存在此文件中
Generated by iptables-save v1.4.21 on Mon Dec 4 06:09:11 2017
*filter
:INPUT ACCEPT [0:0]
:FORWARD ACCEPT [0:0]
:OUTPUT ACCEPT [588:49459]
-A INPUT -i lo -j ACCEPT
-A INPUT -p tcp -m tcp --dport 80 -j ACCEPT
-A INPUT -p tcp -m tcp --dport 22 -j ACCEPT
-A INPUT -j REJECT --reject-with icmp-port-unreachable
COMMIT
![]()
[root@localhost ~]# iptables -A INPUT -i lo -j ACCEPT
[root@localhost ~]# iptables -A INPUT -s 172.25.254.60 -p tcp --dport 22 -j ACCEPT
[root@localhost ~]# iptables -A INPUT -p tcp --dport 80 -j ACCEPT
[root@localhost ~]# iptables -A INPUT -j REJECT ![]()
[root@localhost ~]# iptables -nL
Chain INPUT (policy ACCEPT)
target prot opt source destination
ACCEPT all -- 0.0.0.0/0 0.0.0.0/0
ACCEPT tcp -- 0.0.0.0/0 0.0.0.0/0 tcp dpt:80
ACCEPT tcp -- 0.0.0.0/0 0.0.0.0/0 tcp dpt:22
REJECT all -- 0.0.0.0/0 0.0.0.0/0 reject-with icmp-port-unreachable
ACCEPT all -- 0.0.0.0/0 0.0.0.0/0
ACCEPT tcp -- 172.25.254.60 0.0.0.0/0 tcp dpt:22
ACCEPT tcp -- 0.0.0.0/0 0.0.0.0/0 tcp dpt:80
REJECT all -- 0.0.0.0/0 0.0.0.0/0 reject-with icmp-port-unreachable
[root@localhost ~]# iptables -D INPUT -p tcp --dport 80 -j ACCEPT #删除也是从上向下读取![]()
[root@localhost ~]# iptables -nL
Chain INPUT (policy ACCEPT)
target prot opt source destination
ACCEPT all -- 0.0.0.0/0 0.0.0.0/0
ACCEPT tcp -- 0.0.0.0/0 0.0.0.0/0 tcp dpt:22
REJECT all -- 0.0.0.0/0 0.0.0.0/0 reject-with icmp-port-unreachable
ACCEPT all -- 0.0.0.0/0 0.0.0.0/0
ACCEPT tcp -- 172.25.254.60 0.0.0.0/0 tcp dpt:22
ACCEPT tcp -- 0.0.0.0/0 0.0.0.0/0 tcp dpt:80
REJECT all -- 0.0.0.0/0 0.0.0.0/0 reject-with icmp-port-unreachable
[root@localhost ~]# iptables -D INPUT -p tcp --dport 80 -j ACCEPT
[root@localhost ~]# iptables -nL
Chain INPUT (policy ACCEPT)
target prot opt source destination
ACCEPT all -- 0.0.0.0/0 0.0.0.0/0
ACCEPT tcp -- 0.0.0.0/0 0.0.0.0/0 tcp dpt:22
REJECT all -- 0.0.0.0/0 0.0.0.0/0 reject-with icmp-port-unreachable
ACCEPT all -- 0.0.0.0/0 0.0.0.0/0
ACCEPT tcp -- 172.25.254.60 0.0.0.0/0 tcp dpt:22
REJECT all -- 0.0.0.0/0 0.0.0.0/0 reject-with icmp-p![]()
![]()
[root@localhost ~]# iptables -I INPUT 1 -p tcp --dport 80 -j ACCEPT #添加到filter表第一条接受80端口数据
[root@localhost ~]# iptables -A INPUT -p tcp --dport 80 -j ACCEPT #插入到最后一条允许访问80端口![]()
[root@localhost ~]# iptables -nL
Chain INPUT (policy ACCEPT)
target prot opt source destination
ACCEPT tcp -- 0.0.0.0/0 0.0.0.0/0 tcp dpt:80
ACCEPT all -- 0.0.0.0/0 0.0.0.0/0
ACCEPT tcp -- 0.0.0.0/0 0.0.0.0/0 tcp dpt:22
REJECT all -- 0.0.0.0/0 0.0.0.0/0 reject-with icmp-port-unreachable
ACCEPT all -- 0.0.0.0/0 0.0.0.0/0
ACCEPT tcp -- 172.25.254.60 0.0.0.0/0 tcp dpt:22
REJECT all -- 0.0.0.0/0 0.0.0.0/0 reject-with icmp-port-unreachable
ACCEPT tcp -- 0.0.0.0/0 0.0.0.0/0 tcp dpt:80
[root@localhost ~]# iptables -D INPUT 8 #删除第八条![]()
[root@localhost ~]# iptables -nL
Chain INPUT (policy ACCEPT)
target prot opt source destination
ACCEPT tcp -- 0.0.0.0/0 0.0.0.0/0 tcp dpt:80
ACCEPT all -- 0.0.0.0/0 0.0.0.0/0
ACCEPT tcp -- 0.0.0.0/0 0.0.0.0/0 tcp dpt:22
REJECT all -- 0.0.0.0/0 0.0.0.0/0 reject-with icmp-port-unreachable
ACCEPT all -- 0.0.0.0/0 0.0.0.0/0
ACCEPT tcp -- 172.25.254.60 0.0.0.0/0 tcp dpt:22
REJECT all -- 0.0.0.0/0 0.0.0.0/0 reject-with icmp-p![]()
root@localhost ~]# iptables -nL | grep -E "INPUT|target" -v | cat -b #附加链条数
1 ACCEPT tcp -- 0.0.0.0/0 0.0.0.0/0 tcp dpt:80
2 ACCEPT all -- 0.0.0.0/0 0.0.0.0/0
3 ACCEPT tcp -- 0.0.0.0/0 0.0.0.0/0 tcp dpt:22
4 REJECT all -- 0.0.0.0/0 0.0.0.0/0 reject-with icmp-port-unreachable
5 ACCEPT all -- 0.0.0.0/0 0.0.0.0/0
6 ACCEPT tcp -- 172.25.254.60 0.0.0.0/0 tcp dpt:22
7 REJECT all -- 0.0.0.0/0 0.0.0.0/0 reject-with icmp-port-unreachable
8 Chain FORWARD (policy ACCEPT)
9 Chain OUTPUT (policy ACCEPT)

[root@localhost ~]# iptables -R INPUT 1 -p tcp --dport 80 -j REJECT #R:修改规则,把第一条规则修改为访问我的80端口拒绝[root@localhost ~]# iptables -nL
Chain INPUT (policy ACCEPT)
target prot opt source destination
REJECT tcp -- 0.0.0.0/0 0.0.0.0/0 tcp dpt:80 reject-with icmp-port-unreachable
ACCEPT all -- 0.0.0.0/0 0.0.0.0/0
ACCEPT tcp -- 0.0.0.0/0 0.0.0.0/0 tcp dpt:22
REJECT all -- 0.0.0.0/0 0.0.0.0/0 reject-with icmp-port-unreachable
ACCEPT all -- 0.0.0.0/0 0.0.0.0/0
ACCEPT tcp -- 172.25.254.60 0.0.0.0/0 tcp dpt:22
REJECT all -- 0.0.0.0/0 0.0.0.0/0 reject-with icmp-port-unreachable![]()

[root@localhost ~]# iptables -N WESTOS #新建链 WESTOS
[root@localhost ~]# iptables -nL
Chain INPUT (policy ACCEPT)
target prot opt source destination
REJECT tcp -- 0.0.0.0/0 0.0.0.0/0 tcp dpt:80 reject-with icmp-port-unreachable
ACCEPT all -- 0.0.0.0/0 0.0.0.0/0
ACCEPT tcp -- 0.0.0.0/0 0.0.0.0/0 tcp dpt:22
REJECT all -- 0.0.0.0/0 0.0.0.0/0 reject-with icmp-port-unreachable
ACCEPT all -- 0.0.0.0/0 0.0.0.0/0
ACCEPT tcp -- 172.25.254.60 0.0.0.0/0 tcp dpt:22
REJECT all -- 0.0.0.0/0 0.0.0.0/0 reject-with icmp-port-unreachable
Chain FORWARD (policy ACCEPT)
target prot opt source destination
Chain OUTPUT (policy ACCEPT)
target prot opt source destination
Chain WESTOS (0 references)
target prot opt source destination ![]()

[root@localhost ~]# iptables -E WESTOS linux #修改附加链名称
[root@localhost ~]# iptables -nL
Chain INPUT (policy ACCEPT)
target prot opt source destination
REJECT tcp -- 0.0.0.0/0 0.0.0.0/0 tcp dpt:80 reject-with icmp-port-unreachable
ACCEPT all -- 0.0.0.0/0 0.0.0.0/0
ACCEPT tcp -- 0.0.0.0/0 0.0.0.0/0 tcp dpt:22
REJECT all -- 0.0.0.0/0 0.0.0.0/0 reject-with icmp-port-unreachable
ACCEPT all -- 0.0.0.0/0 0.0.0.0/0
ACCEPT tcp -- 172.25.254.60 0.0.0.0/0 tcp dpt:22
REJECT all -- 0.0.0.0/0 0.0.0.0/0 reject-with icmp-port-unreachable
Chain FORWARD (policy ACCEPT)
target prot opt source destination
Chain OUTPUT (policy ACCEPT)
target prot opt source destination
Chain linux (0 references)
target prot opt source destination ![]()
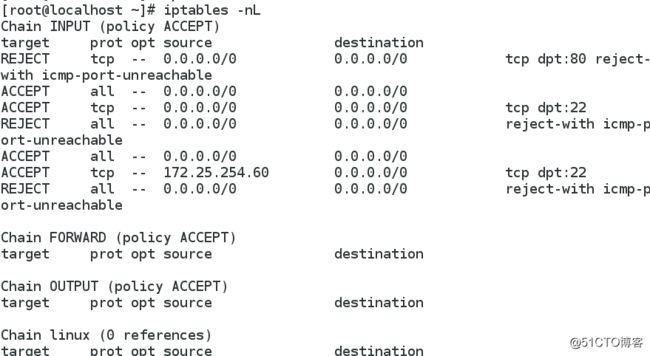
[root@localhost ~]# iptables -X linux #删除链
[root@localhost ~]# iptables -nL
Chain INPUT (policy ACCEPT)
target prot opt source destination
REJECT tcp -- 0.0.0.0/0 0.0.0.0/0 tcp dpt:80 reject-with icmp-port-unreachable
ACCEPT all -- 0.0.0.0/0 0.0.0.0/0
ACCEPT tcp -- 0.0.0.0/0 0.0.0.0/0 tcp dpt:22
REJECT all -- 0.0.0.0/0 0.0.0.0/0 reject-with icmp-port-unreachable
ACCEPT all -- 0.0.0.0/0 0.0.0.0/0
ACCEPT tcp -- 172.25.254.60 0.0.0.0/0 tcp dpt:22
REJECT all -- 0.0.0.0/0 0.0.0.0/0 reject-with ![]()

[root@localhost ~]# iptables -P INPUT DROP #修改默认规则为DROP
[root@localhost ~]# iptables -nL
Chain INPUT (policy DROP)
target prot opt source destination
REJECT tcp -- 0.0.0.0/0 0.0.0.0/0 tcp dpt:80 reject-with icmp-port-unreachable
ACCEPT all -- 0.0.0.0/0 0.0.0.0/0
ACCEPT tcp -- 0.0.0.0/0 0.0.0.0/0 tcp dpt:22
REJECT all -- 0.0.0.0/0 0.0.0.0/0 reject-with icmp-port-unreachable
ACCEPT all -- 0.0.0.0/0 0.0.0.0/0
ACCEPT tcp -- 172.25.254.60 0.0.0.0/0 tcp dpt:22
REJECT all -- 0.0.0.0/0 0.0.0.0/0 reject-with icm
![]()
![]()
[root@localhost ~]# iptables -F
[root@localhost ~]# iptables -nL
Chain INPUT (policy ACCEPT)
target prot opt source destination
Chain FORWARD (policy ACCEPT)
target prot opt source destination
Chain OUTPUT (policy ACCEPT)
target prot opt source destination ![]()
![]()

[root@localhost ~]# service iptables save
iptables: Saving firewall rules to /etc/sysconfig/iptables:[ OK ]![]()
[root@localhost ~]# iptables -A INPUT -m state --state ESTABLISHED,RELATED -j ACCEPT #m:状态 当访问我的状态是正在访问或是访问过我的可以接受访问
[root@localhost ~]# iptables -nL
Chain INPUT (policy ACCEPT)
target prot opt source destination
ACCEPT all -- 0.0.0.0/0 0.0.0.0/0 state RELATED,ESTABLISHED![]()

[root@localhost ~]# iptables -A INPUT -m state --state NEW -i lo -j ACCEPT #当从回环接口进来的数据状态是新的接受![]()
[root@localhost ~]# iptables -A INPUT -m state --state NEW -p tcp --dport 22 -j ACCEPT #当访问我的22端口状态是新的接受![]()
[root@localhost ~]# iptables -A INPUT -m state --state NEW -p tcp --dport 80 -j ACCEPT #当访问我的80端口状态是新的接受访问![]()
[root@localhost ~]# iptables -A INPUT -j REJECT #其他访问拒绝![]()
[root@localhost ~]# iptables -nL
Chain INPUT (policy ACCEPT)
target prot opt source destination
ACCEPT all -- 0.0.0.0/0 0.0.0.0/0 state RELATED,ESTABLISHED
ACCEPT all -- 0.0.0.0/0 0.0.0.0/0 state NEW
ACCEPT tcp -- 0.0.0.0/0 0.0.0.0/0 state NEW tcp dpt:22
ACCEPT tcp -- 0.0.0.0/0 0.0.0.0/0 state NEW tcp dpt:80
REJECT all -- 0.0.0.0/0 0.0.0.0/0 reject-with icmp-port-un![]()
[root@localhost ~]# iptables -t nat -A POSTROUTING -o eth0 -j SNAT --to-source 172.25.254.130 #从eth0出去的数据都转成172.25.254.130这个ip出去![]()
[root@localhost ~]# sysctl -a | grep ip_forward #iptables默认路由功能未打开,1表示打开,若未打开,编辑文件
net.ipv4.ip_forward = 1
[root@localhost ~]# vim /etc/sysctl.conf #编辑该文件net.ipv4.ip_forward = 1打开路由功能
![]()
[root@localhost ~]# iptables -t nat -nL
[root@localhost ~]# ssh [email protected]
[email protected]'s password:
Last login: Mon Dec 4 20:36:10 2017 from 172.25.254.130
[root@foundation60 ~]# w
20:39:49 up 3:57, 5 users, load average: 0.06, 0.08, 0.12
USER TTY FROM LOGIN@ IDLE JCPU PCPU WHAT
kiosk :0 :0 16:43 ?xdm? 19:27 0.21s gdm-session-worker [pa
kiosk pts/0 :0 17:31 25:17 20.82s 0.48s vim iptables
kiosk pts/2 :0 20:26 2:13 0.03s 0.03s /bin/bash
kiosk pts/3 :0 17:56 5.00s 9.46s 0.18s ssh [email protected]
root pts/5 172.25.254.130(从eth0出去的都以172.25.254.130出去的) 20:39 4.00s 0.02s 0.00s w


[root@localhost ~]# iptables -t nat -A PREROUTING -i eth0 -d 172.25.254.130 -j DNAT --to-dest 172.25.60.1 #从eth0网卡以172.25.254.130进来的数据目的地址172.25.60.1![]()
[root@localhost ~]# iptables -t nat -nL
Chain PREROUTING (policy ACCEPT)
target prot opt source destination
DNAT all -- 0.0.0.0/0 172.25.254.130 to:172.25.60.1
Chain INPUT (policy ACCEPT)
target prot opt source destination
Chain OUTPUT (policy ACCEPT)
target prot opt source destination
Chain POSTROUTING (policy ACCEPT)
target prot opt source destination
SNAT all -- 0.0.0.0/0 0.0.0.0/0 to:172.25.254.130
ssh连接时,转到172.25.60.1![]()
本文转自Uniqueh51CTO博客,原文链接: http://blog.51cto.com/13363488/2048096,如需转载请自行联系原作者


