小猪的Android入门之路 Day 9 part 1
Android四大组件之——Service浅析
——转账请注明出处:coder-pig
本节引言:
在前面的学习中我们已经把安卓四个基本组件中的两个:
Actvity(活动)和BroadCastReceiver过了一遍,而在Day 9中我们会对第三个组件Service进行
解析,两种类型的Service,Service的生命周期,如何去使用Service,声明Service,调用,停止Service;
跨进程调用AIDL,以及常用的系统服务的使用!好了,引言就说到这里,接着开始本节的内容!
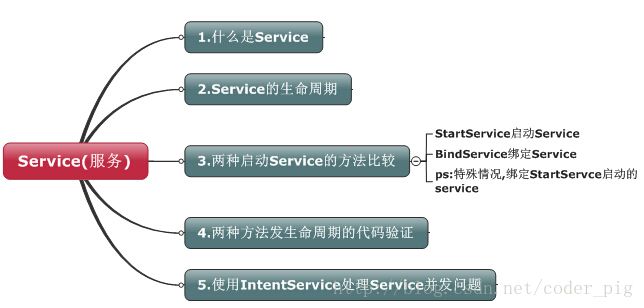
本节学习路线图:
正文:
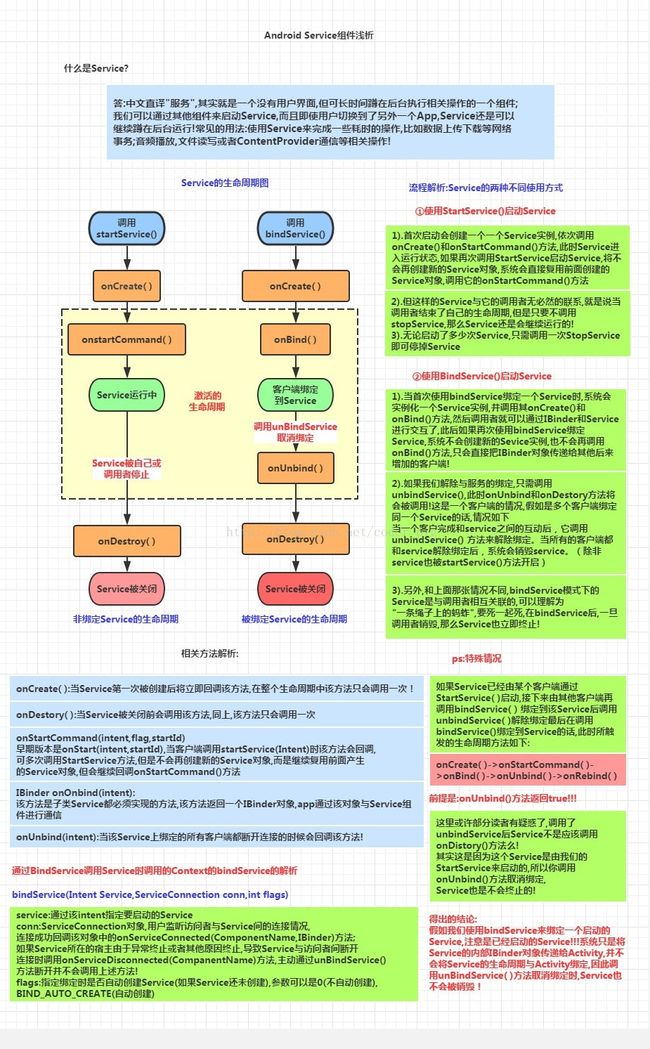
Service简介与生命周期图解析:
代码验证生命周期图:
1.验证StartService启动Service的调用顺序:
首先我们自定义一个Service,重写相关的方法,用户在logcat上打印验证:
TestService1.java
- package com.jay.example.servicetestdemo1;
- import android.app.Service;
- import android.content.Intent;
- import android.os.IBinder;
- import android.util.Log;
- public class TestService1 extends Service {
- private final String TAG = "TestService1";
- //必须要实现的方法
- @Override
- public IBinder onBind(Intent intent) {
- Log.i(TAG, "onBind方法被调用!");
- return null;
- }
- //Service被创建时调用
- @Override
- public void onCreate() {
- Log.i(TAG, "onCreate方法被调用!");
- super.onCreate();
- }
- //Service被启动时调用
- @Override
- public int onStartCommand(Intent intent, int flags, int startId) {
- Log.i(TAG, "onStartCommand方法被调用!");
- return super.onStartCommand(intent, flags, startId);
- }
- //Service被关闭之前回调
- @Override
- public void onDestroy() {
- Log.i(TAG, "onDestory方法被调用!");
- super.onDestroy();
- }
- }
接着在AndroidManifest.xml完成Service组件的注册:
- <service android:name=".TestService1">
- <intent-filter>
- <action android:name="com.jay.example.service.TEST_SERVICE1"/>
- intent-filter>
- service>
再接着是简单的布局文件,两个按钮,再最后是MainActivity的编写,在按钮的点击事件中分别
调用startService( )和stopService( )!
- package com.jay.example.servicetestdemo1;
- import android.app.Activity;
- import android.content.Intent;
- import android.os.Bundle;
- import android.view.View;
- import android.view.View.OnClickListener;
- import android.widget.Button;
- public class MainActivity extends Activity {
- private Button start;
- private Button stop;
- @Override
- protected void onCreate(Bundle savedInstanceState) {
- super.onCreate(savedInstanceState);
- setContentView(R.layout.activity_main);
- start = (Button) findViewById(R.id.btnstart);
- stop = (Button) findViewById(R.id.btnstop);
- //创建启动Service的Intent,以及Intent属性
- final Intent intent = new Intent();
- intent.setAction("com.jay.example.service.TEST_SERVICE1");
- //为两个按钮设置点击事件,分别是启动与停止service
- start.setOnClickListener(new OnClickListener() {
- @Override
- public void onClick(View v) {
- startService(intent);
- }
- });
- stop.setOnClickListener(new OnClickListener() {
- @Override
- public void onClick(View v) {
- stopService(intent);
- }
- });
- }
- }
运行截图:
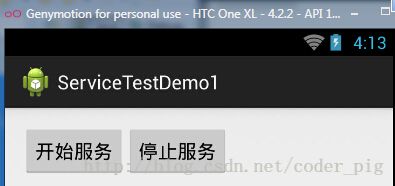
点击开始服务:

吃饱饭没事做,点多几下:

最后点击停止服务:
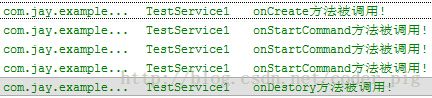
从上面的运行结果我们可以验证我们生命周期图中解释的内容:
我们发现onBind()方法并没有被调用,另外多次点击启动Service,只会重复地调用
onStartCommand方法!无论我们启动多少次Service,一个stopService就会停止
Service!
2.验证BindService启动Service的顺序:
在开始讲写代码之前,我们先要来了解一些东西先:
首先是第一个大图下面给出的Context的bindService方法
①ServiceConnection对象:监听访问者与Service间的连接情况,如果成功连接,回调
onServiceConnected(),如果异常终止或者其他原因终止导致Service与访问者断开
连接则回调onServiceDisconnected方法,调用unBindService()不会调用该方法!
②onServiceConnected方法中有一个IBinder对象,该对象即可实现与被绑定Service
之间的通信!我们再开发Service类时,默认需要实现IBinder onBind()方法,该方法返回的
IBinder对象会传到ServiceConnection对象中的onServiceConnected的参数,我们就可以
在这里通过这个IBinder与Service进行通信!
总结:
step 1:在自定义的Service中继承Binder,实现自己的IBinder对象
step 2:通过onBind( )方法返回自己的IBinder对象
step 3:在绑定该Service的类中定义一个ServiceConnection对象,重写两个方法,
onServiceConnected和onDisconnected!然后直接读取IBinder传递过来的参数即可!
那么好了,接下来就是写代码验证了,这里的话我们定义一个用来计时的Service,
然后来演示BindService的用法以及方法调用流程!代码比较简单,不解释了!
TestService2.java:
- package com.jay.example.servicetestdemo2;
- import android.app.Service;
- import android.content.Intent;
- import android.os.Binder;
- import android.os.IBinder;
- import android.util.Log;
- public class TestService2 extends Service {
- private final String TAG = "TestService2";
- private int count;
- private boolean quit;
- //定义onBinder方法所返回的对象
- private MyBinder binder = new MyBinder();
- public class MyBinder extends Binder
- {
- public int getCount()
- {
- return count;
- }
- }
- //必须实现的方法,绑定改Service时回调该方法
- @Override
- public IBinder onBind(Intent intent) {
- Log.i(TAG, "onBind方法被调用!");
- return binder;
- }
- //Service被创建时回调
- @Override
- public void onCreate() {
- super.onCreate();
- Log.i(TAG, "onCreate方法被调用!");
- //创建一个线程动态地修改count的值
- new Thread()
- {
- public void run()
- {
- while(!quit)
- {
- try
- {
- Thread.sleep(1000);
- }catch(InterruptedException e){e.printStackTrace();}
- count++;
- }
- };
- }.start();
- }
- //Service断开连接时回调
- @Override
- public boolean onUnbind(Intent intent) {
- Log.i(TAG, "onUnbind方法被调用!");
- return true;
- }
- //Service被关闭前回调
- @Override
- public void onDestroy() {
- super.onDestroy();
- this.quit = true;
- Log.i(TAG, "onDestroyed方法被调用!");
- }
- @Override
- public void onRebind(Intent intent) {
- Log.i(TAG, "onRebind方法被调用!");
- super.onRebind(intent);
- }
- }
需要在AndroidManifest.xml中对Service组件进行注册:
- <service android:name=".TestService2" android:exported="false">
- <intent-filter>
- <action android:name="com.jay.example.service.TEST_SERVICE2"/>
- intent-filter>
- service>
MainActivity.java
- package com.jay.example.servicetestdemo2;
- import com.jay.example.servicetestdemo2.TestService2.MyBinder;
- import android.app.Activity;
- import android.app.Service;
- import android.content.ComponentName;
- import android.content.Intent;
- import android.content.ServiceConnection;
- import android.os.Bundle;
- import android.os.IBinder;
- import android.view.View;
- import android.view.View.OnClickListener;
- import android.widget.Button;
- import android.widget.Toast;
- public class MainActivity extends Activity {
- private Button btnbind;
- private Button btncancel;
- private Button btnstatus;
- //保持所启动的Service的IBinder对象,同时定义一个ServiceConnection对象
- TestService2.MyBinder binder;
- private ServiceConnection conn = new ServiceConnection() {
- //Activity与Service断开连接时回调该方法
- @Override
- public void onServiceDisconnected(ComponentName name) {
- System.out.println("------Service DisConnected-------");
- }
- //Activity与Service连接成功时回调该方法
- @Override
- public void onServiceConnected(ComponentName name, IBinder service) {
- System.out.println("------Service Connected-------");
- binder = (TestService2.MyBinder) service;
- }
- };
- @Override
- protected void onCreate(Bundle savedInstanceState) {
- super.onCreate(savedInstanceState);
- setContentView(R.layout.activity_main);
- btnbind = (Button) findViewById(R.id.btnbind);
- btncancel = (Button) findViewById(R.id.btncancel);
- btnstatus = (Button) findViewById(R.id.btnstatus);
- final Intent intent = new Intent();
- intent.setAction("com.jay.example.service.TEST_SERVICE2");
- btnbind.setOnClickListener(new OnClickListener() {
- @Override
- public void onClick(View v) {
- //绑定service
- bindService(intent, conn, Service.BIND_AUTO_CREATE);
- }
- });
- btncancel.setOnClickListener(new OnClickListener() {
- @Override
- public void onClick(View v) {
- //解除service绑定
- unbindService(conn);
- }
- });
- btnstatus.setOnClickListener(new OnClickListener() {
- @Override
- public void onClick(View v) {
- Toast.makeText(getApplicationContext(), "Service的count的值为:"
- + binder.getCount(), Toast.LENGTH_SHORT).show();
- }
- });
- }
- }
运行截图:
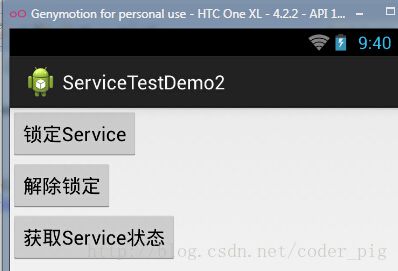
点击锁定Service:
继续点击锁定:没任何变化
获取当前Service的状态:

解除绑定:
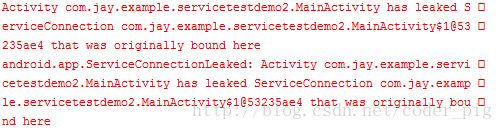
如果我们再绑定后直接关掉Activity的话会报错,
然后会自动调用onUnbind和onDestory方法!
。。。

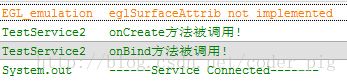
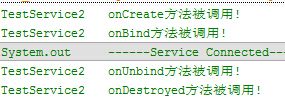
从上面的运行结果验证了生命周期图中的:
使用BindService绑定Service,依次调用onCreate(),onBind()方法,我们可以在onBind()方法中
返回自定义的IBinder对象;再接着调用的是ServiceConnection的onServiceConnected()方法
该方法中可以获得IBinder对象,从而进行相关操作;当Service解除绑定后会自动调用onUnbind和
onDestroyed方法,当然绑定多客户端情况需要解除所有的绑定才会调用onDestoryed方法进行销毁哦!
IntentService的使用:
上面已经学习了Service的用法,现在我们已经知道如何去定义和启动自己的Service了!
但是从上面的bindService的例子中,发现了一个问题,就是我们直接把耗时线程放在了
Service中的onStart( )方法中,网上很多都是直接这样做!但是这样容易引发ANR异常
(Application Not Responding),而Android的官方是这样介绍Service的:
1.A Service is not a separate process. The Service object itself does not imply it is running
in its own process; unless otherwise specified, it runs in the same process as the application it is part of.
2.A Service is not a thread. It is not a means itself to do work off of the main thread
(to avoid Application Not Responding errors).
直接翻译就是:
1.Service不是一个单独的进程,它和它的应用程序在同一个进程中
2.Service不是一个线程,这样就意味着我们应该避免在Service中进行耗时操作
于是乎肯定是有替代Service的东西啦,那就是我们要讲的IntentService
IntentService是继承与Service并处理异步请求的一个类,在IntentService中有
一个工作线程来处理耗时操作,请求的Intent记录会加入队列
工作流程:
客户端通过startService(Intent)来启动IntentService;
我们并不需要手动地区控制IntentService,当任务执行完后,IntentService会自动停止;
可以启动IntentService多次,每个耗时操作会以工作队列的方式在IntentService的
onHandleIntent回调方法中执行,并且每次只会执行一个工作线程,执行完一,再到二这样!
总结使用IntentService的原因:
1)无需在Service中手动地去开辟线程
2)无需手动停止Service,当操作完成时,Service会自动停止
3)简单的使用方式
再接着是代码演示,网上大部分的代码都是比较Service与IntentService的,定义足够长的
休眠时间,演示Service的ANR异常,然后引出IntentService有多好!
这里就不演示Service了,网上的都是自定义Service,然后在onStart()方法中Thread.sleep(20000)
然后引发ANR异常,有兴趣的可以自己写代码试试,这里的话只演示下IntentService的用法
首先自定义一个Service,继承IntentService,重写核心方法onHandleIntent,在这里完成耗时操作
接着重写其他方法,添加log.i用于查看方法的调用顺序!
TestService3.java
- package com.com.example.testservice3;
- import android.app.IntentService;
- import android.content.Intent;
- import android.os.IBinder;
- import android.util.Log;
- public class TestService3 extends IntentService {
- private final String TAG = "hehe";
- //必须实现父类的构造方法
- public TestService3()
- {
- super("TestService3");
- }
- //必须重写的核心方法
- @Override
- protected void onHandleIntent(Intent intent) {
- //Intent是从Activity发过来的,携带识别参数,根据参数不同执行不同的任务
- String action = intent.getExtras().getString("param");
- if(action.equals("s1"))Log.i(TAG,"启动service1");
- else if(action.equals("s2"))Log.i(TAG,"启动service2");
- else if(action.equals("s3"))Log.i(TAG,"启动service3");
- //让服务休眠2秒
- try{
- Thread.sleep(2000);
- }catch(InterruptedException e){e.printStackTrace();}
- }
- //重写其他方法,用于查看方法的调用顺序
- @Override
- public IBinder onBind(Intent intent) {
- Log.i(TAG,"onBind");
- return super.onBind(intent);
- }
- @Override
- public void onCreate() {
- Log.i(TAG,"onCreate");
- super.onCreate();
- }
- @Override
- public int onStartCommand(Intent intent, int flags, int startId) {
- Log.i(TAG,"onStartCommand");
- return super.onStartCommand(intent, flags, startId);
- }
- @Override
- public void setIntentRedelivery(boolean enabled) {
- super.setIntentRedelivery(enabled);
- Log.i(TAG,"setIntentRedelivery");
- }
- @Override
- public void onDestroy() {
- Log.i(TAG,"onDestroy");
- super.onDestroy();
- }
- }
接着记得到AndroidManifest中注册小Service组件哦,不然Service是没响应的哦!
- <service android:name=".TestService3" android:exported="false">
- <intent-filter >
- <action android:name="com.test.intentservice"/>
- intent-filter>
- service>
最后在MainActivity中启动三次服务
- package com.com.example.testservice3;
- import android.app.Activity;
- import android.content.Intent;
- import android.os.Bundle;
- import android.view.Menu;
- import android.view.MenuItem;
- public class MainActivity extends Activity {
- @Override
- protected void onCreate(Bundle savedInstanceState) {
- super.onCreate(savedInstanceState);
- setContentView(R.layout.activity_main);
- Intent it1 = new Intent("com.test.intentservice");
- Bundle b1 = new Bundle();
- b1.putString("param", "s1");
- it1.putExtras(b1);
- Intent it2 = new Intent("com.test.intentservice");
- Bundle b2 = new Bundle();
- b2.putString("param", "s2");
- it2.putExtras(b2);
- Intent it3 = new Intent("com.test.intentservice");
- Bundle b3 = new Bundle();
- b3.putString("param", "s3");
- it3.putExtras(b3);
- //接着启动多次IntentService,每次启动,都会新建一个工作线程
- //但始终只有一个IntentService实例
- startService(it1);
- startService(it2);
- startService(it3);
- }
- }
然后看下运行的截图:
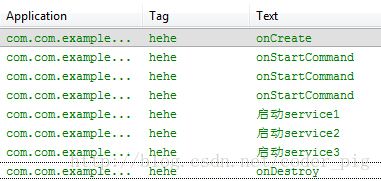
好了,最后总结下,当一个后台的任务,需要分成几个子任务,然后按先后顺序执行,子任务
(简单的说就是异步操作),此时如果我们还是定义一个普通Service然后在onStart方法中
开辟线程,然后又要去控制线程,这样显得非常的繁琐;
此时应该自定义一个IntentService然后再onHandleIntent()方法中完成相关任务!
本节参考代码下载:
1)验证StartService生命周期:点击下载
2)验证BindService生命周期:点击下载
3)IntentService的简单使用:点击下载