【Unity&2D&Sprite&描边&特效&Shader】2D2.5D像素图片描边特效实现
今天偶然在网上找到一个解决 2D2.5D像素图片描边特效实现 的文章,
原文地址在 参考资料 1 里面,里面讲到如何使用他的方法 十分详细,本文不再赘述。Unity 5.5.0P4
那么 这个 描边,是否会影响 图片的显示,已经设置好的。和 Uniy的2D精灵的层级有关。
意思是如果 A精灵加上描边,如何显示在 B精灵加上描边 前面,取决于sorting layer,等渲染层级。(改变渲染层级 代码传送门)
本文讲使用他的方法以后,的实现,以及一些问题
------------------------------------------------------------------------原文Shader代码
Shader "Sprites/Outline"
{
    Properties
    {
        [PerRendererData] _MainTex ("Sprite Texture", 2D) = "white" {}
        _Color ("Tint", Color) = (1,1,1,1)
        [MaterialToggle] PixelSnap ("Pixel snap", Float) = 0

        // Add values to determine if outlining is enabled and outline color.
        [PerRendererData] _Outline ("Outline", Float) = 0
        [PerRendererData] _OutlineColor("Outline Color", Color) = (1,1,1,1)
    }

    SubShader
    {
        Tags
        {
            "Queue"="Transparent"
            "IgnoreProjector"="True"
            "RenderType"="Transparent"
            "PreviewType"="Plane"
            "CanUseSpriteAtlas"="True"
        }

        Cull Off
        Lighting Off
        ZWrite Off
        Blend One OneMinusSrcAlpha

        Pass
        {
            CGPROGRAM
            #pragma vertex vert
            #pragma fragment frag
            #pragma multi_compile _ PIXELSNAP_ON
            #pragma shader_feature ETC1_EXTERNAL_ALPHA
            #include "UnityCG.cginc"

            struct appdata_t
            {
                float4 vertex   : POSITION;
                float4 color    : COLOR;
                float2 texcoord : TEXCOORD0;
            };

            struct v2f
            {
                float4 vertex   : SV_POSITION;
                fixed4 color    : COLOR;
                float2 texcoord  : TEXCOORD0;
            };

            fixed4 _Color;
            float _Outline;
            fixed4 _OutlineColor;

            v2f vert(appdata_t IN)
            {
                v2f OUT;
                OUT.vertex = mul(UNITY_MATRIX_MVP, IN.vertex);
                OUT.texcoord = IN.texcoord;
                OUT.color = IN.color * _Color;
                #ifdef PIXELSNAP_ON
                OUT.vertex = UnityPixelSnap (OUT.vertex);
                #endif

                return OUT;
            }

            sampler2D _MainTex;
            sampler2D _AlphaTex;
            float4 _MainTex_TexelSize;

            fixed4 SampleSpriteTexture (float2 uv)
            {
                fixed4 color = tex2D (_MainTex, uv);

                #if ETC1_EXTERNAL_ALPHA
                // get the color from an external texture (usecase: Alpha support for ETC1 on android)
                color.a = tex2D (_AlphaTex, uv).r;
                #endif //ETC1_EXTERNAL_ALPHA

                return color;
            }

            fixed4 frag(v2f IN) : SV_Target
            {
                fixed4 c = SampleSpriteTexture (IN.texcoord) * IN.color;

                // If outline is enabled and there is a pixel, try to draw an outline.
                if (_Outline > 0 && c.a != 0) {
                    // Get the neighbouring four pixels.
                    fixed4 pixelUp = tex2D(_MainTex, IN.texcoord + fixed2(0, _MainTex_TexelSize.y));
                    fixed4 pixelDown = tex2D(_MainTex, IN.texcoord - fixed2(0, _MainTex_TexelSize.y));
                    fixed4 pixelRight = tex2D(_MainTex, IN.texcoord + fixed2(_MainTex_TexelSize.x, 0));
                    fixed4 pixelLeft = tex2D(_MainTex, IN.texcoord - fixed2(_MainTex_TexelSize.x, 0));

                    // If one of the neighbouring pixels is invisible, we render an outline.
                    if (pixelUp.a * pixelDown.a * pixelRight.a * pixelLeft.a == 0) {
                        c.rgba = fixed4(1, 1, 1, 1) * _OutlineColor;
                    }
                }

                c.rgb *= c.a;

                return c;
            }
            ENDCG
        }
    }
}
------------------------------------------------------------------------原文脚本代码
using UnityEngine;

[ExecuteInEditMode]
public class SpriteOutline : MonoBehaviour {
    public Color color = Color.white;

    private SpriteRenderer spriteRenderer;

    void OnEnable() {
        spriteRenderer = GetComponent();

        UpdateOutline(true);
    }

    void OnDisable() {
        UpdateOutline(false);
    }

    void Update() {
        UpdateOutline(true);
    }

    void UpdateOutline(bool outline) {
        MaterialPropertyBlock mpb = new MaterialPropertyBlock();
        spriteRenderer.GetPropertyBlock(mpb);
        mpb.SetFloat("_Outline", outline ? 1f : 0);
        mpb.SetColor("_OutlineColor", color);
        spriteRenderer.SetPropertyBlock(mpb);
    }
}
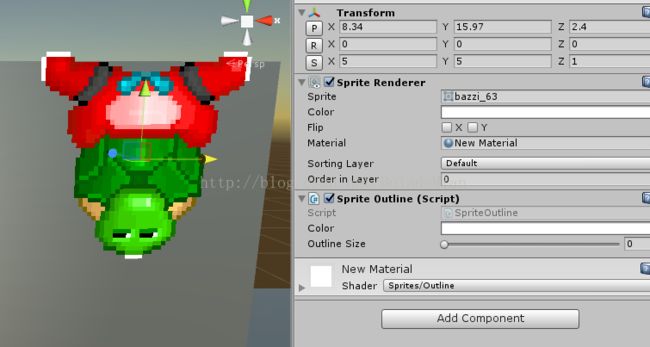
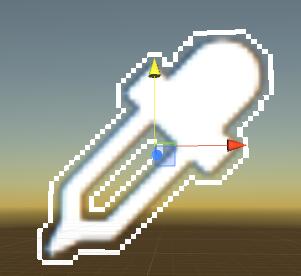
------------------------------------------------------------------------使用之后的效果

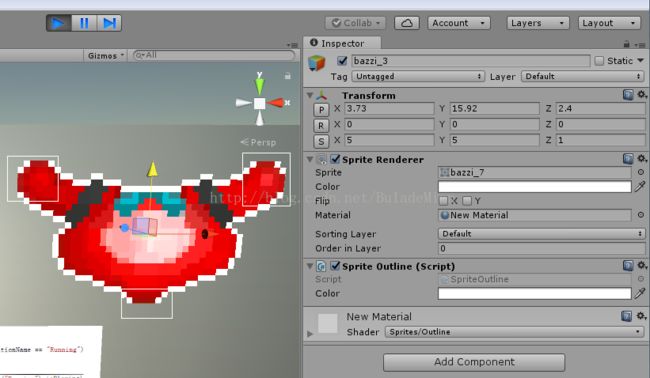
如图所示,可以发现,如果 精灵 物体 的图片只有那么大,就会造成 有的 地方 没有描边
为什么图片会自动处理呢,这就涉及到 图片 的批处理 (传送门)
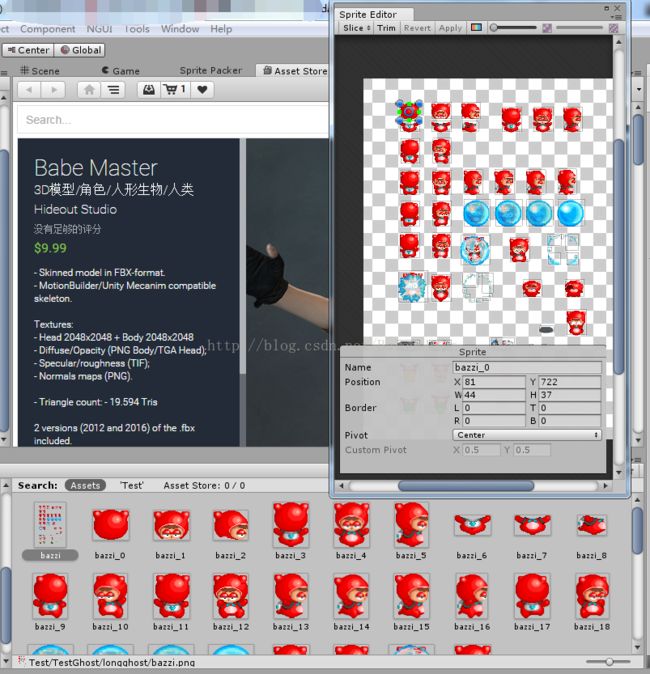
解决办法:
1. 在精灵图片截图的时候,就把图片 裁剪的大一点,把完整的 人物图片 包含进去。
例子如下所示
选中,并且对每一个精灵进行相同的操作
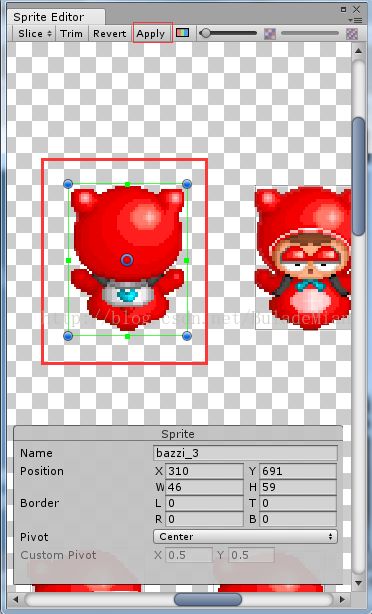
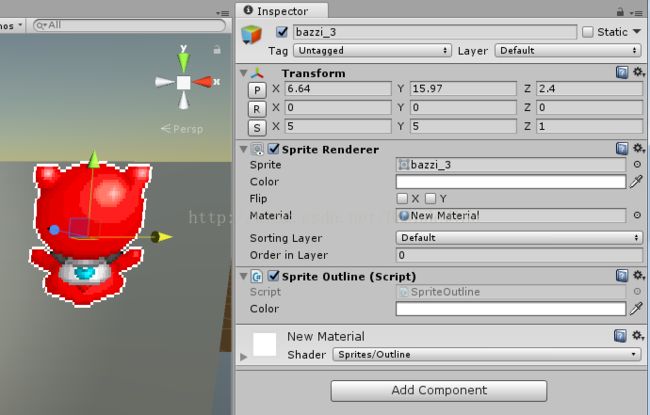
效果如下所示
那么其他人是怎么用代码解决这个问题的
在参考资料1 里面有个人就有用代码 的解决问题,如下所示

改动后 的代码 地址如下所示
Modified SpriteOutline.cs : http://pastebin.com/swHe5L8u
Modified Sprites-Outline.shader : http://pastebin.com/zzbKVJBM
------------------------------------------------------------------------------------------------------------------------------------------------------------------------------------------------------------------------
2017.3.5更新,资源分流
Modified SpriteOutline.rar
http://download.csdn.net/detail/bulademian/9770754该压缩文件,包含下列文件。仅供 网络分流 用途,请勿商用。后果自负。
Modified SpriteOutline.cs : http://pastebin.com/swHe5L8u
Modified Sprites-Outline.shader : http://pastebin.com/zzbKVJBM
------------------------------------------------------------------------------------------------------------------------------------------------------------------------------------------------------------------------
**********************
Modified SpriteOutline.cs:
using UnityEngine;
[ExecuteInEditMode]
public class SpriteOutline : MonoBehaviour {
public Color color = Color.white;
[Range(0, 16)]
public int outlineSize = 1;
private SpriteRenderer spriteRenderer;
void OnEnable() {
spriteRenderer = GetComponent
UpdateOutline(true);
}
void OnDisable() {
UpdateOutline(false);
}
void LateUpdate()
{
UpdateOutline(true);
}
void UpdateOutline(bool outline) {
Sprite sprite = spriteRenderer.sprite;
Vector4 result = new Vector4(sprite.textureRect.min.x / sprite.texture.width,
sprite.textureRect.min.y / sprite.texture.height,
sprite.textureRect.max.x / sprite.texture.width,
sprite.textureRect.max.y / sprite.texture.height);
MaterialPropertyBlock mpb = new MaterialPropertyBlock();
spriteRenderer.GetPropertyBlock(mpb);
mpb.SetFloat("_Outline", outline ? 1f : 0);
mpb.SetColor("_OutlineColor", color);
mpb.SetFloat("_OutlineSize", outlineSize);
mpb.SetVector("_Rect", result);
spriteRenderer.SetPropertyBlock(mpb);
//Debug.Log("Outline : " + result);
}
}
**********************
**********************
Modified Sprites-Outline.shader:
Shader "Sprites/Outline"
{
Properties
{
[PerRendererData] _MainTex("Sprite Texture", 2D) = "white" {}
_Color("Tint", Color) = (1,1,1,1)
[MaterialToggle] PixelSnap("Pixel snap", Float) = 0
// Add values to determine if outlining is enabled and outline color.
[PerRendererData] _Outline("Outline", Float) = 0
[PerRendererData] _OutlineColor("Outline Color", Color) = (1,1,1,1)
[PerRendererData] _OutlineSize("Outline Size", int) = 1
[PerRendererData] _Rect ("Rect Display", Vector) = (0,0,1,1)
}
SubShader
{
Tags
{
"Queue" = "Transparent"
"IgnoreProjector" = "True"
"RenderType" = "Transparent"
"PreviewType" = "Plane"
"CanUseSpriteAtlas" = "True"
}
Cull Off
Lighting Off
ZWrite Off
Blend One OneMinusSrcAlpha
Pass
{
CGPROGRAM
#pragma vertex vert
#pragma fragment frag
#pragma multi_compile _ PIXELSNAP_ON
#pragma shader_feature ETC1_EXTERNAL_ALPHA
#include "UnityCG.cginc"
struct appdata_t
{
float4 vertex : POSITION;
float4 color : COLOR;
float2 texcoord : TEXCOORD0;
};
struct v2f
{
float4 vertex : SV_POSITION;
fixed4 color : COLOR;
float2 texcoord : TEXCOORD0;
};
fixed4 _Color;
float _Outline;
fixed4 _OutlineColor;
int _OutlineSize;
fixed4 _Rect;
v2f vert(appdata_t IN)
{
v2f OUT;
OUT.vertex = mul(UNITY_MATRIX_MVP, IN.vertex);
OUT.texcoord = IN.texcoord;
OUT.color = IN.color * _Color;
#ifdef PIXELSNAP_ON
OUT.vertex = UnityPixelSnap(OUT.vertex);
#endif
return OUT;
}
sampler2D _MainTex;
sampler2D _AlphaTex;
float4 _MainTex_TexelSize;
fixed4 SampleSpriteTexture(float2 uv)
{
fixed4 color = tex2D(_MainTex, uv);
#if ETC1_EXTERNAL_ALPHA
// get the color from an external texture (usecase: Alpha support for ETC1 on android)
color.a = tex2D(_AlphaTex, uv).r;
#endif //ETC1_EXTERNAL_ALPHA
return color;
}
fixed4 frag(v2f IN) : SV_Target
{
fixed4 c = SampleSpriteTexture(IN.texcoord) * IN.color;
// If outline is enabled and there is a pixel, try to draw an outline.
if (_Outline > 0 && c.a != 0) {
float totalAlpha = 1.0;
if (IN.texcoord.x < _Rect.x + _MainTex_TexelSize.x || IN.texcoord.y < _Rect.y + _MainTex_TexelSize.y ||
IN.texcoord.x > _Rect.z - _MainTex_TexelSize.x || IN.texcoord.y > _Rect.w - _MainTex_TexelSize.y)
{
totalAlpha = 0;
}
else
{
[unroll(16)]
for (int i = 1; i < _OutlineSize + 1; i++) {
fixed4 pixelUp = tex2D(_MainTex, IN.texcoord + fixed2(0, i * _MainTex_TexelSize.y));
fixed4 pixelDown = tex2D(_MainTex, IN.texcoord - fixed2(0, i * _MainTex_TexelSize.y));
fixed4 pixelRight = tex2D(_MainTex, IN.texcoord + fixed2(i * _MainTex_TexelSize.x, 0));
fixed4 pixelLeft = tex2D(_MainTex, IN.texcoord - fixed2(i * _MainTex_TexelSize.x, 0));
totalAlpha = totalAlpha * pixelUp.a * pixelDown.a * pixelRight.a * pixelLeft.a;
}
}
if (totalAlpha == 0) {
c.rgba = fixed4(1, 1, 1, 1) * _OutlineColor;
}
}
c.rgb *= c.a;
return c;
}
ENDCG
}
}
}
**********************
亲测效果如下所示

但是会导致一个问题
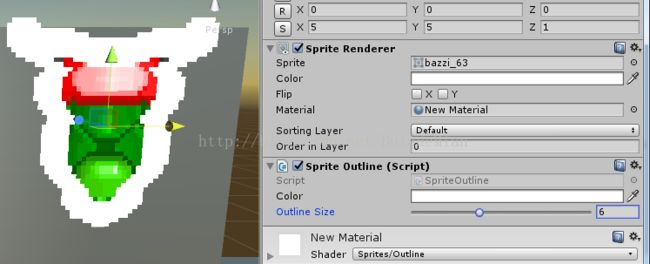
这种描边的方式,是以 原本的精灵 图片 向内 描边,画线。就会导致有些图片不能成功显示出来
贡献上面代码的 好心人

如果当你在使用 animator 动画的时候,你应该把SpriteOutline.cs的Update函数 放入LateUpdate函数里面。
我不确定为什么会造成这种样子,但是我猜测 在animator 动画改变了一个精灵,shader's texcoord立刻就更新了,
但是sprite.textureRect的value值在下一帧更新。(实际上我不确定 逻辑和执行顺序 在它后面执行,我对shader着色器 几乎是新手)
---------------------------------------------2017.5.1更新start
来自网友的意见
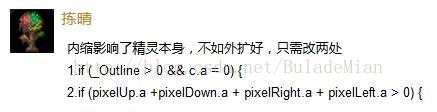
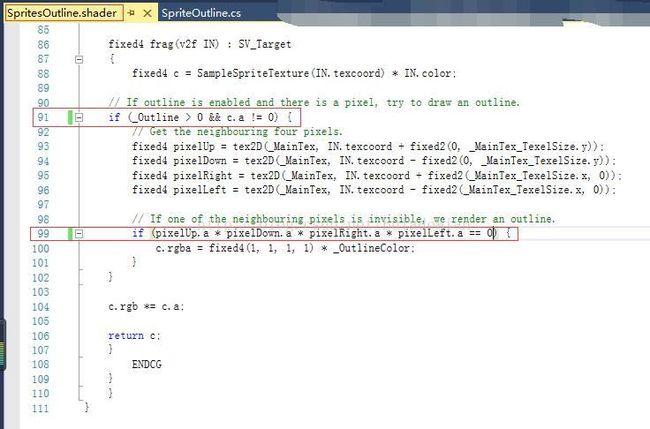
改动的代码,在原代码SpritesOutline.shader 的第91至99行的代码,更改入下图所示。
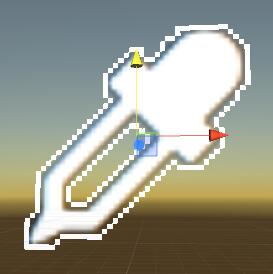
根据网友 的代码改动 实际效果如下所示。
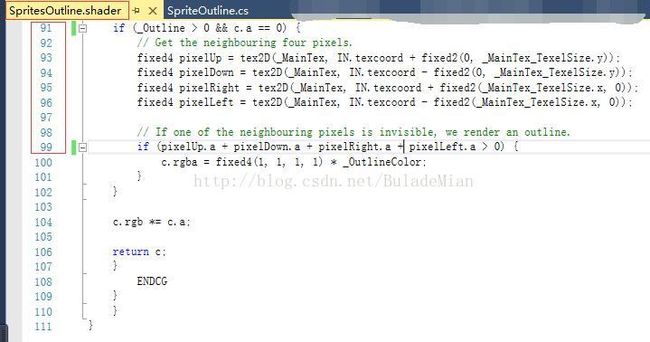

原代码的实际效果如下所示

********************
在使用改进后的代码。
April 7, 2017代码
原代码效果:
Modified SpriteOutline.cs没有改变
Modified Sprites-Outline.shader根据网友 捡晴 的代码改变。

实际效果

********************
---------------------------------------------2017.5.1更新end
请以实际情况为主。本文内容仅供参考。
Modified SpriteOutline.cs : http://pastebin.com/swHe5L8u
Modified Sprites-Outline.shader : http://pastebin.com/zzbKVJBM
sprite_outlines_56.zip为Demo测试文件,在我的资源空间里自行查找。
最新的sprite outline 的文件DEMO请自行 VPN 到参考资料1。
------------------------------------------------------------------------
参考资料:
1.
2D Sprite Outlines in Unity
2.
3.
4.
5.