创新实践记录四
创新实践记录四
相册功能的实现
本来之前还想实现切换前后摄像头功能的,但ARcore有些功能只能用后置摄像头,于是作罢,来实现相册功能。
因为要调用安卓的SDK给Unity使用,需要AndroidStudio导出arr包。这一过程极其折磨,各种莫名其妙的错误。
一、AndroidStudio部分
1.1新建项目
首先创建一个Android空白工程,注意因为是要把编译出的arr包导入Unity工程,所以工程的包名要一致。

红框里是包名,要和Unity工程的一致。

1.2添加Unity的classes.jar引用
(1)把Unity引擎目录下的classes.jar文件拷贝至Android Studio工程中的libs目录
版本不同有所区别
Unity版本为5.0之前时,classes.jar的路径:
unity的安装路径\Editor\Data\PlaybackEngines\androidplayer\bin下的classes.jar
Unity版本为5.0及其之后时,classes.jar的路径:
unity的安装路径\Editor\Data\PlaybackEngines\AndroidPlayer\Variations\mono
\Release\Classes

(2)右击"Project"视图,打开"Open Module Settings", 添加“classes.jar”依赖
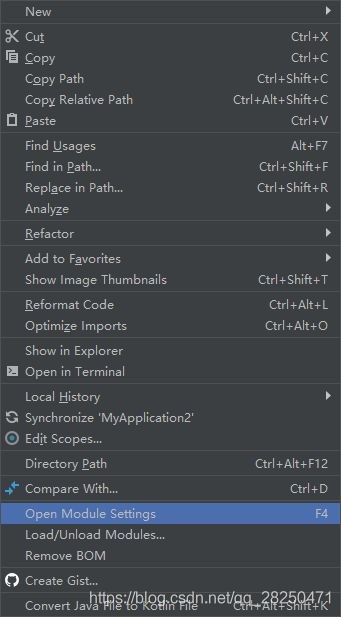

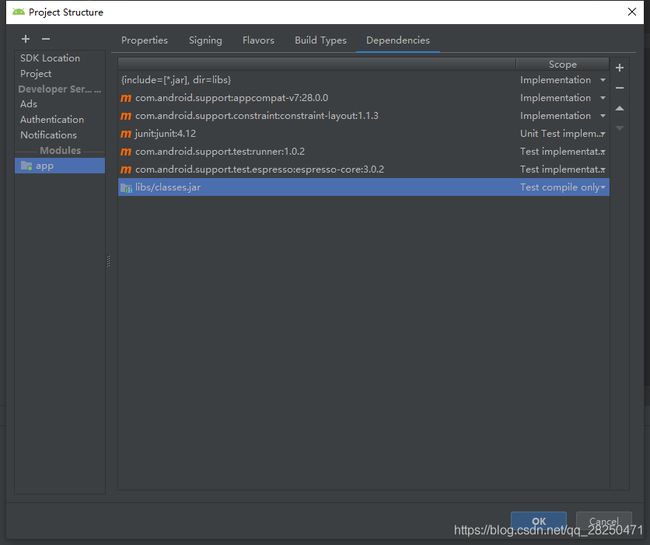

注意:红框选择的是Compile only, 而不是Implemetation,这样选择的原因是最后我们打包出来的aar文件将不会包含这个jar包,如果使用Implemetation 将会把这个jar放到最后打出来的aar包中,我们得手动删除掉,不然我们打Apk的时候会出错,因为unity会使用自己的这个jar包。
1.3修改build.gradle

1.将com.android.application 改为 com.android.library
2.将applicationId “com.qxlz.ARMuseum” 删除掉
然后修改完后编译Gradle
![]()
1.4修改AndroidManifest.xml文件
<?xml version="1.0" encoding="utf-8"?>
<manifest xmlns:android="http://schemas.android.com/apk/res/android"
    package="com.qxlz.ARMeseum">
    <application

        android:icon="@drawable/ic_launcher_background"
        android:label="@string/app_name">
        <meta-data
            android:name="com.google.android.actions"
            android:resource="@xml/provider_paths" />

        <activity android:name=".MainActivity">
            <intent-filter>
                <action android:name="android.intent.action.MAIN" />

                <category android:name="android.intent.category.LAUNCHER" />
            </intent-filter>
        </activity>

 <!-- 连接互联网的权限 -->
    </application>
    <uses-permission android:name="android.permission.INTERNET" /> <!-- SDCard写入数据权限 -->
    <uses-permission android:name="android.permission.WRITE_EXTERNAL_STORAGE" />
</manifest>
增加了xml文件

<?xml version="1.0" encoding="utf-8"?>
<paths xmlns:android="http://schemas.android.com/apk/res/android">
    <external-path name="external_files" path="."/>
</paths>
1.5MainActivity.java
import android.app.Activity;
import android.content.Intent;
import android.graphics.Bitmap;
import android.graphics.BitmapFactory;
import android.net.Uri;
import android.os.Build;
import android.os.Bundle;
import android.os.Environment;
import android.provider.MediaStore;
import android.support.v4.content.FileProvider;
import android.util.Log;

import com.unity3d.player.UnityPlayer;
import com.unity3d.player.UnityPlayerActivity;

import java.io.File;
import java.io.FileNotFoundException;
import java.io.FileOutputStream;
import java.io.IOException;

import static android.content.Intent.FLAG_GRANT_READ_URI_PERMISSION;
import static android.content.Intent.FLAG_GRANT_WRITE_URI_PERMISSION;

public class MainActivity extends UnityPlayerActivity {

    private static final int TAKE_PHOTO = 1;
    private static final int OPEN_GALLERY = 2;
    private static final int CROP_PHOTO = 3;
    private Uri mPhotoUri;
    private Uri mCropPhotoUri;

    @Override
    protected void onCreate(Bundle savedInstanceState)
    {
        super.onCreate(savedInstanceState);
    }

    public void TakePhoto(){
        mPhotoUri = GetUri(CreateFile("temp.png"));
        Intent intent = new Intent(MediaStore.ACTION_IMAGE_CAPTURE);
        intent.addFlags(Intent.FLAG_GRANT_WRITE_URI_PERMISSION);
        intent.addFlags(Intent.FLAG_GRANT_READ_URI_PERMISSION);
        intent.putExtra(MediaStore.EXTRA_OUTPUT, mPhotoUri);
        startActivityForResult(intent, TAKE_PHOTO);

    }

    //调用相册
    public void OpenGallery()
    {
        Intent intent = new Intent(Intent.ACTION_PICK,null);
        intent.setDataAndType(MediaStore.Images.Media.EXTERNAL_CONTENT_URI,"image/*");
        startActivityForResult(intent, OPEN_GALLERY);
    }

    private Uri GetUri(File file)
    {
        Uri uri;
        if(Build.VERSION.SDK_INT >= 24)
        {
            uri = FileProvider.getUriForFile(this, getPackageName() + ".fileprovider", file);
        }
        else
        {
            uri = Uri.fromFile(file);
        }

        return uri;
    }

    private File CreateFile(String name)
    {
        File file = new File(Environment.getExternalStorageDirectory(), name);
        try
        {
            if(file.exists())
            {
                file.delete();
            }
            file.createNewFile();
        }catch(IOException e)
        {
            e.printStackTrace();
        }

        return file;
    }

    private void StartCrop(Uri inputUri)
    {
        mCropPhotoUri = Uri.fromFile(CreateFile("tempCrop.png"));

        Intent intent = new Intent("com.android.camera.action.CROP");
        intent.addFlags(FLAG_GRANT_READ_URI_PERMISSION);
        intent.addFlags(FLAG_GRANT_WRITE_URI_PERMISSION);
        intent.setDataAndType(inputUri, "image/*");
        intent.putExtra("crop", "true");
        // aspectX aspectY 是宽高的比例
        intent.putExtra("aspectX", 1);
        intent.putExtra("aspectY", 1);
        // outputX outputY 是裁剪图片宽高
        intent.putExtra("outputX", 300);
        intent.putExtra("outputY", 300);
        intent.putExtra("scale", true);
        intent.putExtra("return-data", false);
        intent.putExtra("noFaceDetection", true);
        intent.putExtra(MediaStore.EXTRA_OUTPUT, mCropPhotoUri);
        startActivityForResult(intent, CROP_PHOTO);
    }

    protected void onActivityResult(int requestCode, int resultCode, Intent data)
    {
        if(resultCode == Activity.RESULT_CANCELED)
        {
            Log.d("unity","user cancel operator!!");
            return;
        }

        switch (requestCode)
        {
            case TAKE_PHOTO:
            {
                StartCrop(mPhotoUri);
            }
            break;
            case OPEN_GALLERY:
            {
                Uri uri = data.getData();
                StartCrop(uri);
            }
            break;
            case CROP_PHOTO:
            {
                try
                {
                    Bitmap bitmap = BitmapFactory.decodeStream(getContentResolver().openInputStream(mCropPhotoUri));
                    FileOutputStream fOut = null;

                    try
                    {
                        String path = "/mnt/sdcard/Android/data/com.qxlz.ATRMuseum/files";
                        File destDir = new File(path);
                        if(!destDir.exists())
                        {
                            destDir.mkdirs();
                        }

                        fOut = new FileOutputStream(path + "/" + "image.png");
                    }
                    catch (FileNotFoundException e)
                    {
                        e.printStackTrace();
                    }

                    if(bitmap != null)
                    {
                        bitmap.compress(Bitmap.CompressFormat.PNG, 100, fOut);
                        try {
                            fOut.flush();
                        } catch (IOException e) {
                            e.printStackTrace();
                        }
                        try {
                            fOut.close();
                        } catch (IOException e) {
                            e.printStackTrace();
                        }

                        UnityPlayer.UnitySendMessage("UnityPlugin","OnGetPhoto", "image.png");
                    }
                }
                catch(FileNotFoundException e)
                {
                    e.printStackTrace();
                }
            }
            break;
        }
    }
}
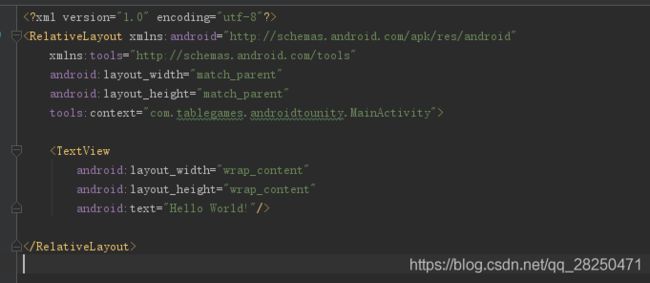
1.6修改activity_main.xml
1.7导出*.arr文件
点击“Build -> Build APK”,生成aar文件

二、Unity调用插件
拷贝*.aar文件跟AndroidMainfest.xml到Unity的Assets -> Plugins -> Android目录下

之后就可以写unity脚本了
using System;
using System.Collections;
using System.Collections.Generic;
using UnityEngine;
using UnityEngine.UI;

public class TestPlugin : MonoBehaviour
{
    public Button mBtnCamera;
    public Button mBtnGallery;
    public RawImage mImage;
    public Text mText;
    private Action<byte[]> mPhotoAction;

    // Use this for initialization
    void Start()
    {
        mBtnCamera.onClick.AddListener(() =>
        {
            TakePhoto((datas) =>
            {
            });
        });

        mBtnGallery.onClick.AddListener(() =>
        {
            OpenGallery((datas) =>
            {
            });
        });
    }

    public void TakePhoto(Action<byte[]> callback)
    {
        AndroidJavaClass jc = new AndroidJavaClass("com.unity3d.player.UnityPlayer");
        AndroidJavaObject jo = jc.GetStatic<AndroidJavaObject>("currentActivity");
        jo.Call("TakePhoto");
        mPhotoAction = callback;
    }

    public void OpenGallery(Action<byte[]> callback)
    {
        AndroidJavaClass jc = new AndroidJavaClass("com.unity3d.player.UnityPlayer");
        AndroidJavaObject jo = jc.GetStatic<AndroidJavaObject>("currentActivity");
        jo.Call("OpenGallery");
        mPhotoAction = callback;
         GameObject quad = GameObject.CreatePrimitive(PrimitiveType.Quad);
                quad.transform.position = Camera.main.transform.position + Camera.main.transform.forward * 2.5f;
                quad.transform.forward = Camera.main.transform.forward;
                quad.transform.localScale = new Vector3(1f, texture.height / (float)texture.width, 1f);

                Material material = quad.GetComponent<Renderer>().material;
                if (!material.shader.isSupported) // happens when Standard shader is not included in the build
                    material.shader = Shader.Find("Legacy Shaders/Diffuse");

                material.mainTexture = texture;

                Destroy(quad, 5f);

                // If a procedural texture is not destroyed manually,
                // it will only be freed after a scene change
                Destroy(texture, 5f);
    }

    void OnGetPhoto(string name)
    {
        StartCoroutine(LoadPhoto(name));
    }

    IEnumerator LoadPhoto(string name)
    {
        mText.text = name;
        string path = "file://" + Application.persistentDataPath + "/" + name;
        WWW www = new WWW(path);
        yield return www;
        mImage.texture = www.texture;
        if (mPhotoAction != null)
        {
            mPhotoAction(((Texture2D)mImage.texture).EncodeToPNG());
            mPhotoAction = null;
            //Destroy(texture);
        }
    }
}
将脚本挂到场景的对象上,关联上图像和按钮,打包编译好后就实现相册和查看图片功能了


遇到的问题
(Error)—— Attribute application@icon value=(@mipmap/ic_launcher) from AndroidManifest.xml:7:9-43
百度了一下,这是一个编译的常见错误,主要是AS的Gradle插件默认会启用Manifest Merger Tool,若Library项目中也定义了与主项目相同的属性(例如默认生成的android:icon和android:theme),则此时会合并失败,并报上面的错误。
修改AndroidManifest.xml第2行的:
xmlns:tools=“http://schemas.android.com/tools”
和application最后一行的
tools:replace=“android:icon, android:theme”