UITableView——实现汽车分组展示
1什么是UITableView
1.1在众多移动应用中,能看到各式各样的表格数据
在iOS中,要实现表格数据展示,最常用的做法就是使用UITableView
UITableView继承自UIScrollView,因此支持垂直滚动,而且性能极佳
UITableView继承自UIScrollView,因此支持垂直滚动,而且性能极佳
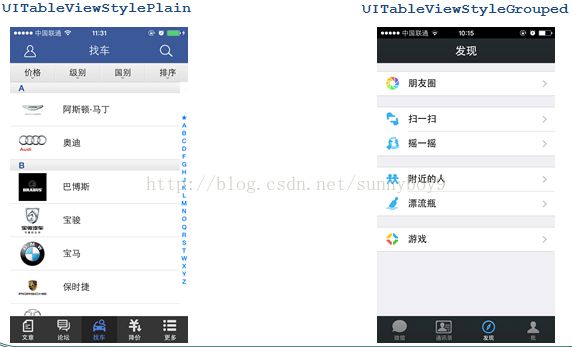
1.2UITableView的两种样式
1.3如何展示数据
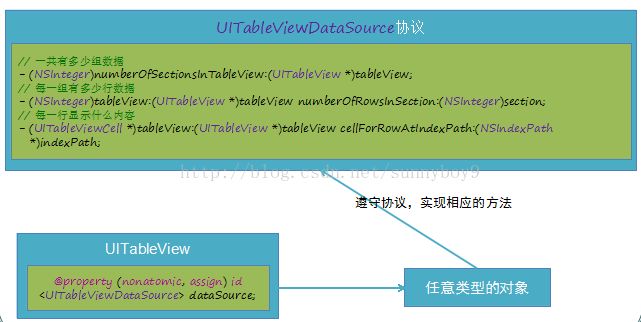
UITableView需要一个数据源(dataSource)来显示数据
UITableView会向数据源查询一共有多少行数据以及每一行显示什么数据等
没有设置数据源的UITableView只是个空壳
凡是遵守UITableViewDataSource协议的OC对象,都可以是UITableView的数据源
UITableView会向数据源查询一共有多少行数据以及每一行显示什么数据等
没有设置数据源的UITableView只是个空壳
凡是遵守UITableViewDataSource协议的OC对象,都可以是UITableView的数据源
tableView和数据源
tableView展示数据的过程
调用数据源的下面方法得知一共有多少组数据
- (NSInteger)numberOfSectionsInTableView:(UITableView *)tableView;
调用数据源的下面方法得知每一组有多少行数据
- (NSInteger)tableView:(UITableView *)tableView numberOfRowsInSection:(NSInteger)section;
调用数据源的下面方法得知每一行显示什么内容
- (UITableViewCell *)tableView:(UITableView *)tableView cellForRowAtIndexPath:(NSIndexPath *)indexPath;
1.4Cell简介
UITableView的每一行都是一个UITableViewCell,通过dataSource的tableView:cellForRowAtIndexPath:方法来初始化每一行
UITableViewCell内部有个默认的子视图:contentView,contentView是UITableViewCell所显示内容的父视图,可显示一些辅助指示视图
辅助指示视图的作用是显示一个表示动作的图标,可以通过设置UITableViewCell的accessoryType来显示,默认是UITableViewCellAccessoryNone(不显示辅助指示视图),其他值如下:
UITableViewCellAccessoryDisclosureIndicator
UITableViewCellAccessoryDetailDisclosureButton
UITableViewCellAccessoryCheckmark
还可以通过cell的accessoryView属性来自定义辅助指示视图(比如往右边放一个开关)
2.实例
2.1实例1
2.1.1搭建界面
先往里面添加一个UItableView
2.1.2代码实现
//
//  MJViewController.m

//

#import "MJViewController.h"

@interface MJViewController ()
@property (weak, nonatomic) IBOutlet UITableView *tableView;

@end

@implementation MJViewController

- (void)viewDidLoad
{
    [super viewDidLoad];

    // 设置数据源
    self.tableView.dataSource = self;
}

#pragma mark - 数据源方法
/**
 *  一共有多少组数据
 */
- (NSInteger)numberOfSectionsInTableView:(UITableView *)tableView
{
//    NSLog(@"numberOfSectionsInTableView-一共有多少组数据");
    return 2;
}

/**
 *  第section组有多少行
 */
- (NSInteger)tableView:(UITableView *)tableView numberOfRowsInSection:(NSInteger)section
{
//    NSLog(@"numberOfRowsInSection-%d", section);

    if (section == 0) {
        return 3;
    } else {
        return 4;
    }
}

/**
 *  每一行显示怎样的内容(cell)
 */
- (UITableViewCell *)tableView:(UITableView *)tableView cellForRowAtIndexPath:(NSIndexPath *)indexPath
{
//    NSLog(@"cellForRowAtIndexPath-%d组%d行", indexPath.section, indexPath.row);
    UITableViewCell *cell = [[UITableViewCell alloc] initWithStyle:UITableViewCellStyleDefault reuseIdentifier:nil];

    if (indexPath.section == 0) { // 德系品牌(第0组)

        if (indexPath.row == 0) { // 第0组的第0行
            cell.textLabel.text = @"奥迪";
        } else if (indexPath.row == 1) { // 第0组的第1行
            cell.textLabel.text = @"宝马";
        } else if (indexPath.row == 2) {
            cell.textLabel.text = @"奔驰";
        }

    } else if (indexPath.section == 1) { // 日韩品牌(第1组)

        if (indexPath.row == 0) { // 第1组的第0行
            cell.textLabel.text = @"本田";
        } else if (indexPath.row == 1) { // 第1组的第1行
            cell.textLabel.text = @"丰田";
        } else if (indexPath.row == 2) {
            cell.textLabel.text = @"铃木";
        } else if (indexPath.row == 3) {
            cell.textLabel.text = @"三菱";
        }
    }

    return cell;
}

@end
2.1.3运行结果
2.2实例2
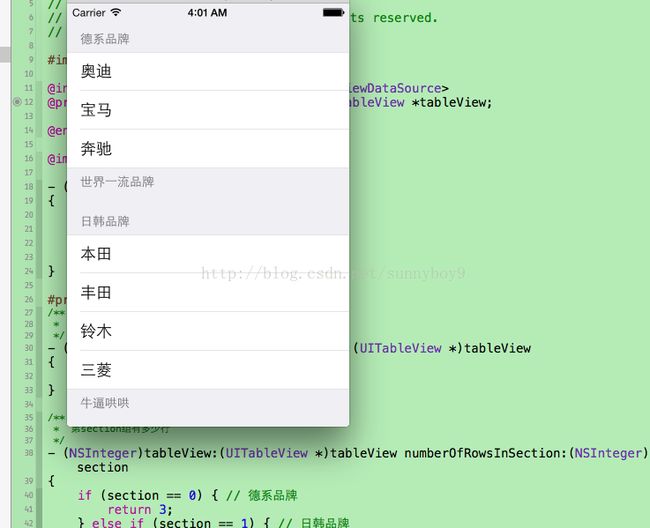
2.2.1 在上面例子中为每一组添加头部标题和尾部标题 ,代码实现
//
//  MJViewController.m
//  01-汽车品牌


#import "MJViewController.h"

@interface MJViewController ()
@property (weak, nonatomic) IBOutlet UITableView *tableView;

@end

@implementation MJViewController

- (void)viewDidLoad
{
    [super viewDidLoad];

    // 设置数据源
    self.tableView.dataSource = self;
}

#pragma mark - 数据源方法
/**
 *  一共有多少组数据
 */
- (NSInteger)numberOfSectionsInTableView:(UITableView *)tableView
{
    return 3;
}

/**
 *  第section组有多少行
 */
- (NSInteger)tableView:(UITableView *)tableView numberOfRowsInSection:(NSInteger)section
{
    if (section == 0) { // 德系品牌
        return 3;
    } else if (section == 1) { // 日韩品牌
        return 4;
    } else { // 欧系品牌
        return 2;
    }
}

/**
 *  每一行显示怎样的内容(cell)
 */
- (UITableViewCell *)tableView:(UITableView *)tableView cellForRowAtIndexPath:(NSIndexPath *)indexPath
{
    UITableViewCell *cell = [[UITableViewCell alloc] initWithStyle:UITableViewCellStyleDefault reuseIdentifier:nil];

    if (indexPath.section == 0) { // 德系品牌(第0组)

        if (indexPath.row == 0) { // 第0组的第0行
            cell.textLabel.text = @"奥迪";
        } else if (indexPath.row == 1) { // 第0组的第1行
            cell.textLabel.text = @"宝马";
        } else if (indexPath.row == 2) {
            cell.textLabel.text = @"奔驰";
        }

    } else if (indexPath.section == 1) { // 日韩品牌(第1组)

        if (indexPath.row == 0) { // 第1组的第0行
            cell.textLabel.text = @"本田";
        } else if (indexPath.row == 1) { // 第1组的第1行
            cell.textLabel.text = @"丰田";
        } else if (indexPath.row == 2) {
            cell.textLabel.text = @"铃木";
        } else if (indexPath.row == 3) {
            cell.textLabel.text = @"三菱";
        }

    } else if (indexPath.section == 2) { // 欧系品牌(第2组)

        if (indexPath.row == 0) { // 第2组的第0行
            cell.textLabel.text = @"兰博基尼";
        } else if (indexPath.row == 1) { // 第2组的第1行
            cell.textLabel.text = @"劳斯莱斯";
        }

    }

    return cell;
}

/**
 *  第section组显示怎样的头部标题
 */
- (NSString *)tableView:(UITableView *)tableView titleForHeaderInSection:(NSInteger)section
{
    if (section == 0) {
        return @"德系品牌";
    } else if (section == 1) {
        return @"日韩品牌";
    } else {
        return @"欧系品牌";
    }
}

/**
 *  第section组显示怎样的尾部标题
 */
- (NSString *)tableView:(UITableView *)tableView titleForFooterInSection:(NSInteger)section
{
    if (section == 0) {
        return @"世界一流品牌";
    } else if(section == 1) {
        return @"牛逼哄哄";
    } else {
        return @"价格昂贵";
    }
}

@end
2.2.2运行结果
2.3用MVC思想——用模型实现上面的例子
2.3.1模型类
//
//  MJCarGroup.h
/

#import

@interface MJCarGroup : NSObject
/**
 *  头部标题
 */
@property (nonatomic, copy) NSString *title;

/**
 *  尾部标题(描述)
 */
@property (nonatomic, copy) NSString *desc;

/**
 *  这组的所有车(字符串)
 */
@property (nonatomic, strong) NSArray *cars;
@end
2.3.2控制器
//
//  MJViewController.m


#import "MJViewController.h"
#import "MJCarGroup.h"

@interface MJViewController ()
@property (weak, nonatomic) IBOutlet UITableView *tableView;

@property (nonatomic, strong) NSArray *carGroups;
@end

@implementation MJViewController

- (void)viewDidLoad
{
    [super viewDidLoad];

    // 设置数据源
    self.tableView.dataSource = self;
}

// 隐藏状态栏
- (BOOL)prefersStatusBarHidden
{
    return YES;
}

- (NSArray *)carGroups
{
    if (_carGroups == nil) {
        // 初始化
        // 德系品牌
        MJCarGroup *cg1 = [[MJCarGroup alloc] init];
        cg1.title = @"德系品牌";
        cg1.desc = @"德系品牌很好";
        cg1.cars = @[@"奥迪", @"宝马", @"奔驰", @"奥迪", @"宝马", @"奔驰", @"奥迪", @"宝马", @"奔驰", @"奥迪", @"宝马", @"奔驰"];

        // 日韩品牌
        MJCarGroup *cg2 = [[MJCarGroup alloc] init];
        cg2.title = @"日韩品牌";
        cg2.desc = @"日韩品牌很好haohaohao";
        cg2.cars = @[@"本田", @"丰田", @"本田", @"丰田", @"本田", @"丰田", @"本田", @"丰田", @"本田", @"丰田", @"本田", @"丰田", @"本田", @"丰田", @"本田", @"丰田", @"本田", @"丰田"];

        // 欧系品牌
        MJCarGroup *cg3 = [[MJCarGroup alloc] init];
        cg3.title = @"欧系品牌";
        cg3.desc = @"欧系品牌goodgood";
        cg3.cars = @[@"兰博基尼", @"法拉利"];

        _carGroups = @[cg1, cg2, cg3];
    }
    return _carGroups;
}

#pragma mark - 数据源方法
/**
 *  一共有多少组数据
 */
- (NSInteger)numberOfSectionsInTableView:(UITableView *)tableView
{
    return self.carGroups.count;
}

/**
 *  第section组有多少行
 */
- (NSInteger)tableView:(UITableView *)tableView numberOfRowsInSection:(NSInteger)section
{
    // 取得第section组对应的模型
    MJCarGroup *cg = self.carGroups[section];

    return cg.cars.count;
}

/**
 *  每一行显示怎样的内容(cell)
 */
- (UITableViewCell *)tableView:(UITableView *)tableView cellForRowAtIndexPath:(NSIndexPath *)indexPath
{
    UITableViewCell *cell = [[UITableViewCell alloc] initWithStyle:UITableViewCellStyleDefault reuseIdentifier:nil];

    // 取出第indexPath.section组对应的模型
    MJCarGroup *cg = self.carGroups[indexPath.section];

    // 取车第indexPath.row这行对应的品牌名称
    NSString *car = cg.cars[indexPath.row];

    // 设置cell显示的文字
    cell.textLabel.text = car;

    return cell;
}

/**
 *  第section组显示怎样的头部标题
 */
- (NSString *)tableView:(UITableView *)tableView titleForHeaderInSection:(NSInteger)section
{
    MJCarGroup *cg = self.carGroups[section];

    return cg.title;
}

/**
 *  第section组显示怎样的尾部标题
 */
- (NSString *)tableView:(UITableView *)tableView titleForFooterInSection:(NSInteger)section
{
    MJCarGroup *cg = self.carGroups[section];

   return cg.desc;
}

@end
mvc总结:从上面的代码可以看出使用MVC当要改变view的显示界面的时候不需要改变view的实现代码,只需要改变模型即可改变显示界面。这就是MVC的好处。
MVC是一种设计思想,贯穿于整个iOS开发中,需要积累一定的项目经验,才能深刻体会其中的含义和好处
MVC中的三个角色
M:Model,模型数据
V:View,视图(界面)
C:Control,控制中心
MVC的几个明显的特征和体现:
View上面显示什么东西,取决于Model
只要Model数据改了,View的显示状态会跟着更改
Control负责初始化Model,并将Model传递给View去解析展示
MVC中的三个角色
M:Model,模型数据
V:View,视图(界面)
C:Control,控制中心
MVC的几个明显的特征和体现:
View上面显示什么东西,取决于Model
只要Model数据改了,View的显示状态会跟着更改
Control负责初始化Model,并将Model传递给View去解析展示


