使用ASP.NET Core开始使用gRPC客户端和服务器
目录
介绍
GRPC
Protobuf文件
背景
先决条件
使用代码
第1步——创建gRPC服务应用程序
gRPC项目结构
构建并运行应用程序
第2步:创建客户端控制台.NET核心应用程序
添加必需的包
通过管理NuGet包安装包
将Protobuf文件添加到客户端应用程序
使用客户端Program.cs文件
兴趣点
- 下载示例 - 1.6 MB
介绍
在本文中,我们将了解如何使用ASP.NET Core模板创建gRPC服务。我们还将使用.NET控制台核心创建一个客户端应用程序,以直接调用gRPC服务的服务器方法来发送和接收来自客户端应用程序的消息。
GRPC
gRPC是一种快速,高效,轻量级的远程过程调用,广泛应用于微服务。gRPC最初由谷歌开发,现在它是开源的。
在ASP.NET Core3中,我们可以看到新模板已作为gRPC服务包含在内。是的,使用此模板,我们可以创建我们的gRPC服务并创建一个客户端应用程序,如.NET Core Console,WinForms或ASP.NET Core,用于数据序列化,以便从客户端向服务器发送和接收数据。gRPC使用HTTP / 2进行传输。gRPC使用协议缓冲区(又称Protobuf)作为数据序列化格式,用于从客户端向服务器发送和接收。
Protobuf文件
gRPC使用protobuf作为默认数据序列化,来从客户端和服务器发送和接收数据。换句话说,protobuf用作接口设计语言。为了使用gRPC服务,我们还需要了解protobuf文件。Protobuf文件有两部分,一部分用于定义gRPC服务,另一部分用于定义客户端到服务器之间发送的消息。在这里,我们将看到protobuf文件的每个部分。
在protobuf文件的第一行,我们需要声明语法,这个语法是提到我们使用的协议缓冲语言的版本,在我们的例子中,我们使用的是proto3。
syntax = "proto3";接下来,我们提供我们的解决方案名称,也是C#应用程序命名空间名称。
option csharp_namespace = "GrpcGreeter";接下来是服务部分,在这里,我们创建了名为Greeter的服务。当我们创建gRPC服务应用程序时,默认情况下已添加了proto文件,并且已自动创建以下服务。
在此Greeter服务中,我们在这个调用创建了2个SayHello,Servermessage调用,每个调用都以消息的形式发送HelloRequest并接收HelloReplay消息。
// The greeting service definition.
service Greeter {
  // Sends a greeting
  rpc SayHello (HelloRequest) returns (HelloReply) {}
  rpc Servermessage (HelloRequest) returns (HelloReply) {}
}参考链接:https://docs.microsoft.com/en-us/aspnet/core/grpc/?view=aspnetcore-3.0
背景
确保已在计算机上安装了所有必备组件。如果没有,则逐个下载并安装它们。
先决条件
- Visual Studio 2019的最新预览版
- .NET Core 3.0 Preview 6 SDK
使用代码
第1步——创建gRPC服务应用程序
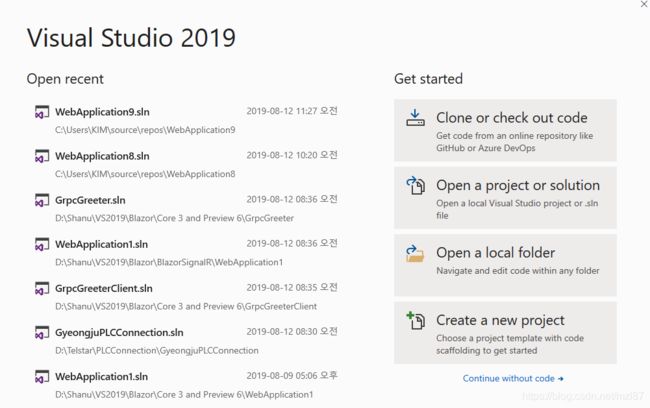
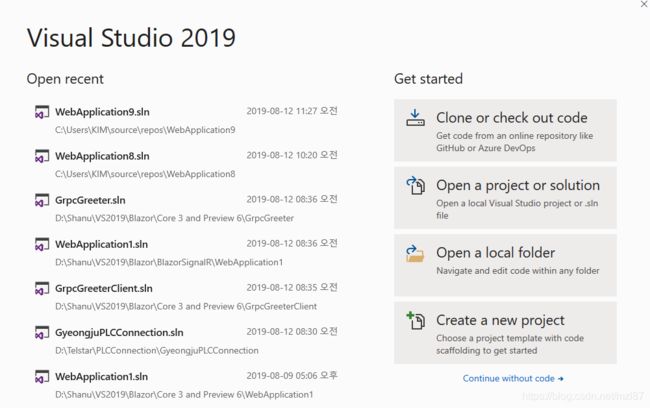
安装上面列出的所有先决条件后,单击桌面上的开始>>程序>> Visual Studio 2019 >> Visual Studio 2019>>单击“新建项目”。
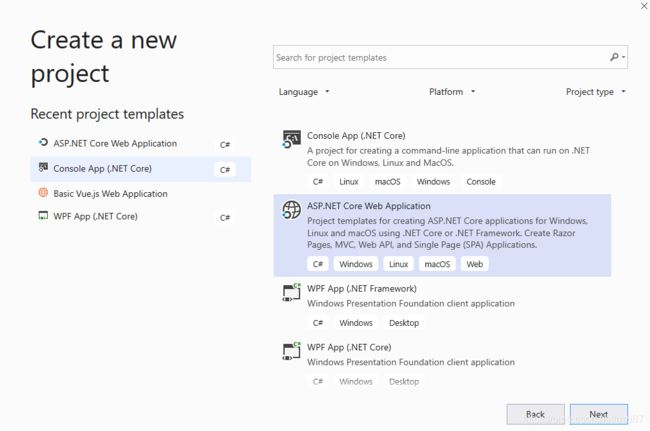
单击ASP.NET Core Web Application,然后单击“下一步”。
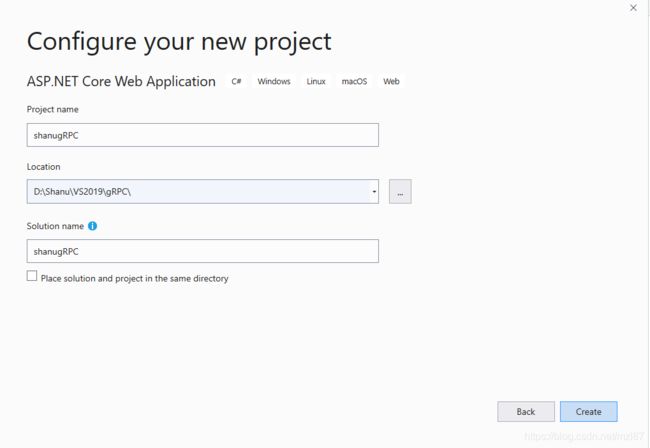
输入您的项目名称,然后单击“创建”按钮。
现在,我们可以看到已经列出了ASP.NET Core 3.0。我们选择gRPC服务并单击创建以创建我们的gRPC服务应用程序。
gRPC项目结构
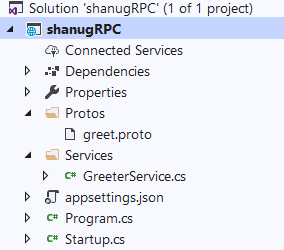
一旦我们创建了gRPC服务项目,我们就可以看到默认情况下项目将包含带有protobuf文件的Protos文件夹作为带有“.proto”文件的扩展名。此外,我们可以使用我们的Service类文件查看Services文件夹。在本文的开头,我们已经详细了解了什么是protobuf文件以及protobuf文件包含的内容。在我们的gRPC服务项目中,我们可以看到默认情况下使用sayHello方法调用创建了proto文件,以便在客户端和服务器之间发送和接收请求并重复进行。
我们再添加一个方法调用:
rpc Servermessage(HelloRequest)返回(HelloReply){}
在这里,我们为我们的示例添加了一个方法调用,让我们看看如何在我们的服务和客户端应用程序中使用它。这是greet.proto文件的完整代码。
syntax = "proto3";

option csharp_namespace = "shanugRPC";

package Greet;

// The greeting service definition.
service Greeter {
  // Sends a greeting
  rpc SayHello (HelloRequest) returns (HelloReply) {}
   rpc Servermessage (HelloRequest) returns (HelloReply) {}
}

// The request message containing the user's name.
message HelloRequest {
  string name = 1;
}

// The response message containing the greetings.
message HelloReply {
  string message = 1;
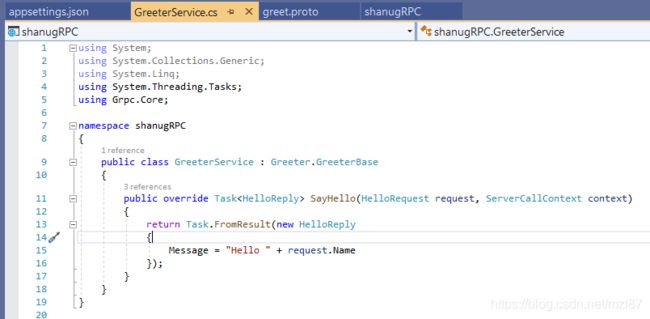
}service文件夹的服务类默认为GreeterService。此类具有默认创建的SayHello方法。像这样,我们可以添加自己的方法来发送响应。
现在我们还需要在 此服务中添加一个Override方法作为ServerMessage,我们可以将方法消息返回给客户端应用程序。像这样,您可以创建任意数量的方法,并从客户端应用程序调用它们以获取消息请求并从服务器回复。
这是我们Service的完整代码。
public class GreeterService : Greeter.GreeterBase
  {
      public override Task
             SayHello(HelloRequest request, ServerCallContext context)
      {
          return Task.FromResult(new HelloReply
          {
              Message = "Hello " + request.Name
          });
      }

      public override Task
             Servermessage(HelloRequest request, ServerCallContext context)
      {
          return Task.FromResult(new HelloReply
          {
              Message = "Your Friend Name is :   " + request.Name
          });
      }
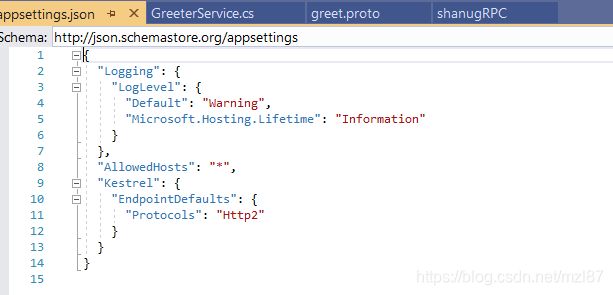
} appsetting.json文件将包含用于该服务的协议。在这里,我们可以看到Http2协议已经用于gRPC服务。
构建并运行应用程序
当我们构建并运行应用程序时,我们可以看到服务正在成功运行,我们也可以看到我们的gRPC服务正在侦听http://localhost:50051。
请注意,由于gRPC是模板配置为使用TSL,客户端需要使用HTTPS来调用服务器。但是在这里,我们使用http来在我们的客户端应用程序中使用http,我们需要使用下面的代码来连接服务器和客户端
AppContext.SetSwitch("System.Net.Http.SocketsHttpHandler.Http2UnencryptedSupport", true);我们将在创建客户端应用程序时详细了解这一点。
第2步:创建客户端控制台.NET核心应用程序
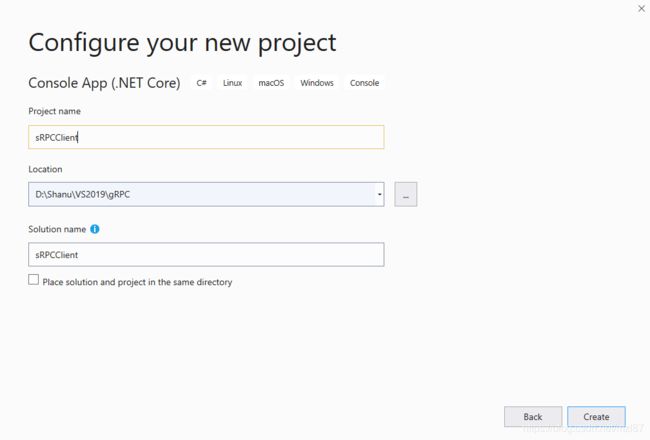
安装上面列出的所有先决条件后,单击桌面上的开始>>程序>> Visual Studio 2019 >> Visual Studio 2019。>>单击“新建项目”。
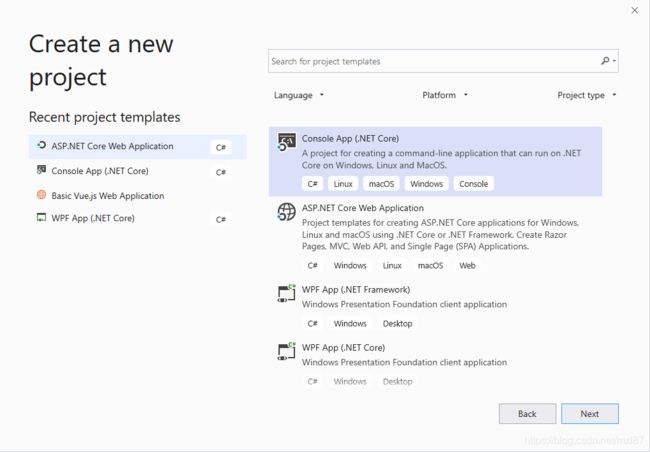
单击Console App(.NET Core)并单击“下一步”。
输入您的项目名称,然后单击“创建”按钮。
现在我们的控制台应用程序已创建。
添加必需的包
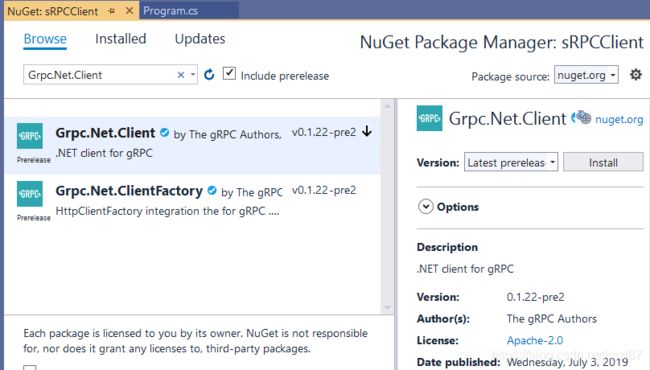
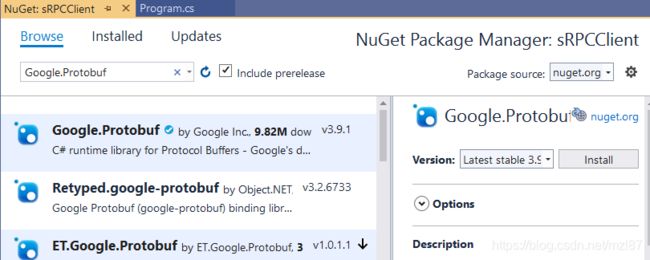
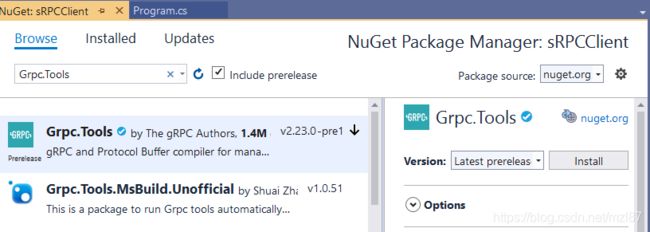
为了客户端和GRPC服务端之间发送和接收消息,我们需要添加Grpc.Net.Client,Google.Protobuf和Grpc.Tools包到我们的项目。
Grpc.Net.Client软件包用于.NET Core客户端,Google.Protobuf软件包包含用于C#语言的protobuf消息API。Grpc.Tool包含protobuf文件的工具支持。
我们可以通过NuGet Package Manager或Manage NuGet Packages安装此软件包。
通过管理NuGet包安装包
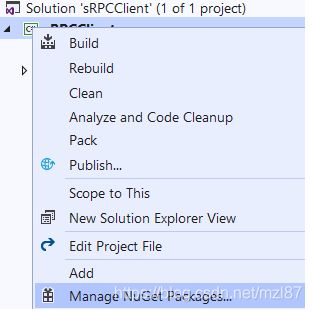
右键单击您的gRPC客户端项目,然后单击Manage NuGet Packages。
选择Browse选项卡,输入“Grpc.net.Client”后搜索并将软件包安装到我们的客户端项目中。
与此相同,安装“ Google.Protobuf”搜索并将包安装到我们的客户端项目。
与此相同,安装“ Grpc.Tools”搜索并将包安装到我们的客户端项目。
将Protobuf文件添加到客户端应用程序
在我们的客户端应用程序中,我们需要添加相同的protobuf文件,用于从客户端到服务器的数据发送和接收。首先,我们在客户端项目中创建Protos文件夹。
现在我们需要将我们在Service项目中使用的protobuf添加到Protos文件夹中。
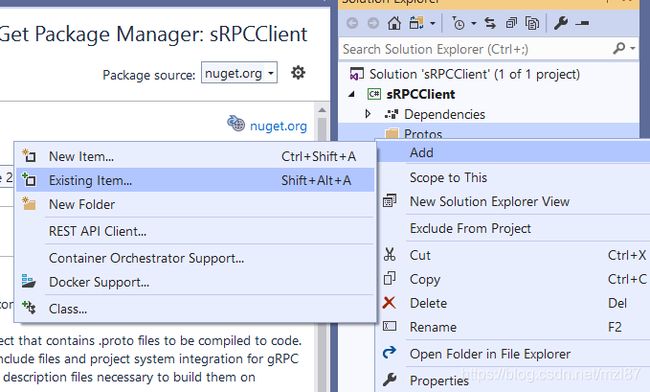
右键单击Protos文件夹,然后单击Add Existing Item。
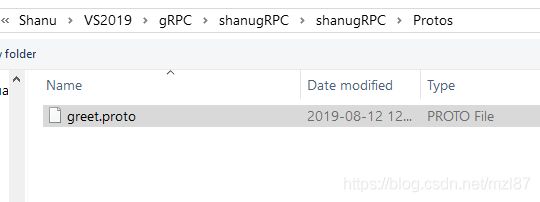
选择并添加我们在Service项目中使用的greet.proto文件。
现在为了在我们的项目中使用greet.proto文件,我们需要将带有Protobuf 的itemGroup添加到我们的项目中。
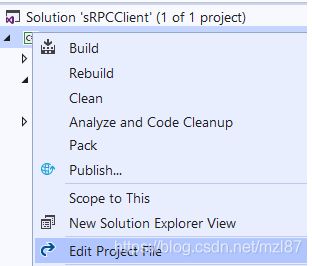
右击我们的项目,然后单击编辑项目文件。
将以下代码添加到项目文件中:
构建应用程序以便在客户端应用程序中使用我们的服务。
使用客户端Program.cs文件
现在是我们创建客户端程序以便从客户端向我们的gRPC服务发送和接收消息的时候了。
为此,我们打开program.cs文件并添加以下命名空间。shanugRPC是我们的服务项目命名空间。
using shanugRPC ;
using Grpc.Net.Client;
using Grpc.Core;现在在yourprogram.cs文件的Main方法中添加以下代码:
static async Task Main(string[] args)
      {
          var httpClient = new HttpClient();
          httpClient.BaseAddress = new Uri("https://localhost:50051");
          var client = GrpcClient.Create(httpClient);

          var reply = await client.SayHelloAsync(
                    new HelloRequest { Name = "GreeterClient" });
          Console.WriteLine("Greeting: " + reply.Message);
          Console.WriteLine("Press any key to exit...");
          Console.ReadKey();
      }
构建并运行应用程序
注意:首先运行我们的服务应用程序,然后运行客户端应用程序进行客户端和服务器通信。在运行客户端之前,始终确保服务正在运行。
当我们运行应用程序时,我们可能会收到错误
这意味着我们的服务监听 http://localhost:50051 ,但上面的代码适用于https,在我们的示例中,我们需要使用https://localhost:50051,所以我们更改代码如下:
static async Task Main(string[] args)
        {
            //----------------
            AppContext.SetSwitch("System.Net.Http.SocketsHttpHandler.Http2UnencryptedSupport",
                                  true);
            var httpClient = new HttpClient();
            httpClient.BaseAddress = new Uri("http://localhost:50051");
            var client = GrpcClient.Create(httpClient);

            var reply = await client.SayHelloAsync(
                      new HelloRequest { Name = "Shanu" });
            Console.WriteLine("Greeting: " + reply.Message);
            Console.WriteLine("Press any key to exit...");
            Console.ReadKey();

        }
代码部分说明
要使用http而不是https,请先设置以下代码部分:
AppContext.SetSwitch("System.Net.Http.SocketsHttpHandler.Http2UnencryptedSupport", true);
var httpClient = new HttpClient();接下来,我们使用url创建客户端对象:
var httpClient = new HttpClient();
 httpClient.BaseAddress = new Uri("http://localhost:50051");
var client = GrpcClient.Create(httpClient); 接下来,我们通过调用service方法发送并从服务获取重播,并传递请求并获取回复消息。
var reply = await client.SayHelloAsync(
          new HelloRequest { Name = "Shanu" });
Console.WriteLine("Greeting: " + reply.Message);
运行应用程序
当我们运行应用程序时,我们可以看到结果,因为我们从客户端向服务发送名称作为Shanu,我们得到服务的回复为“ Hello Shanu”。
现在我们更改代码以获取我们的名字和我们的朋友的名字,以便发送给服务进行diriment方法调用,并从每条消息中获取它们并显示结果。
这是完整的代码。我们使用了类似的代码,并要求用户输入他们的姓名和朋友姓名,并调用服务方法SayHello和Servermessage方法来发送和接收来自客户端和服务器的消息。
static async Task Main(string[] args)
      {
          var httpClient = new HttpClient();
          // The port number(5001) must match the port of the gRPC server.
          httpClient.BaseAddress = new Uri("https://localhost:50051");
          var client = GrpcClient.Create(httpClient);

          //----------------
          AppContext.SetSwitch
          ("System.Net.Http.SocketsHttpHandler.Http2UnencryptedSupport", true);
          var httpClient = new HttpClient();
          // The port number(5001) must match the port of the gRPC server.
          httpClient.BaseAddress = new Uri("http://localhost:50051");
          var client = GrpcClient.Create(httpClient);

          //-----------------------

          Boolean isexit = true;
          while (isexit)
          {
              Console.WriteLine("Enter Your Name to send request to the server : ");
              String myName = Console.ReadLine();

              var reply = await client.SayHelloAsync(
                                new HelloRequest { Name = myName });
              Console.WriteLine("Hello world : " + reply.Message);

              Console.WriteLine("Enter YourFriend  Name  : ");
              String friendName = Console.ReadLine();

              var serverreply = await client.ServermessageAsync(
                                new HelloRequest { Name = friendName });
              Console.WriteLine("Message from Server -> " + serverreply.Message);

              Console.WriteLine("Do you want to continue say Y or N");
              string YN = Console.ReadLine();
              if (YN.ToLower() == "y")
              {
                  isexit = true;
              }
              else
              {
                  isexit = false;
              }
              Console.WriteLine("==========================  ============");
              Console.WriteLine("");
          }

          Console.WriteLine("Press any key to exit...");
          Console.ReadKey();
      }
兴趣点
在本文中,我讨论了如何使用gRPC服务和客户端应用程序来发送和接收来自gRPC服务的消息。为了使用此示例,请不要忘记安装.NET Core 3.0和Visual Studio 2019预览。

