微信小程序使用HTTP请求_绕过HTTPS_云函数 request-promise get、post 请求SpringBoot 超详细使用总结
微信小程序使用HTTP请求_绕过HTTPS_云函数 request-promise get、post 超详细使用总结
在微信小程序中鹅产出于安全性的考虑限定了小程序使用的服务器请求必须是HTTPS,即需要合法域名的备案才行,默认是不支持HTTP请求的,当然开发版和本地、真机调试是只要在 详情里的本地设置中关闭合法域名校验也是可以使用HTTP进行测试的,但是一旦发布体验版或者正式版是无法通过请求的。但是同时鹅厂也提供了云开发的支持,而云开发是支持node.js的,那么我们可以通过使用 request-promise 来使用HTTP请求,进而绕过HTTPS的限制。
大多人都使用的是 request-promise 或者 got, 我这里使用的是 request-promise,在使用 request-promise 前请先在本地安装好 node.js 环境。
使用 request-promise 使用 HTTP请求 绕过HTTPS校验
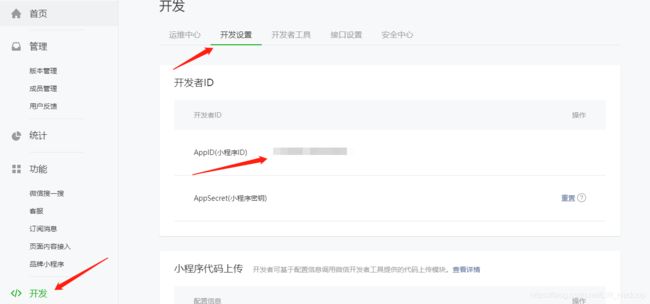
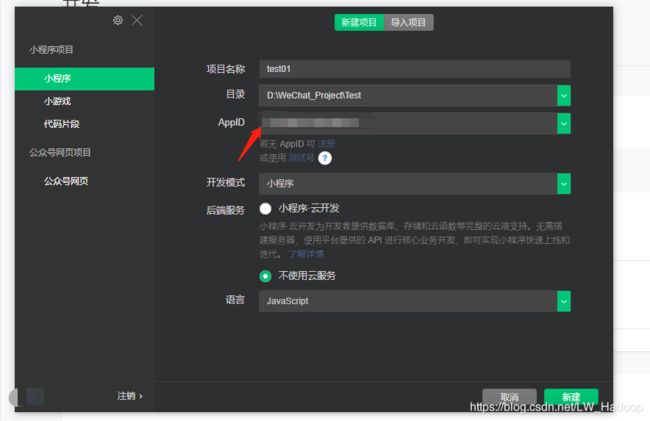
1、 首先我们需要在开发工具中使用云开发,注意必须要使用自己 微信公众平台 注册的后得到的 AppID(小程序ID) 来创建项目
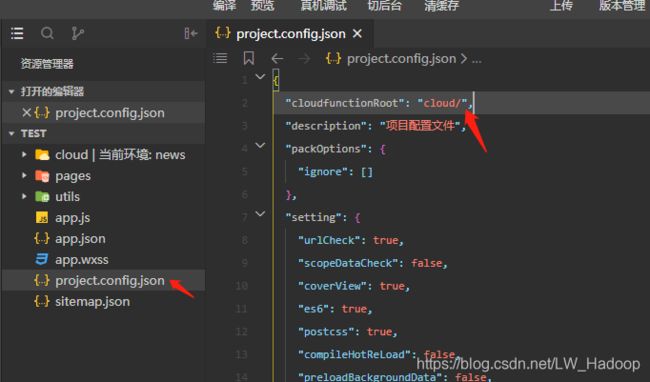
2、 然后在项目中创建一个文件夹(我这里创建了一个cloud文件夹),注意文件夹的目录结构,然后在项目的配置文件中使用 "cloudfunctionRoot": "cloud/", 指定云函数的文件夹路径,注意必须是 cloudfunctionRoot 文件夹可以随意命名

"cloudfunctionRoot": "cloud/"
注意如果之前没有使用过云开发,那么是没有默认的云开发环境的,我这里是之前有一个news的云环境,系统自动指定的
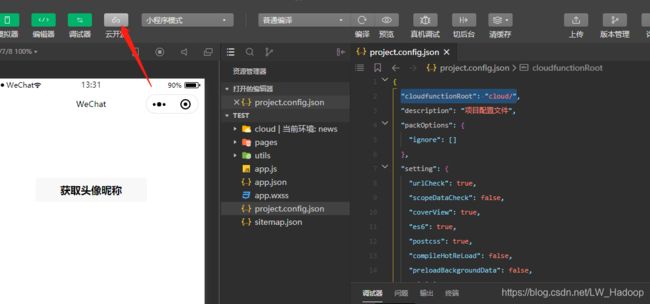
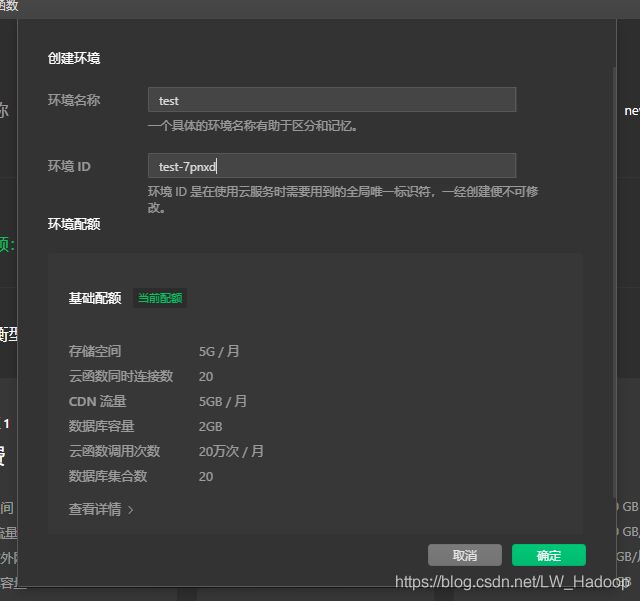
3、 创建云开发环境,打开云开发,然后创建一个云环境,需要记号云环境的id,建议复制下来
如果是之前有云环境可以从这里创建,我这里已经创建好了云环境了,就不再创建一个了
	wx.cloud.init({
      env: "news-sdnlu"
    });

选择自己的云环境

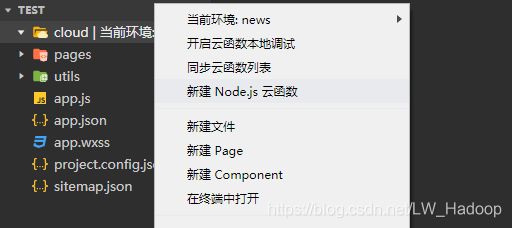
5、 右键云环境文件夹,在云环境中创建 node.js 函数
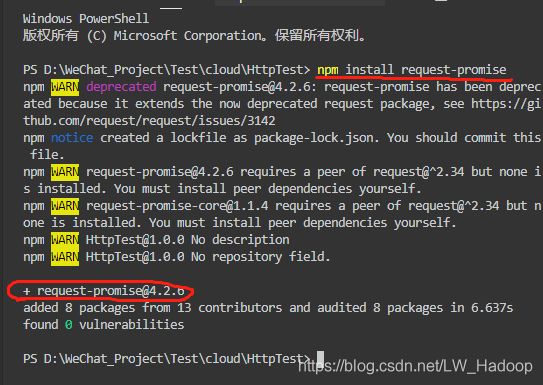
6、 右键云函数,使用终端打开,然后输入 npm install request-promise 注意本地要 先安装好 node.js 环境 ,关于安装 node.js 环境的百度一下就有了请自行安装,这里不做赘述。

npm install request-promise
出现 request-promise@xxx 证明安装成功,你的版本不一定和我的一样
7、 在云函数中使用 request-promise 注意完成云函数的创建后都要右键上传部署,并且每次修改都要重新上传部署
// 云函数入口文件
const cloud = require('wx-server-sdk')
//引入request-promise用于做网络请求
var rp = require('request-promise');
//这里是指定云环境的id,与app.json中一样,为了方便切换环境,建议使用 cloud.DYNAMIC_CURRENT_ENV 自动指定
cloud.init({
  env: cloud.DYNAMIC_CURRENT_ENV
})

// 云函数入口函数
exports.main = async (event, context) => {
  //我这里是指定使用小程序传递的URL进行的测试请求,默认是GET请求
  let url = event.url;
  // console.log('前端参数');
  // console.log(event);
  if(url == null || url == undefined ){
    return 'URL不存在'
  }else{
    return await rp(url)
    .then(function (res) {
      return res
    })
    .catch(function (err) {
      return '请求失败'
    });
  }

}
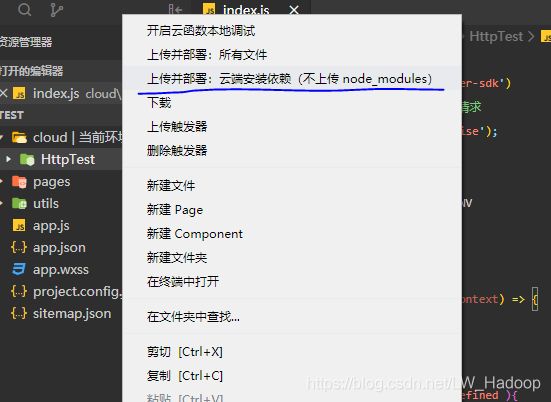
8、 在项目中调用云函数测试 HTTP 请求,在wx.cloud.callFunction 中指定云函数的名称
	 //测试请求
    wx.cloud.callFunction({
      name: 'HttpAPI',//你的云函数名称
      data: {
        url: 'http://ip:端口/test',
      }
    }).then( (res)=>{
    //请求成功
      console.log(res);
    }).catch( (res)=> {
    //请求失败
      console.log(res);
    })
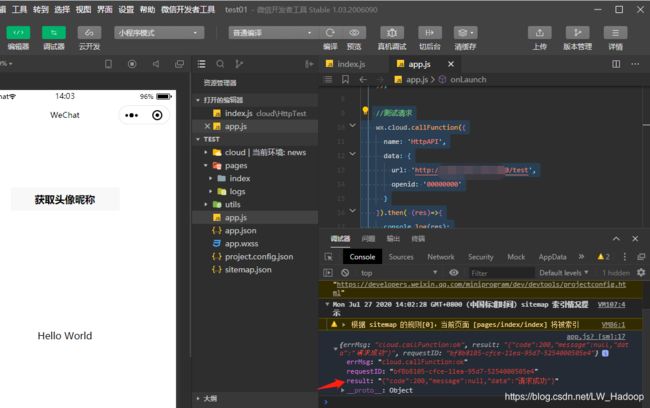
注意 result 是请求的结果,我使用的是springboot做的后台服务器,但是结果是字符串所以需要使用 JSON.parse(res.result) 转成json数据,如果那你们的请求结果不是字符串那么就不需要json化
初步使用HTTP请求就成功啦,接下来介绍一下使用 request-promise 的GET于POST请求的参数传递,我这里使用的是springboot的后台,这里赘述springboot 的内容,并且这里不封装 RESTful 风格的请PUT、DELETE求,只使用GET、POST
request-promise GET 请求
不废话直接上代码
1、云函数中
云函数的console.log();只能在云函数的日志中查看,不会打印到控制台上,以为云函数不是本地
// 云函数入口文件
const cloud = require('wx-server-sdk')
//引入request-promise用于做网络请求
var rp = require('request-promise');

cloud.init({
  env: cloud.DYNAMIC_CURRENT_ENV
})

// 云函数入口函数
exports.main = async (event, context) => {
  let url = event.url;
  // console.log('前端参数');
  // console.log(event);
  if(url == null || url == undefined ){
    return 'URL不存在'
  }else{
    return await rp(url)
    .then(function (res) {
      return res
    })
    .catch(function (err) {
      return '请求失败'
    });
  }
}
小程序js中
wx.showLoading({
      title: '加载中',
      mask: true
    });

    var that = this;

    wx.cloud.callFunction({
      name: 'HttpGetNotepad',//你的云函数名称
      data: {
      //对于get请求我们的参数可以直接拼接在url?后面,多个参数使用 & 了解 如:url?a=1&b=1 我这里是使用 RESTful 风格的URL
        url: 'http://ip或者域名:端口/notepad/'+app.globalData.openid
      }
    }).then( (res)=>{
      // console.log(res);
      var result = JSON.parse(res.result);
      if(result.code == 200){
        that.setData({
          noepadInfo: result.data
        })
      }else{
        wx.showToast({
          title: '服务器错误',
          duration: 2000
        });
        // wx.hideLoading();
      }
      wx.hideLoading();

    }).catch( (res)=>{
      // console.log(res);
      wx.showToast({
        title: '服务器断开',
        duration: 2000
      });
      wx.hideLoading();
    })
springboot后端
 @GetMapping("/notepad/{opendId}")
    public Result getUserContent(@PathVariable("opendId") String opendId){
        List<User_Notepad> notepadByOpendId = user_service.findNotepadByOpendId(opendId);
        return Result.success(notepadByOpendId);
    }
request-promise POST 请求
这一部分是个重点,有两种传递参数的方式
1、 使用form表单传递参数
云函数
// 云函数入口文件
const cloud = require('wx-server-sdk')
//引入request-promise用于做网络请求
var rp = require('request-promise');

cloud.init({
  env: cloud.DYNAMIC_CURRENT_ENV
})

// 云函数入口函数
exports.main = async (event, context) => {
  // console.log(event);
  let url = event.url;
  if(url == null || url == undefined ){
    return 'URL不存在'
  }else{
    return await rp({
      url: url,
      method: "POST",
      json: true,
      form: {
        openId: event.openId,
        content: event.content,
        date: event.date,
        startAddress: event.startAddress,
        startPoint: event.startPoint,
        endAddress: event.endAddress,
        endPoint: event.endPoint,
        startTime: event.startTime,
        endTime: event.endTime,
        beforTime: event.beforTime,
        remind: event.remind
      },
      headers: {
        //"content-type": "application/json",
        "content-Type": "application/x-www-form-urlencoded; charset=UTF-8",
      },
    })
    .then(function (res) {
      return res
    })
    .catch(function (err) {
      return '请求失败'
    });
  }

}
小程序js调用
//发送请求到服务器
	//这只是为了用户友好性做的显示 loading
      wx.showLoading({
        title: '保存中',
        mask: true
      })

      wx.cloud.callFunction({
        name: 'HttpAddNotepad',//你的云函数名称
        data: {
          // url: 'http://lw.free.idcfengye.com/notepad',
          url: 'http://ip或者域名/notepad',
          openId: app.globalData.openid,
          content: this.data.zhuti,
          date: this.data.date,
          startAddress: this.data.startAddress,
          startPoint: this.data.startPoint,
          endAddress: this.data.endAddress,
          endPoint: this.data.endPoint,
          startTime: this.data.timeStart,
          endTime: this.data.timeEnd,
          beforTime: this.data.tiqian,
          remind: (this.data.flag?1:0)
        }
      }).then( (res)=>{
        // console.log(res);
        if(res.result.code == 200 || res.result.data >0){
          wx.showToast({
            title: '保存成功',
            duration: 1000
          });
          //返回页面
          setTimeout(function () {
            wx.navigateBack({
              delta: 1
            })
          }, 1000)
        }else{
          wx.showToast({
            title: '保存失败',
            duration: 2000
          });
          // wx.hideLoading();
        }
      }).catch( (res)=> {
        // console.log(res);
        wx.showToast({
          title: '保存失败',
          duration: 2000
        });
        // wx.hideLoading();
      })
springboot后端
	 @PostMapping("/notepad")
	 //这里不能使用 @RequestBody 接收数据,只能是自动入参
    public Result addUserNotepad( User_Notepad notepad ) throws Exception{
        JobAndTrigger jt = null;

        if(notepad.getRemind() == 1 && notepad.getBeforTime()!=null && notepad.getStartTime()!=null){

            jt = user_service.addSendJob(notepad);
        }
        //数据入库
        notepad.setJt(jt);

        int row = user_service.insertUseNotepad(notepad);
        return Result.success("添加成功",notepad.getId());
    }
2、 使用body传递参数
云函数
// 云函数入口文件
const cloud = require('wx-server-sdk')
//引入request-promise用于做网络请求
var rp = require('request-promise');

cloud.init({
  env: cloud.DYNAMIC_CURRENT_ENV
})

// 云函数入口函数
exports.main = async (event, context) => {
  let url = event.url;
  let data = event.info;
  // console.log(data);

  if(url == null || url == undefined ){
    return 'URL不存在'
  }else{
    return await rp({
      url: url,
      method: "POST",
      json: true,
      body: data,//这里就是使用的json格式的数据
      headers: {
        "content-Type": "application/json",
        // "content-Type": "application/x-www-form-urlencoded; charset=UTF-8",
        // 'User-Agent': 'Request-Promise'
        // "token": event.token
      },
    })
    .then(function (res) {
      return res
    })
    .catch(function (err) {
      return '请求失败'
    });
  }
}
小程序js调用
	//构造数据 数据可以在 调用云函数的data中写,这里是个人风格这么写,没有强制要求
      var info =
      {
        id: this.data.notepadInfo.id,
        openId: app.globalData.openid,
        content: this.data.zhuti,
        date: this.data.date,
        startAddress: this.data.startAddress == this.data.notepadInfo.startAddress?null:this.data.startAddress,
        startPoint: this.data.startPoint == this.data.notepadInfo.startPoint?null:this.data.startPoint,
        endAddress: this.data.endAddress == this.data.notepadInfo.endAddress?null:this.data.endAddress,
        endPoint: this.data.endPoint == this.data.notepadInfo.endPoint?null:this.data.endPoint,
        startTime: this.data.timeStart,
        endTime: this.data.timeEnd,
        beforTime: this.data.tiqian,
        remind: (this.data.flag?1:0),
      }
      // console.log(info);
      wx.cloud.callFunction({
        name: 'HttpUpdateRemind',
        data: {
          url: 'http://ip或者域名/upnotepad',
          info: info //json格式的数据
        }
      }).then( (res)=>{
        // console.log(res);
        if(res.result.code == 200 || res.result.data >0){
          wx.showToast({
            title: '修改成功',
            duration: 1000
          });
          //返回页面
          setTimeout(function () {
            wx.redirectTo({
              url: '/pages/myNotepad/myNotepad'
            })
          }, 1000)
        }else{
          wx.showToast({
            title: '修改失败',
            duration: 2000
          });
          // wx.hideLoading();
        }
      }).catch( (res)=> {
        // console.log(res);
        wx.showToast({
          title: '修改失败',
          duration: 2000
        });
        // wx.hideLoading();
      })
sprongboot后端
@PostMapping("/remind/{flag}")
//这里就用 @RequestBody接收参数
    public Result updateRemind(@PathVariable("flag") boolean flag, @RequestBody User_Notepad notepad ) throws Exception{

        JobAndTrigger jt = null;

        if(notepad!=null && flag){

            jt = user_service.addSendJob(notepad);
            notepad.setJt(jt);
//            System.out.println(jt);
            notepad.setRemind(1);
        }else if(notepad!=null && !flag && notepad.getJt()!=null && (!StringUtils.isEmpty(notepad.getJt().getJobName())) ){
            jt = quartzService.deleteJob(notepad.getJt());
            notepad.setJt(jt);
//            System.out.println(jt);
            notepad.setRemind(0);
        }
        //数据入库
        int res = user_service.updateRemind(notepad);

        return Result.success("修改成功",notepad);
    }
这里是个人做微信小程序的一点总结,如果你觉得对你有用请留个赞呗
> 转发请注明出处:https://blog.csdn.net/LW_Hadoop
