HTML5画布canvas实战(2)--饼状图
画布
HTML5 canvas 元素用于图形的绘制,通过脚本 (通常是JavaScript)来完成 canvas 标签只是图形容器,您必须使用脚本来绘制图形。你可以通过多种方法使用 canvas 绘制路径,盒、圆、字符以及添加图像。
福利广告
以前画画能把猪画成四不像,现在入门学了画布后,觉得自己已经是米开朗基罗级别的画家,从此走向人生的巅峰…后来获取上下文(CanvasRenderingContext2D),绘制工具箱,一步一步走向了人生的盆地…画布的CanvasRenderingContext2D如马良的神笔,但是还是要花费一番心血学习它,才能从一棵葱发展成为一颗参天大葱…做个有理想的葱
饼状图
技术分析
- 使用arc()来画我们的圆
CanvasRenderingContext2D.arc() 是 Canvas 2D API 绘制圆弧路径的方法。 圆弧路径的圆心在 (x, y) 位置,半径为 r ,根据anticlockwise (默认为顺时针)指定的方向从 startAngle 开始绘制,到 endAngle 结束。
void ctx.arc(x, y, radius, startAngle, endAngle, anticlockwise);
- 使用fillRect()来填充正方形
void ctx.fillRect(x, y, width, height);
- 使用fillText()绘制文本
在 (x, y)位置填充文本(text)的方法。如果选项的第四个参数提供了最大宽度(maxWidth),文本会进行缩放以适应最大宽度。
- 使用Math.random()获取随机颜色
HTML结构
    <style>
        canvas{
            display: block;
            margin: 10px auto;
            border: 1px solid #000;
        }
    </style>
<canvas width="600" height="400"></canvas>
使用构造函数初始化饼图的一些变量
    function PieChart(cxt){
        // 1.1 获取上下文
        this.myCan = document.querySelector('canvas')
        this.cxt = cxt || this.myCan.getContext('2d')
        // 1.2 获取画布的宽高
        this.w = this.cxt.canvas.width
        this.h = this.cxt.canvas.height
        // 1.3 获取饼状图的圆心
        this.x = this.w/2 + 30
        this.y = this.h/2
        // 1.4 定义饼状图的半径
        this.r = 150
        this.line = 20
        // 1.5 初始化矩形长宽
        this.rectW = 30
        this.rectH = 15
        // 1.6 初始化矩形距离坐上的距离
        this.rectL = 10
        this.rectT = 6
    }
使用闭包来产生一个区域内的随机数
    PieChart.prototype.ranNum = function (min,max) {
        return function () {
            return parseInt(Math.random()*(max-min+1)+min)
        }
    }
实现随机颜色
因为r,g,b颜色的区间是[0,255],所以我们直接作为参数
    PieChart.prototype.ranColor = function () {
         this.color = this.ranNum(0,255)
         return `rgb(${this.color()},${this.color()},${this.color()})`
    }
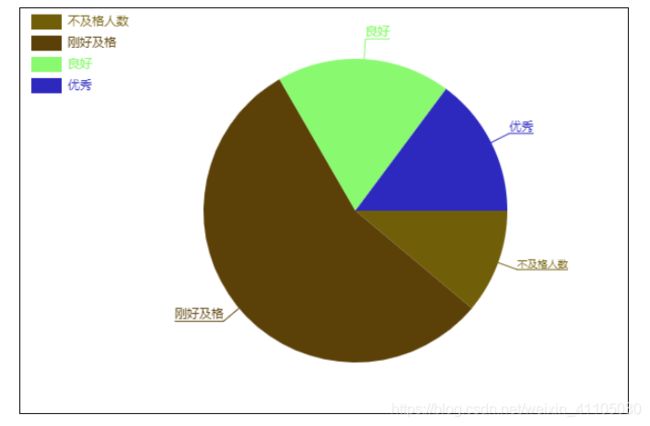
给一个模拟数据方便我们画圆
    var data = [
        {
            title: '不及格人数',
            num: 6
        },
        {
            title: '刚好及格',
            num: 30
        },
        {
            title: '良好',
            num: 10
        },
        {
            title: '优秀',
            num: 8
        }
    ];
绘制左上方第n个矩形和其文字
我们在构造函数已经定义好矩形的长rectW宽rectW间隔距离rectT,str是文本内容,n代表矩形的序列,rectColor矩形颜色

    PieChart.prototype.drawRect = function(str,n,rectColor){
        // 绘制左上角矩形
        this.cxt.beginPath()
        let rectEndT = this.rectT*(n+1)+this.rectH*(n)
        this.cxt.fillRect(this.rectL,rectEndT,this.rectW,this.rectH)
        // 配套相应的文字
        this.cxt.font = '12px Miscrosoft Yahei'
        this.cxt.textBaseline = 'middle'
        this.cxt.fillText(str,this.rectL+this.rectW+this.rectT,rectEndT+this.rectH/2)
        this.cxt.fillStyle = rectColor
        this.cxt.fill()
    }
画一个圆弧
圆包括圆心(this.x,this.y),起始弧度和结束弧度,颜色(这三个未定义:sAngel,eAngle,color)
    PieChart.prototype.drawArc = function(sAngle,eAngle,color){
        this.cxt.moveTo(this.x,this.y)
        this.cxt.arc(this.x,this.y,this.r,sAngle,eAngle)
        this.cxt.fillStyle = color
        this.cxt.fill()
    }
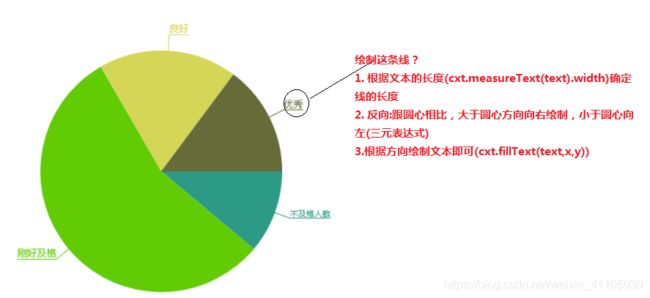
从圆心引出一条线,绘制标题文本
    PieChart.prototype.drawTitle = function(sAngle,angle,color,str){
        this.cxt.beginPath()
        this.endX = Math.cos(sAngle + angle/2)*(this.r+this.line)+this.x
        this.endY = Math.sin(sAngle + angle/2)*(this.r+this.line)+this.y
        this.cxt.moveTo(this.x,this.y)
        this.cxt.lineTo(this.endX,this.endY)
        this.cxt.strokeStyle = color
        this.cxt.stroke()

        this.cxt.beginPath()
        this.textWidth = this.cxt.measureText(str).width
        this.cxt.moveTo(this.endX,this.endY)
        this.lineEndX = this.endX>this.x?this.endX+this.textWidth:this.endX-this.textWidth
        this.cxt.lineTo(this.lineEndX,this.endY)
        this.cxt.strokeStyle = color
        this.cxt.stroke()

        // 绘制标题
        this.cxt.beginPath()
        this.cxt.textBaseline = 'bottom'
        this.cxt.fillText(str,this.x>this.endX?this.lineEndX:this.endX,this.endY)

    }
根据数据的绘制饼图
    PieChart.prototype.drawPie = function (data) {
        if(!data.length){
            return
        }
        let sum = 0
        let start = 0
        let end = 0
        data.forEach(function (item) {
            sum += item.num
        })
        data.map(function (item) {
            item.num = item.num/sum*Math.PI*2
            return item
        })
        for(var i = 0;i < data.length;i++){
            let ran = this.ranColor()
            this.cxt.beginPath()
            if(i==0){
                start = 0
                end = data[i].num
            }else{
                start += data[i-1].num
                end += data[i].num
            }
            this.drawArc(start,end,ran)

            this.drawTitle(start,data[i].num,ran,data[i].title)

            this.drawRect(data[i].title,i,ran)

        }
    }
实例化
    let pie = new PieChart()
    pie.drawPie(data)
- 过程中最好是做一步测试一步(可以先一起做好在拿出代码进行封装代码块)
- 要画饼状图必须先对基础知识有大概了解(文本绘制,圆弧的绘制)
- 难点主要是绘制标题点的坐标
- 可能stroke(),fill(),beginPath()有些去掉也不影响代码,因为有moveTo()重新绘制起点,加上颜色只需要填充或描边一次;但是我们最好加上,增加代码可读性。可读性比影响那么小的性能重要的多
Demo
<!DOCTYPE html>
<html lang="en">
<head>
    <meta charset="UTF-8">
    <title>Title</title>
    <style>
        canvas{
            display: block;
            margin: 10px auto;
            border: 1px solid #000;
        }
    </style>
</head>
<body>
<canvas width="600" height="400"></canvas>
</body>
<script>
    function PieChart(cxt){
        this.myCan = document.querySelector('canvas')
        this.cxt = cxt || this.myCan.getContext('2d')
        this.w = this.cxt.canvas.width
        this.h = this.cxt.canvas.height
        this.x = this.w/2 + 30
        this.y = this.h/2
        this.r = 150
        this.line = 20
        this.rectW = 30
        this.rectH = 15
        this.rectL = 10
        this.rectT = 6
    }
    PieChart.prototype.ranNum = function (min,max) {
        return function () {
            return parseInt(Math.random()*(max-min+1)+min)
        }
    }
    PieChart.prototype.ranColor = function () {
         this.color = this.ranNum(0,255)
         return `rgb(${this.color()},${this.color()},${this.color()})`
    }
    PieChart.prototype.drawRect = function(str,n,rectColor){
        this.cxt.beginPath()
        let rectEndT = this.rectT*(n+1)+this.rectH*(n)
        this.cxt.fillRect(this.rectL,rectEndT,this.rectW,this.rectH)
        // 配套相应的文字
        this.cxt.font = '12px Miscrosoft Yahei'
        this.cxt.textBaseline = 'middle'
        this.cxt.fillText(str,this.rectL+this.rectW+this.rectT,rectEndT+this.rectH/2)
        this.cxt.fillStyle = rectColor
        this.cxt.fill()
    }
    PieChart.prototype.drawArc = function(sAngle,eAngle,color){
        this.cxt.moveTo(this.x,this.y)
        this.cxt.arc(this.x,this.y,this.r,sAngle,eAngle)
        this.cxt.fillStyle = color
        this.cxt.fill()
    }
    PieChart.prototype.drawTitle = function(sAngle,angle,color,str){
        this.cxt.beginPath()
        this.endX = Math.cos(sAngle + angle/2)*(this.r+this.line)+this.x
        this.endY = Math.sin(sAngle + angle/2)*(this.r+this.line)+this.y
        this.cxt.moveTo(this.x,this.y)
        this.cxt.lineTo(this.endX,this.endY)
        this.cxt.strokeStyle = color
        this.cxt.stroke()

        this.cxt.beginPath()
        this.textWidth = this.cxt.measureText(str).width
        this.cxt.moveTo(this.endX,this.endY)
        this.lineEndX = this.endX>this.x?this.endX+this.textWidth:this.endX-this.textWidth
        this.cxt.lineTo(this.lineEndX,this.endY)
        this.cxt.strokeStyle = color
        this.cxt.stroke()

        // 绘制标题
        this.cxt.beginPath()
        this.cxt.textBaseline = 'bottom'
        this.cxt.fillText(str,this.x>this.endX?this.lineEndX:this.endX,this.endY)

    }
    PieChart.prototype.drawPie = function (data) {
        if(!data.length){
            return
        }
        let sum = 0
        let start = 0
        let end = 0
        data.forEach(function (item) {
            sum += item.num
        })
        data.map(function (item) {
            item.num = item.num/sum*Math.PI*2
            return item
        })
        for(var i = 0;i < data.length;i++){
            let ran = this.ranColor()
            this.cxt.beginPath()
            if(i==0){
                start = 0
                end = data[i].num
            }else{
                start += data[i-1].num
                end += data[i].num
            }
            this.drawArc(start,end,ran)

            this.drawTitle(start,data[i].num,ran,data[i].title)

            this.drawRect(data[i].title,i,ran)

        }
    }


    var data = [
        {
            title: '不及格人数',
            num: 6
        },
        {
            title: '刚好及格',
            num: 30
        },
        {
            title: '良好',
            num: 10
        },
        {
            title: '优秀',
            num: 8
        }
    ];
    let pie = new PieChart()
    console.log(pie.ranColor())
    pie.drawPie(data)
</script>
</html>


