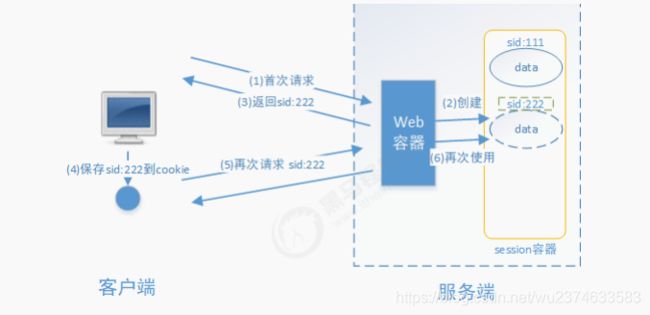
基于Session的认证方式
1 交互流程如下:
用户认证成功后,在服务端生成用户相关的数据保存在session(当前会话)中,发给客户端的 sesssion_id 存放到 cookie 中,这样用户客户端请求时带上 session_id 就可以验证服务器端是否存在 session 数 据,以此完成用户的合法校验,当用户退出系统或session过期销毁时,客户端的session_id也就无效了。

2 具体实现
2.1 项目结构

2.2 login.html
<html lang="zh" xmlns:th="http://www.thymeleaf.org"
      xmlns:sec="http://www.thymeleaf.org/thymeleaf-extras-springsecurity4">
<head><title>用户登录title>head>
<body>
<form action="/login" method="post">
    姓名:<input type="text" name="username"><br>
    密码:<input type="password" name="password"><br> <input type="submit" value="登录">
form>
body>
html>
2.3 application.yml
server:
  port: 8080
spring:
  thymeleaf:
    mode: LEGACYHTML5
  main:
    allow-bean-definition-overriding: true
user:
  key: SESSION_USER_KEY
2.4 LoginController
@Controller
public class LoginController {

    @Resource
    private AuthenticationService authenticationService;

    @Value("${user.key}")
    private String userKey;

    @GetMapping(path = "/goLogin")
    public String goLogin() {

        return "user/login";
    }

    @PostMapping(path = "/login", produces = "text/html;charset=UTF-8")
    @ResponseBody
    public String login(AuthenticationRequest authenticationRequest, HttpSession session) {

        UserDto userDetails = authenticationService.authentication(authenticationRequest);
        System.out.println("登录"+userKey);
        session.setAttribute(userKey, userDetails);
        return userDetails.getUsername() + "登录成功";
    }

    @GetMapping(value = "logout")
    @ResponseBody
    public String logout(HttpSession session) {

        session.invalidate();
        return "退出成功";
    }

}
2.5 UserController
@RestController
public class UserController {

    @Value("${user.key}")
    private String userKey;

    /*** 测试资源1 * @param session * @return */
    @GetMapping(value = "/r/r1")
    public String r1(HttpSession session) {
        String fullname = null;
        Object userObj = session.getAttribute(userKey);
        if (userObj != null) {
            fullname = ((UserDto) userObj).getFullname();
        } else {
            fullname = "匿名";
        }
        return fullname + " 访问资源1";
    }

    @GetMapping(value = "/r/r2",produces = {"text/html;charset=UTF-8"})
    public String r2(HttpSession session) {
        String fullname = null;
        Object userObj = session.getAttribute(userKey);
        if (userObj != null) {
            fullname = ((UserDto) userObj).getFullname();
        } else {
            fullname = "匿名";
        }
        return fullname + " 访问资源2";
    }
}
2.6 AuthenticationRequest.java
@Data
public class AuthenticationRequest {

    /*** 用户名 */
    private String username;

    /*** 密码 */
    private String password;
}
2.7 UserDto.java
@Data
@AllArgsConstructor
@NoArgsConstructor
public class UserDto {

    private String id;

    private String username;

    private String password;

    private String fullname;

    private String mobile;

    private Set<String> authorities;
}
2.8 AuthenticationServiceImpl .java
@Service
@Slf4j
public class AuthenticationServiceImpl implements AuthenticationService {


    //用户信息
    private Map<String, UserDto> userMap = new HashMap<>();
    {
        Set<String> authorities1 = new HashSet<>();
        authorities1.add("p1");
        Set<String> authorities2 = new HashSet<>();
        authorities2.add("p2");
        userMap.put("zhangsan", new UserDto("1010", "zhangsan", "123", "张 三", "133443", authorities1));
        userMap.put("lisi", new UserDto("1011", "lisi", "456", "李四", "144553", authorities2));
    }

    @Override
    public UserDto authentication(AuthenticationRequest authenticationRequest) {

        Optional.ofNullable(authenticationRequest).orElseThrow(() -> new RuntimeException("账号信息为空"));
        String password = authenticationRequest.getPassword();
        String username = authenticationRequest.getUsername();
        if (StringUtils.isEmpty(password) || StringUtils.isEmpty(username)) {

            throw new RuntimeException("用户名密码为空");
        }
        UserDto userDto = getUserDto(username);
        if (ObjectUtils.isEmpty(userDto)) {
            throw new RuntimeException("用户信息不存在");
        }
        return userDto;
    }

    public UserDto getUserDto(String username) {
        return userMap.get(username);
    }

}
2.9 SimpleAuthenticationInterceptor.java
@Component
@Slf4j
public class SimpleAuthenticationInterceptor implements HandlerInterceptor {

    @Value("${user.key}")
    private String userKey;

    @Override
    public boolean preHandle(HttpServletRequest request, HttpServletResponse response, Object handler) throws Exception {
        //读取会话信息
        System.out.println(userKey);
        Object object = request.getSession().getAttribute(userKey);
        if (object == null) {
            log.info("请登录");
            writeContent(response, "请登录");
            return false;
        }
        log.info("object ={}",object);
        UserDto user = (UserDto) object;
        //请求的url
        String requestURI = request.getRequestURI();
        if (user.getAuthorities().contains("p1") && requestURI.contains("/r1")) {
            return true;
        }
        if (user.getAuthorities().contains("p2") && requestURI.contains("/r2")) {
            return true;
        }
        log.info("权限不足,拒绝访问");
        writeContent(response, "权限不足,拒绝访问");
        return false;
    }

    private void writeContent(HttpServletResponse response, String msg) throws IOException {
        response.setContentType("text/html;charset=UTF-8");
        PrintWriter writer = response.getWriter();
        writer.print(msg);
        writer.close();
    }
}
2.10 WebAppConfigurer.java
@EnableWebMvc
@Configuration
public class WebAppConfigurer implements WebMvcConfigurer {


    @Bean
    SimpleAuthenticationInterceptor simpleAuthenticationInterceptor() {
        return new SimpleAuthenticationInterceptor();
    }

    @Override
    public void addInterceptors(InterceptorRegistry registry) {
        // 可添加多个
        registry.addInterceptor(simpleAuthenticationInterceptor()).addPathPatterns("/r/*");
    }
}
注意:
在拦截器中,@Value这种注入性的注解是不生效的,因为拦截器先执行,解决办法就是在配置文件中,手动装配拦截器对象,让拦截器在自动装配后执行,或者直接用AOP切面实现。如果遇到@Resouce这种注入型可以通过applicationContext上下文来手动获取并注入。