magento高可用架构部署
电商系统部署手册
1.系统部署架构
Ø 部署架构图
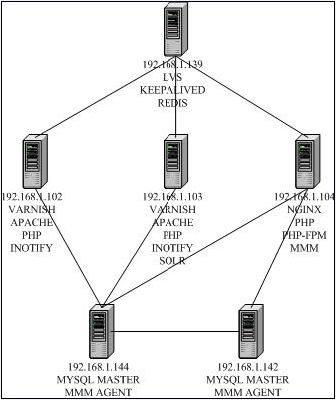
Ø 服务器列表
| IP地址 |
配置 |
操作系统 |
应用软件 |
| 192.168.1.139 |
4C/4G |
CentOS 6.4 |
keepalived-1.2.7-3 redis-2.4.10 |
| 192.168.1.102 |
4C/20G |
CentOS 6.5 |
varnish-2.1.5-5 httpd-2.2.15-29 php-5.3.3 inotify-tools-3.14-1 |
| 192.168.1.103 |
4C/20G |
CentOS 6.5 |
varnish-2.1.5-5 httpd-2.2.15-29 php-5.3.3 inotify-tools-3.14-1 apache-solr-3.4.0 |
| 192.168.1.104 |
4C/16G |
CentOS 6.5 |
nginx-1.4.4 php-5.3.3-27 php-fpm-5.3.3-27 |
| 192.168.1.144 |
1C/8G |
CentOS 6.4 |
mysql55-server-5.5.33 |
| 192.168.1.142 |
1C/8G |
CentOS 6.4 |
mysql55-server-5.5.33 |
2.部署转发lvs+keepalived
Ø 在192.168.1.139上
安装lvs 和 keepalived
| yum install keepalived yum install ipvsadm |
配置/etc/sysconfig/ipvsadm
| -A -t 192.168.1.105:22 -s rr -p 60 -a -t 192.168.1.105:22 -r 127.0.0.1:22 -g -w 3 -A -t 192.168.1.105:80 -s wrr -p 600 -a -t 192.168.1.105:80 -r 192.168.1.102:80 -g -w 5 -a -t 192.168.1.105:80 -r 192.168.1.103:80 -g -w 5 |
编辑配置文件vi /etc/keepalived/keepalived.conf
| ! Configuration File for keepalived global_defs { router_id LVS_MASTER }
vrrp_instance VI_1 { state MASTER interface eth1 virtual_router_id 51 priority 99 advert_int 1 nopreempt 1 authentication { auth_type PASS auth_pass 1111 } virtual_ipaddress { 192.168.1.105 } }
virtual_server 192.168.1.105 80 { delay_loop 10 lb_algo rr lb_kind DR nat_mask 255.255.255.0 persistence_timeout 600 inhibit_on_failure protocol TCP real_server 192.168.1.102 80 { weight 5 inhibit_on_failure TCP_CHECK{ connect_timeout 30 nb_get_retry 4 delay_before_retry 30 connect_port 80 } }
real_server 192.168.1.103 80 { weight 5 inhibit_on_failure TCP_CHECK{ connect_timeout 30 nb_get_retry 4 delay_before_retry 30 connect_port 80 } }
} virtual_server 192.168.1.105 22 { delay_loop 6 lb_algo rr lb_kind DR nat_mask 255.255.255.0 persistence_timeout 60 inhibit_on_failure protocol TCP
real_server 127.0.0.1 22 { weight 3
inhibit_on_failure TCP_CHECK{ connect_timeout 10 nb_get_retry 4 delay_before_retry 10 connect_port 22 } }
service keepalived start #启动
|
Ø 分别在192.168.1.102和 103上
编辑lvs脚本 vi/bin/lvs.sh
| #!/bin/bash vip=192.168.1.105 /sbin/ifconfig lo:0 $vip broadcast $vip netmask 255.255.255.255 up /sbin/route add -host $vip dev lo:0 echo "1" >/proc/sys/net/ipv4/conf/lo/arp_ignore echo "2" >/proc/sys/net/ipv4/conf/lo/arp_announce echo "1" >/proc/sys/net/ipv4/conf/all/arp_ignore echo "2" >/proc/sys/net/ipv4/conf/all/arp_announce sysctl -p |
启动lvs
| chmod u+x /bin/lvs.sh /bin/lvs.sh |
3.部署应用varnish+ apache + php
Ø 在192.168.1.102和 103上
安装varnish
| yum install varnish |
配置参数 vi/etc/sysconfig/varnish
| VARNISH_LISTEN_PORT=80 VARNISH_MIN_THREADS=50 VARNISH_MAX_THREADS=1000 VARNISH_THREAD_TIMEOUT=120 VARNISH_STORAGE_FILE=/var/lib/varnish/varnish_storage.bin VARNISH_STORAGE_SIZE=1G VARNISH_ADMIN_LISTEN_ADDRESS=192.168.1.102 VARNISH_ADMIN_LISTEN_PORT=6082
|
vi /etc/varnish/default.vcl
| backend myblogserver { .host = "127.0.0.1"; .port = "9000"; } sub vcl_recv { if (req.http.host~"192.168.1.105") { remove req.http.X-Forwarded-For; set req.http.X-Forwarded-For = client.ip; set req.backend = myblogserver; if (req.request != "GET" && req.request != "HEAD") { return(pass); } else { return(lookup); } } else { error 404 "ProdApp Cache Server"; return(lookup); } } sub vcl_deliver { if (obj.hits > 0) { set resp.http.X-Cache = "HIT from server"; } else { set resp.http.X-Cache = "miss from server"; } return (deliver); }
|
启动varnish
| service varnish start |
查看varnish 状态
| varnishstat |
安装apache和php相关组件
| yum install php-pear php-mysql php-pecl-redis php-xml php-mbstring php php-pecl-memcache php-pecl-lzf php-pecl-igbinary php-gd php-common php-mcrypt php-soap php-devel php-cli php-pdo httpd |
配置主要参数vi /etc/httpd/conf/httpd.conf
| DocumentRoot "/var/www/html/magento" KeepAlive on MaxKeepAliveRequests 500 KeepAliveTimeout 15 StartServers 8 MinSpareServers 5 MaxSpareServers 20 ServerLimit 400 MaxClients 400 MaxRequestsPerChild 4000 Listen 9000
|
启动APACHE
| service httpd start |
配置php主要参数 vi/etc/php.ini
| max_execution_time = 60 memory_limit = 2048M |
4.部署图片nginx + php-fpm
Ø 在192.168.1.104上
安装相关组件
| yum install wget make gcc gcc-c++ zlib-devel openssl openssl-devel pcre-devel gd kernel keyutils patch perl php-fpm php-cli php-pdo php-mysql php-mcrypt php-mbstring php-gd php-tidy php-xml php-xmlrpc php-pear php-eaccelerator |
下载NGINX软件
| cd /opt wget http://nginx.org/download/nginx-1.4.4.tar.gz wget ftp://ftp.csx.cam.ac.uk/pub/software/programming/pcre/pcre-8.34.tar.gz wget http://labs.frickle.com/files/ngx_cache_purge-2.1.tar.gz wget http://www.openssl.org/source/openssl-1.0.1f.tar.gz |
安装NGINX
| tar zxvf nginx-1.4.4.tar.gz tar zxvf pcre-8.34.tar.gz tar zxvf ngx_cache_purge-2.1.tar.gz tar xvzf openssl-1.0.1f.tar.gz cd pcre-8.34 ./configure --prefix=/usr/local/pcre make make install
cd ../nginx-1.4.4 ./configure --prefix=/usr/local/nginx --user=www --group=www --with-http_stub_status_module --with-openssl=/opt/openssl-1.0.1f --with-http_ssl_module --with-pcre=/opt/pcre-8.34 --add-module=/opt/ngx_cache_purge-2.1
make make install |
编辑NGINX启动脚本 vi/etc/rc.d/init.d/nginx
| # chkconfig: - 85 15 # description: nginx is a World Wide Web server. It is used to serve
nginxd=/usr/local/nginx/sbin/nginx nginx_config=/usr/local/nginx/conf/nginx.conf nginx_pid=/usr/local/nginx/logs/nginx.pid RETVAL=0 prog="nginx" # Source function library. . /etc/rc.d/init.d/functions # Source networking configuration. . /etc/sysconfig/network # Check that networking is up. [ ${NETWORKING} = "no" ] && exit 0 [ -x $nginxd ] || exit 0 # Start nginx daemons functions. start() { if [ -e $nginx_pid ];then echo "nginx already running...." exit 1 fi echo -n $"Starting $prog: " daemon $nginxd -c ${nginx_config} RETVAL=$? echo [ $RETVAL = 0 ] && touch /var/lock/subsys/nginx return $RETVAL } # Stop nginx daemons functions. stop() { echo -n $"Stopping $prog: " killproc $nginxd RETVAL=$? echo [ $RETVAL = 0 ] && rm -f /var/lock/subsys/nginx /usr/local/nginx/logs/nginx.pid } reload() { echo -n $"Reloading $prog: " #kill -HUP `cat ${nginx_pid}` killproc $nginxd -HUP RETVAL=$? echo } # See how we were called. case "$1" in start) start ;; stop) stop ;; reload) reload ;; restart) stop start ;;
status) status $prog RETVAL=$? ;; *) echo $"Usage: $prog {start|stop|restart|reload|status|help}" exit 1 esac exit $RETVAL |
设置脚本权限
| chmod 775 /etc/rc.d/init.d/nginx chkconfig nginx on |
配置nginx参数 vi /usr/local/nginx/conf/nginx.conf
| user root; worker_processes 16;
error_log /var/log/nginx/error.log;
pid /usr/local/nginx/logs/nginx.pid;
events { use epoll; worker_connections 65535; }
http { include mime.types; default_type application/octet-stream;
log_format main '$remote_addr - $remote_user [$time_local] "$request" ' '$status $body_bytes_sent "$http_referer" ' '"$http_user_agent" "$http_x_forwarded_for"';
access_log /var/log/nginx/access.log main;
charset utf-8; server_names_hash_bucket_size 128; client_header_buffer_size 32k; large_client_header_buffers 4 32k; client_max_body_size 300m; sendfile on; tcp_nopush on; keepalive_timeout 65;
gzip on; gzip_min_length 1k; gzip_buffers 4 16k; gzip_http_version 1.1; gzip_comp_level 2; gzip_types text/plain application/x-javascript text/css application/xml; gzip_vary on;
proxy_temp_path /var/www/html/magento/media/images_temp; proxy_cache_path /var/www/html/magento/media/images_cache levels=1:2 keys_zone=cache_one:200m inactive=1d max_size=30g; log_format cache '***$time_local ' '***$upstream_cache_status ' '***Cache-Control: $upstream_http_cache_control ' '***Expires: $upstream_http_expires ' '***"$request" ($status) ' '***"$http_user_agent" '; server { listen 80; server_name 192.168.1.104; location ~ .*\.(gif|jpg|png|htm|html|css|js|flv|ico|swf)(.*) { proxy_cache cache_one; proxy_cache_valid 200 304 12h; proxy_cache_key $host$uri$is_args$args; proxy_set_header Host $host; proxy_set_header X-Forwarded-For $remote_addr; proxy_pass http://192.168.1.104:8080; proxy_redirect off; access_log /var/log/nginx/cache.log cache; expires 1d; }
location ~ /purge(/.*) { allow 127.0.0.1; allow 192.168.0.0/16; deny all; proxy_cache_purge cache_one $host$1$is_args$args; }
location ~ .*\.(php|jsp|cgi)?$ { proxy_set_header Host $host; proxy_set_header X-Forwarded-For $remote_addr; proxy_pass http://192.168.1.104:8080; } access_log off; }
server{ listen 8080; server_name 192.168.1.104; location / { root /var/www/html/magento; index index.php index.html index.htm; if (-f $request_filename) { expires 30d; break; } if (!-e $request_filename) { rewrite ^(.+)$ /index.php last; } } location ~ \.php$ { root /var/www/html/magento; fastcgi_pass 127.0.0.1:9000; fastcgi_index index.php; fastcgi_param SCRIPT_FILENAME /var/www/html/magento$fastcgi_script_name; include fastcgi_params; }
access_log off; } server { server_name 192.168.1.104; listen 443; ssl on; ssl_certificate /usr/local/nginx/conf/server.crt; ssl_certificate_key /usr/local/nginx/conf/server.key; location / { root /var/www/html/magento; index index.php index.html index.htm; if (-f $request_filename) { expires 30d; break; } if (!-e $request_filename) { rewrite ^(.+)$ /index.php last; } } location ~ \.php$ { root /var/www/html/magento; fastcgi_pass 127.0.0.1:9000; fastcgi_index index.php; fastcgi_param SCRIPT_FILENAME /var/www/html/magento$fastcgi_script_name; include fastcgi_params; } } }
|
配置php-fpm主要参数
| listen = 127.0.0.1:9000 pm = dynamic pm.max_children = 50 pm.start_servers = 5 pm.min_spare_servers = 5 pm.max_spare_servers = 35 |
启动php-fpm
| service php-fpm start |
5.部署缓存redis
Ø 在192.168.1.139上
安装redis
| yum install redis |
配置主要参数 vi /etc/redis.conf
| #bind 127.0.0.1 maxmemory 2147483648 maxmemory-policy volatile-lru |
启动redis
| service redis start |
Ø 在192.168.1.102和 103上
编辑/etc/php.ini增加
| extension=igbinary.so extension=redis.so |
编辑 /etc/php.d/igbinary.ini
| ;extension=igbinary.so |
编辑 /etc/php.d/redis.ini
| ;extension=redis.so |
安装redis相关组件
| yum install php-redis php-pecl-lzf git |
安装redis cache extension 和redis session extension
| cd /var/www/html/magento git clone https://github.com/colinmollenhour/Cm_Cache_Backend_Redis.git mkdir -p app/code/community/Cm/ rsync -vPpar --delete Cm_Cache_Backend_Redis/Cm/ app/code/community/Cm/ rm -rf Cm_Cache_Backend_Redis git clone https://github.com/colinmollenhour/credis.git mkdir -p lib/Credis/ app/code/community/Cm/RedisSession/ rsync -vPpar --delete credis/ lib/Credis/ git clone https://github.com/colinmollenhour/Cm_RedisSession.git rsync -vPpar --delete Cm_RedisSession/code/ app/code/community/Cm/RedisSession/ rsync -vPpar Cm_RedisSession/Cm_RedisSession.xml app/etc/modules/Cm_RedisSession.xml rm -rf Cm_RedisSession |
6 部署搜索引擎solr
Ø 在192.168.1.103上
安装jdk
| yum install java-1.7.0-openjdk |
配置solr
| mkdir /opt/solr useradd -d /opt/solr -s /bin/bash solr chown solr:solr /opt/solr/ su - solr wget http://archive.apache.org/dist/lucene/solr/3.4.0/apache-solr-3.4.0.tgz tar xf apache-solr-3.4.0.tgz cp -r /var/www/html/magento/lib/Apache/Solr/conf/* apache-solr-3.4.0/example/solr/conf/ |
编辑sorl启动脚本vi /etc/init.d/apache-solr
| #! /bin/sh ### BEGIN INIT INFO # Provides: apache-solr # Required-Start: $all # Required-Stop: $all # Default-Start: 2 3 4 5 # Default-Stop: 0 1 6 # Short-Description: Apache Solr # Description: Apache Solr search engine ### END INIT INFO
# Author: XXXXX XXXXXXXX #chkconfig:2345 20 80 SOLR_DIR="/opt/solr/apache-solr-3.4.0/example" SOLR_USER="solr" JAVA_OPTIONS="-Xmx1024m -DSTOP.PORT=10000 -DSTOP.KEY=jetty-stop-key -jar start.jar" LOG_FILE="/var/log/apache-solr.log" JAVA="java"
case $1 in start) echo "Starting Solr" su - $SOLR_USER -c "cd $SOLR_DIR && exec $JAVA $JAVA_OPTIONS >$LOG_FILE 2>&1 &" ;; stop) echo "Stopping Solr" su - $SOLR_USER -c "cd $SOLR_DIR && $JAVA $JAVA_OPTIONS --stop" ;; restart) $0 stop sleep 1 $0 start ;; *) echo "Usage: $0 {start|stop|restart}" >&2 exit 1 ;; esac |
配置solr日志 vi /etc/logrotate.d/apache-solr
| /var/log/apache-solr.log { daily rotate 7 compress delaycompress missingok notifempty create 640 solr adm } |
启动 solr
| touch /var/log/apache-solr.log chown solr:adm /var/log/apache-solr.log chmod 0640 /var/log/apache-solr.log
chmod 755 /etc/init.d/apache-solr chkconfig --add apache-solr service apache-solr start |
Solr管理地址
| http://192.168.1.103:8983/solr/admin |
在网站配置使用solr

7 部署rsyncinotity
Ø 在192.168.1.104上
安装rsync
| yum install rsync |
配置rsync vi /etc/rsyncd.conf
| uid = root gid = root use chroot = no max connections=0 log file=/var/log/rsyncd.log pid file=/var/run/rsyncd.pid lock file=/var/run/rsyncd.lock [media] path = /var/www/html/magento/media read only = no list = no auth users = root secrets file = /etc/media.pas |
配置密码文件vi /etc/media.pas
| root:root1234 |
启动rsync服务
| chmod 600 /etc/media.pas /usr/bin/rsync --daemon --config=/etc/rsyncd.conf |
Ø 在192.168.1.102和 103 上
安装inotify
| yum install inotify-tools |
编辑同步规则vi /etc/rules.txt
| - *.svn* |
编辑inotify启动脚本
| #!/bin/sh if [ ! -f /etc/media.pas ];then echo "root1234">/etc/media.pas /bin/chmod 600 /etc/media.pas fi log=/var/log/rsync.log src="/var/www/html/magento/media/" host="192.168.1.104" module="media" /usr/bin/inotifywait -mr --timefmt '%d/%m/%y %H:%M' --format '%T %w %f' -e close_write,modify,delete,create,attrib $src | while read DATE TIME DIR FILE; do FILECHANGE=${DIR}${FILE} /usr/bin/rsync -avH --delete --progress --password-file=/etc/media.pas $src --exclude-from="/etc/rules.txt"root@$host::$module & echo "At ${TIME} on ${DATE}, file $FILECHANGE was backed up via rsync" >> $log done |
启动inotify
| chmod +x /bin/inotify_rsync.sh /bin/inotify_rsync.sh & |
8.部署mysql主主
Ø 在192.168.1.144和 142上
安装mysql
| yum install mysql55-server mysql55 |
配置参数(server-id需不同) vi /etc/my.cnf
| [client] #password = your_password port = 3310 socket = /tmp/mysql.sock
[mysqld] port = 3310 socket = /tmp/mysql.sock datadir = /data/magento skip-external-locking skip-name-resolve back-log = 500 key_buffer_size = 10M max_allowed_packet = 1M sort_buffer_size = 1M read_buffer_size = 1M read_rnd_buffer_size = 4M myisam_sort_buffer_size = 64M query_cache_size= 16M thread_concurrency = 16 log-error=/data/log/magento.err slow-query-log-file = /data/log/slow.log long_query_time = 10 #log = /data/log/magento.log performance_schema=on default_time_zone='+08:00' binlog_format=row max_binlog_cache_size=10M max_binlog_size=200M max_connect_errors=50000 max_connections=500 max_user_connections=2000 open_files_limit=131070 sync_binlog=0 table_definition_cache=2048 table_open_cache=2048 thread_cache_size=256 innodb_log_group_home_dir=/data/magento innodb_data_home_dir=/data/magento innodb_adaptive_flushing innodb_adaptive_hash_index=on innodb_buffer_pool_instances=1 innodb_buffer_pool_size=10M innodb_file_per_table=1 expire_logs_days=10 innodb_flush_log_at_trx_commit=2 innodb_flush_method=O_DIRECT innodb_io_capacity=1000 innodb_lock_wait_timeout=100 innodb_log_buffer_size=5M innodb_log_file_size=50M innodb_log_files_in_group=4 innodb_max_dirty_pages_pct=60 innodb_open_files=6000 innodb_read_io_threads=8 innodb_stats_on_metadata=on innodb_thread_concurrency=16 innodb_write_io_threads=8 log-bin=mysql-bin server-id = 2 binlog-do-db = magento replicate-do-db = magento binlog-ignore-db = mysql binlog-ignore-db = information_schema binlog-ignore-db = performance_schema
[mysqldump] quick max_allowed_packet = 16M
[mysql] no-auto-rehash
[myisamchk] key_buffer_size = 128M sort_buffer_size = 128M read_buffer = 2M write_buffer = 2M |
配置复制用户和mmm监控用户
| grant replication slave on *.* to 'replication'@'192.168.1.%' identified by '1qazse4'; flush privileges; grant super,replication client,process on *.* to 'rep_agent'@'192.168.1.%' identified by '1qazse4'; grant replication client on *.* to 'rep_monitor'@'192.168.1.%' identified by '1qazse4'; |
Ø 在192.168.1.144上
配置复制,通过show master status获取正确参数值
| change master to master_host='192.168.1.142', master_port=3310, master_user='replication', master_password='1qazse4', master_log_file='mysql-bin.000003', master_log_pos=335; |
Ø 在192.168.1.142上
配置复制,通过show master status获取正确参数值
| change master to master_host='192.168.1.144', master_port=3310, master_user='replication', master_password='1qazse4', master_log_file='mysql-bin.000011', master_log_pos=107; |
Ø 在192.168.1.144和 142上
启动slave进程
| Slave start; show slave status \G; SHOW PROCESSLIST\G; |
9 部署MMM
Ø 在192.168.1.144和 142 和104上
安装mmm
| yum install mysql-mmm mysql-mmm-agent mysql-mmm-monitor |
Ø 在192.168.1.104上
配置mmm vi /etc/mysql-mmm/mmm_mon.conf
| include mmm_common.conf
ip 192.168.1.104 pid_path /var/run/mysql-mmm/mmm_mond.pid bin_path /usr/libexec/mysql-mmm status_path /var/lib/mysql-mmm/mmm_mond.status ping_ips 192.168.1.144,192.168.1.142,192.168.1.104 auto_set_online 60
# The kill_host_bin does not exist by default, though the monitor will # throw a warning about it missing. See the section 5.10 "Kill Host # Functionality" in the PDF documentation. # # kill_host_bin /usr/libexec/mysql-mmm/monitor/kill_host #
monitor_user rep_monitor monitor_password 1qazse4
debug 0 |
vi /etc/mysql-mmm/mmm_common.conf
| active_master_role writer
cluster_interface eth0 pid_path /var/run/mysql-mmm/mmm_agentd.pid bin_path /usr/libexec/mysql-mmm/ replication_user replication replication_password 1qazse4 agent_user rep_agent agent_password 1qazse4
ip 192.168.1.144 mysql_port 3310 mode master peer db2
ip 192.168.1.142 mysql_port 3310 mode master peer db1
hosts db1, db2 ips 192.168.1.106 mode exclusive |
启动mmm_mon
| mmm_mond |
Ø 在192.168.1.144和 142上
配置mmm agent vi /etc/mysql-mmm/mmm_agent.conf (this后面名称需不同)
| include mmm_common.conf
# The 'this' variable refers to this server. Proper operation requires # that 'this' server (db1 by default), as well as all other servers, have the # proper IP addresses set in mmm_common.conf. this db1 |
vi /etc/mysql-mmm/mmm_common.conf
| active_master_role writer
cluster_interface eth0 pid_path /var/run/mysql-mmm/mmm_agentd.pid bin_path /usr/libexec/mysql-mmm/ replication_user replication replication_password 1qazse4 agent_user rep_agent agent_password 1qazse4
ip 192.168.1.144 mysql_port 3310 mode master peer db2
ip 192.168.1.142 mysql_port 3310 mode master peer db1
hosts db1, db2 ips 192.168.1.106 mode exclusive |
启动mmm_agentd
| mmm_agentd |
10. 网站连接配置
编辑网站配置文件 vi app/etc/local.xml
|
|