缓存加速CDN——squid代理服务器应用(ACL访问控制,sarg日志管理软件,squid反向代理)
这里写目录标题
- 一、ACL访问控制
- 1.1 ACL访问控制方式
- 1.2 ACL规则优先级
- 1.3 常用的ACL列表类型
- 1.4 最简单的ACL控制
- 1.5 ACL综合应用
- 二、Sarg日志分析工具
- 三、squid反向代理
- 3.1 反向代理概述
- 3.2 反向代理网站加速
- 四、实验
- 实验一 验证ACL
- 实验二 Sarg日志分析
- 实验三 搭建squid反向代理服务器
一、ACL访问控制
1.1 ACL访问控制方式
- 根据源地址、目标URL、 文件类型等定义列表
acl 列表名称 列表类型 列表内容 ..
- 针对已定义的acI列表进行限制
http_access allow或deny 列表名称..
1.2 ACL规则优先级
- 一个用户访问代理服务器时,Squid会顺序匹配Squid中定义的所有规则列表,一-旦匹配成功,立即停止匹配
- 所有规则都不匹配时,Squid会使用与最后一条相反的规则
1.3 常用的ACL列表类型
- src→源地址
- dst →目标地址
- port →端口
- dstdomain→目标域
- time →访问时间
- maxconn →最大并发连接
- url_ _regex →目标URL 地址,正则表达式
- Urlpath_regex →整个目标URL路径,整个URL过滤
1.4 最简单的ACL控制
禁止任何客户机使用此代理服务
[root@localhost ~]# vi /etc/squid.conf
......
acl all src 0.0.0.0/0.0.0.0
http_ access deny all
1.5 ACL综合应用
- 允许多个局域网段在工作时间上网
[root@localhost ~]# vi /etc/squid.conf
.....
acl all src 0.0.0.0/0.0.0.0
acl MYLAN src 192.168.1 .0/24192.1 68.4.0/24
acl WORKTIME time MTWHF 08:30-17:30    //星期12345的早上八点半到下午五点半
http_ access allow MYLAN WORKTIME
http_ access deny all
- 通过黑名单限制目标网站
[root@localhost ~]# vi /etc/squid/ipblock.list
61.135.167.36
60.28.14.0/24
[root@localhost ~]# vi /etc/squid/dmblock.list
.qq.com
.msn.com
二、Sarg日志分析工具
- 安装并配置Sarg
- 配置Sarg
- 运行及验证Sarg
- 将Sarg做成计划任务
三、squid反向代理
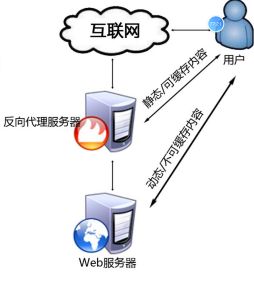
3.1 反向代理概述
- 如果Squid反向代理服务器中缓存了该请求的资源,则将该请求的资源直接返回给客户端;否则反向代
理服务器将向后台的WEB服务器请求资源,然后将请求的应答返回给客户端,同时也将该应答缓存在
本地,供下一个请求者使用
3.2 反向代理网站加速
四、实验
实验一 验证ACL
实验环境:
squid服务器 192.168.200.60
Web服务器 192.168.200.90
win10主机 192.168.200.11
实验步骤;
1、安装配置squid服务器
[root@localhost ~]# iptables -F
[root@localhost ~]# iptables -t nat -F
[root@localhost ~]# setenforce 0
[root@localhost ~]# tar zxvf squid-3.4.6.tar.gz
[root@localhost ~]#yum -y install gcc gcc-c++
[root@localhost ~]# cd squid-3.4.6/
[root@localhost squid-3.4.6]# ./configure --prefix=/usr/local/squid --sysconfdir=/etc --enable-arp-acl --enable-linux-netfilter --enable-linux-tproxy --enable-async-io=100 --enable-err-language="Simplify Chinese" --enable-underscore --enable-poll --enable-gnuregex
[root@localhost squid-3.4.6]# make && make install
[root@localhost squid-3.4.6]# ln -s /usr/local/squid/sbin/* /usr/local/sbin/
[root@localhost squid-3.4.6]# useradd -M -s /sbin/nologin squid
[root@localhost squid-3.4.6]# chown -R squid.squid /usr/local/squid/var/
[root@localhost squid-3.4.6]# vim /etc/squid.conf
 56 http_access allow all
 57 http_access deny all
61 cache_effective_user squid
 62 cache_effective_group squid
[root@localhost squid-3.4.6]# squid -k parse
[root@localhost squid-3.4.6]# squid -z
[root@localhost squid-3.4.6]# netstat -antp | grep squid
tcp6       0      0 :::3128                 :::*                    LISTEN      47503/(squid-1)
[root@localhost squid-3.4.6]# cd /etc/init.d/
[root@localhost init.d]# vim squid
#!/bin/bash
#chkconfig: 2345 90 25
PID="/usr/local/squid/var/run/squid.pid"
CONF="/etc/squid.conf"
CMD="/usr/local/squid/sbin/squid"
case "$1" in
start)
                netstat -ntap | grep squid &> /dev/null
                if [ $? -eq 0 ]
                then
                 echo "squid is running"
                 else
                 echo "正在启动 squid...."
                 $CMD
                fi
                ;;
stop)
                $CMD -k kill &> /dev/null
                rm -rf $PID &> /dev/null
                ;;
status)
                [ -f $PID ] &> /dev/null
                 if [ $? -eq 0 ]
                                then
                                 netstat -ntap | grep squid
                                else
                                 echo "squid is not running"
                fi
                ;;
restart)
                $0 stop &> /dev/null
                echo "正在关闭 squid..."
                $0 start &> /dev/null
                echo "正在启动 squid..."
                ;;
reload)
                $CMD -k reconfigure
                ;;
check)
                $CMD -k parse
                ;;
*)
                echo "用法:$0{start|stop|reload|status|check|restart}"
                ;;
esac
[root@localhost init.d]# chmod +x squid
[root@localhost init.d]# ls
functions  netconsole  network  README  squid
[root@localhost init.d]# chkconfig --add squid
[root@localhost init.d]# chkconfig --level 35 squid on
[root@localhost init.d]# vim /etc/squid.conf
 63 cache_mem 64 MB
 64 reply_body_max_size 10 MB
 65 maximum_object_size 6096 KB
[root@localhost init.d]# service squid reload
[root@localhost init.d]# iptables -I INPUT -p tcp --dport 3128 -j ACCEPT
2、WIN10浏览器开代理 192.168.200.60 端口3128,查看Apache服务器日志文件

[root@localhost ~]# cd /var/log/httpd/
[root@localhost httpd]# ls
access_log  error_log
[root@localhost httpd]# cat access_log
192.168.200.60 - - [07/Sep/2020:16:55:03 +0800] "GET /noindex/css/fonts/Light/OpenSans-Light.ttf HTTP/1.1" 404 240 "http://192.168.200.90/" "Mozilla/5.0 (Windows NT 10.0; Win64; x64) AppleWebKit/537.36 (KHTML, like Gecko) Chrome/70.0.3538.102 Safari/537.36 Edge/18.18363"
192.168.200.60 - - [07/Sep/2020:16:55:03 +0800] "GET /favicon.ico HTTP/1.1" 404 209 "-" "Mozilla/5.0 (Windows NT 10.0; Win64; x64) AppleWebKit/537.36 (KHTML, like Gecko) Chrome/70.0.3538.102 Safari/537.36 Edge/18.18363"
3、设置acl访问控制
[root@localhost init.d]# vim /etc/squid.conf
  8 acl hostlocal src 192.168.200.11/32
 32 http_access deny hostlocal
 [root@localhost init.d]# service squid reload
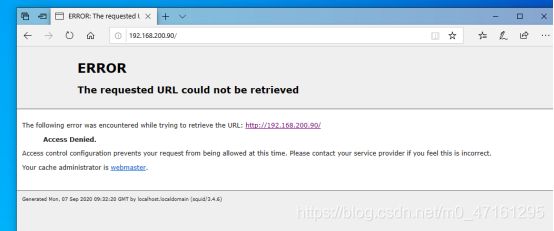
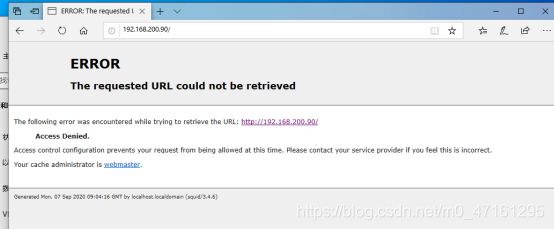
用win10 访问Apache拒绝访问
4、设置ACL文件访问控制,文件里面禁止
[root@localhost init.d]# vim /etc/squid.conf
 8 #acl hostlocal src 192.168.200.11/32
 33 #http_access deny hostlocal
9 acl hostlocal src "/etc/squid/src.list"
34 http_access deny hostlocal
[root@localhost init.d]# mkdir /etc/squid
[root@localhost init.d]# cd /etc/squid/
[root@localhost squid]# vim src.list
192.168.200.11
192.168.200.12
192.168.200.13
[root@localhost squid]# pkill squid
[root@localhost squid]# netstat -antp | grep squid
[root@localhost squid]# squid
[root@localhost squid]# netstat -antp | grep squid
[root@localhost squid]# service squid start
正在启动 squid....
[root@localhost squid]# netstat -antp | grep squid
tcp6       0      0 :::3128                 :::*                    LISTEN      103413/(squid-1)
实验二 Sarg日志分析
1、安装sarg
[root@localhost squid]# vim /etc/squid.conf
 9 #acl hostlocal src "/etc/squid/src.list"
 34 #http_access deny hostlocal
[root@localhost squid]# pkill squid
[root@localhost squid]# service squid start
[root@localhost squid]# netstat -antp | grep squid
tcp6       0      0 :::3128                 :::*                    LISTEN      104040/(squi-1)
[root@localhost ~]# tar zxvf sarg-2.3.7.tar.gz
[root@localhost ~]# cd sarg-2.3.7/
[root@localhost sarg-2.3.7]# mkdir /usr/local/sarg
[root@localhost sarg-2.3.7]# yum install gd gd-devel -y           //安装gd库  做图像化处理
[root@localhost sarg-2.3.7]# ./configure --prefix=/usr/local/sarg --sysconfdir=/etc/sarg --enable-extraprotection    //安全防护功能
[root@localhost sarg-2.3.7]# make && make install
[root@localhost sarg-2.3.7]# cd /etc/sarg/

[root@localhost sarg]# vim sarg.conf
7 access_log /usr/local/squid/var/logs/access.log   //指定访问日志文件
25 title "Squid User Access Reports"                   //网页标题
120 output_dir /var/www/html/squid-reports           //报告输出目录
178 user_ip no    									//使用用户名显示
184 topuser_sort_field connect reverse				//top排序中有连接次数 访问字节 降序排序 升序是normal
206 exclude_hosts /usr/local/sarg/noreport     //不计入排序的站点列表文件
257 overwrite_report no							//同名日志是否覆盖
289 mail_utility mailq.postfix 				//发送邮件报告命令
434 charset UTF-8							//使用字符集
518 weekdays 0-6							//top排行的星期周期
525 hours 0-23							 //top排行的时间周期
633 www_document_root /var/www/html		 //网页根目录
[root@localhost sarg]# ln -s /usr/local/sarg/bin/sarg /usr/local/bin/
[root@localhost sarg]# ls /usr/local/sarg
bin  share
[root@localhost sarg]# touch /usr/local/sarg/noreport   //添加不计入站点文件,添加的域名将不被显示在排序中
[root@localhost sarg]# sarg
SARG: 纪录在文件: 218, reading: 100.00%
SARG: 成功的生成报告在 /var/www/html/squid-reports/2020Sep07-2020Sep07
[root@localhost sarg]# ls /var/www/html/
squid-reports
[root@localhost sarg]# ls /var/www/html/squid-reports/
2020Sep07-2020Sep07  images  index.html
[root@localhost sarg]# yum -y install httpd
[root@localhost sarg]# netstat -antp | grep httpd
tcp6       0      0 :::80                   :::*                    LISTEN      106552/httpd
win10 访问http://192.168.200.60/squid-reports/网页查看
[root@localhost sarg]# sarg -l /usr/local/squid/var/logs/access.log -o    /var/www/html/squid-reports/ -z -d $(date -d "1 day ago" +%d/%m/%Y)-$(date +%d/%m/%Y)    //周期性计划任务执行每天生成报告crontab
实验三 搭建squid反向代理服务器
1、实验环境:
squid服务器 192.168.200.60
web服务器 192.168.200.90 192.168.200.80
win10主机 192.168.200.11
2、实验步骤:
配置Apache服务器1
[root@localhost ~]# iptables -F
[root@localhost ~]# setenforce 0
[root@localhost ~]# yum -y install httpd
[root@localhost ~]# systemctl start httpd
[root@localhost ~]# cd /var/www/html/
[root@localhost html]# vim index.html
<h1>this is test01 web!</h1>
配置Apache服务器2
[root@localhost ~]# iptables -F
[root@localhost ~]# setenforce 0
[root@localhost ~]# yum -y install httpd
[root@localhost ~]# systemctl start httpd
[root@localhost ~]# cd /var/www/html/
[root@localhost html]# vim index.html
<h1>this is test02 web!</h1>
配置squid服务器
[root@localhost sarg]# vim /etc/squid.conf
http_port 192.168.200.60:80 accel vhost vport    '//监控本机80端口'
cache_peer 192.168.200.90 parent 80 0 no-query originserver round-robin max_conn=30 weight=1 name=web1
cache_peer 192.168.200.80 parent 80 0 no-query originserver round-robin max_conn=30 weight=1 name=web2
cache_peer_domain web1 web2 www.yun.com           '//访问www.yun.com匹配web1,web2节点'
[root@localhost sarg]# netstat -antp |grep 80   //80端口被占用
tcp6       0      0 :::80                   :::*                    LISTEN      106552/httpd
[root@localhost sarg]# systemctl stop httpd
[root@localhost sarg]# netstat -antp |grep 80
[root@localhost sarg]# service squid stop
[root@localhost sarg]# netstat -antp |grep squid
[root@localhost sarg]# service squid start
[root@localhost sarg]# netstat -antp |grep squid
tcp        0      0 192.168.200.60:80       0.0.0.0:*               LISTEN      107568/(squid-1)
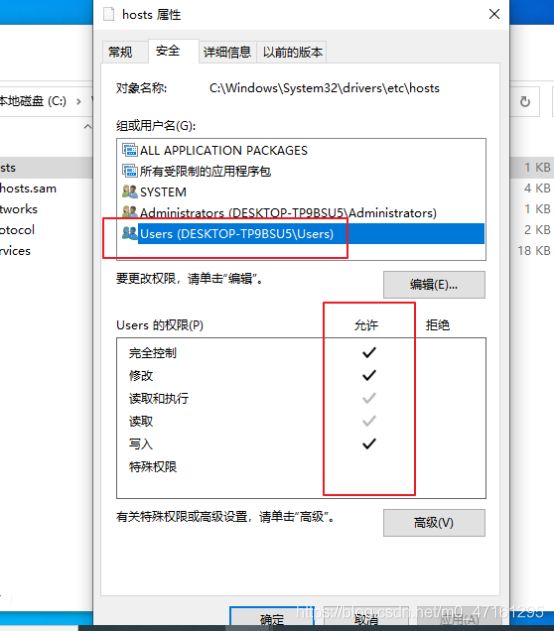
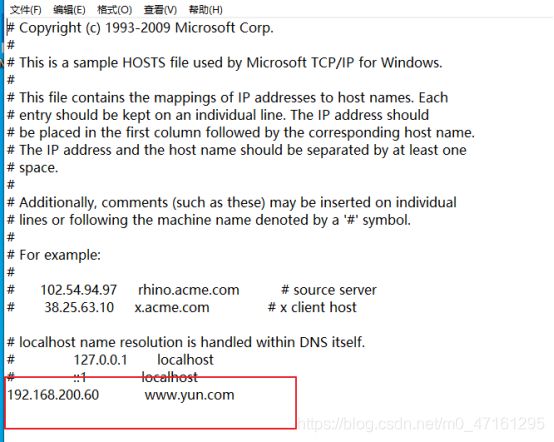
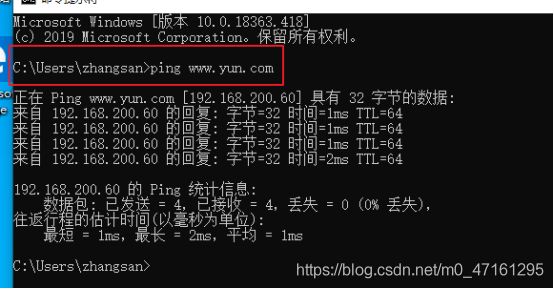
在win10 上host文件加入下面内容
C:\Windows\System32\drivers\etc   //路径
host    //文件
192.168.200.60           www.yun.com   要加的内容
