SpringBoot快速入门
SpringBoot快速入门
接下来,我们就来利用SpringBoot搭建一个web工程,体会一下SpringBoot的魅力所在!
1.创建工程
我们先新建一个空的工程:

工程名为demo:

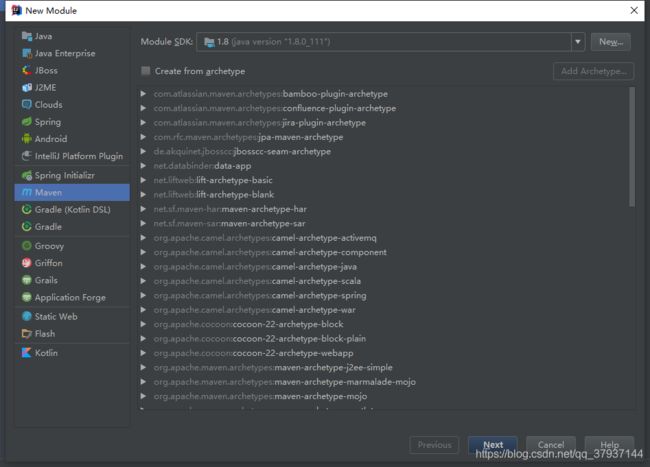
新建一个model:

使用maven来构建:
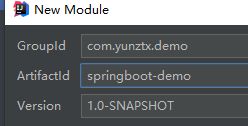
然后填写项目坐标:
目录结构:

项目结构:

2.添加依赖
现在我们的项目与SpringBoot还没有什么关联。SpringBoot提供了一个名为spring-boot-starter-parent的工程,里面已经对各种常用依赖(并非全部)的版本进行了管理,我们的项目需要以这个项目为父工程,这样我们就不用操心依赖的版本问题了,需要什么依赖,直接引入坐标即可!
2.1.添加父工程坐标
    <parent>
        <groupId>org.springframework.bootgroupId>
        <artifactId>spring-boot-starter-parentartifactId>
        <version>2.0.0.RELEASEversion>
    parent>
2.2.添加web启动器
为了让SpringBoot帮我们完成各种自动配置,我们必须引入SpringBoot提供的自动配置依赖,我们称为启动器。因为我们是web项目,这里我们引入web启动器:
    <dependencies>
        <dependency>
            <groupId>org.springframework.bootgroupId>
            <artifactId>spring-boot-starter-webartifactId>
        dependency>
    dependencies>
需要注意的是,我们并没有在这里指定版本信息。因为SpringBoot的父工程已经对版本进行了管理了。
这个时候,我们会发现项目中多出了大量的依赖,这些都是SpringBoot根据spring-boot-starter-web这个依赖自动引入的,而且所有的版本都已经管理好,不会出现冲突。
2.3.管理jdk版本
默认情况下,maven工程的jdk版本是1.5,而我们开发使用的是1.8,因此这里我们需要修改jdk版本,只需要简单的添加以下属性即可:
    <properties>
        <java.version>1.8java.version>
    properties>
2.4.完整的pom.xml
<project xmlns="http://maven.apache.org/POM/4.0.0"
         xmlns:xsi="http://www.w3.org/2001/XMLSchema-instance"
         xsi:schemaLocation="http://maven.apache.org/POM/4.0.0 http://maven.apache.org/xsd/maven-4.0.0.xsd">
    <modelVersion>4.0.0modelVersion>

    <groupId>com.yunztx.demogroupId>
    <artifactId>springboot-demoartifactId>
    <version>1.0-SNAPSHOTversion>

    <properties>

        <java.version>1.8java.version>
    properties>


    <parent>
        <groupId>org.springframework.bootgroupId>
        <artifactId>spring-boot-starter-parentartifactId>
        <version>2.0.0.RELEASEversion>
    parent>


    <dependencies>
        <dependency>
            <groupId>org.springframework.bootgroupId>
            <artifactId>spring-boot-starter-webartifactId>
        dependency>
    dependencies>

project>
3.启动类
Spring Boot项目通过main函数即可启动,我们需要创建一个启动类:

然后编写main函数:
package com.yunztx;

import org.springframework.boot.SpringApplication;
import org.springframework.boot.autoconfigure.SpringBootApplication;

@SpringBootApplication
public class Application {
    public static void main(String[] args) {
        SpringApplication.run(Application.class, args);
    }
}
4.编写controller
接下来,我们就可以像以前那样开发SpringMVC的项目了!
我们编写一个controller:

代码:
package com.yunztx.controller;

import org.springframework.web.bind.annotation.RequestMapping;
import org.springframework.web.bind.annotation.RestController;

@RestController
public class DemoController {

    @RequestMapping("/hello")
    public String sayHello(){
        return "Hello World";
    }
}
5.启动测试
接下来,我们运行main函数,查看控制台:

并且可以看到监听的端口信息:
- 1)监听的端口是8080
- 2)SpringMVC的映射路径是:/
- 3)
/hello路径已经映射到了HelloController中的hello()方法
打开页面访问:http://localhost:8080/hello
出现Hello World,测试成功!