Jetpack之安全的FileProvider
首先我们要清楚FileProvider出现的意义是什么,官方的解释是:
FileProvider is a special subclass of ContentProvider that facilitates secure sharing of files associated with an app by creating a content:// Uri for a file instead of a file:/// Uri.
A content URI allows you to grant read and write access using temporary access permissions. When you create an Intent containing a content URI, in order to send the content URI to a client app, you can also call Intent.setFlags() to add permissions. These permissions are available to the client app for as long as the stack for a receiving Activity is active. For an Intent going to a Service, the permissions are available as long as the Service is running.
In comparison, to control access to a file:/// Uri you have to modify the file system permissions of the underlying file. The permissions you provide become available to any app, and remain in effect until you change them. This level of access is fundamentally insecure.
The increased level of file access security offered by a content URI makes FileProvider a key part of Android’s security infrastructure.
大概就是FileProvider会创建content://uri的Uri格式来代替file:///uri的格式,至于为什么替换,是为了安全性考虑,file:///必须要修改系统设置访问请求的文件的权限,这样一来其他所有的app都可以访问了,而content://uri可以允许你赋予某个app临时权限来访问(通过Intent的setFlags设置权限,譬如Intent.addFlags(Intent.FLAG_GRANT_READ_URI_PERMISSION)),而不是面向全体。
现在来看一下如何规范地使用它:
首先需要在AndroidManifest文件中定义,
<manifest>
    ...
    <application>
        ...
        <provider
            android:name="androidx.core.content.FileProvider"
            android:authorities="com.mydomain.fileprovider"
            android:exported="false"
            android:grantUriPermissions="true">
            ...
        provider>
        ...
    application>
manifest>
name属性是固定的“androidx.core.content.FileProvider”,如果你想重写一些FileProvider的默认方法,可以建一个子类继承自它并使用完整限定类名作为name属性的值;authorities属性的值可以自定义,但规范的写法是包名加上.fileprovider;exported需要设置成false,因为the FileProvider does not need to be public.若是设置成true,也就是失去了安全的意义;最后Set the android:grantUriPermissions attribute to true, to allow you to grant temporary access to files.
接着,我们需要使用xml定义访问路径,比如在res/xml目录中定义一个file_paths.xml:
<paths xmlns:android="http://schemas.android.com/apk/res/android">
    <files-path name="my_images" path="images/"/>
    <files-path name="my_docs" path="docs/"/>
paths>
这里的name和path(斜杠可以不加)可以自定义,但是path要和后面代码中的路径最后的子目录一致,后面会看到。需要注意的是,name不能相同,即使是和的name相同也会报错。可用的子节点标签及其对应的应用内部存储目录是:
-
<files-path name="name" path="path" />对应的是context.getFilesDir()。
-
<cache-path name="name" path="path" />对应的是context.getCacheDir()。
-
<external-path name="name" path="path" />对应的是Environment.getExternalStorageDirectory(),这个方法已经被弃用了:
* @deprecated To improve user privacy, direct access to shared/external
*             storage devices is deprecated. When an app targets
*             {@link android.os.Build.VERSION_CODES#Q}, the path returned
*             from this method is no longer directly accessible to apps.
*             Apps can continue to access content stored on shared/external
*             storage by migrating to alternatives such as
*             {@link Context#getExternalFilesDir(String)},
*             {@link MediaStore}, or {@link Intent#ACTION_OPEN_DOCUMENT}.
可以使用下面的context.getExternalFilesDir(String)代替。
-
<external-files-path name="name" path="path" />对应的是context.getExternalFilesDir(String),里面的参数表示在getExternalFilesDir目录下的子目录,有以下几种:
* @param type The type of files directory to return. May be {@code null} * for the root of the files directory or one of the following * constants for a subdirectory: * {@link android.os.Environment#DIRECTORY_MUSIC}, * {@link android.os.Environment#DIRECTORY_PODCASTS}, * {@link android.os.Environment#DIRECTORY_RINGTONES}, * {@link android.os.Environment#DIRECTORY_ALARMS}, * {@link android.os.Environment#DIRECTORY_NOTIFICATIONS}, * {@link android.os.Environment#DIRECTORY_PICTURES}, or * {@link android.os.Environment#DIRECTORY_MOVIES}. -
<external-cache-path name="name" path="path" />对应的是context.getExternalCacheDir()。
-
<external-media-path name="name" path="path" />对应的是context.getExternalMediaDirs(),Note: this directory is only available on API 21+ devices.
然后在中引用这个xml文件(下面的meta-data中的name属性必须是android.support.FILE_PROVIDER_PATHS这个值):
<provider
    android:name="androidx.core.content.FileProvider"
    android:authorities="com.mydomain.fileprovider"
    android:exported="false"
    android:grantUriPermissions="true">
    <meta-data
        android:name="android.support.FILE_PROVIDER_PATHS"
        android:resource="@xml/file_paths" />
provider>
代码中是这样用的:
val imagePath = File(filesDir ,"images")   //这里的“images”对应的就是前面xml中的path属性的值,一定要一致
val newFile = File(imagePath ,Calendar.getInstance().timeInMillis.toString() + "newFileName.jpg")   //这里的文件名用时间戳避免使用缓存
Uri contentUri = FileProvider.getUriForFile(getContext(), "com.mydomain.fileprovider", newFile); //这里的第二个参数就是Manifest中authorities的值
值得注意的是,这里指定的getFilesDir()/images/Calendar.getInstance().timeInMillis.toString() + "newFileName.jpg"一定要存在,因为这里的images是自定义的子目录名字,所以images目录如果未创建则需要mkDir()先创建,同样文件也需要createNewFile()进行创建,否则会报错;如果是用getExternalFilesDir(Environment.DIRECTORY_PICTURES),则不需要去做mkDir()操作,因为这个文件夹系统已经创建,但是xml中 的path得是“Pictures”(因为Environment.DIRECTORY_PICTURES的值是这个)。
下面从源码中看看是这一套如何运作起来的。
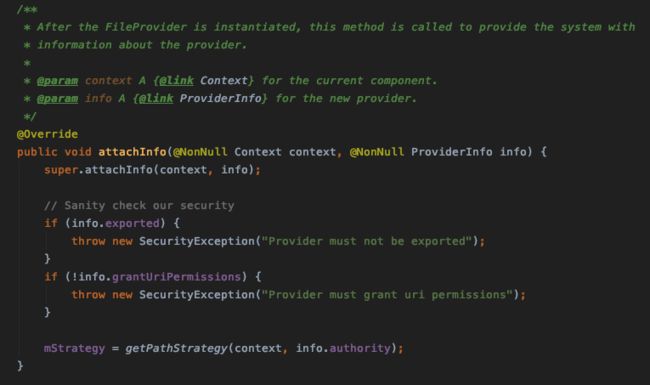
首先我们在AndroidManifest文件中定义了,那么App启动之时系统会自动去实例化(FileProvider最为ContentProvider的子类自然也会,像Activity一样),实例化之后会自动执行attachInfo(@NonNull Context context, @NonNull ProviderInfo info)方法,ps:我用断点验证过。注释中是这么写的:
我们看到有两个if判断,这就是Manifest文件中定义的export属性要设置成false、grantUriPermissions属性要设置成true的原因。因为我们用的是FileProvider的静态方法getUriForFile,所以这里的mStrategy我们没用到,这应该是为了手动实例化的需求设计的。剩下的逻辑就在getPathStrategy方法里了:
大体上就是构造一个PathStrategy对象,首先先从一个叫sCache的HashMap中去取,如果没取到就通过parsePathStrategy方法生成一个,并把它存到sCache中,注意sCache是一个静态变量,所以这也是为什么这里使用了同步代码块。接下来就该去看看parsePathStrategy方法了:
一开始就定义了SimplePathStrategy(PathStrategy的实现类)对象作为返回值,然后根据context.getPackageManager()
.resolveContentProvider(authority, PackageManager.GET_META_DATA)方法获取Manifest中 中定义的meta-data,进一步通过info.loadXmlMetaData( context.getPackageManager(), META_DATA_FILE_PROVIDER_PATHS)拿到resource指向的xml资源,这里的META_DATA_FILE_PROVIDER_PATHS的值正是我们meta-data中name的值,最后遍历xml文件,把所有定义的路径存放在SimplePathStrategy里,注意这里的name和path对应的就是xml里面每个子标签的name和path属性。看一下addRoot:
这里会以xml中子标签的name为key,内部存储的绝对路径为value存放到mRoots中,后面会用这个Map来取。
回过头再去看getUriForFile方法:
看到也是走的getPathStrategy方法,拿到的PathStrategy对象其实是之前构造的SimplePathStrategy对象,所以我们去看看SimplePathStrategy的getUriForFile方法:
首先会取到文件的规范化绝对路径(就是会把.等符号解析成对应的路径目录)
// Find the most-specific root path
Map.Entry<String, File> mostSpecific = null;
for (Map.Entry<String, File> root : mRoots.entrySet()) {
    final String rootPath = root.getValue().getPath();
    if (path.startsWith(rootPath) && (mostSpecific == null
            || rootPath.length() > mostSpecific.getValue().getPath().length())) {
        mostSpecific = root;
    }
}
我们先来看看这段代码,正如注释说的那样,会遍历mRoots,找到最匹配的路径,path是传进来的文件路径,而rootPath是xml中定义的路径,所以这里的每次循环首先都会判断是否传进来的路径是在定义的目录下面(也就是必须是定义目录的子目录),其次rootPath.length() > mostSpecific.getValue().getPath().length()是为了找到最匹配的路径,比如现在path是"a/b/c",第一次循环的rootPath是"a/b",这时是符合匹配的(因为此时mostSpecific是null),后面再次循环时rootPath变成了"a/b/c",此时"a/b/c"的长度就大于"a/b"了,所以"a/b/c"就是最合适的路径。
// Start at first char of path under root
final String rootPath = mostSpecific.getValue().getPath();
if (rootPath.endsWith("/")) {
    path = path.substring(rootPath.length());
} else {
    path = path.substring(rootPath.length() + 1);
}
这段代码是拿到文件路径中xml定义路径’/'之后的路径字符串
// Encode the tag and path separately
path = Uri.encode(mostSpecific.getKey()) + '/' + Uri.encode(path, "/");
return new Uri.Builder().scheme("content")
        .authority(mAuthority).encodedPath(path).build();
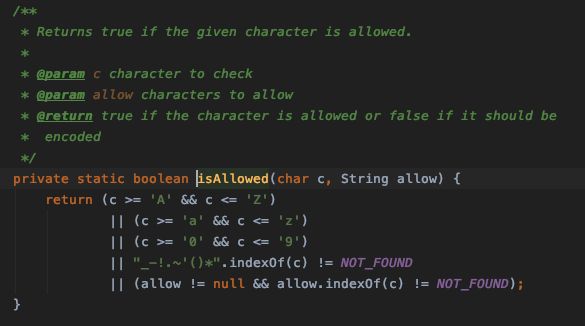
最后的处理是组装content格式的uri,这里会把真正的路径隐藏,最终使用content://authority/name/path(已经encoded的)的格式。这其中的authority就是中的authority属性值,name就是路径xml中子标签的name属性值,path前面说到是除了定义的父目录之后的文件路径,因为这部分路径是自定义的,所以需要encode,Uri.encode方法的工作就是剔除路径中的非法字符,判断路径中每个字符是否合格的方法是:
到此我们就得到了一个合格的uri,如果要得到完整的uri字符串则需要调用uri.toString方法:
可以看到组装的字符串先是以scheme:开头,这里的scheme就是前面构造Uri时传入的“cotent”,之后进入appendSspTo()方法:
把之前保存在Uri对象中的authority、path等信息组装到一起,最终构成content://authority/name/path的uri字符串。


