How to Deploy Magento 2 on CentOS 7 with ECS and ApsaraDB
By Liptan Biswas Alibaba Cloud Tech Share Author
Magento is the most popular open source e-commerce application for the companies who want to sell online. It provides full feature set required to run an online shop. Features include product listing, inventory control, smooth checkout, payment, delivery, sending out emails, revenue generator etc. Magento helps users to quickly set up an online store without doing any type of coding. You can customize the store with thousands of extensions, plugin, and themes that are available in the market. Magento is responsive and available in many languages.
This tutorial will help you to install the latest version of Magento 2 open source edition on a fresh CentOS 7.4 server running on Alibaba Cloud ECS instance. We will also use ApsaraDB to host the MySQL database server instance, which we will use to store the Magento database.
Prerequisite
Create a new ECS instance choosing CentOS 7.4 as the operating system with at least 2GB RAM. Connect to your ECS instance and log in as the root user. To follow this guide, you will also need a domain name that needs to be pointed towards your ECS instance.
Once you are logged into your CentOS 7 instance, run the following command to update your base system with the latest available packages.
yum -y update
You are recommended to set up a sudo user instead of using root user account to run the commands. Since we will require a new user for Magento installation, we will create a new sudo user with username magento.
adduser magento
usermod -aG wheel magento
passwd magento
Switch to the newly created magento user.
su - magento
Install Apache with PHP 7
As of now, Magento 2 supports PHP version 7.0 to 7.1. In this tutorial, we will install PHP 7.1. Install EPEL and Remi repository so that we can install the pre-built PHP packages directly.
sudo yum -y install epel-release yum-utils nano
sudo rpm -Uvh http://rpms.remirepo.net/enterprise/remi-release-7.rpm
sudo yum-config-manager --enable remi-php71
Install Apache web server and PHP 7.1 along with the required PHP modules.
sudo yum -y install httpd php php-pdo php-mysqlnd php-opcache php-xml php-mcrypt php-gd php-devel php-intl php-mbstring php-bcmath php-json php-iconv php-openssl php-zip php-soap
Edit the loaded PHP configuration file.
sudo nano /etc/php.ini
Set appropriate time zone and memory limit. Using -1 as the memory limit provides unlimited available memory to the PHP runtime.
; Maximum amount of memory a script may consume (128MB)
; http://php.net/memory-limit
memory_limit = 512M

...

[Date]
; Defines the default timezone used by the date functions
; http://php.net/date.timezone
date.timezone =Asia/Kolkata
Since we will use Varnish Cache server to serve the application through the default HTTP port 80, we will need to change the listening port of Apache web server to 8080.
Edit the default Apache configuration file.
sudo nano /etc/httpd/conf/httpd.conf
Find the line Listen 80 and change 80 to 8080.
#Listen 12.34.56.78:80
Listen 8080
This way, we will run Apache on port 8080 and Varnish cache server will serve the websites to the users on port 80.
Restart Apache web server and enable it to automatically start at boot time.
sudo systemctl restart httpd
sudo systemctl enable httpd
Install Magento
Magento 2 can be installed by various methods. For production environment and creating live websites, you should install Magento using either composer or the installer archive. If you are installing Magento for development purpose, you can clone the git repository and install Magento. In this tutorial, we will look at all of these options of installing Magento.
Note: This tutorial covers three different methods of installation of Magento files. Make sure you choose only one of these methods. The remaining steps of the tutorial remains same for all these different methods.
For Production using Composer
If you wish to install Magento using composer, browse to Magento Marketplace site and log in or register yourself. Once you are successfully logged in, go to My Profile >> Access keys and create a new access key for Magento 2. You will get the public key and private key, which is your username and password respectively.
Install Composer.
curl -sS https://getcomposer.org/installer | php
sudo mv composer.phar /usr/bin/composer
sudo chmod +x /usr/bin/composer
Now run the following command into the terminal to start the installation of Magento using Composer.
cd /var/www
sudo composer create-project --repository-url=https://repo.magento.com/ magento/project-community-edition magento2
The installer will ask you to enter your username and password. Provide the public key and private key respectively. Once the command successfully installs the application, set appropriate ownership and file permissions.
sudo usermod -g apache magento
cd /var/www/magento2 && sudo find var vendor pub/static pub/media app/etc -type f -exec chmod g+w {} \; && sudo find var vendor pub/static pub/media app/etc -type d -exec chmod g+ws {} \; && sudo chown -R magento:apache . && sudo chmod u+x bin/magento

sudo chown -R apache: generated && sudo chmod 775 generated
Now, proceed to the install Install Varnish Cache.
For Production using Installer Archive
Download the latest version of Magento 2 archive in zip format on your computer using any browser from Magento Download page. You will need to sign up to Magento website before downloading the archive.
Once the installer archive is downloaded on your computer, you will need to upload the archive to your ECS instance.
Windows users can use WinSCP to upload the archive to remote Magento instance. Start a new session with hostname as your domain name or public IP address and login with magento user we have created earlier. Once you are logged in, drag and drop the file from your computer to remote host to upload it in /home/magento directory.
Linux and Mac user can directly use SCP command to upload the archive to the ECS instance.
scp /path/to/Magento-CE-*.zip [email protected]:.
Replace /path/to/Magento-CE-*.zip with the actual path to the file on your machine and 172.16.0.1 with the actual public IP address of your ECS instance.
Once the archive is uploaded, switch to the ECS command line interface and extract the file to /var/www/magento2 by running.
sudo yum -y install unzip
sudo /home/magento/Magento-CE*.zip -d /var/www/magento2
Set appropriate ownership and file permissions.
sudo usermod -g apache magento
cd /var/www/magento2 && sudo find var vendor pub/static pub/media app/etc -type f -exec chmod g+w {} \; && sudo find var vendor pub/static pub/media app/etc -type d -exec chmod g+ws {} \; && sudo chown -R magento:apache . && sudo chmod u+x bin/magento
sudo chown -R apache: generated && sudo chmod 775 generated
Now, proceed to the install Install Varnish Cache.
For Development using Git
Install Git and Composer. Git will be used to clone the Magento repository from GitHub and Composer will be used to install the PHP dependencies.
sudo yum -y install git
curl -sS https://getcomposer.org/installer | php
sudo mv composer.phar /usr/bin/composer
sudo chmod +x /usr/bin/composer
Now, clone Magento repository from GitHub.
cd /var/www
sudo git clone https://github.com/magento/magento2.git
sudo chown -R magento:magento /var/www/magento2
Checkout the latest stable release.
cd magento2
git checkout $(git tag -l | grep -v 'rc[0-9]*$' | sort -V | tail -n 1)
Install the PHP dependencies by running.
composer install
Set appropriate ownership and file permissions.
sudo usermod -g apache magento
cd /var/www/magento2 && sudo find var vendor pub/static pub/media app/etc -type f -exec chmod g+w {} \; && sudo find var vendor pub/static pub/media app/etc -type d -exec chmod g+ws {} \; && sudo chown -R magento:apache . && sudo chmod u+x bin/magento
sudo chown -R apache: generated && sudo chmod 775 generated
Now proceed to the installation of Varnish cache.
Install Varnish Cache
Default YUM repository contains an older version of Varnish cache server. To install the latest version of the application, we will need to add additional Varnish repository, which can be easily done by running the following command.
curl -s https://packagecloud.io/install/repositories/varnishcache/varnish5/script.rpm.sh | sudo bash
Install Varnish cache server.
sudo yum -y install varnish
Edit the default parameter file of Varnish cache.
sudo nano /etc/varnish/varnish.params
Set the listen port to 80. You can also change the memory limit for Varnish data storage on RAM. You should consider giving more RAM to Varnish if you can spare. Giving more RAM to cache storage will enable Varnish to store more data into memory.
VARNISH_LISTEN_PORT=80

...

# Backend storage specification, see Storage Types in the varnishd(5)
# man page for details.
VARNISH_STORAGE="malloc,256M"
Now, edit the default VCL file of Varnish cache.
sudo nano /etc/varnish/default.vcl
Make sure that the backend port is set to 8080, on which Apache web server is running.
    backend default {
    .host = "127.0.0.1";
    .port = "8080";
}
Restart Varnish cache and enable it to automatically start at boot time using.
sudo systemctl restart varnish
sudo systemctl enable varnish
You can test if Varnish cache server is running by running
curl -I http://127.0.0.1/
You should see the following output.
[magento@iZt4nh1b7ra871iww33mpqZ ~]$ curl -I http://127.0.0.1/
HTTP/1.1 403 Forbidden
Date: Sat, 02 Dec 2017 15:27:14 GMT
Server: Apache/2.4.6 (CentOS) PHP/7.1.12
Last-Modified: Thu, 16 Oct 2014 13:20:58 GMT
ETag: "1321-5058a1e728280"
Accept-Ranges: bytes
Content-Length: 4897
Content-Type: text/html; charset=UTF-8
X-Varnish: 32770
Age: 0
Via: 1.1 varnish (Varnish/5.2)
Connection: keep-alive
At the end of the above output, you are able to see that content is delivered via Varnish. Next, create new Apache virtual host to serve the application using your domain name.
sudo nano /etc/httpd/conf.d/shop.example.com.conf
Add the following content to the file.
    ServerName shop.example.com
    DocumentRoot /var/www/magento2

        Options Indexes FollowSymLinks MultiViews
        AllowOverride All
        Order allow,deny
        allow from all
Make sure you change shop.example.com with your actual domain name. Now, restart Varnish cache and Apache web servers.
sudo systemctl restart httpd
sudo systemctl restart varnish
Setting up MySQL database on ApsaraDB RDS instance
Using an ApsaraDB RDS instance of MySQL has many benefits over the self-hosted version of MySQL. It is very easy to deploy and provides ease of management with high-performance features such as SQL and parameter optimization. It is also highly secure and reliable, protecting you from many threats such as DDoS attacks etc.
To create a new ApsaraDB MySQL instance, go to your RDS console and click on Create Instance button. Choose your payment method, region, and zone. You should create the RDS instance in the same region and zone where the ECS instance of Magento is created however it is not necessary. If your instances are in different region or zone, they will not be able to communicate using private IP or intranet address and you will need to apply for the internet address. In this tutorial, I will be creating the RDS instance in the same region Singapore and Zone A where my ECS instance is created.
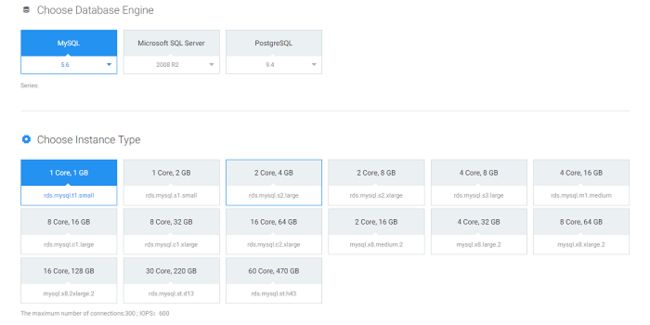
Choose MySQL 5.6 as the database engine. Choose the instance type, for small to medium traffic websites a 1GB instance is enough. You can upgrade later if you want.
Choose the required storage and network. It is important that you choose the same VPC network and VSwitch in which the ECS instance is running. Otherwise, you will get errors while connecting to the database instance.
Once, you have created the RDS instance wait for few minutes to let it start. Once the instance has successfully started, click on the Manage link to go to the instance's management panel.
On basic information interface, click on the Set whitelist link.
You will be taken to Security tab. Click on Add a Whitelist Group. Provide a group name and enter the private IP address or Intranet address of the ECS instance on which you are running the Magento shop. You can find the private IP address of the ECS instance on your ECS dashboard.
Now, create a new database user for Magento database. Navigate to Accounts tab from the sidebar and click on Create Account button. Provide and database username and a password. Make a note of the username and password as we will require that later in the tutorial.
Once an account is created, navigate to Databases tab and click on Create Database button. Provide the name of the database and select magento user from the list of accounts. Select Read/Write access checkbox.
Now, head back to the Basic Information tab from the sidebar and you will see the Intranet address of your RDS instance.
Make a note of the Intranet address which is pointing towards your RDS instance.
At this point, our Magneto 2 files have been placed and a database is also created. Proceed to web-based installation using your favorite web browser.
Browser-based installation
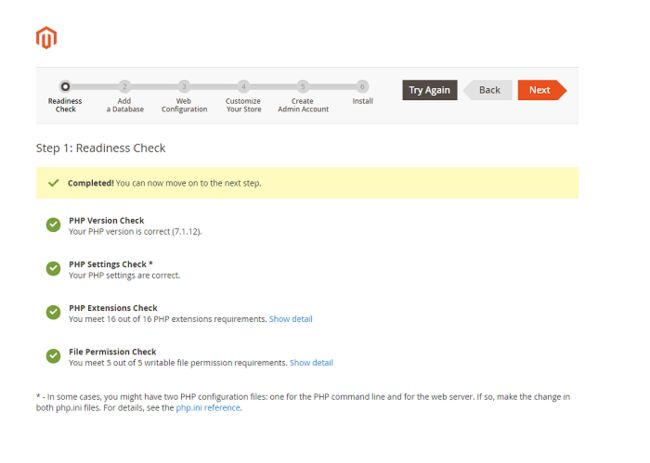
Open your favorite browser and browse to http://shop.example.com replacing it with your actual domain name. If everything is working correctly, you should see the welcome screen by Magento. Click Agree and Setup Magento to proceed with the installation. On next interface, you will see Readiness check interface. If you have followed the tutorial correctly, you should see that all the requirements have been satisfied.
On the next interface, you will be asked to provide the database details. Enter the intranet address of your RDS instance into the hostname. Also, provide the database username, password, and database name of the Magento database you have created earlier in RDS instance.
Now provide your store address and admin panel address. You can use the admin panel address generated by Magento or set it yourself. Be sure to use a random string rather than using some generic address. This will ensure that the admin panel is secured from brute force attacks.
On next interface, choose the appropriate time zone, currency, and language for your store. Finally, create the administrator account and click Install button. The installer will now write the database. Once installed, you can access the frontend of the website by going to http://shop.example.com and the administration interface can be accessed via the URL you have chosen.
Congratulations, the Magento 2 e-commerce shop is now installed and configured on your ECS server. Before you can start using the application, you will need to make some final configurations.
Final Configurations
Enable Varnish Cache in Magento
However, we have installed and configured Varnish on the default HTTP port, Magento is still configured to use built-in full page cache. To enable Varnish cache in Magento, login to the administrative panel and navigate to Stores > Configuration > Advanced > System. In Full Page Cache, uncheck "Use system value" and select "Varnish Cache" from the drop-down menu. Save the configuration.
Once you have saved the configuration, expand Varnish Configuration and click on Export VCL for Varnish 5. It will download varnish.vcl file into your computer.
Note: Make sure that you download the VCL file after saving the configuration once.
Switch back to the command line interface of your CentOS ECS instance and take the backup of the current default VCL.
sudo mv /etc/varnish/default.vcl /etc/varnish/default.vcl.backup
Now open the default.vcl file into the editor.
sudo nano /etc/varnish/default.vcl
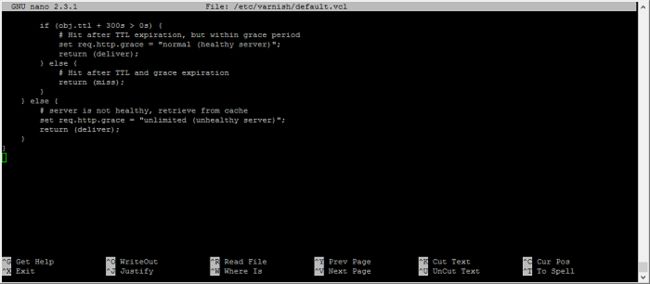
Copy paste the whole content of the file varnish.vcl to the editor.
Save the file and exit from the editor. Now restart Varnish cache server so that the changes can take effect.
sudo systemctl restart varnish
Adding Cron Jobs
You will need to install few Cron jobs in order to run the scheduled tasks of Magento application. Run the following commands to install the Cron jobs. Make sure that you run the commands using magento user.
crontab -l > /var/www/magento2/cron
cat < /var/www/magento2/cron
* * * * * /usr/bin/php /var/www/magento2/bin/magento cron:run | grep -v "Ran jobs by schedule" >> /var/www/magento2/var/log/magento.cron.log
* * * * * /usr/bin/php /var/www/magento2/update/cron.php >> /var/www/magento2/var/log/update.cron.log
* * * * * /usr/bin/php /var/www/magento2/bin/magento setup:cron:run >> /var/www/magento2/var/log/setup.cron.log
EOF
crontab /var/www/magento2/cron
You can check if Cron jobs are successfully set.
crontab -l
Enable Production Mode
By default, Magento is installed in Default mode. If you wish to deploy the Magento application in production mode, it is recommended that you change the Default mode into Production. This will enable Magento to log the errors into the log files rather than showing them on the frontend. Run the following command through the command line to change the default mode into production mode.
cd /var/www/magento2
bin/magento deploy:mode:set production
Conclusion
In this detailed tutorial, we have learned to install Magento 2 open source edition on CentOS 7.4 operating system running on ECS instance. We also learned to create and configure ApsaraDB RDS instance for MySQL 5.6. Now that you have successfully setup your online shop with Magento, proceed to configure the shop according to your preferences. Add some categories and products and start selling online!


