Linux下centos6.4安装nexus
准备工作:
环境:linux
系统:centos6.4-x86-x64
安装工具:nexus-2.14
软件下载:nexus-2.14
官网下载地址:点击打开链接
将下载的压缩包通过xft5上传至/opt目录下,解压至nexus目录下,删除压缩包
#将压缩包解压至指定目录下
tar -zxvf nexus-2.14.8-01-bundle.tar.gz -C  /opt/nexus
rm -rf nexus-2.14.8-01-bundle.tar.gz解压后有两个文件夹
nexus-2.14.8-01:是nexus的核心文件
sonatype-work :maven下载jar存放地址
修改配置文件(修改端口号和work目录信息)
cd /opt/nexus/nexus-2.14.8-01/conf
vi nexus.properties
#Jetty section
application-port=18888
application-host=0.0.0.0
nexus-webapp=${bundleBasedir}/nexus
nexus-webapp-context-path=/nexus
# Nexus section
nexus-work=${bundleBasedir}/../sonatype-work/nexus
runtime=${bundleBasedir}/nexus/WEB-INF/opt/nexus/nexus-2.14.8-01/bin/nexus start
解决方法:
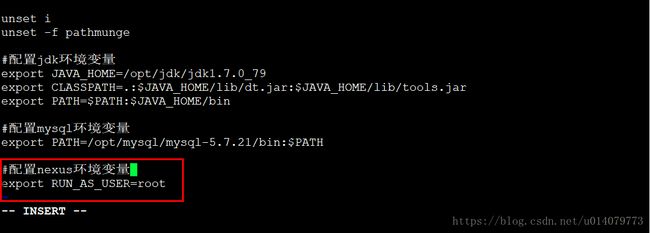
首先到nexus安装目录的bin下用户修改为root,然后/etc/profile中添加环境变量
cd /opt/nexus/nexus-2.14.8-01/bin
vi /nexus
RUN_AS_USER=root
vi /etc/profile
export RUN_AS_USER=rootsource /etc/profile 重新启动nexus
/opt/nexus/nexus-2.14.8-01/bin/nexus start
以上该截图表示nexus启动成功
配置nexus自启动(可根据需要配置)
touch /etc/init.d/nexus
vim nexus
输入如下内容:
#!/bin/bash
#chkconfig:2345 20 90
#description:nexus
#processname:nexus

export JAVA_HOME=/opt/jdk/jdk1.7.0_79

case $1 in
        start) su root /opt/nexus/nexus-2.14.8-01/bin/nexus start;;
        stop) su root /opt/nexus/nexus-2.14.8-01/bin/nexus stop;;
        status) su root /opt/nexus/nexus-2.14.8-01/bin/nexus status;;
        restart) su root /opt/nexus/nexus-2.14.8-01/bin/nexus restart;;
        dump) su root /opt/nexus/nexus-2.14.8-01/bin/nexus dump ;;
        console) su root /opt/nexus/nexus-2.14.8-01/bin/nexus console ;;
        *) echo "require console | start | stop | restart | status | dump " ;;
esac
将创建的/etc/init.d/nexus文件添加权限,设置自启动
#增加nexus服务控制脚本执行权限
chmod +x /etc/init.d/nexus
#通过chkconfig命令将nexus服务加入到自启动服务中
chkconfig --add nexus
#开启自启动服务
chkconfig nexus on
#查看是否添加成功
chkconfig --list nexus
注意:java_home替换成自己的jdk安装目录,/opt/nexus/nexus-2.14.8-01替换成自己nexus安装目录
若配置了nexus自启动方式则可以使用服务方式启动nexus
#启动nexus
service nexus start
#停止nexus
service nexus stop
#重新启动nexus
service nexus restart
#查看nexus状态
service nexus status
测试客户端是否登录成功
浏览器输入 http://192.168.174.128:18888/nexus
发现登录失败则是因为未设置防火墙对外开放端口
查看是否开启18888端口号
netstat -an|grep 18888 配置防火墙开启 nexus18888端口
方法一:命令方式
#开启防火墙
chkconnfig iptables on
#开启nexus18888端口
iptables -A INPUT -m state --state NEW -m tcp -p tcp --dport 18888 -j ACCEPT
#保存开启的端口号
service iptables save
#重新启动防火墙
service iptables restart
方法二:配置文件方式
vim /etc/sysconfig/iptables
-A INPUT -m state --state NEW -m tcp -p tcp --dport 18888 -j ACCEPT
#重新启动防火墙
service iptables restart
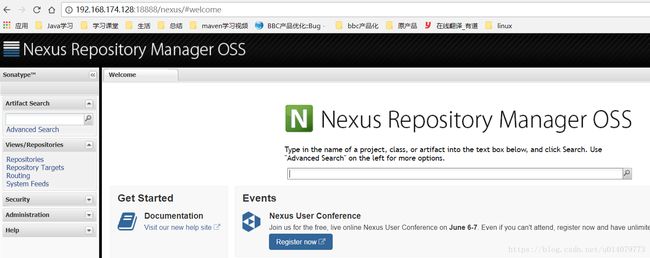
防火墙设置成功后重新启动访问nexus,如下截图表示访问nexus成功。nexus默认登录账号:admin/admin123
如何将第三方的jar上传至本地私服:
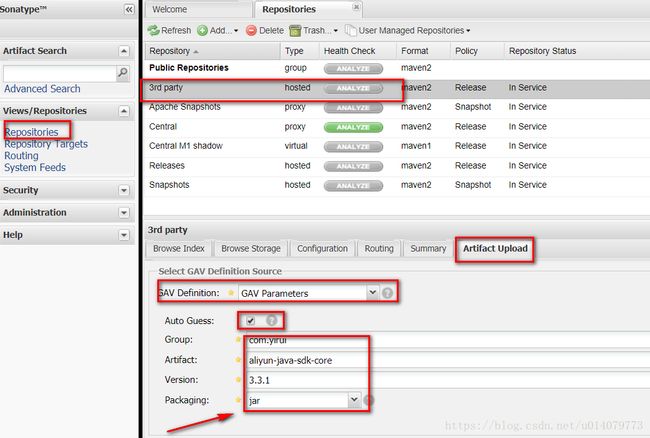
在Repository列表中,选中 3rd party,选中artifact upload,
选择GAV Defini3ion: GAV Parameters,Auto Guess 打钩。
在下方输入JAR包对应的Group、Artifact、Version,Packaging选择JAR格式。
点击select Artifact(s) to upload 按钮,选择要上传的JAR包。
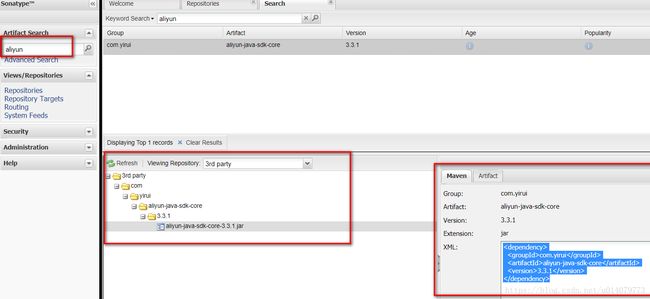
查看已经上传的jar包:在左侧"Artifact Search"输入"aliyun"则出现如下截图,则表示上传成功
配置本地项目引用私服
maven调用本地私服:在pom.xml中
            nexus
            local private nexus
            http://192.168.174.128:18888/nexus/content/groups/public/

                true
                always


                true
                always
本地maven服务器的setting.xml中
        releases
        admin
        admin123


        snapshots
        admin
        admin123
补充:
maven私服nexus用户介绍
admin:该用户拥有Nexus的全部权限,默认密码为admin123。则账号:admin/admin123
deployment:该用户能够访问Nexus,浏览仓库内容、搜索、上传部署构件,但是不能对Nexus进行任何配置,默认密码为deployment123。则账号:deployment/deployment123
anonymous:该用户对应了所有未登录的匿名用户,它们可以浏览仓库并进行搜索。
添加第三方jar默认情况下Nexus为我们创建了以下主要的Repository:
1、Public Repositories:这是一个Repository Group,该Repository Group包含了多个Repository,其中包含了Releases、Snapshots、ThirdParty和Central。
2、3rd party:该Repository即是存放你公司所购买的第三方软件库的地方,它是一个由Nexus自己维护的一个Repository。
3、Apache Snapshots:看名字你就应该知道这是个什么样的Repository,这是一个代理Repository,即最终的依赖还是得在Apache官网上去下载,然后缓存在Nexus中。
4、Central:这就是代理Maven Central Repository的Repository。
5、Releases:你自己的项目要发布时,就应该发布在这个Repository,他也是Nexus自己维护的Repository,而不是代理。
6、Snapshots:你自己项目Snapshot的Repository。


