vue3.0 beta版入门

官网 API:https://composition-api.vuejs.org/#summary
1.创建项目
// 先升级 vue-cli 到 4.x 版本
npm install -g @vue/cli

// 通过脚手架创建项目,一路回车就行
vue create vue3.0
(这一步实际上用的仍然是 2.x 的版本)
2.升级 2.x 版本到 3.0 beta版本
这一步命令执行需要进入上一步创建好的项目 vue3.0 文件夹中
// 安装完 vue/cli 后,可以使用 vue add 添加插件
// 目前 3.0 对应的是 vue-next 项目
vue add vue-next
安装完 vue-next 以后,我们就发现本地项目已经升级到了 3.0 ,打开 main.js 可以看到与之前的项目内容有所不同

3.LifeCycle 生命周期介绍
vue 3 生命周期发生了很大的变化
| 原方法 | 升级后 |
|---|---|
| beforeCreate | setup |
| created | setup |
| beforeMount | onBeforeMount |
| mounted | onMounted |
| beforeUpdate | onBeforeUpdate |
| updated | onUpdated |
| beforeDestory | onBeforeUnmount |
| destoryed | onUnmounted |
4.composition API 介绍
- reactive API
- ref API
- watch API
- cpmputed API
- 生命周期钩子变化
- TypeScript 和 JSX 支持
reactive
作用:创建响应式对象,非包装对象,类似于在 2.x 的 data 中声明变量
// 打开 App.vue,删除多余代码
<template>
  <div id="app">
    <h1>{{title.name}}</h1>
  </div>
  <!-- 此处可以并列多个 div ,不再要求一个根元素了 -->
</template>

<script>
import { reactive } from 'vue'

export default {
  name: 'App',
  setup() {
    const title = reactive({
      name: '欢迎学习 Vue3.0'
    })
    return { title }
  }
}
</script>

<style>
#app {
  font-family: Avenir, Helvetica, Arial, sans-serif;
  -webkit-font-smoothing: antialiased;
  -moz-osx-font-smoothing: grayscale;
  text-align: center;
  color: #2c3e50;
  margin-top: 60px;
}
</style>
ref
作用:创建一个包装式对象,含有一个响应式属性 value
它和 reactive 的差别就是,前者没有包装属性 value
<template>
  <div id="app">
    <h1>{{title.name}}</h1>
    <p>{{user}}</p>
  </div>
  <!-- 此处可以并列多个 div ,不再要求一个根元素了 -->
</template>

<script>
import { reactive, ref } from 'vue'

export default {
  name: 'App',
  setup() {
    const title = reactive({
      name: '欢迎学习 Vue3.0'
    })
    const user = ref('我是 ref 创建出来的')
    // 如果需要修改值,可以通过 value
    user.value = '我被改变了'
    return { title, user }
  }
}
</script>

<style>
#app {
  font-family: Avenir, Helvetica, Arial, sans-serif;
  -webkit-font-smoothing: antialiased;
  -moz-osx-font-smoothing: grayscale;
  text-align: center;
  color: #2c3e50;
  margin-top: 60px;
}
</style>
事件处理
既然不用 methods ,那事件处理该怎么调用方法?
<template>
  <div id="app">
    <h1>{{title.name}}</h1>
    <p>{{user}}</p>
    <button @click="updateUser">修改名称</button>
  </div>
  <!-- 此处可以并列多个 div ,不再要求一个根元素了 -->
</template>

<script>
import { reactive, ref } from 'vue'

export default {
  name: 'App',
  setup() {
    const title = reactive({
      name: '欢迎学习 Vue3.0'
    })
    const user = ref('我是 ref 创建出来的')
    const updateUser = () => {
      // 如果需要修改值,可以通过 value
      user.value = '我被改变了'
    }
    return { title, user, updateUser }
  }
}
</script>

<style>
#app {
  font-family: Avenir, Helvetica, Arial, sans-serif;
  -webkit-font-smoothing: antialiased;
  -moz-osx-font-smoothing: grayscale;
  text-align: center;
  color: #2c3e50;
  margin-top: 60px;
}
</style>
onMounted/computed
作用:周期函数和计算函数
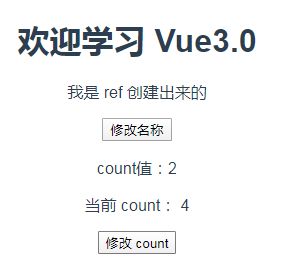
<template>
  <div id="app">
    <h1>{{title.name}}</h1>
    <p>{{user}}</p>
    <button @click="updateUser">修改名称</button>
    <p>count值:{{count}}</p>
    <p>当前 count: {{computedCount}}</p>
    <button @click="increment">修改 count</button>
  </div>
  <!-- 此处可以并列多个 div ,不再要求一个根元素了 -->
</template>

<script>
import { reactive, ref, onMounted, computed } from 'vue'

export default {
  name: 'App',
  setup() {
    const title = reactive({
      name: '欢迎学习 Vue3.0'
    })
    const user = ref('我是 ref 创建出来的')
    const updateUser = () => {
      // 如果需要修改ref 创建的值,可以通过 value
      user.value = '我被改变了'
    }

    // 生命周期方法
    onMounted(() => {
      console.log('init onMounted...')
    })
    // 初始化 count 值
    const count = ref(0)
    const increment = () => {
      count.value ++
    }
    // 调用计算属性函数 Hook
    // 注意 computed 后面没有大括号 {}
    const computedCount = computed(() => count.value * 2)
    return { title, user, updateUser, count, increment, computedCount }
  }
}
</script>

<style>
#app {
  font-family: Avenir, Helvetica, Arial, sans-serif;
  -webkit-font-smoothing: antialiased;
  -moz-osx-font-smoothing: grayscale;
  text-align: center;
  color: #2c3e50;
  margin-top: 60px;
}
</style>


