Telegram 桌面端 Visual Studio 2019 编译 tdesktop 指南
编译该项目起初耗时 1 天半(1 个通宵 + 2 个白天),结果还失败了。
然后时隔 3 个月,又尝试重新编译,耗时 1 个白天,编译成功。
坑还是有(fei)点(chang)多的。
不多说了,进入正题。
1、准备环境
由于此开源项目较大,编译容易出错,一些第三方软件可能与您已安装的版本相冲突。
所以强烈建议在虚拟机中编译该项目,并保存多个时间点快照。
环境要求:16G 或以上的内存 + VMware + Windows 10 x64 + 网络代理
16G 以下的,就不建议在本机编译了,建议找个在线编译平台操作。
我虚拟机拉到 8G 都还是会编译失败,最后是拉到 12G 才勉强编译成功的。
先安装好虚拟机,在虚拟机内下载安装 VS 2019 和 Git bash。
Git bash 安装时需要勾上这个选项,其他的不多赘述。
2、准备编译
前往 tdesktop 的 GitHub 仓库页面。
在 README 中找到 Visual Studio 2019 的编译说明。
本指南按照 May 12, 2020 提交的 building-msvc.md 作为讲述。
实际操作请按照最新提交的 building-msvc.md 执行。
Prepare folder
Choose an empty folder for the future build, for example D:\TBuild. It will be named BuildPath in the rest of this document. Create two folders there, BuildPath\ThirdParty and BuildPath\Libraries.
All commands (if not stated otherwise) will be launched from x86 Native Tools Command Prompt for VS 2019.bat (should be in Start Menu > Visual Studio 2019 menu folder). Pay attention not to use any other Command Prompt.
首先按照教程开头说明,准备一个编译文件夹,这里就用文中默认的路径 D:\TBuild,后续称之为 BuildPath。
之后的所有命令(除非另有说明)都将在 x86 Native Tools Command Prompt for VS 2019(x86 本机工具命令提示符) 中执行(位于 开始菜单 -> Visual Studio 2019 文件夹中)。
Obtain your API credentials
You will require api_id and api_hash to access the Telegram API servers. To learn how to obtain them click here.
api_id: 17349 api_hash: 344583e45741c457fe1862106095a5eb
用于测试的 API 授权信息,非官方编译的第三方 Telegram 版本都需要 API_ID 和 API_HASH 来与 Telegram 官方服务器进行交互。API 可以向 Telegram 官方申请,二次开发的 Telegram 客户端需要遵守 Telegram 的相关规定,否则 API 可能会被封禁。
Install third party software
- Download Strawberry Perl installer from http://strawberryperl.com/ and install to BuildPath\ThirdParty\Strawberry
- Download NASM installer from http://www.nasm.us and install to BuildPath\ThirdParty\NASM
- Download Yasm executable from http://yasm.tortall.net/Download.html, rename to yasm.exe and put to BuildPath\ThirdParty\yasm
- Download MSYS2 installer from http://www.msys2.org/ and install to BuildPath\ThirdParty\msys64
- Download jom archive from http://download.qt.io/official_releases/jom/jom.zip and unpack to BuildPath\ThirdParty\jom
- Download Python 2.7 installer from https://www.python.org/downloads/ and install to BuildPath\ThirdParty\Python27
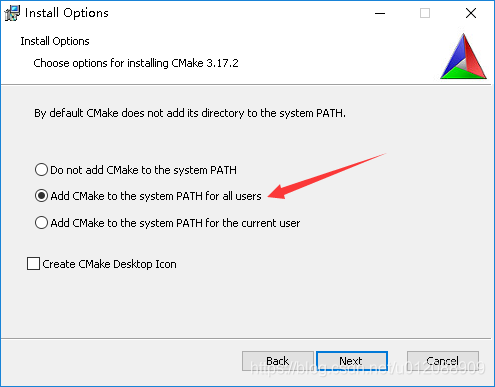
- Download CMake installer from https://cmake.org/download/ and install to BuildPath\ThirdParty\cmake
- Download Ninja executable from https://github.com/ninja-build/ninja/releases/download/v1.7.2/ninja-win.zip and unpack to BuildPath\ThirdParty\Ninja
安装第三方软件,根据上述提供的地址,下载安装即可。
版本皆选 win64 / x64 版下载和安装,尽量选择 Stable 版而不是 RC 版。
安装中的选项基本默认即可,但要注意文中指出的指定安装路径。
需要注意的两个点:
Python 需要安装 2.7 版的,在安装过程中需要修改该选项。
CMake 需要修改为该选项。
git config --global http.proxy http://127.0.0.1:10809
git config --global https.proxy http://127.0.0.1:10809
先设置 Git 代理,打开 Git bash 执行以上代码,不然后面的 clone 速度会非常慢。
使用的端口可能不一样,请自行修改。
Open x86 Native Tools Command Prompt for VS 2019.bat, go to BuildPath and run
cd ThirdParty
git clone https://github.com/desktop-app/patches.git
cd patches
git checkout b08b497
cd ../
git clone https://chromium.googlesource.com/external/gyp
cd gyp
git checkout 9f2a7bb1
git apply ../patches/gyp.diff
cd ..\..
打开 x86 Native Tools Command Prompt for VS 2019,cd 到 BuildPath 执行以上代码。
可以直接复制全部代码,在 cmd 窗口中粘贴。可以以此自动执行。
但是复制内容的最后一行代码需要手动回车执行!
Add GYP and Ninja to your PATH:
- Open Control Panel -> System -> Advanced system settings
- Press Environment Variables...
- Select Path
- Press Edit
- Add BuildPath\ThirdParty\gyp value
- Add BuildPath\ThirdParty\Ninja value
关闭 x86 Native Tools Command Prompt for VS 2019,将 BuildPath\ThirdParty\gyp 和 BuildPath\ThirdParty\Ninja 添加到系统环境变量 Path 中。
Clone source code and prepare libraries
Open x86 Native Tools Command Prompt for VS 2019.bat, go to BuildPath and run
SET PATH=%cd%\ThirdParty\Strawberry\perl\bin;%cd%\ThirdParty\Python27;%cd%\ThirdParty\NASM;%cd%\ThirdParty\jom;%cd%\ThirdParty\cmake\bin;%cd%\ThirdParty\yasm;%PATH%

git clone --recursive https://github.com/telegramdesktop/tdesktop.git

mkdir Libraries
cd Libraries

SET LibrariesPath=%cd%

git clone https://github.com/desktop-app/patches.git
cd patches
git checkout b08b497
cd ..

git clone https://github.com/desktop-app/lzma.git
cd lzma\C\Util\LzmaLib
msbuild LzmaLib.sln /property:Configuration=Debug
msbuild LzmaLib.sln /property:Configuration=Release
cd ..\..\..\..

git clone https://github.com/openssl/openssl.git openssl_1_1_1
cd openssl_1_1_1
git checkout OpenSSL_1_1_1-stable
perl Configure no-shared debug-VC-WIN32
nmake
mkdir out32.dbg
move libcrypto.lib out32.dbg
move libssl.lib out32.dbg
move ossl_static.pdb out32.dbg\ossl_static
nmake clean
move out32.dbg\ossl_static out32.dbg\ossl_static.pdb
perl Configure no-shared VC-WIN32
nmake
mkdir out32
move libcrypto.lib out32
move libssl.lib out32
move ossl_static.pdb out32
cd ..

git clone https://github.com/desktop-app/zlib.git
cd zlib
cd contrib\vstudio\vc14
msbuild zlibstat.vcxproj /property:Configuration=Debug
msbuild zlibstat.vcxproj /property:Configuration=ReleaseWithoutAsm
cd ..\..\..\..

git clone https://github.com/telegramdesktop/openal-soft.git
cd openal-soft
git checkout fix_capture
cd build
cmake -G "Visual Studio 16 2019" -A Win32 -D LIBTYPE:STRING=STATIC -D FORCE_STATIC_VCRT:STRING=ON ..
msbuild OpenAL.vcxproj /property:Configuration=Debug
msbuild OpenAL.vcxproj /property:Configuration=Release
cd ..\..

git clone https://github.com/google/breakpad
cd breakpad
git checkout a1dbcdcb43
git apply ../../tdesktop/Telegram/Patches/breakpad.diff
cd src
git clone https://github.com/google/googletest testing
cd client\windows
gyp --no-circular-check breakpad_client.gyp --format=ninja
cd ..\..
ninja -C out/Debug common crash_generation_client exception_handler
ninja -C out/Release common crash_generation_client exception_handler
cd tools\windows\dump_syms
gyp dump_syms.gyp
msbuild dump_syms.vcxproj /property:Configuration=Release
cd ..\..\..\..\..

git clone https://github.com/telegramdesktop/opus.git
cd opus
git checkout tdesktop
cd win32\VS2015
msbuild opus.sln /property:Configuration=Debug /property:Platform="Win32"
msbuild opus.sln /property:Configuration=Release /property:Platform="Win32"

cd ..\..\..\..
SET PATH_BACKUP_=%PATH%
SET PATH=%cd%\ThirdParty\msys64\usr\bin;%PATH%
cd Libraries

git clone https://github.com/FFmpeg/FFmpeg.git ffmpeg
cd ffmpeg
git checkout release/3.4

set CHERE_INVOKING=enabled_from_arguments
set MSYS2_PATH_TYPE=inherit
bash --login ../../tdesktop/Telegram/Patches/build_ffmpeg_win.sh

SET PATH=%PATH_BACKUP_%
cd ..

git clone git://code.qt.io/qt/qt5.git qt_5_12_8
cd qt_5_12_8
perl init-repository --module-subset=qtbase,qtimageformats
git checkout v5.12.8
git submodule update qtbase qtimageformats
cd qtbase
git apply ../../patches/qtbase_5_12_8.diff
cd ..

configure -prefix "%LibrariesPath%\Qt-5.12.8" -debug-and-release -force-debug-info -opensource -confirm-license -static -static-runtime -I "%LibrariesPath%\openssl_1_1_1\include" -no-opengl -openssl-linked OPENSSL_LIBS_DEBUG="%LibrariesPath%\openssl_1_1_1\out32.dbg\libssl.lib %LibrariesPath%\openssl_1_1_1\out32.dbg\libcrypto.lib Ws2_32.lib Gdi32.lib Advapi32.lib Crypt32.lib User32.lib" OPENSSL_LIBS_RELEASE="%LibrariesPath%\openssl_1_1_1\out32\libssl.lib %LibrariesPath%\openssl_1_1_1\out32\libcrypto.lib Ws2_32.lib Gdi32.lib Advapi32.lib Crypt32.lib User32.lib" -mp -nomake examples -nomake tests -platform win32-msvc

jom -j4
jom -j4 install
cd ..
重新打开 x86 Native Tools Command Prompt for VS 2019,cd 到 BuildPath,执行以上代码。
此处最为关键!有几点需要注意的。
1、不知道是不是因为以上代码太多太长,如果你想要直接复制粘贴执行,以上代码只会执行到一半左右位置就会停住,需要你再次复制后半段代码重新粘贴。如果你不确定所有代码有没有执行完,或不知道执行的最后一行代码是哪里,可以按上光标键查看已执行的最后一行代码。
以我这个版本的说明为例,执行完这行代码后就会停止等待输入:
cmake -G "Visual Studio 16 2019" -A Win32 -D LIBTYPE:STRING=STATIC -D FORCE_STATIC_VCRT:STRING=ON ..
2、第一部分代码执行完后,复制后面的代码执行。但是最好先保存一个快照,因为接下来的这处代码特别容易出错:
bash --login ../../tdesktop/Telegram/Patches/build_ffmpeg_win.sh该行代码会下载一些数据库用作 ffmpeg 安装和编译,但是似乎会检查下载速度,如果速度低于某个阈值,就会报错如下:
目前没有找到相关解决方案,但是我在第二天重新执行该代码后可以顺利下载完成。
所以你可以先尝试:更换网络代理节点,或者选一个良辰吉日再重试。
3、另外还有一个需要注意的地方:
git clone git://code.qt.io/qt/qt5.git qt_5_12_8这行代码会从 git://code.qt.io/ 地址克隆 Qt 源代码。但是下载速度非常之慢,平均只能达到 10kb/s 左右。
不确定是服务器的问题还是代理的问题。直接执行下载会耗费大约 10 小时的时间。
事后研究了一下,发现 GitHub 也有 Qt 的仓库。
于是乎,将 git://code.qt.io/ 改为 https://github.com/。下载速度得到了明显改善,不到一分钟就克隆完了。
测试编译也没有任何报错。
3、开始编译
Build the project
Go to BuildPath\tdesktop\Telegram and run (using your api_id and api_hash)
configure.bat -D TDESKTOP_API_ID=YOUR_API_ID -D TDESKTOP_API_HASH=YOUR_API_HASH -D DESKTOP_APP_USE_PACKAGED=OFF
- Open BuildPath\tdesktop\out\Telegram.sln in Visual Studio 2019
- Select Telegram project and press Build > Build Telegram (Debug and Release configurations)
- The result Telegram.exe will be located in D:\TBuild\tdesktop\out\Debug (and Release)
cd 到 BuildPath\tdesktop\Telegram,执行以上代码。注意替换其中的 YOUR_API_ID 和 YOUR_API_HASH。
如果执行完后没有报错,前往 BuildPath\tdesktop\out 就可以看到 Telegram.sln 解决方案。
打开解决方案,将所有项目 右键 -.> 属性 -> 所有配置 -> C/C++ -> 将警告视为错误 改为 否。
然后选择你需要的配置,重新生成 ALL_BUILD。
如果编译时报错:C1002:在第 2 遍中编译器的堆空间不足
解决方法:把虚拟机的内存拉高。
我是拉到 12G 才编译成功的,编译过程中最高占用到了 12.7/14.5 GB(已提交,包括换页)。


