Linux安装FastDfs并搭配nginx实现外部访问
Linux安装FastDfs并搭配nginx实现外部访问
- FastDFS--tracker安装
-
- FastDFS安装环境
- libevent
- 安装libfastcommon基础库
- 安装tracker
- 设置tracker启动项
- FastDFS—storage配置
- 上传图片测试
- FastDFS整合nginx
-
- 安装nginx整合插件fastdfs-nginx-module
- 安装nginx
FastDFS–tracker安装
FastDFS安装环境
FastDFS是C语言开发,建议在linux上运行,学习中使用Centos7.4作为安装环境。
- 安装gcc 依赖环境
yum install gcc-c++ -y
libevent
yum -y install libevent- 如果没有perl库,需要使用
yum install perl*命令安装一下
yum -y install zlib zlib-devel pcre pcre-devel gcc gcc-c++ openssl openssl-devel libevent libevent-devel perl unzip net-tools wget
安装libfastcommon基础库
上传压缩包文件libfastcommonV1.0.7.tar.gz 到 /opt目录下,并解压。
tar -zxvf libfastcommonV1.0.7.tar.gz- 进入到解压后的文件夹中
cd /opt/libfastcommon-1.0.7/- 进行编译
./make.sh - 如果出现编译perl 不识别 运行下面这段命令
# yum -y install zlib zlib-devel pcre pcre-devel gcc gcc-c++ openssl openssl-devel libevent libevent-devel perl unzip net-tools wget- 安装 ./make.sh install
- 注意:libfastcommon安装好后会自动将库文件拷贝至/usr/lib64下,由于FastDFS程序引用usr/lib目录所以需要将/usr/lib64下的库文件拷贝至/usr/lib下。
cp /usr/lib64/libfastcommon.so /usr/lib/
安装tracker
- 上传资料FastDFS_v5.05.tar.gz到 /usr/local 目录下
- 解压编译安装
tar -zxvf FastDFS_v5.05.tar.gzcd FastDFS./make.sh./make.sh install- 安装成功之后,将安装目录下的conf下的文件拷贝到/etc/fdfs/下。
cd conf cp * /etc/fdfs/
- 修改配置文件
vim /etc/fdfs/tracker.conf
# the tracker server port
port=22122

# connect timeout in seconds
# default value is 30s
connect_timeout=30

# network timeout in seconds
# default value is 30s
network_timeout=60

# the base path to store data and log files
# 软件基础目录修改成自己定义的
base_path=/opt/fastdfs
软件基础目录修改成自己定义的
base_path=/opt/fastdfs
- 创建fastdfs文件夹
mkdir /opt/fastdfs
设置tracker启动项
-
创建一个启动服务文件夹
mkdir /usr/local/fdfs -
拷贝安装目录下stop.sh 和restart.sh 到/usr/local/fdfs/
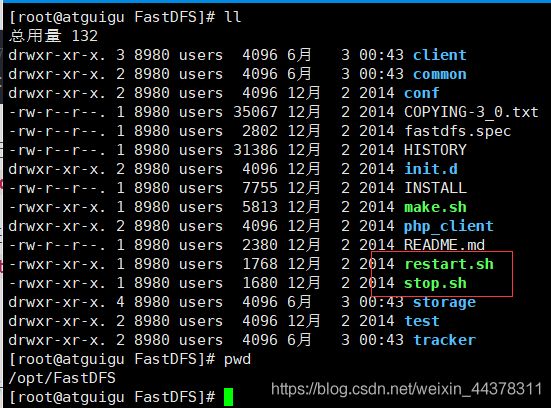
cp restart.sh /usr/local/fdfs/
cp stop.sh /usr/local/fdfs/ -
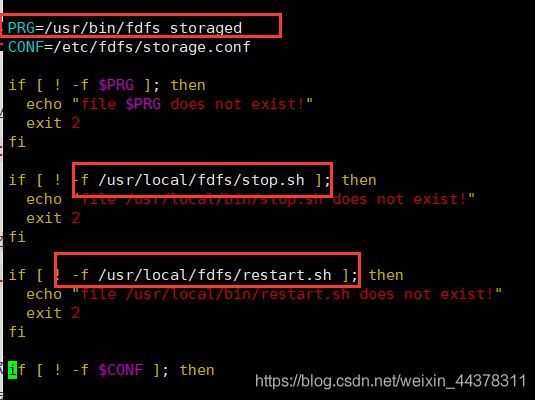
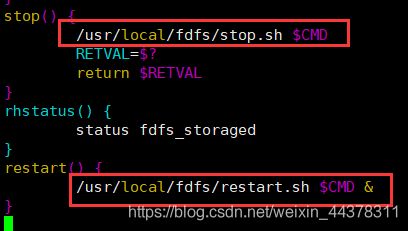
修改启动脚本
vim /etc/init.d/fdfs_trackerd
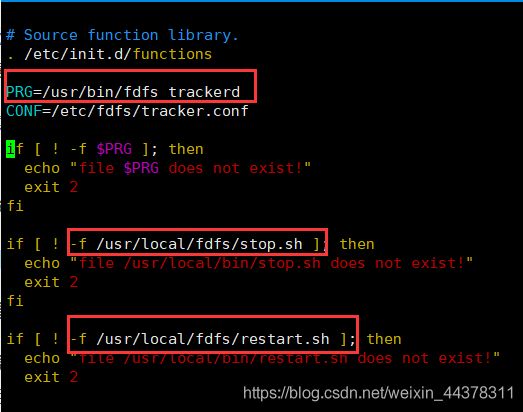
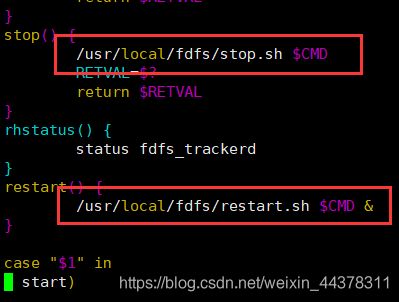
- 第一个修改项按照教程说是
/usr/bin目录是一个启动配置项 - 第二到第四个配置项改成前面复制到
/usr/local/fafs/下的两个启动文件
- 第一个修改项按照教程说是
-
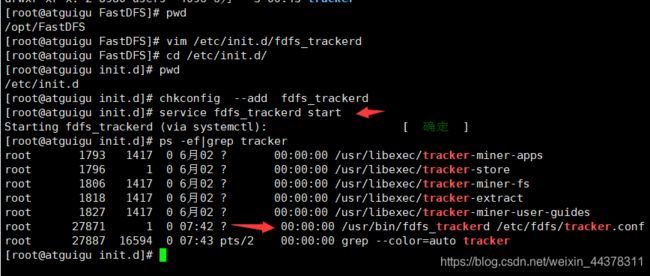
注册服务,把启动脚本放到开机服务里
chkconfig --add fdfs_trackerd
然后可以用service fdfs_trackerd start 启动测试 如下图
FastDFS—storage配置
-
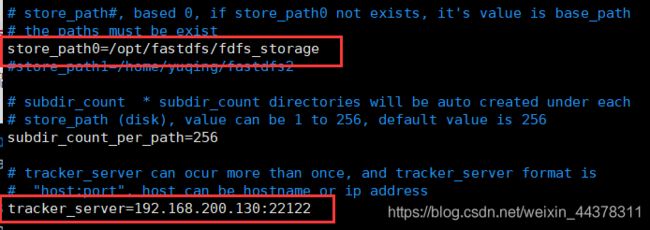
修改配置文件
vim /etc/fdfs/storage.conf -
设置storage服务
上传图片测试
- FastDFS安装成功可通过/usr/bin/fdfs_test测试上传、下载等操作。
修改/etc/fdfs/client.conf

- 测试,upload 后面是上传文件
/usr/bin/fdfs_test /etc/fdfs/client.conf upload /root/winteriscoming.jpg
[root@atguigu ~]# /usr/bin/fdfs_test  /etc/fdfs/client.conf  upload  /root/01.jpg
This is FastDFS client test program v5.05

Copyright (C) 2008, Happy Fish / YuQing

FastDFS may be copied only under the terms of the GNU General
Public License V3, which may be found in the FastDFS source kit.
Please visit the FastDFS Home Page http://www.csource.org/
for more detail.

[2020-06-03 02:18:16] DEBUG - base_path=/opt/fastdfs, connect_timeout=30, network_timeout=60, tracker_server_count=1, anti_steal_token=0, anti_steal_secret_key length=0, use_connection_pool=0, g_connection_pool_max_idle_time=3600s, use_storage_id=0, storage server id count: 0

tracker_query_storage_store_list_without_group:
	server 1. group_name=, ip_addr=192.168.200.130, port=23000

group_name=group1, ip_addr=192.168.200.130, port=23000
storage_upload_by_filename
group_name=group1, remote_filename=M00/00/00/wKjIgl7Wl-iAJhhyAABiTR6BiQY165.jpg
source ip address: 192.168.200.130
file timestamp=2020-06-03 02:18:16
file size=25165
file crc32=511805702
example file url: http://192.168.200.130/group1/M00/00/00/wKjIgl7Wl-iAJhhyAABiTR6BiQY165.jpg
storage_upload_slave_by_filename
group_name=group1, remote_filename=M00/00/00/wKjIgl7Wl-iAJhhyAABiTR6BiQY165_big.jpg
source ip address: 192.168.200.130
file timestamp=2020-06-03 02:18:16
file size=25165
file crc32=511805702
example file url: http://192.168.200.130/group1/M00/00/00/wKjIgl7Wl-iAJhhyAABiTR6BiQY165_big.jpg
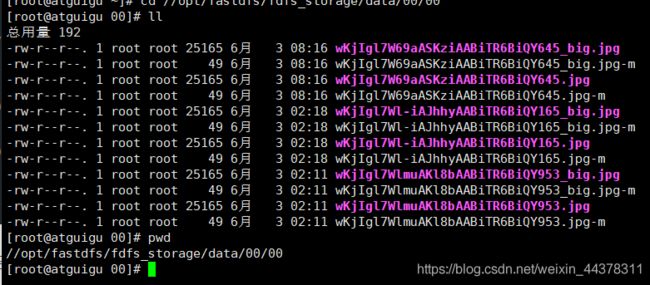
上传文件对应的上传路径:
/opt/fastdfs/fdfs_storage/data/00/00/wKjIgl7Wl-iAJhhyAABiTR6BiQY165_big.jpg
FastDFS整合nginx
安装nginx整合插件fastdfs-nginx-module
- 上传fastdfs-nginx-module_v1.16.tar.gz上传到 /opt,并解压
tar -zxvf fastdfs-nginx-module_v1.16.tar.gz - 编辑配置文件:修改config文件将/usr/local/路径改为/usr/(这里要修改三个路径)
vim /opt/fastdfs-nginx-module/src/config

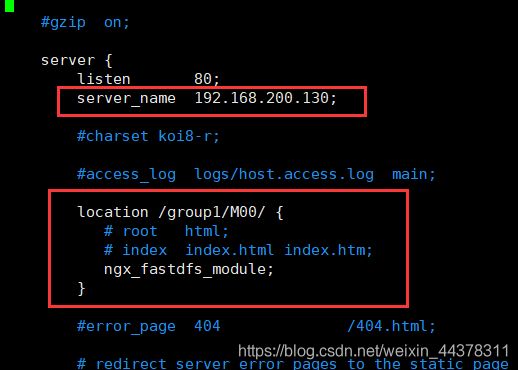
- 将FastDFS-nginx-module/src下的mod_fastdfs.conf拷贝至/etc/fdfs/下
cp /opt/fastdfs-nginx-module/src/mod_fastdfs.conf /etc/fdfs/
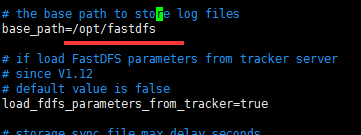
并修改mod_fastdfs.conf的内容:
vim /etc/fdfs/mod_fastdfs.conf


- 将libfdfsclient.so拷贝至/usr/lib下
cp /usr/lib64/libfdfsclient.so /usr/lib/
安装nginx
- 创建nginx/client目录
mkdir -p /var/temp/nginx/client - 安装环境:
安装pcre库
yum -y install pcre-devel
安装zlib库
yum install -y zlib-devel - 上传nginx
上传nginx压缩包到/opt目录下,解压
tar -zxvf nginx-1.12.2.tar.gz - 添加fastdfs-nginx-module模块
cd /opt/nginx-1.12.2/
./configure \
--prefix=/usr/local/nginx \
--pid-path=/usr/local/nginx/nginx.pid \
--lock-path=/var/lock/nginx.lock \
--error-log-path=/var/log/nginx/error.log \
--http-log-path=/var/log/nginx/access.log \
--with-http_gzip_static_module \
--http-client-body-temp-path=/var/temp/nginx/client \
--http-proxy-temp-path=/var/temp/nginx/proxy \
--http-fastcgi-temp-path=/var/temp/nginx/fastcgi \
--http-uwsgi-temp-path=/var/temp/nginx/uwsgi \
--http-scgi-temp-path=/var/temp/nginx/scgi \
--add-module=/opt/fastdfs-nginx-module/src
最重要的是最后面的--add-module=/opt/fastdfs-nginx-module/src
添加之前设置好的fastdfs-nginx-module模块
-
编译
cd /opt/nginx-1.12.2/
make
安装
cd /opt/nginx-1.12.2/
make install -
启动nginx
/usr/local/nginx/sbin/nginx
设置开机启动
vim /etc/rc.d/rc.local

-
需要关闭防火墙
service iptables stop
永久关闭chkconfig iptables off -
测试
This is FastDFS client test program v5.05

Copyright (C) 2008, Happy Fish / YuQing

FastDFS may be copied only under the terms of the GNU General
Public License V3, which may be found in the FastDFS source kit.
Please visit the FastDFS Home Page http://www.csource.org/
for more detail.

[2020-06-03 08:16:22] DEBUG - base_path=/opt/fastdfs, connect_timeout=30, network_timeout=60, tracker_server_count=1, anti_steal_token=0, anti_steal_secret_key length=0, use_connection_pool=0, g_connection_pool_max_idle_time=3600s, use_storage_id=0, storage server id count: 0

tracker_query_storage_store_list_without_group:
	server 1. group_name=, ip_addr=192.168.200.130, port=23000

group_name=group1, ip_addr=192.168.200.130, port=23000
storage_upload_by_filename
group_name=group1, remote_filename=M00/00/00/wKjIgl7W69aASKziAABiTR6BiQY645.jpg
source ip address: 192.168.200.130
file timestamp=2020-06-03 08:16:22
file size=25165
file crc32=511805702
example file url: http://192.168.200.130/group1/M00/00/00/wKjIgl7W69aASKziAABiTR6BiQY645.jpg
storage_upload_slave_by_filename
group_name=group1, remote_filename=M00/00/00/wKjIgl7W69aASKziAABiTR6BiQY645_big.jpg
source ip address: 192.168.200.130
file timestamp=2020-06-03 08:16:22
file size=25165
file crc32=511805702
example file url: http://192.168.200.130/group1/M00/00/00/wKjIgl7W69aASKziAABiTR6BiQY645_big.jpg
