pacemaker + corosync + haproxy配置集群
配置corosync
在server5 和 server6 中皆安装corosync pacemaker
yum install corosync pacemaker -y
在server5中编辑corosync配置文件
mv /etc/corosync/corosync.conf.example /etc/corosync/corosync.conf
vim /etc/corosync/corosync.conf
# Please read the corosync.conf.5 manual page
compatibility: whitetank
totem {
version: 2
secauth: off #是否开启认证
threads: 0 #实现认证时,并发线程数,0表示默认
interface {
ringnumber: 0 #环号码,为这个网卡定义一个唯一的环号码,以避免心跳信息环发送
bindnetaddr: 172.25.31.0 #绑定的网络地址
mcastaddr: 226.94.1.1 #广播地址
mcastport: 31 #广播端口
ttl: 1 #只向外播一次
}
}
logging {
fileline: off
to_stderr: no
to_logfile: yes
to_syslog: yes
logfile: /var/log/cluster/corosync.log
debug: off
timestamp: on
logger_subsys {
subsys: AMF
debug: off
}
}
amf {
mode: disabled
}
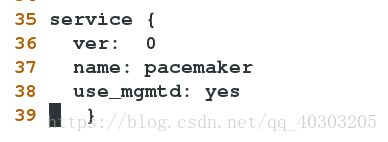
service { #定义一个服务来启动pacemaker
ver: 0 #启动corosync时会自动启动pacemaker
name: pacemaker
use_mgmtd: yes
}
scp /etc/corosync/corosync.conf 172.25.31.6:/etc/corosync/ #将配置文件scp到server6上
/etc/init.d/corosync start  #在server5和server6中都打开corosync
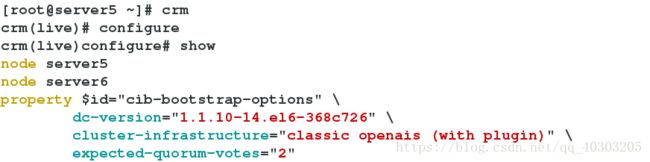
用crm配置集群
yum localinstall crmsh-1.2.6-0.rc2.2.1.x86_64.rpm pssh-2.3.1-2.1.x86_64.rpm
检查配置文件,会报错,因为我们此时还没有配置stonith
crm_verify -LV
禁用fence
crm
crm(live)# configure
crm(live)configure# property stonith-enabled=false
crm(live)configure# commit  #提交
此时再次检查,没有报错
crm_verify -LV
查看当前集群
crm configure show
将no-quorum-policy 设置为ignore
在两个节点中,当节点达不到法定票数时,即两个节点一个坏了,没法投票,正常的节点达不到法定票数,此时如果是默认参数,即正常的机器不能工作,所以需要该为ignore,使正常机器接管
crm(live)configure#  property no-quorum-policy=ignore
crm(live)configure# commit
添加vip
crm(live)configure# primitive vip ocf:heartbeat:IPaddr2 params ip=172.25.31.100 cidr_netmask=24 op monitor interval=1min
crm(live)configure# commit
添加haproxy
crm(live)configure# primitive haproxy lsb:haproxy op monitor interval=1min
crm(live)configure# commit
发现两个资源不在同一个节点上运行,发生资源漂移,添加资源组可解决这一问题

添加资源组
crm(live)configure# group westos vip haproxy
crm(live)configure# commit
在节点server5上执行 crm node standby 命令,停用该节点
资源会转移到server6上

在server5上执行crm node online 命令,激活该节点
资源不会发生转移

添加fence
确保主机上的fence_virtd 服务开启
stonith_admin -I    #查询fence设备
stonith_admin -M -a fence_xvm   #查看相关的配置内容
我们要用到的的是fence_xvm,如果没有,在server5、6都安装以下软件
yum install -y fence-virt.x86_64 fence-agents.x86_64
添加fence资源
crm(live)configure# primitive vmfence stonith:fence_xvm params pcmk_host_map="server5:test5;server6:test6" op monitor interval=1min
#添加fence资源,并做好集群节点名和真实server的名字映射
crm(live)configure# property stonith-enabled=true  #开启fence功能
crm(live)configure# commit #提交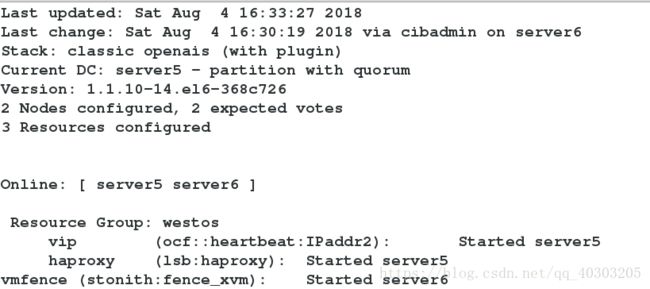
测试:
在server5中执行 echo c >/proc/sysrq-trigger ,使其内核崩溃
server5会自动重启
fence_xvm -H test6 #手动fence test6