iOS零碎知识
【杂乱中的杂乱】
MRC和ARC混编设置方式
-fno-objc-arc1、调用代码使APP进入后台,达到点击Home键的效果
[[UIApplication sharedApplication] performSelector:@selector(suspend)];2、带有中文的URL处理。
http://static.tripbe.com/videofiles/视频/我的自拍视频.mp4
NSString *path  = (__bridge_transfer NSString*)CFURLCreateStringByReplacingPercentEscapesUsingEncoding(NULL,
 (__bridge CFStringRef)model.mp4_url,
CFSTR(""),
CFStringConvertNSStringEncodingToEncoding(NSUTF8StringEncoding));
3、强制让App直接退出(非闪退,非崩溃)
    - (void)exitApplication {
        AppDelegate *app = [UIApplication sharedApplication].delegate;
        UIWindow *window = app.window;
        [UIView animateWithDuration:1.0f animations:^{
            window.alpha = 0;
        } completion:^(BOOL finished) {
            exit(0);
        }];
    }
4、删除NSUserDefaults所有记录
//方法一
NSString *appDomain = [[NSBundle mainBundle] bundleIdentifier];
[[NSUserDefaults standardUserDefaults] removePersistentDomainForName:appDomain];

//方法二
- (void)resetDefaults {
    NSUserDefaults * defs = [NSUserDefaults standardUserDefaults];
    NSDictionary * dict = [defs dictionaryRepresentation];
    for (id key in dict) {
        [defs removeObjectForKey:key];
    }
    [defs synchronize];
}
5、相对路径和绝对路径
iOS程序有固定的文件访问限制,只能在自己的沙盒内。
相对路径位置是相对当前项目的路径,无论你的项目在哪台电脑上这个项目都可以正常运行,而绝对路径的项目路决只对当前电脑的位置有效,换一台电脑路径就会出现错误。
相对路径:$(SRCROOT)代表的是项目根目录下。
绝对路劲:$(PROJECT_DIR)代表的是当前工程文件夹目录,也就是整个项目。
读取文件
NSString *newPath=[[NSBundle mainBundle] pathForResource:@"test" ofType:@"txt"];
NSFileHandle *fileHandle=[NSFileHandle fileHandleForReadingAtPath:newPath];
NSString *str=[NSString stringWithContentsOfFile:newPath encoding:NSUTF8StringEncoding error:nil];
// 获取程序Documents目录路径
NSArray *paths = NSSearchPathForDirectoriesInDomains(NSDocumentDirectory,NSUserDomainMask, YES);
NSString *documentsDirectory = [paths objectAtIndex:0];
// 获取程序app文件所在目录路径
NSHomeDirectory();
// 获取程序tmp目录路径
NSTemporaryDirectory();
// 获取程序应用包路径
[[NSBundle mainBundle] resourcePath];
或
[[NSBundle mainBundle] pathForResource: @"info" ofType: @"txt"];6、禁止锁屏
默认情况下,当设备一段时间没有触控动作时,iOS会锁住屏幕。但有一些应用是不需要锁屏的,比如视频播放器。
[UIApplication sharedApplication].idleTimerDisabled = YES;
或
[[UIApplication sharedApplication] setIdleTimerDisabled:YES];
7、iOS跳转到App Store下载应用评分
[[UIApplication sharedApplication] openURL:[NSURL URLWithString:@"itms-apps://itunes.apple.com/WebObjects/MZStore.woa/wa/viewContentsUserReviews?type=Purple+Software&id=APPID"]];8、获取第一响应者
UIWindow * keyWindow = [[UIApplication sharedApplication] keyWindow];
UIView * firstResponder = [keyWindow performSelector:@selector(firstResponder)];
9、判断对象是否遵循了某协议
if ([self.selectedController conformsToProtocol:@protocol(RefreshPtotocol)])
{
     [self.selectedController performSelector:@selector(onTriggerRefresh)];
}
10、判断view是不是指定视图的子视图
BOOL isView = [textView isDescendantOfView:self.view];11、获取一个类的所有子类
+ (NSArray *) allSubclasses
{
    Class myClass = [self class];
    NSMutableArray *mySubclasses = [NSMutableArray array];
    unsigned int numOfClasses;
    Class *classes = objc_copyClassList(&numOfClasses;);
    for (unsigned int ci = 0; ci < numOfClasses; ci++)
    {
        Class superClass = classes[ci];
        do{
            superClass = class_getSuperclass(superClass);
        } while (superClass && superClass != myClass);

        if (superClass)
        {
            [mySubclasses addObject: classes[ci]];
        }
    }
    free(classes);
    return mySubclasses;
}
12、防止scrollView手势覆盖侧滑手势
[scrollView.panGestureRecognizerrequireGestureRecognizerToFail:self.navigationController.interactivePopGestureRecognizer];13、获取手机安装的应用
Class c =NSClassFromString(@"LSApplicationWorkspace");
id s = [(id)c performSelector:NSSelectorFromString(@"defaultWorkspace")];
NSArray *array = [s performSelector:NSSelectorFromString(@"allInstalledApplications")];
for (id item in array)
{
    NSLog(@"%@",[item performSelector:NSSelectorFromString(@"applicationIdentifier")]);
    //NSLog(@"%@",[item performSelector:NSSelectorFromString(@"bundleIdentifier")]);
    NSLog(@"%@",[item performSelector:NSSelectorFromString(@"bundleVersion")]);
    NSLog(@"%@",[item performSelector:NSSelectorFromString(@"shortVersionString")]);
}
14、简单的图文混排
- (void)setupTextView
{
// 富文本技术:
// 1.图文混排
// 2.随意修改文字样式
//    self.textView.text = @"哈哈4365746875";
//    self.textView.textColor = [UIColor blueColor];
NSMutableAttributedString *string = [[NSMutableAttributedString alloc] initWithString:@"哈哈123456"];
 // 设置“哈哈”为蓝色
[string addAttribute:NSForegroundColorAttributeName value:[UIColor blueColor] range:NSMakeRange(0, 2)];
[string addAttribute:NSFontAttributeName value:[UIFont systemFontOfSize:30] range:NSMakeRange(0, 2)];
[string addAttribute:NSBackgroundColorAttributeName value:[UIColor redColor] range:NSMakeRange(0, 2)];

// 设置“456”为红色
[string addAttribute:NSForegroundColorAttributeName value:[UIColor redColor] range:NSMakeRange(6, 2)];
[string addAttribute:NSFontAttributeName value:[UIFont boldSystemFontOfSize:24] range:NSMakeRange(6, 2)];
[string addAttribute:NSUnderlineStyleAttributeName value:@(NSUnderlineStyleSingle) range:NSMakeRange(6, 2)];

// 创建图片图片附件
NSTextAttachment *attach = [[NSTextAttachment alloc] init];
attach.image = [UIImage imageNamed:@"d_aini"];
attach.bounds = CGRectMake(0, 0, 15, 15);
NSAttributedString *attachString = [NSAttributedString attributedStringWithAttachment:attach];


[string appendAttributedString:attachString];

[string appendAttributedString:[[NSAttributedString alloc] initWithString:@"789"]];


 //图文混排,设置图片的位置
    UIImageView * imageView = [[UIImageView alloc] initWithFrame:CGRectMake(120, 120, 100, 110)];
    imageView.image = [UIImage imageNamed:@"image"];
    imageView.backgroundColor = [UIColor redColor];
    [self.view addSubview:imageView];
    CGRect rect = CGRectMake(100, 100, 120, 120);

    //设置环绕的路径
    UIBezierPath * path = [UIBezierPath bezierPathWithRect:rect];
    self.textView.textContainer.exclusionPaths = @[path];
self.textView.attributedText = string;

/**
 iOS 6之前:CoreText,纯C语言,极其蛋疼
 iOS 6开始:NSAttributedString,简单易用
 iOS 7开始:TextKit,功能强大,简单易用
 */
}
效果图
15、设备号
NSDictionary *infoDictionary = [[NSBundle mainBundle] infoDictionary];
 CFShow(infoDictionary);
// app名称
 NSString *app_Name = [infoDictionary objectForKey:@"CFBundleDisplayName"];
 // app版本
 NSString *app_Version = [infoDictionary objectForKey:@"CFBundleShortVersionString"];
 // app build版本
 NSString *app_build = [infoDictionary objectForKey:@"CFBundleVersion"];


    //手机序列号
    NSString* identifierNumber = [[UIDevice currentDevice] uniqueIdentifier];
    NSLog(@"手机序列号: %@",identifierNumber);
    //手机别名: 用户定义的名称
    NSString* userPhoneName = [[UIDevice currentDevice] name];
    NSLog(@"手机别名: %@", userPhoneName);
    //设备名称
    NSString* deviceName = [[UIDevice currentDevice] systemName];
    NSLog(@"设备名称: %@",deviceName );
    //手机系统版本
    NSString* phoneVersion = [[UIDevice currentDevice] systemVersion];
    NSLog(@"手机系统版本: %@", phoneVersion);
    //手机型号
    NSString* phoneModel = [[UIDevice currentDevice] model];
    NSLog(@"手机型号: %@",phoneModel );
    //地方型号  (国际化区域名称)
    NSString* localPhoneModel = [[UIDevice currentDevice] localizedModel];
    NSLog(@"国际化区域名称: %@",localPhoneModel );

    NSDictionary *infoDictionary = [[NSBundle mainBundle] infoDictionary];
    // 当前应用名称
    NSString *appCurName = [infoDictionary objectForKey:@"CFBundleDisplayName"];
    NSLog(@"当前应用名称:%@",appCurName);
    // 当前应用软件版本  比如:1.0.1
    NSString *appCurVersion = [infoDictionary objectForKey:@"CFBundleShortVersionString"];
    NSLog(@"当前应用软件版本:%@",appCurVersion);
    // 当前应用版本号码   int类型
    NSString *appCurVersionNum = [infoDictionary objectForKey:@"CFBundleVersion"];
    NSLog(@"当前应用版本号码:%@",appCurVersionNum);
16、获取现在UINavagition的第几层
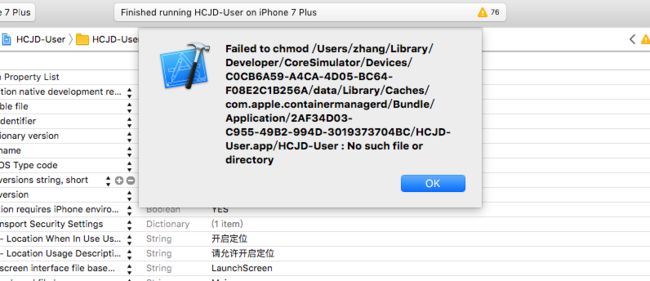
self.navigationController.viewControllers.count17、高德地图出现这个
把在模拟器上不该APP删除,然后退出Xcode和模拟器
18、 放在某个父视图的最上层
[self.view bringSubviewToFront:label1];19、获取window
UIWindow *window = [UIApplication sharedApplication].keyWindow;【UITextField】
1、设置placeholder的大小以及颜色
[_phoneTextField setValue:[UIColor colorWithRed:(255)/255.0 green:(255)/255.0 blue:(255)/255.0 alpha:0.5] forKeyPath:@"_placeholderLabel.textColor"];

[_phoneTextField setValue:[UIFont boldSystemFontOfSize:17] forKeyPath:@"_placeholderLabel.font"];
2、收起键盘
[self.view endEditing:YES]3、实时监测textField的变化
[_textField addTarget:self action:@selector(textFieldChange:) forControlEvents:UIControlEventEditingChanged];4、UITextField每四位加一个空格,实现代理
- (BOOL)textField:(UITextField *)textField shouldChangeCharactersInRange:(NSRange)range replacementString:(NSString *)string
{
    // 四位加一个空格
    if ([string isEqualToString:@""])
    {
        // 删除字符
        if ((textField.text.length - 2) % 5 == 0)
        {
            textField.text = [textField.text substringToIndex:textField.text.length - 1];
        }
        return YES;
    }
    else
    {
        if (textField.text.length % 5 == 0)
        {
            textField.text = [NSString stringWithFormat:@"%@ ", textField.text];
        }
    }
    return YES;
}
//=======================================================
//=======================================================
//=======================================================
【UITableView】
1、滚动时执行的代理,可以找出当前滚动的位置
- (void)scrollViewDidScroll:(UIScrollView *)scrollView
{
    CGPoint offset = scrollView.contentOffset;  // 当前滚动位移
    CGRect bounds = scrollView.bounds;          // UIScrollView 可视高度
//    CGSize size = scrollView.contentSize;         // 滚动区域
    UIEdgeInsets inset = scrollView.contentInset;
    float y = offset.y + bounds.size.height - inset.bottom;
//    float h = size.height;

    //在界面上显示的高度
    float allH = _dataSource.count *170 + SCREEN_WIDTH/2+40;
    if (allH < SCREENH_HEIGHT) {
        _tableView.scrollEnabled = NO;
    }else{
        _tableView.scrollEnabled = YES;
        if (SCREENH_HEIGHT >= y) {
            _tableView.backgroundColor = RGB(255, 122, 82);
        }else{
            _tableView.backgroundColor = grayBG;
        }

    }


}
2、状态栏的相关设置(UIStatusBar)
ios上状态栏 就是指的最上面的20像素高的部分
状态栏分前后两部分,要分清这两个概念,后面会用到:
前景部分:就是指的显示电池、时间等部分;
背景部分:就是显示黑色或者图片的背景部分;
如下图:前景部分为白色,背景部分为黑色
1.plist设置statusBar
在plist里增加一行 UIStatusBarStyle(或者是“Status bar style”也可以),这里可以设置两个值,就是上面提到那两个 UIStatusBarStyleDefault 和 UIStatusBarStyleLightContent
这样在app启动的launch页显示的时候,statusBar的样式就是上面plist设置的风格。
/
2.程序代码里设置statusBar
[[UIApplication sharedApplication] setStatusBarStyle:UIStatusBarStyleLightContent];
或者
//相对于上面的接口,这个接口可以动画的改变statusBar的前景色
[[UIApplication sharedApplication] setStatusBarStyle:UIStatusBarStyleLightContent animated:YES];
/
不仅如此,ios还很贴心的在UIViewController也增加了几个接口,
目的是让状态栏根据当前显示的UIViewController来定制statusBar的前景部分。
- (UIStatusBarStyle)preferredStatusBarStyle;

- (UIViewController *)childViewControllerForStatusBarStyle;

- (void)setNeedsStatusBarAppearanceUpdate

- (UIStatusBarStyle)preferredStatusBarStyle:
在你自己的UIViewController里重写此方法,返回你需要的值(UIStatusBarStyleDefault 或者 UIStatusBarStyleLightContent);
注意:
这里如果你只是简单的return一个固定的值,那么该UIViewController显示的时候,程序就会马上调用该方法,来改变statusBar的前景部分;
如果在该UIViewController已经在显示在当前,你可能还要在当前页面不时的更改statusBar的前景色,那么,你首先需要调用下面的setNeedsStatusBarAppearanceUpdate方法(这个方法会通知系统去调用当前UIViewController的preferredStatusBarStyle方法), 这个和UIView的setNeedsDisplay原理差不多(调用UIView对象的setNeedsDisplay方法后,系统会在下次页面刷新时,调用重绘该view,系统最快能1秒刷新60次页面,具体要看程序设置)。
- (UIViewController *)childViewControllerForStatusBarStyle: 这个接口也很重要,默认返回值为nil。当我们调用setNeedsStatusBarAppearanceUpdate时,系统会调用application.window的rootViewController的preferredStatusBarStyle方法,我们的程序里一般都是用UINavigationController做root,如果是这种情况,那我们自己的UIViewController里的preferredStatusBarStyle根本不会被调用;
这种情况下childViewControllerForStatusBarStyle就派上用场了,
我们要子类化一个UINavigationController,在这个子类里面重写childViewControllerForStatusBarStyle方法,如下:
- (UIViewController *)childViewControllerForStatusBarStyle{
    return self.topViewController;
}
上面代码的意思就是说,不要调用我自己(就是UINavigationController)的preferredStatusBarStyle方法,而是去调用navigationController.topViewController的preferredStatusBarStyle方法,这样写的话,就能保证当前显示的UIViewController的preferredStatusBarStyle方法能影响statusBar的前景部分。
另外,有时我们的当前显示的UIViewController可能有多个childViewController,重写当前UIViewController的childViewControllerForStatusBarStyle方法,让childViewController的preferredStatusBarStyle生效(当前UIViewController的preferredStatusBarStyle就不会被调用了)。
简单来说,只要UIViewController重写的的childViewControllerForStatusBarStyle方法返回值不是nil,那么,UIViewController的preferredStatusBarStyle方法就不会被系统调用,系统会调用childViewControllerForStatusBarStyle方法返回的UIViewController的preferredStatusBarStyle方法。
- (void)setNeedsStatusBarAppearanceUpdate:让系统去调用application.window的rootViewController的preferredStatusBarStyle方法,如果rootViewController的childViewControllerForStatusBarStyle返回值不为nil,则参考上面的讲解。
另辟蹊径
创建一个UIView,
设置该UIView的frame.size 和statusBar大小一样,
设置该UIView的frame.origin 为{0,-20},
设置该UIView的背景色为你希望的statusBar的颜色,
在navigationBar上addSubView该UIView即可。
3、自适应高度,关键代码
_tableView.rowHeight = UITableViewAutomaticDimension;
_tableView.estimatedRowHeight = 44;
4、调整cell分割线的位置
-(void)viewDidLayoutSubviews {

    if ([self.mytableview respondsToSelector:@selector(setSeparatorInset:)]) {
        [self.mytableview setSeparatorInset:UIEdgeInsetsMake(0, 0, 0, 0)];

    }
    if ([self.mytableview respondsToSelector:@selector(setLayoutMargins:)])  {
        [self.mytableview setLayoutMargins:UIEdgeInsetsMake(0, 0, 0, 0)];
    }

}
5、设置滑动的时候隐藏navigationBar
navigationController.hidesBarsOnSwipe = Yes; //=======================================================
//=======================================================
//=======================================================
【UIView】
渐变色
CAGradientLayer *layer = [CAGradientLayer layer];

layer.startPoint = CGPointMake(0.5 , 0);//(0,0)表示从左上角开始变化。默认值是(0.5,0.0)表示从x轴为中间,y为顶端的开始变化

layer.endPoint = CGPointMake(0.5, 1);//(1,1)表示到右下角变化结束。默认值是(0.5,1.0)  表示从x轴为中间,y为低端的结束变化

layer.colors = [NSArray arrayWithObjects:(id)RGB(255, 122, 82).CGColor,(id)RGB(254, 89, 85).CGColor, nil];

//    layer.locations = @[@0.0f,@0.6f,@1.0f];//渐变颜色的区间分布,locations的数组长度和color一致,这个值一般不用管它,默认是nil,会平均分布

layer.frame = headerView.layer.bounds;

[headerView.layer insertSublayer:layer atIndex:0];
【UDID UUID】
UDID的全名为 Unique Device Identifier :设备唯一标识符。从名称上也可以看出,UDID这个东西是和设备有关的,而且是只和设备有关的,有点类似于MAC地址。需要把UDID这个东西添加到Provisoning Profile授权文件中,也就是把设备唯一标识符添加进去,以此来识别某一台设备。
但是如果我们代码中要用到UDID,那么应该怎么办呢?很遗憾,自从iOS5之后,苹果就禁止了通过代码访问UDID,在这之前,可以使用[[UIDevice cuurrent] uniqueIdenfier] 这个方法来获取某设备UDID,现在是不可能了
NSUUID *uuid = [UIDevice currentDevice].identifierForVendor;
NSLog(@"uuid 1 = %@",uuid.UUIDString);
英文名称是:Universally Unique Identifier,翻译过来就是通用唯一标识符。是一个32位的十六进制序列,使用小横线来连接:8-4-4-4-12 。UUID在某一时空下是唯一的。比如在当前这一秒,全世界产生的UUID都是不一样的;当然同一台设备产生的UUID也是不一样的。我在很早之前的一篇博客中使用了一种现在看起来非常愚蠢的方式来获取当前的UUID,下面也有读者反映了这个情况,现在最简单获取UUID的代码如下
 for (int i = 0; i < 10; i++)
    {
        NSString *uuid = [NSUUID UUID].UUIDString;
        NSLog(@"uuid 2 = %@",uuid);
    }
通过运行程序可以发现,循环10次,每一次打印的值都是不一样的,当然循环的再多,这个值永远不会出现两个一样的值。所以从某种程序上来说,UUID跟你的设备没有什么关系了。
/
IDFA(identifierForIdentifier)广告标示符,适用于对外:例如广告推广,换量等跨应用的用户追踪等。
#import
NSString *adId = [[[ASIdentifierManager sharedManager] advertisingIdentifier] UUIDString];
【imageView】
1、获取网络image
//首先得拿到照片的路径,也就是下边的string参数,转换为NSData型。
 NSData *data = [NSData dataWithContentsOfURL:[NSURL URLWithString:string]];
//然后就是添加照片语句,这次不是`imageWithName`了,是 imageWithData。
 UIImageView.image = [UIImage imageWithData:data];
2、上传多张图片
上传图片到服务器我们一般使用AFNetWorking方法里面的下面这个方法,这是一般的上传单张图片。
如果我们需要上传多张图片,我们可以使用两种方法:
1、使用for循环,直接把这个网络请求的方法直接写在for循环里面
2、使用递归方法,记录下总照片数,在成功里面写这个回归主线程的方法,在成功的时候把总照片数减一,然后在重新调用这个方法,当总数为0的时候return
dispatch_async(dispatch_get_global_queue(0, 0), ^{
//通知主线程刷新
dispatch_async(dispatch_get_main_queue(), ^{
//回调或者说是通知主线程刷新,
});
    AFHTTPSessionManager *manager = [AFHTTPSessionManager manager];
    manager.responseSerializer = [AFHTTPResponseSerializer serializer];
    manager.responseSerializer.acceptableContentTypes = [NSSet setWithObjects:@"application/json",@"text/json", @"text/plain", @"text/html", nil];
 [manager POST:url parameters:param constructingBodyWithBlock:^(id  _Nonnull formData) {

    } progress:nil success:^(NSURLSessionDataTask * _Nonnull task, id  _Nullable responseObject) {

    } failure:^(NSURLSessionDataTask * _Nullable task, NSError * _Nonnull error) {

}]; 
