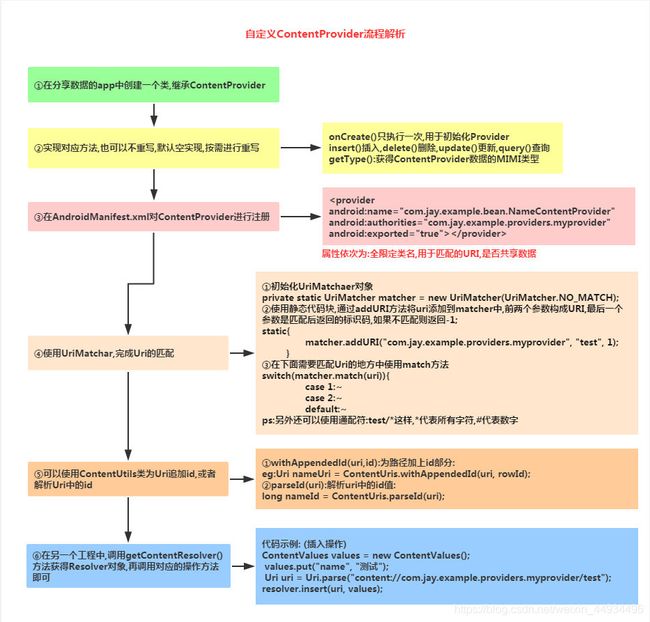
Android基础学习 自定义内容提供器ContentProvider
内容提供器( Content Provider )主要用于在不同的应用程序之间实现数据共享的功能,它提供了一套完整的机制,允许一个程序访问另一 个 程序中的数据,同时还能保证被访数据的安全性。目前,使用内容提供器是Android实现跨程序共享数据的标准方式。
不同于文件存储和SharedPreferences存储中的两种全局可读写操作模式,内容提供器可以选.择只对哪一部分数据进行共享,从而保证我们程序中的隐私数据不会有泄漏的风险。
- 系统自带的: 也就是电话联系人之类的。它们这一类的大概用法就是先获取权限,获取到权限后再用类似数据库操作的增删查改对其数据进行操作。
- 自定义的: 就是在自己写的程序里,添加一个ContentProvider类,让其他程序可以访问到它里面的数据,本次也是主要举例讲自定义内容提供器。

①.一个程序要想访问另一个程序的数据,就必须要有被访问程序的URI,然后通过ContentResolver类来访问这个URI。
②.这和使用sQLiteDatabase类似,他们的不同是ContentResolver是在其他程序里用来访问其他程序数据的,查找通过URI;sQLiteDatabase是在一个程序了用来访问本程序的数据的,查找是通过表名
URI的写法如下:
它主要由两部分组成: authority 和path。authoritv 是用于对不同的应用程序做区分的,一般为了避免冲突,都会采用程序包名的方式来进行命名。比如某个程序的包名是com.examole,app,那么该程序对应的authority就可以命名为com. example.app. provider。path 则是用于对同一应用程序中不同的表做区分的,通常都会添加到authority的后面。比如桌个程序的数据库里存在
两张表: tablel 和table2,这时就可以将path分别命名为/table1和 /table2 ,然后把authority和path进行组合,内容URI就变成了com. exampleappprovider/able1和com.example app-provider/table2.不过,目前还很难辨认出这两个字符串就是两个内容URI,我们还需要在字符串的头部加上协议
声明。因此。内容URI最标准的格式写法如下:
content://com. example. app. provider/table1
content://com. example. app. provider/table2
这是ContentProvider里的六个主要方法的介绍:
1. onCreate( )
初始化内容提供器的时候调用。通常会在这里完成对数据库的创建和升级等操作,返回true表示内容提供器初始化成功,返回false则表示失败。注意,只有当存在ContentResolver 尝试访问我们程序中的数据时,内容提供器才会被初始化。
2. query()
从内容提供器中查询数据。使uri参数来确定查询哪张表,projection参数用于确定查询哪些列,selection和selectionArgs参数用于约束查询哪sortOrder参数用于对结果进行排序。查 询的结果存放在Cursor对象中返回。
3. insert()
向内容提供器中添加一-条数据。使用uri参数来确定要添加到的表,待添加的数据保存在values参数中。添加完成后,返回一个用于表示这条新记录URI。
4. update() .
更新内容提供器中已有的数据。使用uri参数来确定更新哪一张表中的数据,新数据保存在values参数中,selection 和selectionArgs参数用于约束更新哪些行,受影响的行数将作为返回值返回。
5. delete()
从内容提供器中删除数据。使用uri参数来确定删除哪一张表中的数据,selection 和selectionArgs参数用于约束删除哪些行,被删除的行数将作为返回值返回。
6. getType()
根据传人的内容URI来返回相应的MIME类型。
一.首先建立一个项目,它里面建一个表来装数据,再为它建一个ContentProvider类
这是它的SQLiteOpenHelper类,构造时会创建一个名字叫user的表,表里有account和password两种数据
public class MyDbOpenHelper extends SQLiteOpenHelper {

    public MyDbOpenHelper(Context context) {

        super(context, "my.db", null, 1);
    }
    @Override
    //数据库第一次创建时被调用
    public void onCreate(SQLiteDatabase db) {

        db.execSQL("CREATE TABLE user(userid INTEGER PRIMARY KEY AUTOINCREMENT,account VARCHAR(20),password VARCHAR(5))");

    }
    //软件版本号发生改变时调用
    @Override
    public void onUpgrade(SQLiteDatabase db, int oldVersion, int newVersion) {

        db.execSQL("ALTER TABLE user ADD phone VARCHAR(12) NULL");
    }
}
再为这个程序创建ContentProvider类,内容提供器需要在AndroidManifest.xml中为其注册。可以通过File->New->Other->Content Provider来创建内容提供器,这样就不需要手动为其注册了。
创建SimpleLoginProvider类继承ContentProvider
public class SimpleLoginProvider extends ContentProvider {


    private MyDbOpenHelper myHelper;
    private static UriMatcher uriMatcher = new UriMatcher(UriMatcher.NO_MATCH);

    static {

        uriMatcher.addURI("com.example.simpleloginsystem.provider","user",1);
    }

    public SimpleLoginProvider() {

    }

    @Override
    public int delete(Uri uri, String selection, String[] selectionArgs) {

        // Implement this to handle requests to delete one or more rows.
        throw new UnsupportedOperationException("Not yet implemented");
    }

    @Override
    public String getType(Uri uri) {

        // TODO: Implement this to handle requests for the MIME type of the data
        // at the given URI.
        throw new UnsupportedOperationException("Not yet implemented");
    }

    @Override
    public Uri insert(Uri uri, ContentValues values) {

        switch (uriMatcher.match(uri)){

            case 1:
                SQLiteDatabase db = myHelper.getReadableDatabase();
                long rowId = db.insert("user",null,values);
                if (rowId>0){

                    //在前面已有的Uri后面追加ID
                    Uri nameUri = ContentUris.withAppendedId(uri, rowId);
                    //通知数据已经发生改变
                    getContext().getContentResolver().notifyChange(nameUri, null);
                    return nameUri;
                }
        }
        return null;
    }

    @Override
    public boolean onCreate() {

        myHelper = new MyDbOpenHelper(this.getContext());
        return true;
    }

    @Override
    public Cursor query(Uri uri, String[] projection, String selection,
                        String[] selectionArgs, String sortOrder) {

            SQLiteDatabase db = myHelper.getReadableDatabase();
            Cursor cursor = null;
            switch (uriMatcher.match(uri)){

                case 1:
                    cursor=db.query("user",null,null,null,null,null,null,null);
                    //cursor = db.query("user",null,null,null,null,null,null);
                    //return cursor;
                    break;
            }
            return  cursor;
    }

    @Override
    public int update(Uri uri, ContentValues values, String selection,
                      String[] selectionArgs) {

        // TODO: Implement this to handle requests to update one or more rows.
        throw new UnsupportedOperationException("Not yet implemented");
    }
}
这里首先实现了两个类:
①一个是刚刚建的用来建表的MyDbOpenHelper类。
②另一个是UriMatcher类,UriMatcher 这个类是用来实现匹配内容URI的功能的。UriMatcher中提供了一个addURI()方法,这个方法接收3个参数,可以分别把authority. path和一个自定义代码传进去。这样,当调用UriMatcher的match()方法时,就可以将一个 Uri对象传入 ,返回值是某个能够匹配这个Uri对象所对应的自定义代码,利用这个代码,我们就可以判断出调用方期望访问的是哪张表中的数据了。
这里只重写了insert()和query()两个方法
二.新建TestContentProvider项目来访问上一个程序的表的内容
MainActivity.java
先获得ContentResolver实例,在传入uri对上一个程序的表进行访问
public class MainActivity extends AppCompatActivity {


    private Button mBtn;
    private Button mBtnQuery;

    @Override
    protected void onCreate(Bundle savedInstanceState) {

        super.onCreate(savedInstanceState);
        setContentView(R.layout.activity_main);

        final ContentResolver resolver = this.getContentResolver();
        mBtn = findViewById(R.id.btn_insert);
        mBtn.setOnClickListener(new View.OnClickListener() {

            @Override
            public void onClick(View v) {

                ContentValues values = new ContentValues();
                values.put("account","456");
                values.put("password", "123456");
                Uri uri = Uri.parse("content://com.example.simpleloginsystem.provider/user");
                resolver.insert(uri,values);
                Toast.makeText(getApplicationContext(), "数据插入成功", Toast.LENGTH_SHORT).show();
            }
        });
        mBtnQuery = findViewById(R.id.btn_query);
        mBtnQuery.setOnClickListener(new View.OnClickListener() {

            @Override
            public void onClick(View v) {

                Uri uri = Uri.parse("content://com.example.simpleloginsystem.provider/user");
                Cursor cursor = resolver.query(uri,null,null,null,null);
                StringBuffer sb = new StringBuffer();
               if(cursor!=null){

                   while(cursor.moveToNext()){

                       String account = cursor.getString(cursor.getColumnIndex("account"));
                       String password = cursor.getString(cursor.getColumnIndex("password"));
                       //int id = cursor.getInt(cursor.getColumnIndex("userid"));
                       sb.append(account+" "+password+"\n");
                   }
               }
                Toast.makeText(getApplicationContext(),sb.toString(),Toast.LENGTH_SHORT).show();
            }
        });
    }
}
s
xml,随便放了两个按钮,一个插入数据,一个查询数据
<?xml version="1.0" encoding="utf-8"?>
<androidx.constraintlayout.widget.ConstraintLayout xmlns:android="http://schemas.android.com/apk/res/android"
    xmlns:app="http://schemas.android.com/apk/res-auto"
    xmlns:tools="http://schemas.android.com/tools"
    android:layout_width="match_parent"
    android:layout_height="match_parent"
    tools:context=".MainActivity">

    <Button
        android:id="@+id/btn_insert"
        android:layout_width="wrap_content"
        android:layout_height="wrap_content"
        android:text="Hello World!"
        app:layout_constraintLeft_toLeftOf="parent"
        app:layout_constraintRight_toRightOf="parent"
        app:layout_constraintTop_toTopOf="parent" />

    <Button
        android:layout_marginTop="50dp"
        android:textSize="30sp"
        android:id="@+id/btn_query"
        android:layout_width="wrap_content"
        android:layout_height="wrap_content"
        android:layout_marginStart="8dp"
        android:layout_marginEnd="8dp"
        android:text="查询"
        app:layout_constraintEnd_toEndOf="parent"
        app:layout_constraintStart_toStartOf="parent"
        app:layout_constraintTop_toBottomOf="@+id/btn_insert" />

</androidx.constraintlayout.widget.ConstraintLayout>
