openGaussDB 初体验(上)
作者 | JiekeXu
来源 | JiekeXu之路(ID: JiekeXu_IT)
转载请联系授权 | (微信ID:xxq1426321293)
大家好,我是 JiekeXu,很高兴又和大家见面了,今天分享下 openGaussDB 初体验(上)。本文首发于微信公众号【JiekeXu之路】,欢迎点击上方蓝字关注我吧!
一、openGaussDB 介绍
openGaussDB(openGauss)是华为云深度融合在数据库领域多年的经验,结合企业级场景需求,推出的新一代企业级分布式数据库,支持集中式与分布式两种部署形态。在支撑传统业务的基础上,持续构建竞争力特性,为企业面向 5G 时代的挑战,提供了无限可能。 早在 2019 年的华为 HDC 大会,官方就已经正式宣布,华为将于 2020 年 6 月 30 日,开源其单机数据库 openGauss,这一承诺已经准时兑现。
开源后的 openGauss 其官网为:
https://opengauss.org/zh/
源码开放地址:
https://gitee.com/opengauss
GitHub 镜像:
https://github.com/opengauss-mirror
在墨天轮国产数据库排行榜上,TiDB 稳居第一,OceanBase 居第二,DM(达梦) 居第三,希望在社区的推动之下,openGauss 会迎来更加广阔的发展空间,能够跻身前三!
2019 年已经是国产数据库元年,早在去年数据嘉年华大会上, 对于数据库技术百花齐放的时代 Oracle ACED专家盖国强(Eygle)提出“一主一备双引擎,一洋一中保无虞”的观点,前段时间数据库技术深度脱口秀上还看到盖总的十四字箴言,盖总就说过“一主一备双引擎,开源商用两相宜”,什么意思呢?大概就是现在学习数据库技术不能只单单学一种数据库了,至少要学习两到三门数据库知识,既要学习类似 Oracle 的商用数据库,还要学习开源数据库,既要学习国外的数据库也要学习国产数据库。足以证明国产数据库将会蓬勃发展,学习国产数据库势在必行。根据上面的排行榜,赶紧挑选自己喜欢的数据库来练练手吧。
视频如下:
二、安装前准备
软件包官网下载地址:
https://opengauss.org/zh/download.html
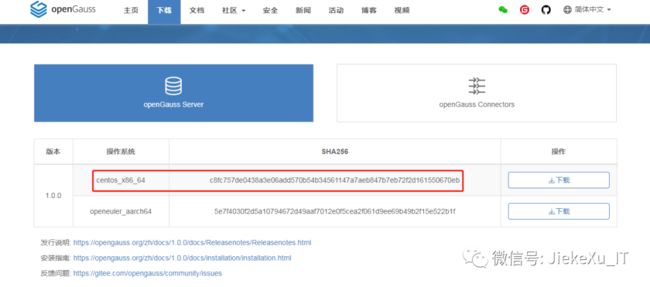
如下,将下载的软件包传至服务器,检验 sha256sum 值和官网一致,说明软件下载无损坏,可正常使用。
[root@openGauss app]# ll
total 60960
-rw-r--r--. 1 root root 62419226 Jul  9 11:40 openGauss-1.0.0-CentOS-64bit.tar.gz
[root@openGauss app]#
[root@openGauss app]# sha256sum openGauss-1.0.0-CentOS-64bit.tar.gz
c8fc757de0438a3e06add570b54b34561147a7aeb847b7eb72f2d161550670eb  openGauss-1.0.0-CentOS-64bit.tar.gz
(1)使虚拟机能够上网,配置网络 yum 源
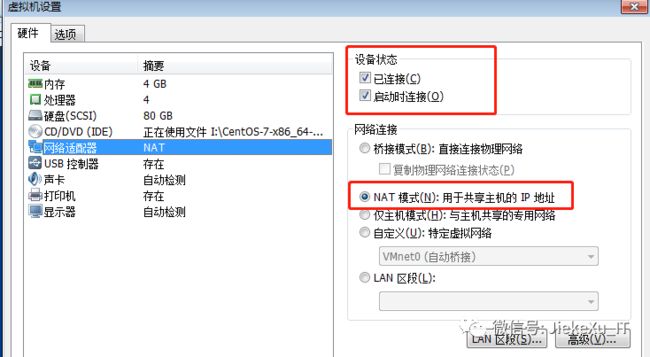
首先网络适配器选择【NAT】模式
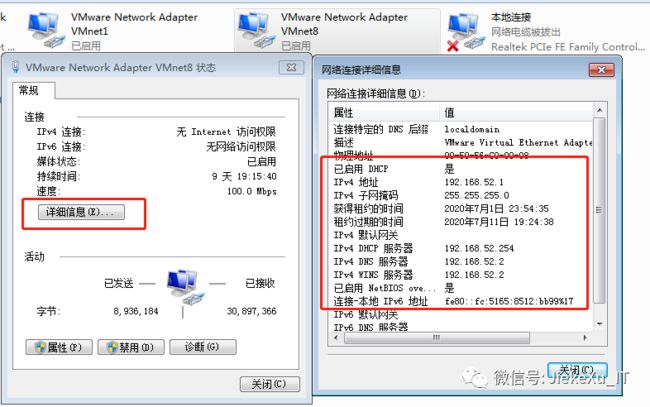
查看宿主机无线适配器关于 net8 的网络配置
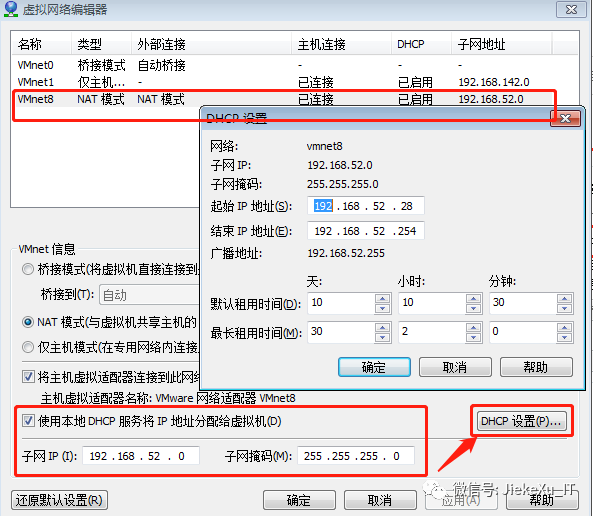
然后 VM 里选择【编辑】——>【虚拟网络编辑器】——>【DHCP设置】
子网 IP 需要和前面看到的在同一网段里,然后选择 DHCP 自动获取。
最后需要修改网卡 ens33,将 BOOTPROTO 由 “none”改为 “dhcp”自动获取,重启网卡虚拟机便可以上网了。
[root@openGauss network-scripts]# service network restart
Restarting network (via systemctl):                        [  OK  ]
[root@openGauss network-scripts]# ping www.baidu.com
PING www.a.shifen.com (182.61.200.7) 56(84) bytes of data.
64 bytes from 182.61.200.7 (182.61.200.7): icmp_seq=1 ttl=128 time=12.4 ms
64 bytes from 182.61.200.7 (182.61.200.7): icmp_seq=2 ttl=128 time=6.12 ms
64 bytes from 182.61.200.7 (182.61.200.7): icmp_seq=3 ttl=128 time=5.76 ms
^C
--- www.a.shifen.com ping statistics ---
3 packets transmitted, 3 received, 0% packet loss, time 2003ms
rtt min/avg/max/mdev = 5.766/8.114/12.452/3.072 ms
(2)查看 yum 源,安装 Python3.6
[root@openGauss ~]# cd /etc/yum.repos.d/
[root@openGauss yum.repos.d]# ll
total 32
-rw-r--r--. 1 root root 1664 Nov 23  2018 CentOS-Base.repo
-rw-r--r--. 1 root root 1309 Nov 23  2018 CentOS-CR.repo
-rw-r--r--. 1 root root  649 Nov 23  2018 CentOS-Debuginfo.repo
-rw-r--r--. 1 root root  314 Nov 23  2018 CentOS-fasttrack.repo
-rw-r--r--. 1 root root  630 Nov 23  2018 CentOS-Media.repo
-rw-r--r--. 1 root root 1331 Nov 23  2018 CentOS-Sources.repo
-rw-r--r--. 1 root root 5701 Nov 23  2018 CentOS-Vault.repo
[root@openGauss yum.repos.d]#
[root@openGauss yum.repos.d]#
[root@openGauss yum.repos.d]# yum repolist
Loaded plugins: fastestmirror, langpacks
Loading mirror speeds from cached hostfile
* base: ftp.sjtu.edu.cn
* extras: mirrors.bfsu.edu.cn
* updates: ftp.sjtu.edu.cn
repo id                                                       repo name                                                      status
!base/7/x86_64                                                CentOS-7 - Base                                                10,070
!extras/7/x86_64                                              CentOS-7 - Extras                                                 412
!updates/7/x86_64                                             CentOS-7 - Updates                                                890
repolist: 11,372
[root@openGauss yum.repos.d]#
[root@openGauss yum.repos.d]#
[root@openGauss yum.repos.d]# yum list
Loaded plugins: fastestmirror, langpacks
Loading mirror speeds from cached hostfile
* base: mirrors.bfsu.edu.cn
* extras: mirrors.aliyun.com
* updates: mirrors.aliyun.com
Installed Packages
GConf2.x86_64                                                         3.2.6-8.el7                                         @anaconda
GeoIP.x86_64                                                          1.5.0-13.el7                                        @anaconda
ModemManager.x86_64                                                   1.6.10-1.el7                                        @anaconda
ModemManager-glib.x86_64                                              1.6.10-1.el7                                        @anaconda
NetworkManager.x86_64                                                 1:1.12.0-6.el7                                      @anaconda
.................(省略包信息)..............


[root@openGauss yum.repos.d]# yum install python3.6*
Loaded plugins: fastestmirror, langpacks
Loading mirror speeds from cached hostfile
* base: mirrors.bfsu.edu.cn
* extras: mirrors.bfsu.edu.cn
* updates: mirrors.bfsu.edu.cn
base                                                                                                        | 3.6 kB  00:00:00
extras                                                                                                      | 2.9 kB  00:00:00
updates                                                                                                     | 2.9 kB  00:00:00
Resolving Dependencies
--> Running transaction check
---> Package python3-pip.noarch 0:9.0.3-7.el7_7 will be installed
--> Processing Dependency: python(abi) = 3.6 for package: python3-pip-9.0.3-7.el7_7.noarch
--> Processing Dependency: /usr/bin/python3 for package: python3-pip-9.0.3-7.el7_7.noarch
---> Package python3-setuptools.noarch 0:39.2.0-10.el7 will be installed
---> Package python3-wheel.noarch 0:0.31.1-5.el7_7 will be installed
--> Running transaction check
---> Package python3.x86_64 0:3.6.8-13.el7 will be installed
--> Processing Dependency: python3-libs(x86-64) = 3.6.8-13.el7 for package: python3-3.6.8-13.el7.x86_64
--> Processing Dependency: libpython3.6m.so.1.0()(64bit) for package: python3-3.6.8-13.el7.x86_64
--> Running transaction check
---> Package python3-libs.x86_64 0:3.6.8-13.el7 will be installed
--> Finished Dependency Resolution
Dependencies Resolved
===================================================================================================================================
Package                              Arch                     Version                             Repository                 Size
===================================================================================================================================
Installing:
python3-pip                          noarch                   9.0.3-7.el7_7                       updates                   1.8 M
python3-setuptools                   noarch                   39.2.0-10.el7                       base                      629 k
python3-wheel                        noarch                   0.31.1-5.el7_7                      base                       63 k
Installing for dependencies:
python3                              x86_64                   3.6.8-13.el7                        base                       69 k
python3-libs                         x86_64                   3.6.8-13.el7                        base                      7.0 M
Transaction Summary
===================================================================================================================================
Install  3 Packages (+2 Dependent packages)
Total download size: 9.5 M
Installed size: 48 M
Is this ok [y/d/N]: y
Downloading packages:
warning: /var/cache/yum/x86_64/7/base/packages/python3-3.6.8-13.el7.x86_64.rpm: Header V3 RSA/SHA256 Signature, key ID f4a80eb5: NOKEY
Public key for python3-3.6.8-13.el7.x86_64.rpm is not installed
(1/5): python3-3.6.8-13.el7.x86_64.rpm                                                                      |  69 kB  00:00:00
(2/5): python3-wheel-0.31.1-5.el7_7.noarch.rpm                                                              |  63 kB  00:00:00
(3/5): python3-setuptools-39.2.0-10.el7.noarch.rpm                                                          | 629 kB  00:00:01
Public key for python3-pip-9.0.3-7.el7_7.noarch.rpm is not installed==-                          ] 897 kB/s | 3.4 MB  00:00:06 ETA
(4/5): python3-pip-9.0.3-7.el7_7.noarch.rpm                                                                 | 1.8 MB  00:00:02
(5/5): python3-libs-3.6.8-13.el7.x86_64.rpm                                                                 | 7.0 MB  00:00:04
-----------------------------------------------------------------------------------------------------------------------------------
Total                                                                                              1.9 MB/s | 9.5 MB  00:00:05
Retrieving key from file:///etc/pki/rpm-gpg/RPM-GPG-KEY-CentOS-7
Importing GPG key 0xF4A80EB5:
Userid     : "CentOS-7 Key (CentOS 7 Official Signing Key) "
Fingerprint: 6341 ab27 53d7 8a78 a7c2 7bb1 24c6 a8a7 f4a8 0eb5
Package    : centos-release-7-6.1810.2.el7.centos.x86_64 (@anaconda)
From       : /etc/pki/rpm-gpg/RPM-GPG-KEY-CentOS-7
Is this ok [y/N]: y
Running transaction check
Running transaction test
Transaction test succeeded
Running transaction
  Installing : python3-setuptools-39.2.0-10.el7.noarch                                                                         1/5
  Installing : python3-libs-3.6.8-13.el7.x86_64                                                                                2/5
  Installing : python3-3.6.8-13.el7.x86_64                                                                                     3/5
  Installing : python3-pip-9.0.3-7.el7_7.noarch                                                                                4/5
  Installing : python3-wheel-0.31.1-5.el7_7.noarch                                                                             5/5
  Verifying  : python3-pip-9.0.3-7.el7_7.noarch                                                                                1/5
  Verifying  : python3-3.6.8-13.el7.x86_64                                                                                     2/5
  Verifying  : python3-wheel-0.31.1-5.el7_7.noarch                                                                             3/5
  Verifying  : python3-setuptools-39.2.0-10.el7.noarch                                                                         4/5
  Verifying  : python3-libs-3.6.8-13.el7.x86_64                                                                                5/5
Installed:
  python3-pip.noarch 0:9.0.3-7.el7_7      python3-setuptools.noarch 0:39.2.0-10.el7      python3-wheel.noarch 0:0.31.1-5.el7_7
Dependency Installed:
  python3.x86_64 0:3.6.8-13.el7                                 python3-libs.x86_64 0:3.6.8-13.el7
Complete!
[root@openGauss yum.repos.d]#
(3) 查看 Ptrhon3
由于 CentOS7 默认安装了 Python2.7,直接敲命令 python3 直接进入 python 交互式环境,默认安装了 Python3.6.8。因为 openGauss 依赖 Python3 环境,故需要安装 Python3.6,也是建议按照此版本。
[root@openGauss opt]# python3
Python 3.6.8 (default, Apr  2 2020, 13:34:55)
[GCC 4.8.5 20150623 (Red Hat 4.8.5-39)] on linux
Type "help", "copyright", "credits" or "license" for more information.
>>>
>>> exit()
[root@openGauss opt]# python2
Python 2.7.5 (default, Oct 30 2018, 23:45:53)
[GCC 4.8.5 20150623 (Red Hat 4.8.5-36)] on linux2
Type "help", "copyright", "credits" or "license" for more information.
>>>
>>> quit()
[root@openGauss opt]# python
Python 2.7.5 (default, Oct 30 2018, 23:45:53)
[GCC 4.8.5 20150623 (Red Hat 4.8.5-36)] on linux2
Type "help", "copyright", "credits" or "license" for more information.
>>> quit()
[root@openGauss opt]# which python
/usr/bin/python
[root@openGauss opt]# which python2
/usr/bin/python2
[root@openGauss opt]# which python3
/usr/bin/python3
[root@openGauss opt]# cd /usr/bin
[root@openGauss bin]# ll python*
lrwxrwxrwx. 1 root root     7 Jul  8 21:42 python -> python2
lrwxrwxrwx. 1 root root     9 Jul  8 21:42 python2 -> python2.7
-rwxr-xr-x. 1 root root  7216 Oct 31  2018 python2.7
lrwxrwxrwx. 1 root root     9 Jul 11 18:57 python3 -> python3.6
-rwxr-xr-x. 2 root root 11336 Apr  2 21:37 python3.6
-rwxr-xr-x. 2 root root 11336 Apr  2 21:37 python3.6m
(4)安装所需要的软件包
如下所示,有些包没安装也可以正常通过。
[root@openGauss yum.repos.d]# yum install -y libaio-devel \ flex \ bison \ ncurses-devel \ glibc-devel \ patch \ lsb_release
Loaded plugins: fastestmirror, langpacks
Loading mirror speeds from cached hostfile
* base: mirrors.bfsu.edu.cn
* extras: mirrors.bfsu.edu.cn
* updates: mirrors.bfsu.edu.cn
No package  flex available.
No package  bison available.
No package  ncurses-devel available.
No package  glibc-devel available.
No package  patch available.
No package  lsb_release available.
Resolving Dependencies
--> Running transaction check
---> Package libaio-devel.x86_64 0:0.3.109-13.el7 will be installed
--> Finished Dependency Resolution
Dependencies Resolved
===================================================================================================================================
Package                           Arch                        Version                             Repository                 Size
===================================================================================================================================
Installing:
libaio-devel                      x86_64                      0.3.109-13.el7                      base                       13 k
Transaction Summary
===================================================================================================================================
Install  1 Package
Total download size: 13 k
Installed size: 7.8 k
Downloading packages:
libaio-devel-0.3.109-13.el7.x86_64.rpm                                                                      |  13 kB  00:00:00
Running transaction check
Running transaction test
Transaction test succeeded
Running transaction
  Installing : libaio-devel-0.3.109-13.el7.x86_64                                                                              1/1
  Verifying  : libaio-devel-0.3.109-13.el7.x86_64                                                                              1/1
Installed:
  libaio-devel.x86_64 0:0.3.109-13.el7
Complete!
(5)关闭防火墙,禁用 SWAP、SELINUX
[root@openGauss ~]# systemctl status firewalld
● firewalld.service - firewalld - dynamic firewall daemon
   Loaded: loaded (/usr/lib/systemd/system/firewalld.service; enabled; vendor preset: enabled)
   Active: active (running) since Fri 2020-07-10 00:04:36 CST; 1 day 20h ago
     Docs: man:firewalld(1)
Main PID: 8889 (firewalld)
    Tasks: 2
   CGroup: /system.slice/firewalld.service
           └─8889 /usr/bin/python -Es /usr/sbin/firewalld --nofork --nopid
Jul 10 00:04:34 openGauss systemd[1]: Starting firewalld - dynamic firewall daemon...
Jul 10 00:04:36 openGauss systemd[1]: Started firewalld - dynamic firewall daemon.
[root@openGauss ~]# systemctl stop firewalld
[root@openGauss ~]# systemctl status firewalld
● firewalld.service - firewalld - dynamic firewall daemon
   Loaded: loaded (/usr/lib/systemd/system/firewalld.service; enabled; vendor preset: enabled)
   Active: inactive (dead) since Sat 2020-07-11 20:19:00 CST; 3s ago
     Docs: man:firewalld(1)
  Process: 8889 ExecStart=/usr/sbin/firewalld --nofork --nopid $FIREWALLD_ARGS (code=exited, status=0/SUCCESS)
Main PID: 8889 (code=exited, status=0/SUCCESS)
Jul 10 00:04:34 openGauss systemd[1]: Starting firewalld - dynamic firewall daemon...
Jul 10 00:04:36 openGauss systemd[1]: Started firewalld - dynamic firewall daemon.
Jul 11 20:18:58 openGauss systemd[1]: Stopping firewalld - dynamic firewall daemon...
Jul 11 20:19:00 openGauss systemd[1]: Stopped firewalld - dynamic firewall daemon.
[root@openGauss ~]# systemctl disable firewalld
Removed symlink /etc/systemd/system/multi-user.target.wants/firewalld.service.
Removed symlink /etc/systemd/system/dbus-org.fedoraproject.FirewallD1.service.
###禁用swap
[root@openGauss ~]# swapoff -a
[root@openGauss ~]# swapoff -av
swapoff /dev/mapper/centos_opengauss-swap
###禁用 SELINUX
[root@openGauss ~]# sed -i 's/SELINUX=enforcing/SELINUX=disabled/g' /etc/selinux/config
[root@openGauss ~]# cat /etc/selinux/config | grep SELINUX
# SELINUX= can take one of these three values:
SELINUX=disabled
# SELINUXTYPE= can take one of three values:
SELINUXTYPE=targeted
(6)设置网卡 MTU 值
MTU 默认 1500,也可以不用设置,保持默认即可,在前段时间中曾遇到在 Oracle 数据库中,因两节点 MTU 值不一致导致数据库和主机不断重启。https://mp.weixin.qq.com/s/vv44DIrDi2_Xzb6Xw_4UfA
MTU 是英文 Maximum Transmission Unit 的缩写,意为"最大传输单位",也就是在连接的时候,所传输信息包最多可以有多少字节。我们必须找到不会返回 fragment (碎片)信息的最大 MTU。除了 ADSL PPPoE 的 MTU 是 1492 外,其余各种 DSL 的 MTU 标准设置都是 1500。MaxMTU 是最大的 TCP/IP 传输单元,在 TCP/IP 协议中,将要传输的数据分成较小的组进行传输,每个组的大小为 576 字节。
[root@openGauss ~]# ifconfig ens33 | grep mtu
ens33: flags=4163  mtu 1500
[root@openGauss ~]# ifconfig ens33 mtu 8192
[root@openGauss ~]# ifconfig ens33 | grep mtu
ens33: flags=4163  mtu 8192
(7)了解安装用户及用户组
为了实现安装过程中安装帐户权限最小化,及安装后 openGauss 的系统运行安全性。安装脚本在安装过程中会自动按照用户指定创建安装用户,并将此用户作为后续运行和维护 openGauss 的管理员帐户。默认单独的用户组为 dbgrp,用户为 omm .
(8) 解压安装包
[root@openGauss ~]# cd /opt/openGauss
[root@openGauss openGauss]# ll
total 60960
-rw-r--r--. 1 root root 62419226 Jul  9 11:40 openGauss-1.0.0-CentOS-64bit.tar.gz
[root@openGauss openGauss]# tar -zxvf openGauss-1.0.0-CentOS-64bit.tar.gz
./lib/
./lib/pyasn1/
./lib/pyasn1/codec/
./lib/pyasn1/codec/cer/
./lib/pyasn1/codec/cer/__init__.py
./lib/pyasn1/codec/cer/decoder.py
./lib/pyasn1/codec/cer/encoder.py
前面已经配置好网络,如下图也可以直接 wget 下载软件包。然后修改安装目录权限。
chmod -R 755 /opt/openGauss
(9) 创建 XML 配置文件,执行预安装脚本 gs_preinstall
[root@openGauss openGauss]# pwd
/opt/openGauss
[root@openGauss openGauss]# vi clusterconfig.xml


          <-->


--具体详细的配置文件说明可查看官方文档配置文件说明。
为确保 openssl 版本正确,执行预安装前请加载安装包中 lib 库。
export LD_LIBRARY_PATH=/opt/openGauss/script/gspylib/clib:$LD_LIBRARY_PATH
注意:如果是 openEuler 的操作系统,需要修改 /etc/profile.d/performance.sh 文件
使用#注释sysctl -w vm.min_free_kbytes=112640 &> /dev/null
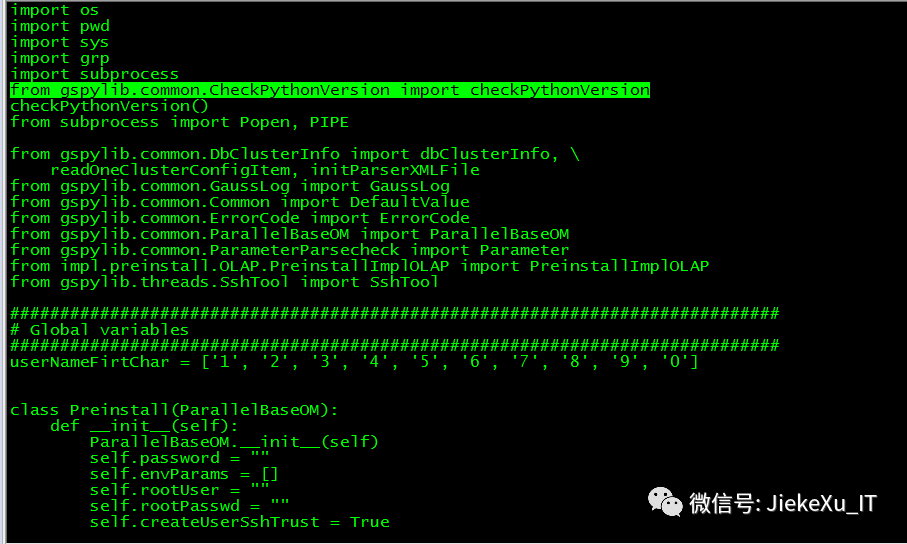
gs_preinstall 为 Python 脚本,查看脚本内容为集群环境配置脚本 “environment for a cluster”,会设置 root 用户互信然后新建 omm 用户 dbgrp 组并配置互信,检查操作系统版本,创建路径,设置系统参数,配置环境变量 /etc/profile 以及 omm 用户的 .bashrc 环境变量 等等。
使用 gs_preinstall 的目的就是准备好安装环境,类似于 Oracle 的 *preinstall-19c*.rpm 包 。这里采用交互模式执行前置,并在执行过程中自动创建 root 用户互信和 openGauss 用户互信等一些信息,详细内容请看如下执行过程。
./gs_preinstall -U omm -G dbgrp -X /opt/openGauss/clusterconfig.xml
[root@openGauss etc]# cd /opt/openGauss/script/
[root@openGauss script]# ./gs_preinstall -U omm -G dbgrp -X /opt/openGauss/clusterconfig.xml
Parsing the configuration file.
Successfully parsed the configuration file.
Installing the tools on the local node.
Successfully installed the tools on the local node.
Are you sure you want to create trust for root (yes/no)? yes
Please enter password for root.
Password:             --输入 root 密码开始配置互信
Creating SSH trust for the root permission user.
Checking network information.
All nodes in the network are Normal.
Successfully checked network information.
Creating SSH trust.
Creating the local key file.
Successfully created the local key files.
Appending local ID to authorized_keys.
Successfully appended local ID to authorized_keys.
Updating the known_hosts file.
Successfully updated the known_hosts file.
Appending authorized_key on the remote node.
Successfully appended authorized_key on all remote node.
Checking common authentication file content.
Successfully checked common authentication content.
Distributing SSH trust file to all node.
Successfully distributed SSH trust file to all node.
Verifying SSH trust on all hosts.
Successfully verified SSH trust on all hosts.
Successfully created SSH trust.
Successfully created SSH trust for the root permission user.
Setting pssh path
Successfully set core path.
Distributing package.
Begin to distribute package to tool path.
Successfully distribute package to tool path.
Begin to distribute package to package path.
Successfully distribute package to package path.
Successfully distributed package.  --创建 omm 用户,这里需要两次输入密码 openGauss_1 然后开始配置互信
Are you sure you want to create the user[omm] and create trust for it (yes/no)? yes
Please enter password for cluster user.
Password:
Please enter password for cluster user again.
Password:
Successfully created [omm] user on all nodes.
Preparing SSH service.
Successfully prepared SSH service.
Installing the tools in the cluster.
Successfully installed the tools in the cluster.
Checking hostname mapping.
Successfully checked hostname mapping.
Creating SSH trust for [omm] user.
Checking network information.
All nodes in the network are Normal.
Successfully checked network information.
Creating SSH trust.
Creating the local key file.
Successfully created the local key files.
Appending local ID to authorized_keys.
Successfully appended local ID to authorized_keys.
Updating the known_hosts file.
Successfully updated the known_hosts file.
Appending authorized_key on the remote node.
Successfully appended authorized_key on all remote node.
Checking common authentication file content.
Successfully checked common authentication content.
Distributing SSH trust file to all node.
Successfully distributed SSH trust file to all node.
Verifying SSH trust on all hosts.
Successfully verified SSH trust on all hosts.
Successfully created SSH trust.
Successfully created SSH trust for [omm] user.
############--->检查操作系统版本,创建路径,设置系统参数
Checking OS software.
Successfully check os software.
Checking OS version.
Successfully checked OS version.
Creating cluster's path.
Successfully created cluster's path.
Setting SCTP service.
Successfully set SCTP service.
Set and check OS parameter.
Setting OS parameters.
Successfully set OS parameters.
[GAUSS-51400] : Failed to execute the command: python3 '/opt/openGauss/script/gs_checkos' -h openGauss -i A -l '/var/log/omm/omm/om/gs_local.log' -X '/opt/openGauss/clusterconfig.xml'.Error:
Checking items:
    A1. [ OS version status ]                                   : Normal
    A2. [ Kernel version status ]                               : Normal
    A3. [ Unicode status ]                                      : Normal
    A4. [ Time zone status ]                                    : Normal
    A5. [ Swap memory status ]                                  : Normal
    A6. [ System control parameters status ]                    : Warning
    A7. [ File system configuration status ]                    : Warning
    A8. [ Disk configuration status ]                           : Normal
    A9. [ Pre-read block size status ]                          : Normal
    A10.[ IO scheduler status ]                                 : Normal
[openGauss]:
[GAUSS-51632] : Failed to do python3 '/opt/openGauss/script/local/LocalCheckOS.py' -t Check_Network_Bond_Mode -X '/opt/openGauss/clusterconfig.xml' -l '/var/log/omm/omm/om/gs_local.log'. Error:
[GAUSS-50604] : Failed to obtain network interface card of backIp(192.168.52.88). Error:
[GAUSS-50604] : Failed to obtain network interface card of backIp(192.168.52.88)..
这里网络方面出现的错误是由于前面配置网络 yum 源将 ens33 的网卡设置成 dhcp 自动获取,IP 地址自动变成 192.168.52.28 所导致 ,现将其修改为 “none”后重启网卡,重新执行此脚本即可。
[root@openGauss opt]# ifconfig
ens33: flags=4163  mtu 8192
        inet 192.168.52.28  netmask 255.255.255.0  broadcast 192.168.52.255
[root@openGauss network-scripts]# cd /etc/sysconfig/network-scripts
[root@openGauss network-scripts]# more ifcfg-ens33 | grep none
PROXY_METHOD="none"
BOOTPROTO="none"
[root@openGauss network-scripts]# service network restart
Restarting network (via systemctl):                        [  OK  ]
[root@openGauss network-scripts]#
[root@openGauss network-scripts]#
[root@openGauss network-scripts]# ifconfig
ens33: flags=4163  mtu 8192
        inet 192.168.52.88  netmask 255.255.255.0  broadcast 192.168.52.255
--------------------------------------------------------------------------------
[root@openGauss script]# pwd
/opt/openGauss/script
[root@openGauss script]# ./gs_preinstall -U omm -G dbgrp -X /opt/openGauss/clusterconfig.xml
Parsing the configuration file.
Successfully parsed the configuration file.
Installing the tools on the local node.
Successfully installed the tools on the local node.
Are you sure you want to create trust for root (yes/no)? yes
Please enter password for root.
Password:
Creating SSH trust for the root permission user.
Checking network information.
All nodes in the network are Normal.
Successfully checked network information.
Creating SSH trust.
Creating the local key file.
Successfully created the local key files.
Appending local ID to authorized_keys.
Successfully appended local ID to authorized_keys.
Updating the known_hosts file.
Successfully updated the known_hosts file.
Appending authorized_key on the remote node.
Successfully appended authorized_key on all remote node.
Checking common authentication file content.
Successfully checked common authentication content.
Distributing SSH trust file to all node.
Successfully distributed SSH trust file to all node.
Verifying SSH trust on all hosts.
Successfully verified SSH trust on all hosts.
Successfully created SSH trust.
Successfully created SSH trust for the root permission user.
Setting pssh path
Successfully set core path.
Distributing package.
Begin to distribute package to tool path.
Successfully distribute package to tool path.
Begin to distribute package to package path.
Successfully distribute package to package path.
Successfully distributed package.
Are you sure you want to create the user[omm] and create trust for it (yes/no)? yes
Preparing SSH service.
Successfully prepared SSH service.
Installing the tools in the cluster.
Successfully installed the tools in the cluster.
Checking hostname mapping.
Successfully checked hostname mapping.
Creating SSH trust for [omm] user.
Please enter password for current user[omm].
Password:
Checking network information.
All nodes in the network are Normal.
Successfully checked network information.
Creating SSH trust.
Creating the local key file.
Successfully created the local key files.
Appending local ID to authorized_keys.
Successfully appended local ID to authorized_keys.
Updating the known_hosts file.
Successfully updated the known_hosts file.
Appending authorized_key on the remote node.
Successfully appended authorized_key on all remote node.
Checking common authentication file content.
Successfully checked common authentication content.
Distributing SSH trust file to all node.
Successfully distributed SSH trust file to all node.
Verifying SSH trust on all hosts.
Successfully verified SSH trust on all hosts.
Successfully created SSH trust.
Successfully created SSH trust for [omm] user.
Checking OS software.
Successfully check os software.
Checking OS version.
Successfully checked OS version.
Creating cluster's path.
Successfully created cluster's path.
Setting SCTP service.
Successfully set SCTP service.
Set and check OS parameter.
Setting OS parameters.
Successfully set OS parameters.
Warning: Installation environment contains some warning messages.
Please get more details by "/opt/openGauss/script/gs_checkos -i A -h openGauss --detail".
Set and check OS parameter completed.
Preparing CRON service.
Successfully prepared CRON service.
Setting user environmental variables.
Successfully set user environmental variables.
Setting the dynamic link library.
Successfully set the dynamic link library.
Setting Core file
Successfully set core path.
Setting pssh path
Successfully set pssh path.
Set ARM Optimization.
No need to set ARM Optimization.
Fixing server package owner.
Setting finish flag.
Successfully set finish flag.
Preinstallation succeeded.
官方安装文档:
https://opengauss.org/zh/docs/1.0.0/docs/installation/%E5%AE%89%E8%A3%85openGauss.html
三、检查健康状态
通过 openGauss 提供的 gs_checkos 工具可以完成系统状态检查。
◾ 以 root 用户身份登录。
◾ 执行如下命令对 openGauss 节点服务器的 OS 参数进行检查。
[root@openGauss opt]# gs_checkos -i A
Checking items:
    A1. [ OS version status ]                                   : Normal
    A2. [ Kernel version status ]                               : Normal
    A3. [ Unicode status ]                                      : Normal
    A4. [ Time zone status ]                                    : Normal
    A5. [ Swap memory status ]                                  : Normal
    A6. [ System control parameters status ]                    : Warning
    A7. [ File system configuration status ]                    : Warning
    A8. [ Disk configuration status ]                           : Normal
    A9. [ Pre-read block size status ]                          : Normal
    A10.[ IO scheduler status ]                                 : Normal
    A11.[ Network card configuration status ]                   : Normal
    A12.[ Time consistency status ]                             : Warning
    A13.[ Firewall service status ]                             : Normal
    A14.[ THP service status ]                                  : Normal
Total numbers:14. Abnormal numbers:0. Warning numbers:3.
----h 主机名查看详细信息
[root@openGauss db1]# /opt/openGauss/script/gs_checkos -i A -h openGauss --detail
Checking items:
    A1. [ OS version status ]                                   : Normal
        [openGauss]
        centos_7.6.1810_64bit


    A2. [ Kernel version status ]                               : Normal
        The names about all kernel versions are same. The value is "3.10.0-957.el7.x86_64".
    A3. [ Unicode status ]                                      : Normal
        The values of all unicode are same. The value is "LANG=en_US.UTF-8".
    A4. [ Time zone status ]                                    : Normal
        The informations about all timezones are same. The value is "+0800".
    A5. [ Swap memory status ]                                  : Normal
        The value about swap memory is correct.
    A6. [ System control parameters status ]                    : Warning
        [openGauss]
        Warning reason: variable 'net.ipv4.tcp_retries1' RealValue '3' ExpectedValue '5'.
        Warning reason: variable 'net.ipv4.tcp_syn_retries' RealValue '6' ExpectedValue '5'.
        Warning reason: variable 'net.sctp.path_max_retrans' RealValue '5' ExpectedValue '10'.
        Warning reason: variable 'net.sctp.max_init_retransmits' RealValue '8' ExpectedValue '10'.
        Check_SysCtl_Parameter warning.
    A7. [ File system configuration status ]                    : Warning
        [openGauss]
        Warning reason: variable 'open files' RealValue '1024' ExpectedValue '1000000'
        Warning reason: variable 'max user processes' RealValue '14950' ExpectedValue 'unlimited'
    A8. [ Disk configuration status ]                           : Normal
        The value about XFS mount parameters is correct.
    A9. [ Pre-read block size status ]                          : Normal
        The value about Logical block size is correct.
    A10.[ IO scheduler status ]                                 : Normal
        The value of IO scheduler is correct.
    A11.[ Network card configuration status ]                   : Normal
        The configuration about network card is correct.
    A12.[ Time consistency status ]                             : Warning
        [openGauss]
        The NTPD not detected on machine and local time is "2020-07-12 11:05:21".
    A13.[ Firewall service status ]                             : Normal
        The firewall service is stopped.
    A14.[ THP service status ]                                  : Normal
        The THP service is stopped.
Total numbers:14. Abnormal numbers:0. Warning numbers:3.
以上检查要是没有任何问题,就可以继续安装了。不过,以下的安装步骤放到下篇文章在继续吧,文章太长不易阅读,本次就先到这里了。写作不易,此文如果对你有帮助,请支持“在看”与转发,您的支持便是我不断写作的最大的动力,加油,让我们一起努力做更好的自己!
![]()
Oracle 12c 及以上版本补丁更新说明及下载方法(收藏版)
Oracle 19c 之多租户 PDB 连接与访问(三)
Oracle 12C 最新补丁下载与安装操作指北
关于 Oracle ACFS 相关知识的简单学习
Oracle 相关认证证书查询及真伪辨别
![]()
![]()
![]()
![]()
点亮在看,你最好看!


