爬虫教程( 5 ) --- Selenium 与 PhantomJS
1. Selenium
中式读法:【 瑟林捏幕 】
Selenium( selenium 中文网:http://www.selenium.org.cn/ )是一个强大的网络数据采集工具,最初是为了网站自动化测试而开发的,被用来测试 Web 应用程序在不同的浏览器和操作系统上运行能力。
Selenium 不带浏览器,它需要与第三方浏览器结合在一起使用。例如,如果你在 Chrome 上运行 Selenium
from selenium import webdriver

driver = webdriver.Chrome(executable_path="/path/to/chromedriver")

driver.get("https://www.baidu.com")

print driver.title

# 可以直接看到Chrome窗口被打开,进入百度首页,然后执行打印title。

近几年,它还被广泛用于获取精确的网站快照,因为 Selenium 可以直接运行在浏览器上。让浏览器自动加载页面,获取需要的数据,甚至执行点击事件、页面截屏等等。
Selenium 虽然运行在浏览器上,看起来更直观,但是如果没有了渲染,执行效率更高,这就是 PhantomJS 的优势。
1.1 selenium --- webdriver 原理
之前看乙醇视频中提到,selenium 的 ruby 实现有一个小后门,在代码中加上 $DEBUG=1 ,再运行脚本的过程中,就可以看到客户端请求的信息与服务器端返回的数据;觉得这个功能很强大,可以帮助理解 webdriver 的运行原理。
后来查了半天,python 并没有提供这样一个方便的后门,不过我们可以通过代理的方式获得这些交互信息;
一、需要安装 java 虚拟机与 selenium-server-standalone ,参考 《selenium + python自动化测试环境搭建》第7、8操作:
二、通过下面命令启动服务:
C:\selenium>java -jar selenium-server-standalone-2.33.0.jar
在命令结尾加 >d:\log.txt 可以将命令信息存入文件,但信息很少。
然后运行下面的自动化脚本:
#coding = utf-8

import time
from selenium import webdriver
from selenium.webdriver.common.desired_capabilities import DesiredCapabilities

driver = webdriver.Remote(desired_capabilities=DesiredCapabilities.CHROME)
driver.get("http://www.youdao.com")
driver.find_element_by_name("q").send_keys("hello")
driver.find_element_by_name("q").send_keys("key.ENTER")

driver.close()
webdriver原理:
- WebDriver 启动目标浏览器,并绑定到指定端口。该启动的浏览器实例做为 webdriver 的 remote server。
- Client 端通过CommandExcuter 发送HTTPRequest 给 remote server 的侦听端口(通信协议: the webriver wire protocol)
- Remote server 需要依赖原生的浏览器组件(如:IEDriver.dll,chromedriver.exe),来转化转化浏览器的 native 调用。
查看命令提示符下的运行日志:
咋一看很乱,慢慢分析一下就发现很有意思!结合上面的脚本分析
启动代理进入监听状态
C:\selenium>java -jar selenium-server-standalone-2.33.0.jar
八月 22, 2013 10:19:48 上午 org.openqa.grid.selenium.GridLauncher main
INFO: Launching a standalone server
10:19:48.734 INFO - Java: Oracle Corporation 23.21-b01
10:19:48.734 INFO - OS: Windows XP 5.1 x86
10:19:48.734 INFO - v2.33.0, with Core v2.33.0. Built from revision 4e90c97
10:19:48.843 INFO - RemoteWebDriver instances should connect to: http://127.0.0.
1:4444/wd/hub
10:19:48.843 INFO - Version Jetty/5.1.x
10:19:48.843 INFO - Started HttpContext[/selenium-server/driver,/selenium-server
/driver]
10:19:48.843 INFO - Started HttpContext[/selenium-server,/selenium-server]
10:19:48.843 INFO - Started HttpContext[/,/]
10:19:48.890 INFO - Started org.openqa.jetty.jetty.servlet.ServletHandler@176343
e
10:19:48.890 INFO - Started HttpContext[/wd,/wd]
10:19:48.906 INFO - Started SocketListener on 0.0.0.0:4444
10:19:48.906 INFO - Started org.openqa.jetty.jetty.Server@388c74
创建新 session
10:20:38.593 INFO - Executing: [new session: {platform=ANY, javascriptEnabled=tr
ue, browserName=chrome, version=}] at URL: /session)
10:20:38.593 INFO - Creating a new session for Capabilities [{platform=ANY, java
scriptEnabled=true, browserName=chrome, version=}]
webdrivr 通过 GET 方式发送请求
[0.921][INFO]: received Webriver request: GET /status向 webdrver 返回响应,返回码 200 表示成功
[0.921][INFO]: sending Webriver response: 200 {
   "sessionId": "",
   "status": 0,
   "value": {
      "build": {
         "version": "alpha"
      },
      "os": {
         "arch": "x86",
         "name": "Windows NT",
         "version": "5.1 SP3"
      }
   }
}
webdriver 再次以 POST 方式发送请求,并启动浏览器相关信息
[0.984][INFO]: received Webriver request: POST /session {
   "desiredCapabilities": {
      "browserName": "chrome",
      "javascriptEnabled": true,
      "platform": "ANY",
      "version": ""
   }
}
[0.984][INFO]: Launching chrome: "C:\ocuments and Settings\Administrator\Local S
ettings\Application ata\Google\Chrome\Application\chrome.exe" --remote-debugging
-port=4223 --no-first-run --enable-logging --logging-level=1 --user-data-dir="C:
\OCUME~1\AMINI~1\LOCALS~1\Temp\scoped_dir1808_7550" --load-extension="C:\OCUME~1
\AMINI~1\LOCALS~1\Temp\scoped_dir1808_26821\internal" --ignore-certificate-error
s data:text/html;charset=utf-8,
[1.773][INFO]: sending Webriver response: 303
webdrive r再次以 GET 方法请求,这附加上了 session 的信息
[1.778][INFO]: received Webriver request: GET /session/32b33aa585ccbbf7ba7853588
2852af3
服务器先对 sesssionID 进行解析,确认是 selenium 调用的以及要访问的网址,
[1.779][INFO]: sending Webriver response: 200 {
   "sessionId": "32b33aa585ccbbf7ba78535882852af3",
   "status": 0,
   "value": {
      "acceptSslCerts": true,
      "applicationCacheEnabled": false,
      "browserConnectionEnabled": false,
      "browserName": "chrome",
      "chrome": {
         "chromedriverVersion": "2.0"
      },
      "cssSelectorsEnabled": true,
      "databaseEnabled": true,
      "handlesAlerts": true,
      "javascriptEnabled": true,
      "locationContextEnabled": true,
      "nativeEvents": true,
      "platform": "Windows NT",
      "rotatable": false,
      "takesScreenshot": true,
      "version": "27.0.1453.116",
      "webStorageEnabled": true
   }
}
10:20:40.640 INFO - Done: /session
10:20:40.640 INFO - Executing: org.openqa.selenium.remote.server.handler.GetSess
ionCapabilities@14cf7a1 at URL: /session/ac5b2c71-5b1a-469e-814c-fdd09a2061fc)
10:20:40.640 INFO - Done: /session/ac5b2c71-5b1a-469e-814c-fdd09a2061fc
10:20:40.656 INFO - Executing: [get: http://www.youdao.com] at URL: /session/ac5
b2c71-5b1a-469e-814c-fdd09a2061fc/url)
webdriver 正式向服务器请求 youdao 网站
[1.820][INFO]: received Webriver request: POST /session/32b33aa585ccbbf7ba78535882852af3/url {
   "url": "http://www.youdao.com"
}
[1.822][INFO]: waiting for pending navigations...
[1.829][INFO]: done waiting for pending navigations
[2.073][INFO]: waiting for pending navigations...
[2.900][INFO]: done waiting for pending navigations
获得服务器数据的应答
[2.900][INFO]: sending Webriver response: 200 {
   "sessionId": "32b33aa585ccbbf7ba78535882852af3",
   "status": 0,
   "value": null
}
10:20:41.734 INFO - Done: /session/ac5b2c71-5b1a-469e-814c-fdd09a2061fc/url
下面,接着发送定位输入框的信息
10:20:41.734 INFO - Executing: [find element: By.name: q] at URL: /session/ac5b2
c71-5b1a-469e-814c-fdd09a2061fc/element)
[2.905][INFO]: received Webriver request: POST /session/32b33aa585ccbbf7ba78535882852af3/element {
   "using": "name",
   "value": "q"
}
[2.905][INFO]: waiting for pending navigations...
[2.905][INFO]: done waiting for pending navigations
[2.922][INFO]: waiting for pending navigations...
[2.922][INFO]: done waiting for pending navigations
得到服务器应答
[2.922][INFO]: sending Webriver response: 200 {
   "sessionId": "32b33aa585ccbbf7ba78535882852af3",
   "status": 0,
   "value": {
      "ELEMENT": "0.19427558477036655:1"
   }
}
10:20:41.765 INFO - Done: /session/ac5b2c71-5b1a-469e-814c-fdd09a2061fc/element

10:20:41.765 INFO - Executing: [send keys: 0 org.openqa.selenium.support.events.
EventFiringWebDriver$EventFiringWebElement@a8215ba9, [h, e, l, l, o]] at URL: /session/ac5b2c71-5b1a-469e-814c-fdd09a2061fc/element/0/value)
向定位到的输入框写入hello
[2.936][INFO]: received Webriver request: POST /session/32b33aa585ccbbf7ba78535882852af3/element/0.19427558477036655:1/value {
   "id": "0.19427558477036655:1",
   "value": [ "h", "e", "l", "l", "o" ]
}
[2.936][INFO]: waiting for pending navigations...
[2.936][INFO]: done waiting for pending navigations
[3.002][INFO]: waiting for pending navigations...
[3.002][INFO]: done waiting for pending navigations
[3.002][INFO]: sending Webriver response: 200 {
   "sessionId": "32b33aa585ccbbf7ba78535882852af3",
   "status": 0,
   "value": null
}
10:20:41.843 INFO - Done: /session/ac5b2c71-5b1a-469e-814c-fdd09a2061fc/element/
0/value
再次发送定位输入框的请求
10:20:41.843 INFO - Executing: [find element: By.name: q] at URL: /session/ac5b2c71-5b1a-469e-814c-fdd09a2061fc/element)
[3.006][INFO]: received Webriver request: POST /session/32b33aa585ccbbf7ba785358
82852af3/element {
   "using": "name",
   "value": "q"
}
[3.006][INFO]: waiting for pending navigations...
[3.006][INFO]: done waiting for pending navigations
[3.016][INFO]: waiting for pending navigations...
[3.016][INFO]: done waiting for pending navigations
[3.016][INFO]: sending Webriver response: 200 {
   "sessionId": "32b33aa585ccbbf7ba78535882852af3",
   "status": 0,
   "value": {
      "ELEMENT": "0.19427558477036655:1"
   }
}
10:20:41.859 INFO - Done: /session/ac5b2c71-5b1a-469e-814c-fdd09a2061fc/element
10:20:41.859 INFO - Executing: [send keys: 0 org.openqa.selenium.support.events.
EventFiringWebDriver$EventFiringWebElement@a8215ba9, [k, e, y, ., E, N, T, E, R]
] at URL: /session/ac5b2c71-5b1a-469e-814c-fdd09a2061fc/element/0/value)
对定位的到的输入框发送回车(ENTER)事件请求
[3.021][INFO]: received Webriver request: POST /session/32b33aa585ccbbf7ba785358
82852af3/element/0.19427558477036655:1/value {
   "id": "0.19427558477036655:1",
   "value": [ "k", "e", "y", ".", "E", "N", "T", "E", "R" ]
}
[3.021][INFO]: waiting for pending navigations...
[3.021][INFO]: done waiting for pending navigations
[3.064][INFO]: waiting for pending navigations...
[3.064][INFO]: done waiting for pending navigations
[3.064][INFO]: sending Webriver response: 200 {
   "sessionId": "32b33aa585ccbbf7ba78535882852af3",
   "status": 0,
   "value": null
}
10:20:41.906 INFO - Done: /session/ac5b2c71-5b1a-469e-814c-fdd09a2061fc/element/
0/value
10:20:41.906 INFO - Executing: [close window] at URL: /session/ac5b2c71-5b1a-469
e-814c-fdd09a2061fc/window)
[3.068][INFO]: received Webriver request: ELETE /session/32b33aa585ccbbf7ba78535
882852af3/window
[WARNING:chrome_desktop_impl.cc(88)] chrome detaches, user should take care of d
irectory:C:\DOCUME~1\ADMINI~1\LOCALS~1\Temp\scoped_dir1808_7550 and C:\DOCUME~1\
ADMINI~1\LOCALS~1\Temp\scoped_dir1808_26821
[5.318][INFO]: sending Webriver response: 200 {
   "sessionId": "32b33aa585ccbbf7ba78535882852af3",
   "status": 0,
   "value": null
}
10:20:44.156 INFO - Done: /session/ac5b2c71-5b1a-469e-814c-fdd09a2061fc/window
request 请求 / response应答
一次请求会对应一次应答
POST/GET是请求(request)两种类型;关于两种请求方式的类别参考其它资料
200 、203是 HTTP请求返回的状态码,200表示成功;
sessionid :每一个访问服务器的客户端,都要先得到服务器端分配的一个sessionid ,就像通行证一样,只有得到sessionid的客户端才能向服务器请求想要的数据。
其它还包括操作系统版本,浏览器类型、URL、字符类型等非常详细的记录。熟悉 HTTP ,了解 TCP 的三次握手四次挥手,相信你对浏览器的交互与webdriver原理会有更深入的认识。
http://www.cnblogs.com/fnng/p/3274186.html
http://download.csdn.net/download/fnngj/6041329
1.2 深入了解 Selenium RC 工作原理
1.2.1. Selenium RC 的组成:
网上的一幅图来:
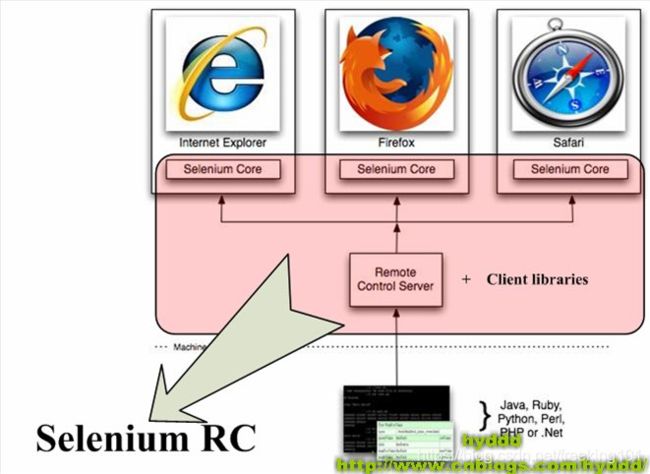
Selenium RC主要由两部分组成:
- (1).Selenium Server:
Selenium Server负责控制浏览器行为,总的来说,Selenium Server主要包括3个部分:Launcher,Http Proxy,Selenium Core。其中Selenium Core是被Selenium Server嵌入到浏览器页面中的。其实Selenium Core就是一堆js函数的集合,就是通过这些JS函数,我们才可以实现用程序对浏览器进行操作。
- (2).Client Libraries:
写测试案例时用来控制Selenium Server的库。
1.2.2 Selenium RC 与 Testcase 的关系
先看下图:
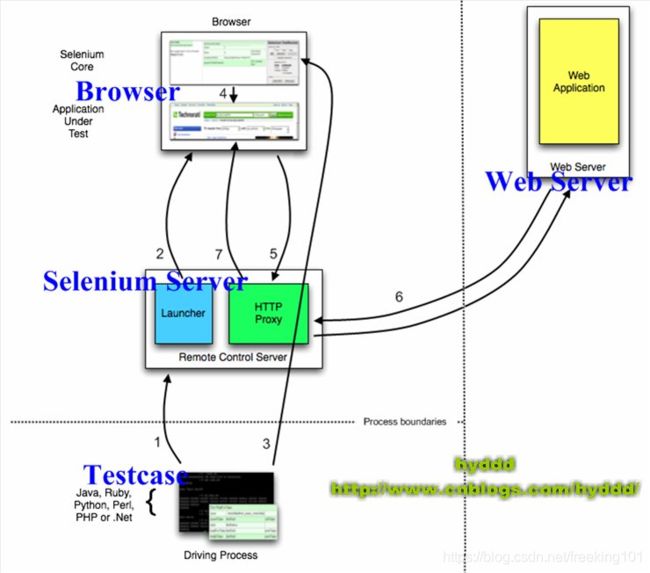
说明:
- (1). 测试案例(Testcase)通过Client Lib的接口向Selenium Server发送Http请求,要求和Selenium Server建立连接。为什么要通过发送Http请求控制Selenium Server而不采用其他方式呢?从上文可以看出,Selenium Server是一个独立的中间服务器(确切地说是代理服务器),它可以架设在其他机器上!所以测试案例通过发送HTTP请求去控制Selenium Server是很正常的。
- (2). Selenium Server 的 Launcher 启动浏览器,把 Selenium Core 加载入浏览器页面当中,并把浏览器的代理设置为Selenium Server 的 Http Proxy。
- (3). 测试案例通过 Client Lib 的接口向 Selenium Server 发送 Http 请求,Selenium Server 对请求进行解析,然后通过 Http Proxy 发送 JS 命令通知 Selenium Core 执行操作浏览器的动作。
- (4). Selenium Core 接收到指令后,执行操作。
- (5). 浏览器收到新的页面请求信息(因为在(4)中,Selenium Core 的操作可能引发新的页面请求),于是发送 Http 请求,请求新的Web页面。由于 Selenium Server 在启动浏览器时做了手脚,所以Selenium Server会接收到所有由它启动的浏览器发送的请求。
- (6). Selenium Server 接收到浏览器的发送的 Http 请求后,自己重组 Http 请求,获取对应的 Web 页面。
- (7). Selenium Server 的 Http Proxy 把接收的 Web 页面返回给浏览器。
为什么 Selenium RC 中的 Selenium Server 需要以这种代理服务器的形式存在呢?
其实,这和浏览器的“同源策略”(The Same Origin Policy)有关。
1.2.3. 什么是同源策略
同源策略,它是由 Netscape 提出的一个著名的安全策略,现在所有的可支持JavaScript的浏览器都会使用这个策略。
为什么需要同源策略?
这里举个例子:假设现在没有同源策略,会发生什么事情呢?大家知道,javascript可以做很多东西,比如:读取/修改网页中某个值。恩,你现在打开了浏览器,在一个tab窗口中打开了银行网站,在另外一个tab窗口中打开了一个恶意网站,而那个恶意网站挂了一个的专门修改银行信息的JavaScript,当你访问这个恶意网站并且执行它JavaScript时,你的银行页面就会被这个JavaScript修改,后果会非常严重!而同源策略就为了防止这种事情发生,看下图:

比如说,浏览器的两个tab页中分别打开了http://www.baidu.com/index.html和http://[www.google.com](http://www.google.com/)/index.html,其中,JavaScript1和JavaScript3是属于百度的脚本,而JavaScript2是属于谷歌的脚本,当浏览器的tab1要运行一个脚本时,便会进行同源检查,只有和[www.baidu.com](http://www.baidu.com/)同源的脚本才能被执行,所谓**同源**,就是指域名、协议、端口相同。所以,tab1只能执行JavaScript1和JavaScript3脚本,而JavaScript2不能执行,从而防止其他网页对本网页的非法篡改。
1.2.4.Selenium Server 为什么以这种代理服务器的形式存在
上面说了同源策略,那同源策略的 Selenium Server 有什么关系呢??呵呵,上一篇说过,Selenium Core 是一堆 JS 函数的集合,它是我们操作浏览器的基础。当存在同源策略时,便出现一些问题,看下图:

因为 Selenium Core 的 JS 脚本的“源”是localhost,所以浏览器会阻止Selenium Core的JS脚本在测试页面上执行,这就是为什么在本系列第一篇中说,如果只使用Selenium Core进行测试,需要把Selenium Core安装到远程服务器上。
为了解决上面这个问题,Selenium RC中的Selenium Server就以代理服务器的形式出现了,下图说明它是如何借助代理的身份蒙骗浏览器的:
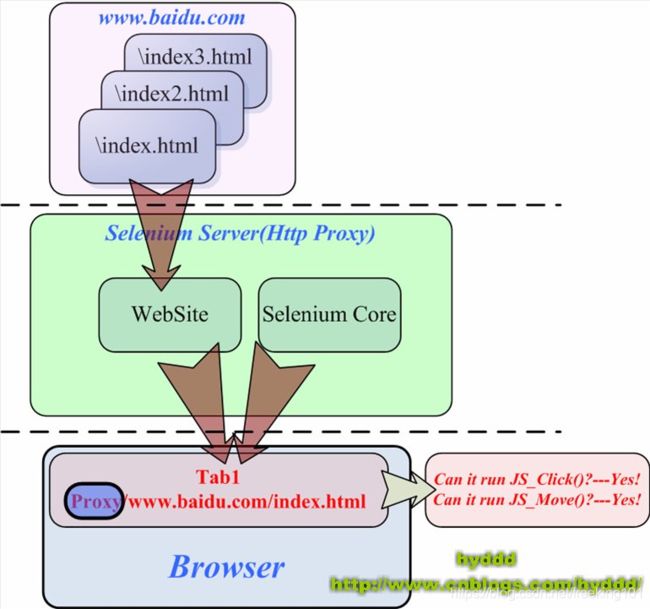
Selenium Server 以代理的形式存在,通过修改WebSite的源信息,从而达到欺骗浏览器的目的,就这样,Selenium RC就轻松绕过了同源策略。在上图中,浏览器会认为WebSite和Selenium Core来自同一个“源”----代理服务器!
1.3 selenium 安装
- selenium 安装:pip install selenium
- ChromeDriver:浏览器 driver下载( Selenium不带浏览器,需要与第三方浏览器配合在一起 ),可以运行在Android和Chrome桌面版本(Mac、Linux、Windows和ChromeOS)。下载地址:https://sites.google.com/a/chromium.org/chromedriver/downloads
1.4 Selenium-WebDriver API
seleniumhq官方文档:http://docs.seleniumhq.org/docs/03_webdriver.jsp
Selenium Python文档:http://selenium-python.readthedocs.io/getting-started.html
Selenium 简单的用法示例
示例代码:
# -*- coding:utf-8 -*-

import os
from selenium import webdriver
from selenium.webdriver.common.keys import Keys

chromedriver = "./chromedriver"

driver = webdriver.Chrome(executable_path=chromedriver)

print('start')

driver.get("http://www.baidu.com/")
assert u"百度一下" in driver.title

elem = driver.find_element_by_name("wd")
elem.send_keys("selenium")
elem.send_keys(Keys.RETURN)
assert "selenium" in driver.title

print('end')
# driver.close()
导航
你要做的第一件事是 WebDriver 的导航链接。可以通过调用 Get 方法:
driver.get("https://www.baidu.com")
值得注意的是,如果你的页面使用了大量的 Ajax 加载,WebDriver 可能不知道什么时候已经完全加载。如果您需要确保这些页面完全加载,那么可以使用 判断页面是否加载特定元素。
页面切换
一个浏览器肯定会有很多窗口,所以我们肯定要有方法来实现窗口的切换。切换窗口的方法如下
driver.switch_to.window("windowName")
另外你可以使用 window_handles 方法来获取每个窗口的操作对象。例如
for handle in driver.window_handles:
    driver.switch_to.window(handle)
另外切换 frame 的方法如下
driver.switch_to.frame("frameName")
history and forward
To move backwards and forwards in your browser’s history:
driver.forward()
driver.back()
Cookies 处理
- 为页面添加 Cookies,用法如下
# Go to the correct domain
driver.get("http://www.example.com")

# Now set the cookie. Here's one for the entire domain
# the cookie name here is 'key' and its value is 'value'
driver.add_cookie({'name':'key', 'value':'value', 'path':'/'})
# additional keys that can be passed in are:
# 'domain' -> String,
# 'secure' -> Boolean,
# 'expiry' -> Milliseconds since the Epoch it should expire.
- 获取页面 Cookies,用法如下
# And now output all the available cookies for the current URL
for cookie in driver.get_cookies():
    print "%s -> %s" % (cookie['name'], cookie['value'])
- 删除Cookies,用法如下
# You can delete cookies in 2 ways
# By name
driver.delete_cookie("CookieName")
# Or all of them
driver.delete_all_cookies()
定位 UI 元素 (WebElements)
关于元素的选取,有如下的 API
- 单个元素选取
find_element_by_id find_element_by_name find_element_by_xpath find_element_by_link_text find_element_by_partial_link_text find_element_by_tag_name find_element_by_class_name find_element_by_css_selector -
多个元素选取
find_elements_by_name find_elements_by_xpath find_elements_by_link_text find_elements_by_partial_link_text find_elements_by_tag_name find_elements_by_class_name find_elements_by_css_selector -
By Id
For instance, consider this page source:
The form element can be located like this:login_form = driver.find_element_by_id('loginForm')
-
By Name
For instance, consider this page source:
The username & password elements can be located like this:
username = driver.find_element_by_name('username')
password = driver.find_element_by_name('password') -
By XPath
This is a little abstract, so for the following piece of HTML:
The form elements can be located like this:
login_form = driver.find_element_by_xpath("/html/body/form[1]")
login_form = driver.find_element_by_xpath("//form[1]")
login_form = driver.find_element_by_xpath("//form[@id='loginForm']") -
By (partial) Link Text
For instance, consider this page source:
    Are you sure you want to do this?
    Continue
    Cancel
The continue.html link can be located like this:
continue_link = driver.find_element_by_link_text('Continue')
continue_link = driver.find_element_by_partial_link_text('Conti') -
By Tag Name
For instance, consider this page source:
The iframe element can be located like this:frame = driver.find_element_by_tag_name("iframe")
-
By Class Name
For instance, consider this page source:
Site content goes here.
The “p” element can be located like this:content = driver.find_element_by_class_name('content')
-
By CSS Selectors
Example of to find the cheese below:
Site content goes here.
The “p” element can be located like this:content = driver.find_element_by_css_selector('p.content')
获取元素文本与属性
For instance, consider this page source:
Site content goes here.
元素 p 文本内容
element = driver.find_element_by_id("element")
element.text
元素 p 属性
element.get_attribute('id')
文本框操作
根据示例:了解通过send_keys向文本框中输入文字
form_textfield = driver.find_element_by_name('username')
form_textfield.send_keys("admin")
This can also be used to set file inputs.
file_input = driver.find_element_by_name('profilePic')
file_input.send_keys("path/to/profilepic.gif")
示例: http://www.chuantu.biz/
# -*- coding:utf-8 -*-
from selenium import webdriver
import os

chromedriver = "./chromedriver"
driver = webdriver.Chrome(executable_path=chromedriver)
driver.get("http://www.chuantu.biz/")


upload = driver.find_element_by_name('uploadimg')

upload.send_keys(os.path.abspath("/home/python/project/dzjg_big1.png"))

print('end')
# driver.quit()
下拉列表

示例代码:
# -*- coding:utf-8 -*-

from selenium import webdriver
from time import sleep

chromedriver = "./chromedriver"
driver = webdriver.Chrome(executable_path=chromedriver)

print('start')
driver.get("http://www.baidu.com/")
elem = driver.find_element_by_name("wd")
elem.send_keys("d")
sleep(3)  # seconds
elem = driver.find_element_by_xpath('//*[@id="form"]//li[2]')
elem.click()
第二个实例:https://www.meituan.com/changecity/
针对于网站中的省份 select 框:
WebDriver 中提供了一个叫 Select 的方法,可以帮助我们完成这些事情。首先获取了 select 元素,也就是下拉选项卡,将元素实例化为 Select 类对象。Select类提供了三种选择某一选项的方法:
select_by_index(index)
select_by_value(value)
select_by_visible_text(text)
示例代码:
# -*- coding:utf-8 -*-

from selenium.webdriver.support.ui import Select
from selenium import webdriver
from time import sleep

chromedriver = "./chromedriver"
driver = webdriver.Chrome(executable_path=chromedriver)

driver.get('http://www.meituan.com/index/changecity/initiative')
s1 = Select(driver.find_element_by_name('province'))  # 实例化 Select

print('start waiting 5s')
sleep(5)  # seconds
print('select_by_index')
s1.select_by_index(2)  # 选择第二项选项

sleep(5)  # seconds
print('select_by_value')
s1.select_by_value("130000")  # 选择value="130000"的项

sleep(5)  # seconds
print('select_by_visible_text')
s1.select_by_visible_text("山西")  # 选择text="山西"的值,即在下拉时我们可以看到的文本
print('end')
以上是三种选择下拉框的方式,注意: ``` index 从 0 开始,value 是 option 标签的一个属性值,并不是显示在下拉框中的值 visible_text 是在 option 标签中间的值,是显示在下拉框的值 ``` ####表单提交 如果你把表单都填好了,最后肯定要提交表单
# -*- coding:utf-8 -*-
from selenium.webdriver.support.ui import Select
from selenium import webdriver
from time import sleep

chromedriver = "./chromedriver"
driver = webdriver.Chrome(executable_path=chromedriver)

driver.get('http://www.meituan.com/index/changecity/initiative')

# Ajax未加载完成,需要 sleep
sleep(4)
s1 = Select(driver.find_element_by_name('province'))  # 实例化Select

s1.select_by_visible_text("山西")
# s1.select_by_index(4)
sleep(4)  # seconds
s2 = Select(driver.find_element_by_name('city'))  # 实例化Select
s2.select_by_visible_text("大同")
sleep(4)  # seconds

# 三种方式
# 是个坑,容性问题
# driver.find_element_by_class_name('btn btn-mini').submit()
# driver.find_element_by_id("changeCity").submit()
# driver.find_element_by_xpath('//*[@value="确定"]').submit()
driver.find_element_by_xpath('//*[@value="确定"]').click()
页面等待( 显式等待、隐式等待 )
页面等待 是非常重要的一部分,现在的网页越来越多采用了 Ajax 技术,这样程序便不能确定何时某个元素完全加载出来了。这会让元素定位困难而且会提高产生 ElementNotVisibleException 的概率。
所以 Selenium 提供了两种等待方式:
- 一种 是 隐式等待。隐式等待是等待特定的时间。
- 一种 是 显式等待。显式等待是指定某一条件直到这个条件成立时继续执行。
显式等待
指定某个条件,然后设置最长等待时间。如果超出这个时间还没有找到元素,那么便会抛出异常了。
# -*- coding:utf-8 -*-

from selenium import webdriver
from selenium.webdriver.common.by import By
from selenium.webdriver.support.ui import WebDriverWait
from selenium.webdriver.support import expected_conditions as EC
from selenium.webdriver.support.ui import Select
from time import sleep

chromedriver = "./chromedriver"
driver = webdriver.Chrome(executable_path=chromedriver)
driver.get("http://www.meituan.com/index/changecity/initiative")
try:
    # 判断 form 表单 ajax 加载完成标记:id属性
    element = WebDriverWait(driver, 10).until(
        EC.presence_of_element_located((By.XPATH, '//select[contains(@id,"yui_3_16")]'))
    )

    s1 = Select(driver.find_element_by_name('province'))  # 实例化 Select

    s1.select_by_visible_text("山西")
    sleep(5)  # seconds

    s2 = Select(driver.find_element_by_name('city'))  # 实例化Select
    s2.select_by_visible_text("大同")
    sleep(5)  # seconds

    driver.find_element_by_xpath('//*[@value="确定"]').submit()
    # 是个坑,容性问题
    # driver.find_element_by_class_name('btn btn-mini').submit()
finally:
    print('end')
    # driver.quit()
程序默认会 500ms 调用一次来查看元素是否已经生成,如果本来元素就是存在的,那么会立即返回。
下面是一些内置的等待条件,你可以直接调用这些条件,而不用自己写某些等待条件了。
- title_is
- title_contains
- presence_of_element_located
- visibility_of_element_located
- visibility_of
- presence_of_all_elements_located
- text_to_be_present_in_element
- text_to_be_present_in_element_value
- frame_to_be_available_and_switch_to_it
- invisibility_of_element_located
- element_to_be_clickable - it is Displayed and Enabled.
- staleness_of
- element_to_be_selected
- element_located_to_be_selected
- element_selection_state_to_be
- element_located_selection_state_to_be
- alert_is_present
from selenium import webdriver
from selenium.webdriver.common.by import By
from selenium.webdriver.support.ui import WebDriverWait
from selenium.webdriver.support import expected_conditions as EC

chromedriver = "./chromedriver"
driver = webdriver.Chrome(executable_path=chromedriver)
wait = WebDriverWait(driver, 10)
element = wait.until(EC.element_to_be_clickable((By.ID, 'some_id')))
隐式等待
隐式等待目的是让 WebDriver 在查找某个或某类元素时候容留一定的时间来进行检查。在这个时间内,如果找到就返回。否则就等到超过设置的时间并告知没有找到。当然如果不设置,默认等待时间为 0。
当我们设定了这个时间后,在我们下一次设定前,这个时间一直就是隐式等待的时间。代码示例如下:
from selenium import webdriver

chromedriver = "./chromedriver"
driver = webdriver.Chrome(executable_path=chromedriver)

driver.implicitly_wait(30)
driver.get("https://www.google.co.in/")
driver.find_element_by_id('lst-ib')
In the above example the implicit waits value is given as 30sec i.e, if web driver able to find the element with in the given span 30sec it immediately returns true else it raises an exception after 30 seconds.
1.5 webdriver cookie 处理
- driver.get_cookies() 获得 cookie 信息
- add_cookie(cookie_dict) 向 cookie 添加会话信息
- delete_cookie(name) 删除特定(部分)的 cookie
- delete_all_cookies() 删除所有 cookie
有时候需要了解浏览器中是否存在了某个cookie 信息,webdriver 可以 读取、添加,删除 cookie 信息。
打印 cookie 信息
# coding=utf-8

from selenium import webdriver
import time

driver = webdriver.Chrome()
driver.get("http://www.youdao.com")

# 获得cookie信息
cookie = driver.get_cookies()

# 将获得cookie的信息打印
print(cookie)

driver.quit()
对 cookie 的操作
上面的方式打印了所有 cookie 信息表,太多太乱,我们只想有真对性的打印自己想要的信息,看下面的例子
# coding=utf-8

from selenium import webdriver
import time

driver = webdriver.Firefox()
driver.get("http://www.youdao.com")

# 向cookie的name 和value添加会话信息。
driver.add_cookie({'name': 'key-abc', 'value': 'value-123'})

# 遍历cookies中的name 和value信息打印,当然还有上面添加的信息
for cookie in driver.get_cookies():
    print(f"{cookie['name']} -> {cookie['value']}")

# 下面可以通过两种方式删除cookie
# 删除一个特定的cookie
driver.delete_cookie("CookieName")
# 删除所有cookie
driver.delete_all_cookies()

time.sleep(2)
driver.close()
运行打印信息:
YOUDAO_MOBILE_ACCESS_TYPE -> 1
_PREF_ANONYUSER__MYTH -> aGFzbG9nZ2VkPXRydWU=
OUTFOX_SEARCH_USER_ID -> [email protected]
JSESSIONID -> abc7qSE_SBGsVgnVLBvcu
key-aaaaaaa -> value-123  # 这一条是我们自己添加的
通过博客园登陆来分析 cookie
# coding=utf-8

from selenium import webdriver
import time

driver = webdriver.Firefox()
driver.get('https://account.cnblogs.com/signin?ReturnUrl=%2Fsettings')

time.sleep(3)
driver.maximize_window()  # 浏览器全屏显示

# 通过用户名密码登陆
driver.find_element_by_id("tbUserName").send_keys("fnngj")
driver.find_element_by_id("tbPassword").send_keys("123456")

# 勾选保存密码
driver.find_element_by_id("chkRemember").click()
time.sleep(3)
# 点击登陆按钮
driver.find_element_by_id("btnLogin").click()

# 获取cookie信息并打印
cookie = driver.get_cookies()
print(cookie)

time.sleep(2)
driver.close()
运行打印信息:
#第一次执行信息
>>>
[{u'domain': u'.cnblogs.com', u'name': u'.DottextCookie', u'value': u'C709F15A8BC0B3E8D9AD1F68B371053849F7FEE31F73F1292A150932FF09A7B0D4A1B449A32A6B24AD986CDB05B9998471A37F39C3B637E85E481AA986D3F8C187D7708028F9D4ED3B326B46DC43B416C47B84D706099ED1D78B6A0FC72DCF948DB9D5CBF99D7848FDB78324', u'expiry': None, u'path': u'/', u'secure': False}]
>>> ========================= RESTART ================================
#第二次执行信息
>>>
[{u'domain': u'.cnblogs.com', u'name': u'.DottextCookie', u'value': u'5BB735CAD62E99F8CCB9331C32724E2975A0150D199F4243AD19357B3F99A416A93B2E803F4D5C9D065429713BE8B5DB4ED760EDCBAF492EABE2158B3A6FBBEA2B95C4DA3D2EFEADACC3247040906F1462731F652199E2A8BEFD8A9B6AAE87CF3059A3CAEB9AB0D8B1B7AD2A', u'expiry': 1379502502, u'path': u'/', u'secure': False}]
>>>
第一次注释掉勾选保存密码的操作,第二次通过勾选保存密码获得cookie信息 ;来看两次运行结果的cookie的何不同:
u'expiry': None
u'expiry': 1379502502
通过对比发现,不勾选保存密码时 expiry 的值为 none ;
那么就可以初步判断勾选保存密码的操作在 cookie 中起到了作用。
至于是否准确可以再做进一步的分析。
1.6 案例:通过 Cookie 跳过登录验证码
通过 Cookie 跳过登录验证码:https://www.cnblogs.com/fnng/p/6431484.html
准备工具:fiddler、Python + selenium
以百度登录为例。

验证码是汉字的,我想通过程序识别起来有点难度,也会比较麻烦。
接下来开始动手。
1、开启 Fiddler 工具,像这样!

2、通过浏览器登录正常登录百度账号。像这样!

3、通过 Fiddler 获取登录请求的 Cookie。找到 Host 为 “passport.baidu.com” 的URL,在右侧窗口查看该请求的 Cookie。

然后,找到重要的两个参数“BAIDUID”和“BDUSS”。
4、编写 Selenium 自动化测试脚本,跳过登录。
from selenium import webdriver

driver = webdriver.Chrome()
driver.get("https://www.baidu.com")

# 添加Cookie
driver.add_cookie({'name': 'BAIDUID', 'value': 'AAAAAAAAAAAAAA:FG=1'})
driver.add_cookie({'name': 'BDUSS', 'value': 'AAAAAAAAAAAAAAAAAAAAAAAAAA'})

# 刷新页面
driver.refresh()

# 获取登录用户名并打印
username = driver.find_element_by_class_name("user-name").text
print(username)

# 关闭浏览器
driver.quit()
首先,访问百度首页,处于未登录状态。
然后,通过 Selenium 所提供 add_cookie() 方法添加 Cookie 信息。
最后,刷新页面,现在已经是登录状态了,获取登录之后的用户名并打印。
前端 SVG 技术
文档:
SVG
SVG
SVG 标签
查看例子(仅用于支持 SVG 的浏览器)
代码解释:
rect 元素的 width 和 height 属性: 可定义矩形的高度和宽度
style 属性: 用来定义 CSS 属性
CSS 的 fill 属性: 定义矩形的填充颜色(rgb 值、颜色名或者十六进制值)
CSS 的 stroke-width 属性: 定义矩形边框的宽度
CSS 的 stroke 属性: 定义矩形边框的颜色
查看此例
创建带有圆角的矩形:
代码解释:
rx 和 ry 属性可使矩形产生圆角。
查看此例
SVG
下面的命令可用于路径数据:
- M = moveto
- L = lineto
- H = horizontal lineto(水平)
- V = vertical lineto
- C = curveto(曲线)
- S = smooth curveto(光滑)
- Q = quadratic Belzier curve(二次belzier曲线)
- T = smooth quadratic Belzier curveto
- A = elliptical Arc
- Z = closepath
例子
上面的例子定义了一条路径,它开始于位置 250 150,到达位置 150 350,然后从那里开始到 350 350,最后在 250 150 关闭路径。

查看例子
下面的例子创建了一个螺旋:
查看例子
测试工具
http://www.runoob.com/try/try.php?filename=trysvg_path2
SVG 贝塞尔曲线
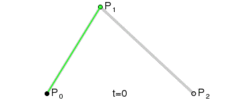
一般而言,“三次贝塞尔曲线”的指令是:
C x1 y1, x2 y2, x y
我们可以看到,上面图片有4个点出现,曲线的两个端点,以及两个控制点,这就是典型的三次贝塞尔曲线。
记住,两个控制点写在前面,后面是一个实点。
明明图片上有4个点啊,你这里的C指令怎么就只有3个参数啊?
其中有一个点是起始点,一般是使用指令Mx, y的,这样1+3就等于4啦~」
selenium 实现百度登陆与指数提取
需求
http://index.baidu.com/?tpl=trend&word=itools

三次贝塞尔曲线分析
M20,209.71043771043767
C20,209.71043771043767,37.403792291215744,202.91564252551038,54.793103448275865,203.41750841750837
C72.18241460533599,203.91937430950637,73.20310901938423,205.95708808566553,89.58620689655173,211.80808080808077
C105.96930477371923,217.65907353049602,107.03607008639847,227.22833278337725,124.37931034482759,228.58922558922558
C141.7225506032567,229.9501183950739,142.51636522414827,213.07945078549736,159.17241379310346,218.10101010101005
C175.82846236205864,223.12256941652274,178.44993667348015,252.18578642065503,193.96551724137933,260.05387205387206
C209.4810978092785,267.92195768708905,211.42970775670906,263.68409090917896,228.75862068965517,262.1515151515151
C246.0875336226013,260.6189393938513,246.2535151946967,251.9137883963013,263.55172413793105,253.76094276094273
C280.8499330811654,255.60809712558415,280.953233267576,270.9573693100153,298.3448275862069,270.54208754208753
C315.7364219048378,270.1268057741598,318.03951864381804,260.3049404318127,333.1379310344828,251.66329966329965
C348.23634342514754,243.02165889478658,352.22734445560417,238.1724636145718,367.93103448275866,230.68686868686865
C383.63472450991316,223.2012737591655,385.3765270266145,216.79701324539502,402.72413793103453,218.10101010101005
C420.0717488354545,219.40500695662507,420.2680561610064,234.72023581086987,437.51724137931035,236.97979797979792
C454.7664265976143,239.239360148726,459.27137746988086,240.10553324989965,472.3103448275862,228.58922558922558
C485.3493121852916,217.0729179285515,489.7547176782527,135.00391473049126,507.1034482758621,136.29292929292924
C524.4521788734716,137.58194385536723,529.3926083978823,285.7163490857493,541.896551724138,297.8114478114478
C554.4004950503937,309.90654653714626,559.2931034482759,304.1043771043771,576.6896551724138,304.1043771043771
C594.0862068965517,304.1043771043771,594.0934474636296,297.30958191944984,611.4827586206897,297.8114478114478
C628.8720697777499,298.3133137034458,630.6164737870624,298.6241860439508,646.2758620689656,306.20202020202015
C661.9352503508686,313.77985436008953,664.461123342158,328.29261708828153,681.0689655172414,333.4713804713804
C697.6768076923248,337.66666666666663,698.9227646961804,335.33605774965736,715.8620689655173,331.37373737373736
C732.8013732348542,327.41141699781735,733.5081181472079,319.62597101028564,750.6551724137931,316.6902356902357
C767.8022266803783,313.7545003701857,768.1759444027329,316.7126491983071,785.4482758620691,318.78787878787875
C802.7206073214052,320.86310837745043,802.8520681532848,325.582673972806,820.2413793103449,325.080808080808
C837.630690467405,324.57894218881006,837.6451716015606,317.1921015822337,855.0344827586207,316.6902356902357
C872.4237939156809,316.18836979823766,873.1531736773215,318.02292520225126,889.8275862068966,322.98316498316495
C906.5019987364716,327.94340476407865,907.4736353885872,334.73093134661667,924.6206896551724,337.66666666666663
C941.7677439217576,337.66666666666663,942.578941522853,337.66666666666663,959.4137931034484,335.56902356902356
C976.2486446840436,331.1840738372781,977.1386719183727,322.1517634107601,994.2068965517242,318.78787878787875
C1011.2751211850757,315.4239941649974,1029,320.8855218855218,1029,320.8855218855218
rect 矩形信息
右侧的标尺

分析

计算
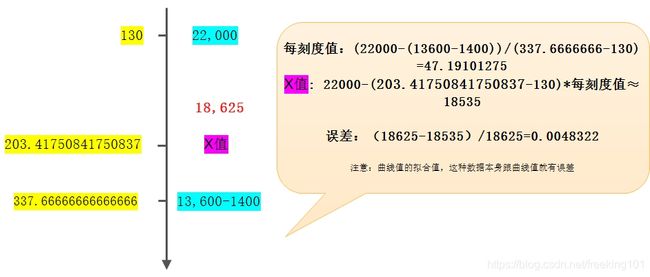
源码分析
类 webdriver chrome 操作
# -*- coding: utf-8 -*-
import datetime
import os
import re
import time
import urllib
from time import sleep

import requests
from selenium import webdriver
from selenium.webdriver.common.by import By
from selenium.webdriver.support import expected_conditions as EC
from selenium.webdriver.support.ui import WebDriverWait

from utils.reg_ocr import getverify


class BD_Crawler(object):
    def __init__(self, userName, pwd, chromedriver, data_dir):
        '''
        初始化 driver
        :param userName:账户
        :param pwd: 密码
        :param chromedriver:webdirver
        '''
        os.environ["webdriver.chrome.driver"] = chromedriver
        options = webdriver.ChromeOptions()
        options.add_argument('--user-data-dir=' + data_dir)  # 设置成用户自己的数据目录
        # option.add_argument('--user-agent=iphone') #修改浏览器的User-Agent来伪装你的浏览器访问手机m站
        # option.add_extension('d:\crx\AdBlock_v2.17.crx')  # 自己下载的crx路径
        self.driver = webdriver.Chrome(executable_path=chromedriver, chrome_options=options)
        # self.driver = webdriver.Chrome(chromedriver)
        self.userName = str(userName)
        self.pwd = pwd

    def login(self):
        '''
        判断是否需要登录
        :return:
        '''
        try:
            if self.driver.find_elements_by_class_name('compInfo'):
                return True

            WebDriverWait(self.driver, 30).until(
                EC.presence_of_element_located((By.NAME, 'userName'))
            )

            userName = self.driver.find_element_by_name("userName")
            userName.send_keys(self.userName)
            password = self.driver.find_element_by_name("password")
            password.send_keys(self.pwd)
            submit = self.driver.find_element_by_xpath('//*[@class="pass-form-item pass-form-item-submit"]')
            submit.submit()
            print '请检查是否有验证码,手动输入'
            sleep(10)
            while self.driver.find_element_by_xpath('//*[@class="pass-verifyCode"]'):
                try:
                    if self.driver.find_element_by_xpath(
                            '//*[@class="pass-success pass-success-verifyCode" and @style="display: block; visibility: visible; opacity: 1;"]'):
                        submit = self.driver.find_element_by_xpath('//*[@class="pass-form-item pass-form-item-submit"]')
                        submit.submit()
                        break
                except:
                    pass
                sleep(6)
            return True
        except:
            return False
            pass
        else:
            return False

    def getTimeSpan(self):
        try:
            self.driver.implicitly_wait(20)  # seconds
            # 获取时间范围
            time_span = self.driver.find_elements_by_class_name('compInfo')[4].text
            from_day = time_span.split()[0]
            to_day = time_span.split()[-1]
            from_daytime = datetime.datetime.strptime(from_day, "%Y-%m-%d").date()
            to_daytime = datetime.datetime.strptime(to_day, "%Y-%m-%d").date()
            alldays = (to_daytime - from_daytime).days
            self.driver.implicitly_wait(5)  # seconds
            return from_daytime, alldays
        except:
            return -1

    def downloadImageFile(self, keyword, imgUrl):
        local_filename = '../photos/' + keyword + time.strftime('_%Y_%m_%d') + '.png'
        print "Download Image File=", local_filename
        r = requests.get(imgUrl, cookies=self.getCookieJson(),
                         stream=True)  # here we need to set stream = True parameter
        with open(local_filename, 'wb') as f:
            for chunk in r.iter_content(chunk_size=1024):
                if chunk:  # filter out keep-alive new chunks
                    f.write(chunk)
                    f.flush()
            f.close()
        return local_filename

    def getCookieJson(self):
        cookie_jar = {}
        for cookie in self.driver.get_cookies():
            name = cookie['name']
            value = cookie['value']
            cookie_jar[name] = value
        return cookie_jar

    def webcrawler(self, keyword):
        '''
        百度指数控制函数
        :return:
        '''
        self.driver.get('http://index.baidu.com/?tpl=trend&word=' + urllib.quote(keyword.encode('gb2312')))
        # self.driver.maximize_window()

        self.login()
        try:
            # 判断form表单ajax加载完成标记:id属性
            WebDriverWait(self.driver, 20).until(
                EC.presence_of_element_located((By.ID, 'trend'))
            )
        except:
            pass
        try:
            for i in range(1, 4):
                if self.driver.find_element_by_class_name('toLoading').get_attribute('style') != u'display: none;':
                    break
                sleep(5)
        except:
            pass
        for i in range(1, 4):
            from_daytime, alldays = self.getTimeSpan()
            if alldays < 0:
                self.driver.refresh()
            else:
                break
        sleep(2)
        for i in range(1, 4):
            try:
                # 获取所有的纵坐标的点
                svg_data = re.search(r'
验证码识别:定义reg_ocr.py
# -*- coding: utf-8 -*-
from PIL import Image
from PIL import ImageEnhance
from pytesseract import *


def getverify(name):
    '''
    图片识别模块
    :param name:图片path
    :return:
    '''
    # 打开图片
    im = Image.open(name)
    # 使用ImageEnhance可以增强图片的识别率
    enhancer = ImageEnhance.Contrast(im)
    image_enhancer = enhancer.enhance(4)
    # 放大图像 方便识别
    im_orig = image_enhancer.resize((image_enhancer.size[0] * 2, image_enhancer.size[1] * 2), Image.BILINEAR)
    # 识别
    text = image_to_string(im_orig)
    im.close()
    im_orig.close()
    # 识别对吗
    text = text.strip()
    return text


# 验证码识别,此程序只能识别数据验证码
if __name__ == '__main__':
    getverify('trendYimg.png')  # 注意这里的图片要和此文件在同一个目录,要不就传绝对路径也行
主函数
# -*- coding: utf-8 -*-
import base64

import yaml

from BD_Spider.bd_spider import BD_Crawler


def main():
    stream = file('../config/setting.yaml', 'r')  # 'document.yaml' contains a single YAML document.
    pyconfig = yaml.load(stream)
    bd_crawler = BD_Crawler(pyconfig['Authentication']['name'], base64.b64decode(pyconfig['Authentication']['pwd']),
                            pyconfig['chromedriver'], pyconfig['data_dir'])
    values = bd_crawler.webcrawler(u'爱情')
    print values
    print 'end'


if __name__ == '__main__':
    main()
定义配置文件 setting.yaml
Authentication:
    name: [email protected]
    pwd: XXXXXXXXXXX
chromedriver: C:\Program Files (x86)\Google\Chrome\Application\chromedriver.exe
data_dir: C:\Users\enlong\AppData\Local\Google\Chrome\User Data11
2. PhantomJS
************************* PhantomJS 已经停止更新 *************************
中式读法:【 饭特姆JS 】
PhantomJS(官网: http://phantomjs.org/ )是一个基于 WebKit 内核、无 UI 界面的浏览器,WebKit 是一个开源的浏览器引擎。比如,主流的 Safari、Google Chrome、傲游3、猎豹浏览器、百度浏览器、opera浏览器 都是基于 Webkit 开发。)
PhantomJS 会把网站数据加载到内存中,并执行页面上的 JavaScript,但不会向用户展示图形界面。
PhantomJS 是一个无界面的,可脚本编程的WebKit浏览器引擎。它原生支持多种web 标准:DOM 操作,CSS选择器,JSON,Canvas 以及SVG。
官方网站:http://phantomjs.org/download.html
Examples:http://phantomjs.org/examples/index.html
安装完成之后命令行输入:phantomjs -v
如果正常显示版本号,那么证明安装成功了。如果提示错误,那么请重新安装。
快速开始
第一个程序
第一个程序当然是Hello World,新建一个 js 文件。命名为 helloworld.js
console.log('Hello, world!');
phantom.exit();
命令行输入
phantomjs helloworld.js
程序输出了 Hello,world!程序第二句话终止了 phantom 的执行。
注意:phantom.exit();这句话非常重要,否则程序将永远不会终止。
页面加载
可以利用 phantom 来实现页面的加载,下面的例子实现了页面的加载并将页面保存为一张图片。
var page = require('webpage').create();
page.open('http://example.com', function (status) {
    console.log("Status: " + status);
    if (status === "success") {
        page.render('example.png');
    }
    phantom.exit();
});
首先创建了一个webpage对象,然后加载本站点主页,判断响应状态,如果成功,那么保存截图为 example.png
以上代码命名为 pageload.js,命令行
phantomjs pageload.js
发现执行成功,然后目录下多了一张图片,example.png

因为这个 render 方法,phantom 经常会用到网页截图的功能。
测试页面加载速度
下面这个例子计算了一个页面的加载速度,同时还用到了命令行传参的特性。新建文件保存为 loadspeed.js
var page = require('webpage').create(),
  system = require('system'),
  t, address;

if (system.args.length === 1) {
  console.log('Usage: loadspeed.js ');
  phantom.exit();
}

t = Date.now();
address = system.args[1];
page.open(address, function(status) {
  if (status !== 'success') {
    console.log('FAIL to load the address');
  } else {
    t = Date.now() - t;
    console.log('Loading ' + system.args[1]);
    console.log('Loading time ' + t + ' msec');
  }
  phantom.exit();
});
程序判断了参数的多少,如果参数不够,那么终止运行。然后记录了打开页面的时间,请求页面之后,再纪录当前时间,二者之差就是页面加载速度。
phantomjs loadspeed.js http://example.com
运行结果
Loading http://example.com
Loading time 11678 msec
这个时间包括JS渲染的时间,当然和网速也有关。
代码评估
利用 evaluate 方法我们可以获取网页的源代码。这个执行是“沙盒式”的,它不会去执行网页外的 JavaScript 代码。evalute 方法可以返回一个对象,然而返回值仅限于对象,不能包含函数(或闭包)
var url = 'http://www.qq.com';
var page = require('webpage').create();
page.open(url, function(status) {
  var title = page.evaluate(function() {
    return document.title;
  });
  console.log('Page title is ' + title);
  phantom.exit();
});
以上代码获取了腾讯的网站标题。
Page title is 腾讯首页
任何来自于网页并且包括来自 evaluate() 内部代码的控制台信息,默认不会显示。
需要重写这个行为,使用 onConsoleMessage 回调函数,示例可以改写成
var url = 'http://www.itcast.cn/';
var page = require('webpage').create();
page.onConsoleMessage = function (msg) {
    console.log(msg);
};
page.open(url, function (status) {
    page.evaluate(function () {
        console.log(document.title);
    });
    phantom.exit();
});
页面自动化处理
- DOM操作
脚本都是像在浏览器中运行的,所以标准的 JavaScript 的 DOM 操作和 CSS 选择器也是生效的。
例如下面的例子就修改了 User-Agent,然后还返回了页面中某元素的内容。
var url = 'http://www.httpuseragent.org';
var page = require('webpage').create();
console.log('The default user agent is ' + page.settings.userAgent);
page.settings.userAgent = 'Mozilla/5.0 (Windows NT 10.0; WOW64) AppleWebKit/537.36 (KHTML, like Gecko) Chrome/50.0.2661.102 Safari/537.36';
page.open('http://www.httpuseragent.org', function (status) {
    if (status !== 'success') {
        console.log('Unable to access network');
    }
    else {
        var ua = page.evaluate(function () {
            return document.getElementById('myagent').innerText;
        });
        console.log(ua);
    }
    phantom.exit();
});
运行结果
The default user agent is Mozilla/5.0 (Unknown; Linux x86_64) AppleWebKit/534.34 (KHTML, like Gecko) PhantomJS/1.9.7 Safari/534.34
Your Http User Agent string is: SpecialAgent
首先打印出了默认的 User-Agent,然后通过修改它,请求验证 User-Agent 的一个站点,通过选择器得到了修改后的 User-Agent。