去中心化计算的未来:通过 RPC 从微服务过渡到WASM
从浏览器内的角度来看,Wasm 最近的开发工作,理所当然地受到了广泛好评。在上一篇文章《只需5分钟,教你如何编写并执行一个 Rust WebAssembly 程序》,我们对 Rust 到 Wasm 的编译以及简单的浏览器内 Wasm 执行的案例做了演示。
在另外一篇文章《区块链、硬件与面向服务的架构,WASM 即将迎来大爆发?》,里面有绝佳的浏览器内的 WASM 应用程序示例,并辅以了对WebAssembly(Wasm)的详细解释。
浏览器之外
Wasm 不仅仅是浏览器的字节码。 Wasm 有着前所未有的强大的可移植性、高效率和灵活性。因此,我们现在可以做到,以多种不同语言编写浏览器内 Wasm 应用程序,发展到在所有设备上分发 Wasm 独立功能单元,在这一点上取得飞跃。
Wasm 执行环境可以包括最少的 shell、移动设备、台式机和物联网设备。Wasm 可能会推动从微芯片乃至整个数据中心,这所有一切的发展(Webassembly.org,2019)。
为什么跨越浏览器很重要?
当连接到现代 Web 服务时,我们并非仅仅与一台机器进行交互,而是持续和后台可能数千台机器进行交互( Arpaci-Dusseau 和Arpaci-Dusseau,2018 )。
网站越复杂,运营成本就越高。散布在分布式系统上的微服务需要尽最大可能做到简单、高效和可靠。对于 Facebook、Google 这种大公司来说,这些特性意味着可以节省大量能耗,进而节省成本,促成积极成果。
除了这些能轻易做到的,我们还应该积极试验,以找到方法来改善 Wasm 最终用户/消费者体验。 eBay 就是一个很好的例子。
利用 Wasm,eBay 最近很好地完善了其移动条形码扫描仪的实现,恰到好处地为客户提供了最优服务( Tech.ebayinc.com,2019)。
为什么选 Wasm?
首先我们需要了解下“抽象化”。
虽然操作系统抽象化对于构建分布式系统来说是一个糟糕的选择,但编程语言抽象化却更具意义。 (阿帕奇-杜索和阿帕奇-杜索,2018)。Wasm 作为从一开始就使用形式语义设计的第一种主流编程语言,进一步地提供了对现代硬件的抽象化的支持(Rossberg等,2018)。
Wasm 允许在最大量的源代码语言中编写和共享每个单个功能的逻辑。Wasm符合我们熟知的最佳软件原则和惯例(DRY 和 KISS),并提供了必要时在所有设备之间转换可执行代码的方法。
为什么要进行远程过程调用(Remote Procedure Call)?
从进程间通信(IPC)角度来看,最主要的抽象化是基于远程程序调用(Remote Procedure Call)的概念,简称 RPC。(Arpaci-Dusseau和Arpaci-Dusseau,2018)。
要实现这种分布式机器之间普遍存在的互操作性,需要具备允许任何应用程序(以任何语言编写)直接从任何其他分布式机器调用服务的功能,就好像它只是调用自己的本地对象一样。 这正是远程过程调用 (RPC) 技术所实现的。
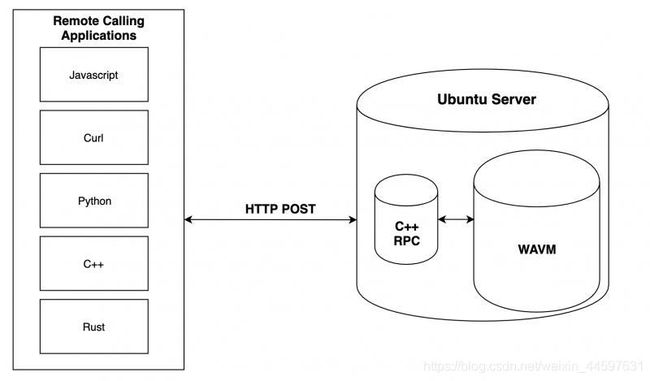
本文的目标是使用 Wasm 和 RPC 在 web 上执行与语言无关的通用代码。
在下一节中,会讲解如何:
- 编写自定义的 Rust 代码并编译为 Wasm
- 设置 RPC 服务器
- 在 RPC 服务器上定义自定义服务
- 安装 Wasm 虚拟机(WAVM)
- 通过 HTTP Post(即Curl,Python等)远程执行自定义 WebAssembly(Wasm)代码
1.编写自定义的 Rust 代码并编译为 Wasm
安装 Rust
curl --proto '=https' --tlsv1.2 -sSf https://sh.rustup.rs (https://sh.rustup.rs/) | shsource $HOME/.cargo/env
创建新的 Rust 项目
cd ~
cargo new --lib add_numbers_via_wavm
cd add_numbers_via_wavm
编辑 Cargo.toml 文件; 添加 lib 部分 ,同时也添加依赖项,如下所示
[lib]
name = "adding_lib"
path = "src/adding.rs"
crate-type =["cdylib"][dependencies]
serde_json = "1.0"
在命令行中添加必要的 Wasm 软件和配置
rustup target add wasm32-wasi
rustup override set nightly
创建一个名为 ~/.cargo/config 的新文件。并将以下构建文本放入这个新创建的配置文件中。
[build]
target = "wasm32-wasi"
编写一个我们可以调用的有不同的功能的定制的 Rust 程序。
在下面的例子中,函数“ double”和“ triple” 会分别取一个整数并分别乘以 2 和 3。
use serde_json::json;
pub extern fn print(answer: i32){
let the_answer = json!({
"Result": answer});
println!("{}", the_answer.to_string());
}
#[no_mangle]
pub extern fn double(x: i32){
let z = x * 2;
print(z);
}
#[no_mangle]
pub extern fn triple(x: i32){
let z = x * 3;
print(z);
}
可以使用以下命令编译上面的代码
cargo build --release
2. 设置 RPC 服务器
这里给大家推荐一个简洁的 C RPC 服务器,叫做 [rpcsrv] (https://github.com/jgarzik/rpcsrv)。 我们要使用这个 C RPC 服务器来接受 HTTP POST 并通过 C 将它们转换为系统调用。
sudo apt-get update
sudo apt-get -y upgrade
sudo apt-get install autoconf
sudo apt install libevent-2.1-6
sudo apt-get install libevent-dev
sudo apt-get install libtool
cd ~
git clone https://github.com/jgarzik/rpcsrv.git
cd ~/rpcsrv
git submodule update --init
./autogen.sh
./configure
make
sudo make install
使用以下命令开启 RPC 服务
sudo ./rpcsrvd --listen-port 8080
3. 在 RPC 服务器上定义自定义服务
在我们进一步讨论之前,我想简单地讨论一下 JSON 的使用。 我简要地探索了一个关于单值的绝妙概念。 Univalue 是一个高性能的 RAII C JSON 库和通用值对象类。我之后会找时间针对这个做彻底的研究。
方便起见,我结合使用了 UniValue 和 rapidjson。 同样,我也需要更多的时间来研究,来找到数据交换和互操作性的最佳方法,我们之后再进行讨论。
下面的代码用于安装 rapidjson。
cd ~
https://github.com/Tencent/rapidjson.git
cd ~/rapidjson
git submodule update --init
mkdir build
cd ~/rapidjson/build/
cmake ..
sudo cp -rp ~/rapidjson/include/rapidjson /usr/include/
在安装 rapidjson 之后,我修改了原始 C API 文件,以便在 rpcsrvcodebase 中包含 rapidjson 功能。
#include "rapidjson/document.h"
#include "rapidjson/writer.h"
#include "rapidjson/stringbuffer.h"
#include
using namespace rapidjson;
在这个阶段,我们可以继续在 C 代码中使用 rapidjson 功能。 下面是一个示例,演示如何修改原始 echo 函数
//
// RPC "echo"
//
static UniValue myapi_1_echo(const UniValue & jreq,
  const UniValue & params) {
  // Receive and parse incoming parameters
  string s = params.write();
  const char * theJson = s.c_str();
  Document d;
  d.Parse(theJson);
  // Assign parameters to C   variables and print to console
  Value & theService = d["Service Name"];
  Value & theType = d["Type"];
  Value & theFunctionName = d["Execution"]["FunctionName"];
  Value & theArgument = d["Execution"]["Argument"];
  cout << endl;
  cout << "Received a new request to execute a service on Wasm Virtual
  Machine..." << endl;
  cout << s.c_str() << endl;
  cout << endl;
  cout << "Service Name is: " << theService.GetString() << endl;
  cout << "Service Type is: " << theType.GetString() << endl;
  cout << "Wasm function is: " << theFunctionName.GetString() << endl;
  cout << "Wasm function argument: " << theArgument.GetString() <<
    endl;

  // Construct and execute the call to Wasm Virtual Machine
  string commandString = "wavm run --abi=wasi --function=";
  commandString  = theFunctionName.GetString();
  commandString  = " ";
  commandString  = "~/add_numbers_via_wavm/target/wasm32
  wasi / release / adding_lib.wasm ";
  commandString  = " ";
  commandString  = theArgument.GetString();
  cout << "\n";
  cout << "Executing command ... " << endl;
  string theWasmResults =
    execute_function_and_return_output(commandString);

  // Print the result to console
  cout << "Results are as follows ...: " << endl;
  cout << theWasmResults << endl;
  UniValue result(theWasmResults);
  cout << "Finished." << endl;
  // Return the results back to the caller of the RPC
  return jrpcOk(jreq, result);
}
4. 安装Wasm 虚拟机(WAVM)
WAVM 使用 LLVM将 WebAssembly 代码编译成机器代码,其性能接近原生性能。
下面是安装 WAVM的说明
sudo apt-get install gcc
sudo apt-get install clang
wget https://github.com/WAVM/WAVM/releases/download/nightly/2019-11-04/wavm-0.0.0-prerelease-linux.deb
sudo apt install ./wavm-0.0.0-prerelease-linux.deb
5. 通过 HTTP Post (即 Curl、 Python 等)远程执行自定义 WebAssembly (Wasm) 代码
执行可以由任何能够生成 HTTP POST 的机制执行。 例如,从 Postman这样的 GUI 到 Linux curl 命令,当然还有像 Python 和 Java 这样的解释和编译代码库。
下面是在 linux 命令行中使用 Curl 的调用代码示例
Curl - 传入一段有效的JSON代码
tpmccallum$ curl --header "Content-Type: application/json" --request POST --data '{"jsonrpc":"2.0","method":"echo","params":{"Service Name": "Double the digits","Type": "Execution","Execution": {"FunctionName": "double","Argument": "10"}}, "id":1}' [http://123.456.78.9:8080/rpc/1](http://localhost:8080/rpc/1)
当查看这个调用代码时,请记住 Rust 程序( Wasm 最早缘起于 Rust) 有两个函数: “ double”和“ triple”。 增加的 RPC 层意味着这些原始函数现在被定义为两个单独的服务。
正如上面所看到的,我们不仅要指定想调用的服务,还要指定所需的单个参数。 当这个 POST 在 web 上执行时,RPC 服务器直接调用 WAVM,然后返回一个 JSON 结果对象给调用代码。
返回有效的 JSON
{
 "jsonrpc": "2.0",
 "result": {
  "Result": 20
 },
 "id": 1
}
返回对象是完全可配置的,这只是一个返回计算结果的简单示例。
RPC 服务器输出
RPC 服务器输出是可选的,这里只是为了演示而创建的。 这里演示了 RPC 服务器可以来回传递 JSON。其他格式也有机会内置到 RPC 层(位于 Rust 和 Wasm 代码之上)。
Received a new request to execute a service on Wasm Virtual Machine... {"Service Name":"Double the digits","Type":"Execution","Execution":{"FunctionName":"double","Argument":"10"}}Service Name is: Double the digits
Service Type is: Execution
Wasm function is: double
Wasm function argument: 10Executing command ...Results are as follows ...:
{"Result":20}Finished.
Python - 传入一段有效的JSON代码
系统设置
sudo apt-get install python-pip
pip install json-rpc
pip install requests
我们将 Python 传入一段有效的JSON代码,描述我们需要哪种服务。 在这个例子中,我们希望将数字10翻一倍,即调用“ FunctionName” : “ double”和“ Argument” : “10”。
>>>import requests
>>>import json

>>>url = "http://123.456.78.9:8080/rpc/1"
>>>payload = {
    "jsonrpc":"2.0","method":"echo","params":{"Service Name":"Double the digits","Type": "Execution","Execution": {"FunctionName": "double","Argument": "10"}}, "id":1
}
>>>response = requests.post(url, json=payload).json()
现在我们可以看到,响应返回执行 Wasm 的结果,即“ Result” : 20。
>>> print response{u'jsonrpc': u'2.0', u'result': u'{"Result":20}, u'id': 1}
我们可以通过调用另一个服务(即“ FunctionName” : “ triple” ,“ Argument” : “10”)再次尝试这个方法
>>>url = "http://123.456.78.9:8080/rpc/1"
>>>payload = {
    "jsonrpc":"2.0","method":"echo","params":{"Service Name":"Triple the digits","Type": "Execution","Execution": {"FunctionName": "triple","Argument": "10"}}, "id":1
}
>>>response = requests.post(url, json=payload).json()
同样,我们可以看到这个响应是所选服务的正确结果。
>>> print response
{u'jsonrpc': u'2.0', u'result': u'{"Result":30}', u'id': 1}
本文通过 RPC 演示了如何使用 Wasm 。我是一名热情的开源区块链软件研究人员,也是 SecondState 公司(在达拉斯、奥斯汀、北京和台北设有办公室)的核心开发 https://www.SecondState.io/ 。 如果你想了解更多关于 Wasm 和其他可以提升业务的技术,请通过电子邮件或 GitHub与我们联系。
参考文献
- Arpaci-Dusseau, R.H. 和 Arpaci-Dusseau, A.C.,2018, 《操作系统:三个简单的部分》, Arpaci-Dusseau Books LLC.
- Rossberg, A., Titzer, B., Haas, A., Schuff, D., Gohman, D., Wagner, L., Zakai, A., Bastien, J. 以及 Holman, M. (2018), 《使用 WebAssembly 加速网络发展》, ACM通讯,107-115页.
- Tech.ebayinc.com. (2019), eBay 上的 WebAssembly : 一个真实世界的案例, [在线资源] 可访问: https://tech.ebayinc.com/engineering/webassembly-at-ebay-a-real-world-use-case/ [2019年11月20日访问].

