springboot文件上传下载(fastdfs,七牛云,本地)
springboot文件上传下载(fastdfs,七牛云,内部外部磁盘{本地})
在实际开发中 ,基本都会有应用到文件上传的场景,但随着或多或少的需求问题 ,所采用的技术方案也不尽相同 ,有用 fastdfs 文件存储服务器的,有用七牛云的,有直接就将文件传到自己部署的服务器上的(win 开发存放某一盘符,linux 存放某一路径下)
本文主要是使用springboot 整合文件上传就一共分为了此三个大模块
(一)springboot-fastdfs
此文章之前以作为了独立博客进行发布 点击springoot-fastdfs文件存储服务器实现文件上传下载 可直连跳转
(二)springboot整合七牛云 存储
(1)七牛云开通与创建存储空间
要使用七牛云 ,首先我们需要进行注册以及开通储存空间
七牛云 这是七牛云的官方网站 未有账号的需进行先注册 注册过后再按照提示进行实名认证,咱们就有免费10G 的存储空间了。
注意的是 认证的时候 有一栏要填写个人网站 ,如果没有 可以不填 ,只要自己身份信息正确也能通过认证(这一点 七牛提示性不够啊)
注册实名后呢
首先查看自己的密钥信息
ak sk 使我们项目中使用代码操作七牛 必须要使用的密钥 切记不要泄露以及随意传播

然后开通储存空间

点击新建空间 设置空间名 选择空间所在地区

看情况选择公开是还私有,至于两者区别 七牛也说的很详细了 仅仅是 是否可读而已 (查看)

我这里选择的是华南地区的空间哈 创好了就会在七牛空间列表展示了

进入空间中 自己可以选择是否绑定域名 如果没绑 七牛会给你此空间 有限时间三十天的一个随机域名, 通过这个域名+文件名 我们就可以在任何有网络的地方进行文件访问了 个人exmaple:http://qa7oc48w0.bkt.clouddn.com/logo.png

到这一步 我们七牛云的存储空间已经开通了 ,接下来咱们就可以再项目中使用了
所需依赖
      com.qiniu
      qiniu-java-sdk
      [7.2.0, 7.2.99]


      com.google.code.gson
      gson
      2.8.5
(2)在springboot配置文件中 自定义七牛云配置
#七牛云配置
qiniu:
  #自己账户的ak sk
  accessKey: xxx
  secretKey: xxx
  #存储空间名
  bucket: xxx
  # 自己的存储空间域名
  cdnProfile: xxx
  #采用的协议 http:// 还是 https://  个人此空间由于没配域名 采用的是http协议  http://qa7oc48w0.bkt.clouddn.com/logo
  protocol: http://
(3)自定义bean 进行 配置解析
个人使用了静态变量 获取空间名示例:QiNiuConfigBean.getBucket()
/**
 * @author lei
 * @date 2020/5/12 17:20
 * @desc
 */
@ConfigurationProperties(prefix = "qiniu")
@Component
public class QiNiuConfigBean {

  private static String accessKey;
  private static String secretKey;
  private static String bucket;
  private static String cdnProfile;
  private static String protocol;

  public static String getAccessKey() {
    return accessKey;
  }

  public  void setAccessKey(String accessKey) {
    QiNiuConfigBean.accessKey = accessKey;
  }

  public static String getSecretKey() {
    return secretKey;
  }

  public  void setSecretKey(String secretKey) {
    QiNiuConfigBean.secretKey = secretKey;
  }

  public static String getBucket() {
    return bucket;
  }

  public  void setBucket(String bucket) {
    QiNiuConfigBean.bucket = bucket;
  }

  public static String getCdnProfile() {
    return cdnProfile;
  }

  public  void setCdnProfile(String cdnProfile) {
    QiNiuConfigBean.cdnProfile = cdnProfile;
  }

  public static String getProtocol() {
    return protocol;
  }

  public  void setProtocol(String protocol) {
    QiNiuConfigBean.protocol = protocol;
  }
}
(4)根据配置bean 编写我们的七牛上传支持配置
配置类中 包含了 认证信息实例 存储区域选择 七牛空间管理实例 上传工具实例
package com.leilei.config;

import com.google.gson.Gson;
import com.qiniu.common.Zone;
import com.qiniu.storage.BucketManager;
import com.qiniu.storage.UploadManager;
import com.qiniu.util.Auth;
import org.springframework.context.annotation.Bean;
import org.springframework.context.annotation.Configuration;

/**
 * @author lei
 * @date 2020/5/12 17:32
 * @desc
 */
@Configuration
public class QiNiuConfig {

  /**
   * 配置自己空间所在的区域 我这里是华南 (个人选择开通的存储区域)
   */
  @Bean
  public com.qiniu.storage.Configuration qiniuConfig() {
    return new com.qiniu.storage.Configuration(Zone.huanan());
  }

  /**
   * 构建一个七牛上传工具实例
   */
  @Bean
  public UploadManager uploadManager() {
    return new UploadManager(qiniuConfig());
  }

  /**
   * 认证信息实例
   *
   * @return
   */
  @Bean
  public Auth auth() {

    return Auth.create(QiNiuConfigBean.getAccessKey(), QiNiuConfigBean.getSecretKey());
  }

  /**
   * 构建七牛空间管理实例
   */
  @Bean
  public BucketManager bucketManager() {
    return new BucketManager(auth(), qiniuConfig());
  }

  @Bean
  public Gson gson() {
    return new Gson();
  }

}
(5)个人参照官方demo示例而修改以及符合个人项目需求的的上传下载 删除 工具类
特别注意的 在本工具类中 大量代码采用了读取我之前定义的配置bean 如果拷贝我的yml 代码和自定义bean 即可一键使用,直接操作 简单快捷…
在上传成功后 会返回一个可直接访问的Url地址 ,复制到浏览器即可查看 或者登陆七牛云在空间中查看
package com.leilei.util;

import com.leilei.config.QiNiuConfigBean;
import com.qiniu.common.QiniuException;
import com.qiniu.http.Response;
import com.qiniu.storage.BucketManager;
import com.qiniu.storage.UploadManager;
import com.qiniu.util.Auth;
import com.qiniu.util.StringMap;
import java.io.File;
import java.io.FileOutputStream;
import java.io.InputStream;
import java.io.OutputStream;
import java.net.URLConnection;
import java.net.URLEncoder;
import lombok.extern.slf4j.Slf4j;
import org.springframework.beans.factory.annotation.Autowired;
import org.springframework.stereotype.Service;
import org.springframework.web.multipart.MultipartFile;

/**
 * @author lei
 * @date 2020/5/12 18:03
 * @desc
 */
@Service
@Slf4j
public class QiNiuSupport {

  @Autowired
  private UploadManager uploadManager;

  @Autowired
  private BucketManager bucketManager;

  @Autowired
  private Auth auth;


  /**
   * 最大尝试次数
   */
  public static final Integer maxReTry = 3;
  /**
   * 七牛云操作成功状态码
   */
  public static final Integer successCode = 200;


  /**
   * 以文件的形式上传 并设置文件上传类型
   *
   * @param file
   * @return
   * @throws QiniuException
   */
  public String uploadFileMimeType(File file, String fileName) throws QiniuException {
    //获取要上传文件的MIME 类型
    String mime = URLConnection.guessContentTypeFromName(file.getName());
    log.info("当前文件MIME类型为:{}", mime);
    Response response = this.uploadManager.put(file, fileName, getUploadToken(), getPutPolicy(),
        mime, false);
    int retry = 0;
    while (response.needRetry() && retry < maxReTry) {
      log.info("当前操作需要进行重试,目前重试第{}次",retry+1);
      response = this.uploadManager.put(file, fileName, getUploadToken(), getPutPolicy(),
          mime, false);
      retry++;
    }
    if (response.statusCode == successCode) {
      return new StringBuffer().append(QiNiuConfigBean.getProtocol())
          .append(QiNiuConfigBean.getCdnProfile()).append("/").append(fileName).toString();
    }
    return "上传失败!";
  }

  /**
   * 以文件的形式上传
   *
   * @param file
   * @return
   * @throws QiniuException
   */
  public String uploadFile(File file, String fileName) throws QiniuException {
    Response response = this.uploadManager.put(file, fileName, getUploadToken());
    int retry = 0;
    while (response.needRetry() && retry < maxReTry) {
      log.info("当前操作需要进行重试,目前重试第{}次",retry+1);
      response = this.uploadManager.put(file, fileName, getUploadToken());
      retry++;
    }
    if (response.statusCode == successCode) {
      return new StringBuffer().append(QiNiuConfigBean.getProtocol())
          .append(QiNiuConfigBean.getCdnProfile()).append("/").append(fileName).toString();
    }
    return "上传失败!";
  }

  /**
   * 以流的形式上传
   *
   * @param inputStream
   * @return
   * @throws QiniuException
   */
  public String uploadFileInputStream(InputStream inputStream, String fileName)
      throws QiniuException {
    Response response = this.uploadManager.put(inputStream, fileName, getUploadToken(), null, null);
    int retry = 0;
    while (response.needRetry() && retry < maxReTry) {
      log.info("当前操作需要进行重试,目前重试第{}次",retry+1);
      response = this.uploadManager.put(inputStream, fileName, getUploadToken(), null, null);
      retry++;
    }
    if (response.statusCode == successCode) {
      return new StringBuffer().append(QiNiuConfigBean.getProtocol())
          .append(QiNiuConfigBean.getCdnProfile()).append("/").append(fileName).toString();
    }
    return "上传失败!";
  }

  /**
   * 删除七牛云上的相关文件
   *
   * @param key
   * @return
   * @throws QiniuException
   */
  public String delete(String key) throws QiniuException {
    Response response = bucketManager.delete(QiNiuConfigBean.getBucket(), key);
    int retry = 0;
    //判断是否需要 重试 删除 且重试次数为3
    while (response.needRetry() && retry++ < maxReTry) {
      log.info("当前操作需要进行重试,目前重试第{}次",retry+1);
      response = bucketManager.delete(QiNiuConfigBean.getBucket(), key);
    }
    return response.statusCode == successCode ? "删除成功!" : "删除失败!";
  }


  /**
   * 获取上传凭证
   *
   * @return
   */
  private String getUploadToken() {
    return this.auth.uploadToken(QiNiuConfigBean.getBucket());
  }

  /**
   * 定义七牛云上传的相关策略
   */
  public StringMap getPutPolicy() {
    StringMap stringMap = new StringMap();
    stringMap.put("returnBody",
        "{\"key\":\"$(key)\",\"hash\":\"$(etag)\",\"bucket\":\"$(bucket)\",\"width\":$(imageInfo.width), \"height\":${imageInfo.height}}");
    return stringMap;
  }

  /**
   * 获取公共空间文件
   * @param fileKey  要下载的文件名
   * @return
   */
  public String getPublicFile(String fileKey) throws Exception{
    String encodedFileName = URLEncoder.encode(fileKey, "utf-8").replace("+", "%20");
    String url = String.format("%s%s/%s", QiNiuConfigBean.getProtocol(),QiNiuConfigBean.getCdnProfile(), encodedFileName);
    log.info("下载地址:{}", url);
    return url;
  }

  /**
   * 获取私有空间文件
   * @param fileKey 要下载的文件名
   * @return
   */
  public String getPrivateFile(String fileKey) throws Exception{
    String encodedFileName = URLEncoder.encode(fileKey, "utf-8").replace("+", "%20");
    String publicUrl = String.format("%s/%s", QiNiuConfigBean.getCdnProfile(), encodedFileName);
    //1小时,可以自定义链接过期时间
    long expireInSeconds = 3600;
    String privateUrl = auth.privateDownloadUrl(publicUrl, expireInSeconds);
    return privateUrl;
  }


  /**
   * MultipartFile 转file
   *
   * @param file
   * @return
   * @throws Exception
   */
  public File multipartFileToFile(MultipartFile file) throws Exception {

    File toFile = null;
    if (file.equals("") || file.getSize() <= 0) {
      file = null;
    } else {
      InputStream ins = null;
      ins = file.getInputStream();
      toFile = new File(file.getOriginalFilename());
      inputStreamToFile(ins, toFile);
      ins.close();
    }
    return toFile;
  }

  //获取流文件
  private void inputStreamToFile(InputStream ins, File file) {
    try {
      OutputStream os = new FileOutputStream(file);
      int bytesRead = 0;
      byte[] buffer = new byte[8192];
      while ((bytesRead = ins.read(buffer, 0, 8192)) != -1) {
        os.write(buffer, 0, bytesRead);
      }
      os.close();
      ins.close();
    } catch (Exception e) {
      e.printStackTrace();
    }
  }
}
(6)七牛云存储的简单使用就搞完了, 接下来咱们编写接口开始测试
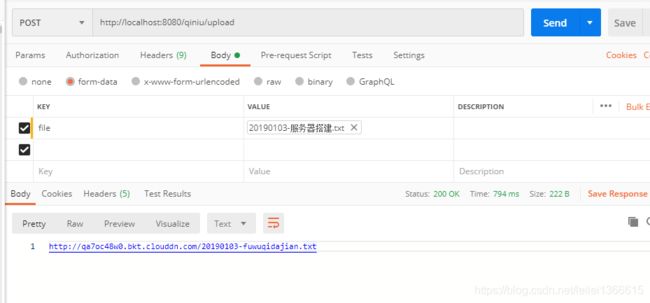
查看七牛上也有了对应的文件


![]()
测试文件删除

到七牛云查看 文件已经被删除了
放上我的全部测试接口
package com.leilei.controller;

import com.leilei.util.QiNiuSupport;
import com.qiniu.common.QiniuException;
import java.io.File;
import java.io.InputStream;
import javax.servlet.http.HttpServletResponse;
import org.springframework.beans.factory.annotation.Autowired;
import org.springframework.web.bind.annotation.GetMapping;
import org.springframework.web.bind.annotation.PathVariable;
import org.springframework.web.bind.annotation.PostMapping;
import org.springframework.web.bind.annotation.RequestMapping;
import org.springframework.web.bind.annotation.RequestParam;
import org.springframework.web.bind.annotation.RestController;
import org.springframework.web.multipart.MultipartFile;

/**
 * @author lei
 * @date 2020/5/12 18:05
 * @desc
 */
@RequestMapping("qiniu")
@RestController
public class QiNiuController {

  @Autowired
  private QiNiuSupport qiNiuSupport;

  /**
   * 根据文件名删除
   * @param name
   * @return
   * @throws QiniuException
   */
  @GetMapping("delete/{name}")
  public String delete(@PathVariable("name") String name) throws QiniuException {
    return qiNiuSupport.delete(name);
  }

  /**
   * 直接传输文件 到七牛
   * @param file
   * @return
   * @throws Exception
   */
  @PostMapping("upload")
  public String upload(@RequestParam("file")MultipartFile file) throws Exception {
    return qiNiuSupport.uploadFile(file);
  }

  /**
   * 以流的形式进行上传
   * @param file
   * @return
   * @throws Exception
   */
  @PostMapping("uploadByStream")
  public String uploadInputStream(@RequestParam("file")MultipartFile file) throws Exception {

    return qiNiuSupport.uploadFileInputStream(file);
  }


  /**
   * 直接传输文件 到七牛云 读取文件类型 传输 MIME 保存
   * @param file
   * @param fileName
   * @return
   * @throws Exception
   */
  @PostMapping("uploadMime/{fileName}")
  public String uploadMIme(@RequestParam("file")MultipartFile file, @PathVariable("fileName") String fileName) throws Exception {
    File file1 = qiNiuSupport.multipartFileToFile(file);
    return qiNiuSupport.uploadFileMimeType(file1, fileName);
  }


  /**
   * 七牛云文件下载
   *
   * @param filename 文件名
   * @return
   */
  @RequestMapping("/file/{filename}")
  public void download(@PathVariable("filename") String filename, HttpServletResponse response) {
    if (filename.isEmpty()) {
      return;
    }
    try {
      String privateFile = qiNiuSupport.getPublicFile(filename);
      response.sendRedirect(privateFile);
    } catch (Exception e) {
      e.printStackTrace();
    }
  }


}
至于文件上传的时候,是选择根据文件名自定获取存储的名字 还是根据传入参数来设定 可根据项目需求来定 汉字拼音工具我已补充填入项目中了。
至于为什么要汉字转拼音

如果不转拼音 文件名与文件链接就不一致了 那么删除时候 必须根据 存储的名字 那查看的时候 又是一串转码符号链接,,,,,,感觉不统一

附上汉字转拼音
依赖
      com.belerweb
      pinyin4j
      2.5.0
package com.leilei.util;

import net.sourceforge.pinyin4j.PinyinHelper;
import net.sourceforge.pinyin4j.format.HanyuPinyinCaseType;
import net.sourceforge.pinyin4j.format.HanyuPinyinOutputFormat;
import net.sourceforge.pinyin4j.format.HanyuPinyinToneType;
import net.sourceforge.pinyin4j.format.exception.BadHanyuPinyinOutputFormatCombination;

/**
 * @author lei
 * @date 2020/5/13 11:02
 * @desc
 */
public class Chines2PingUtils {

  public static String getFirstSpell(String chinese) {
    StringBuffer pybf = new StringBuffer();
    char[] arr = chinese.toCharArray();
    HanyuPinyinOutputFormat defaultFormat = new HanyuPinyinOutputFormat();
    defaultFormat.setCaseType(HanyuPinyinCaseType.LOWERCASE);
    defaultFormat.setToneType(HanyuPinyinToneType.WITHOUT_TONE);

    for (int i = 0; i < arr.length; i++) {
      if (arr[i] > 128) {
        try {
          String[] temp = PinyinHelper.toHanyuPinyinStringArray(arr[i], defaultFormat);
          if (temp != null) {
            pybf.append(temp[0].charAt(0));
          }
        } catch (BadHanyuPinyinOutputFormatCombination e) {
          e.printStackTrace();
        }
      } else {
        pybf.append(arr[i]);
      }
    }
    return pybf.toString().replaceAll("\\W", "").trim().toUpperCase();
  }

  /**
   * 获取汉字串拼音,英文字符不变
   *
   * @param chinese
   * @return
   */
  public static String getFullSpell(String chinese) {
    StringBuffer pybf = new StringBuffer();
    char[] arr = chinese.toCharArray();
    HanyuPinyinOutputFormat defaultFormat = new HanyuPinyinOutputFormat();
    defaultFormat.setCaseType(HanyuPinyinCaseType.LOWERCASE);
    defaultFormat.setToneType(HanyuPinyinToneType.WITHOUT_TONE);
    for (int i = 0; i < arr.length; i++) {
      if (arr[i] > 128) {
        try {
          pybf.append(PinyinHelper.toHanyuPinyinStringArray(arr[i], defaultFormat)[0]);
        } catch (BadHanyuPinyinOutputFormatCombination e) {
          e.printStackTrace();
        }
      } else {
        pybf.append(arr[i]);
      }
    }
    return pybf.toString();
  }

  public static void main(String[] args) {
    String fullSpell = Chines2PingUtils.getFullSpell("aaaaa.txt");
    System.out.println(fullSpell);
  }
}
到这里 七牛云相关操作就结束了 !!由于官网文档很全面 所以操作起来还是很容易上手 且简单的。
附上项目源码:springoot-qiniu
(三)springboot 文件上传下载 本地
springboot 中 对文件进行上传下载删除 基于本地或服务器路径,不借助第三方工具(win 就放在某盘符中 例如 D://img | Linux 就放在某一路径下 例如 /webtest/a/c/file/
即通过url 访问磁盘中的文件
(1)所需依赖
主要是web支持以及 lombok 简化pojo类
      org.springframework.boot
      spring-boot-starter-web


      org.projectlombok
      lombok
      true
(2)添加配置
yml配置
#自定义 file 访问配置 以及下载上传地址
file:
urlPath: /lei
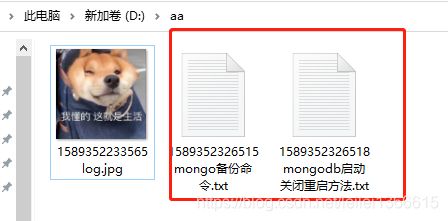
#上传路径 win D://aa/ linux: /web/c/a/d
uploadPath: D://aa/
spring:
# 文件上传下载配置
servlet:
multipart:
# 单个文件最大限制 10M
max-file-size: 10MB
# 上传总文件总共 100Mb
max-request-size: 100MB
自定义bean 解析 yml,其他任何需要使用地方统一调用bean进行获取
需要在启动类上添加 @EnableConfigurationProperties 注解
/**
 * @author lei
 * @date 2020/5/12 14:18
 * @desc
 */
@ConfigurationProperties(prefix = "file")
@Component
public class FileConfigBean {
  /**图片上传后 需加入的访问前缀*/
  private static String urlPath;
  /**图片上传的路径*/
  private static String uploadPath;

  public static String getUrlPath() {
    return urlPath;
  }

  public  void setUrlPath(String urlPath) {
    FileConfigBean.urlPath = urlPath;
  }

  public static String getUploadPath() {
    return uploadPath;
  }

  public  void setUploadPath(String uploadPath) {
    FileConfigBean.uploadPath = uploadPath;
  }
}
添加图片访问资源解析
定义一个类 实现 WebMvcConfigurer 复写其中的addResourceHandlers 方法
/**
 * @author lei
 * @date 2020/5/12 14:17
 * @desc 添加虚拟映射路径  以   FileConfigBean.getUrlPath() + "/**" 访问的静态资源 都会去  "file:"+ FileConfigBean.getUploadPath() 寻找
 * 若部署在linux 中 需注意更改 FileConfigBean.getUploadPath() 的路径  linux 上可没有 CDEFG 盘符  exmaple: file:/home/app/
 */
@Configuration
public class FileConfig implements WebMvcConfigurer {

  @Override
  public void addResourceHandlers(ResourceHandlerRegistry registry) {
    //可以添加多个   registry.
    registry.addResourceHandler(FileConfigBean.getUrlPath() + "/**")
        .addResourceLocations("file:"+ FileConfigBean.getUploadPath());
  }
}
(3)上传下载删除工具类编写
上传主要是通过文件上传地址和传入的文件 拼接 生成一个file 然后判断父目录是否存在 然后写入即可
上传时源文件名拼接当前时间戳 作为名字
至于删除则也是 传入相应文件名 然后 拼接上 自定义的file 上传路径 判断是否存在 存在则删除
package com.leilei.util;

import com.leilei.config.FileConfigBean;
import java.io.BufferedInputStream;
import java.io.File;
import java.io.FileInputStream;
import java.io.IOException;
import java.io.OutputStream;
import java.util.List;
import javax.servlet.http.HttpServletResponse;
import lombok.extern.slf4j.Slf4j;
import org.springframework.web.multipart.MultipartFile;

/**
 * @author lei
 * @date 2020/5/12 14:49
 * @desc 文件上传下载工具类
 */
@Slf4j
public class FileUtils {

  /**
   * 上传单个文件
   *
   * @param file
   * @return
   */
  public static Boolean uploadOne(MultipartFile file) {
    if (file.isEmpty()) {
      return false;
    }
    Long time = System.currentTimeMillis();
    String fileName = time + file.getOriginalFilename();
    int size = (int) file.getSize() / 1024;
    log.info("当前上传文件名:{},上传时间戳:{},保存后文件名:{},-->文件大小为:{}KB", file.getOriginalFilename(), time,
        fileName, size);
    File dest = new File(FileConfigBean.getUploadPath() + "/" + fileName);
    //判断文件父目录是否存在 不存在则创建
    if (!dest.getParentFile().exists()) {
      dest.getParentFile().mkdir();
    }
    try {
      file.transferTo(dest);
      return true;
    } catch (IOException e) {
      e.printStackTrace();
      log.error("单文件上传失败");
      return false;
    }
  }

  /**
   * 批量上传  实质就是 单文件上传 循环版罢了
   *
   * @param files
   * @return
   */
  public static Boolean uploadMore(List files) {

    if (files != null && files.size() > 0) {
      for (int i = 0; i < files.size(); i++) {
        MultipartFile file = files.get(i);
        if (!file.isEmpty()) {
          Long time = System.currentTimeMillis();
          String fileName = time + file.getOriginalFilename();
          int size = (int) file.getSize() / 1024;
          log.info("当前上传文件名:{},上传时间戳:{},保存后文件名:{},-->文件大小为:{}KB", file.getOriginalFilename(), time,
              fileName, size);
          File dest = new File(FileConfigBean.getUploadPath() + "/" + fileName);
          //判断文件父目录是否存在 不存在则创建
          if (!dest.getParentFile().exists()) {
            dest.getParentFile().mkdir();
          }
          try {
            file.transferTo(dest);
            continue;
          } catch (IOException e) {
            e.printStackTrace();
            log.error("第{}个文件上传失败", i + 1);
            continue;
          }
        }
      }
      return true;
    }
    return false;
  }

  /**
   * 文件下载
   *
   * @param res
   * @param fileName 要下载的文件名
   * @return
   */
  public static void download(HttpServletResponse res, String fileName) {
    //响应头设置
    res.setHeader("content-type", "application/octet-stream");
    res.setContentType("application/octet-stream");
    res.setHeader("Content-Disposition", "attachment;filename=" + fileName);
    byte[] buff = new byte[1024];
    BufferedInputStream bis = null;
    OutputStream os = null;
    try {
      os = res.getOutputStream();
      bis = new BufferedInputStream(new FileInputStream(new File(FileConfigBean.getUploadPath()
          + fileName)));
      int i = bis.read(buff);
      while (i != -1) {
        os.write(buff, 0, buff.length);
        os.flush();
        i = bis.read(buff);
      }
      log.info("文件下载成功:{}", fileName);

    } catch (IOException e) {
      e.printStackTrace();
    } finally {
      if (bis != null) {
        try {
          bis.close();
        } catch (IOException e) {
          e.printStackTrace();
        }
      }
    }
  }

  /**
   * 文件删除
   *
   * @param fileName 要删除的文件名
   * @return
   */
  public static Boolean deleteFile(String fileName) {
    File file = new File(FileConfigBean.getUploadPath() + fileName);
    if (file.exists()) {
      return file.delete();
    }
    return false;
  }
}
(4)开始测试


批量上传

测试删除


下载我这里就不测试了 ,后续会放出源码
发现问题

这里配置了 /lei/** 的静态资源请求 都会去 file:D://aa/ 寻找 那么我咋去访问项目中 例如 static下 存放的图片或者静态资源呢
我们可以继续在 下边添加 registry
也可以在yml中添加一些配置
	#spring下
  # url  以 /** 开头的静态资源访问都会 到 resource 下 配置的地方去找
 mvc:
   static-path-pattern: /**
 resources:
   static-locations: classpath:/META-INF/resources/,classpath:/resources/, classpath:/static/, classpath:/public/, file:${file.uploadPath}
访问项目中静态资源

附上我的测试接口代码
package com.leilei.controller;

import com.leilei.util.FileUtils;
import java.util.List;
import javax.servlet.http.HttpServletRequest;
import javax.servlet.http.HttpServletResponse;
import org.springframework.web.bind.annotation.GetMapping;
import org.springframework.web.bind.annotation.PathVariable;
import org.springframework.web.bind.annotation.PostMapping;
import org.springframework.web.bind.annotation.RequestParam;
import org.springframework.web.bind.annotation.RestController;
import org.springframework.web.multipart.MultipartFile;
import org.springframework.web.multipart.MultipartHttpServletRequest;

/**
 * @author lei
 * @date 2020/5/12 14:48
 * @desc
 */
@RestController
public class FileController {


  /**
   * 实现单个文件上传
   */
  @PostMapping("uploadOne")
  public Boolean fileUpload(@RequestParam("file") MultipartFile file) {
    return FileUtils.uploadOne(file);
  }

  /**
   * 多文件上传
   */
  @PostMapping("uploadMore")
  public Boolean fileUploadMore(HttpServletRequest request) {
    List files = ((MultipartHttpServletRequest) request)
        .getFiles("files");
    return FileUtils.uploadMore(files);
  }

  /**
   * 文件下载
   *
   * @param res
   * @param fileName 要下載的文件名
   */
  @GetMapping("download/{fileName}")
  public void testDownload(HttpServletResponse res, @PathVariable("fileName") String fileName) {
    FileUtils.download(res, fileName);
  }

  /**
   * 文件删除
   *
   * @param fileName 要删除的文件名
   * @return
   */
  @GetMapping("delete/{fileName}")
  public Boolean delete(@PathVariable("fileName") String fileName) {
    return FileUtils.deleteFile(fileName);
  }
}
springboot 本地中 文件上传下载 就完成了 !
项目中仍存在 上传中文文件名 删除 找不到情况 可选择将文件名 汉字转拼音后再上传
      com.belerweb
      pinyin4j
      2.5.0
package com.leilei.util;

import net.sourceforge.pinyin4j.PinyinHelper;
import net.sourceforge.pinyin4j.format.HanyuPinyinCaseType;
import net.sourceforge.pinyin4j.format.HanyuPinyinOutputFormat;
import net.sourceforge.pinyin4j.format.HanyuPinyinToneType;
import net.sourceforge.pinyin4j.format.exception.BadHanyuPinyinOutputFormatCombination;

/**
 * @author lei
 * @date 2020/5/13 11:02
 * @desc
 */
public class Chines2PingUtils {

  public static String getFirstSpell(String chinese) {
    StringBuffer pybf = new StringBuffer();
    char[] arr = chinese.toCharArray();
    HanyuPinyinOutputFormat defaultFormat = new HanyuPinyinOutputFormat();
    defaultFormat.setCaseType(HanyuPinyinCaseType.LOWERCASE);
    defaultFormat.setToneType(HanyuPinyinToneType.WITHOUT_TONE);

    for (int i = 0; i < arr.length; i++) {
      if (arr[i] > 128) {
        try {
          String[] temp = PinyinHelper.toHanyuPinyinStringArray(arr[i], defaultFormat);
          if (temp != null) {
            pybf.append(temp[0].charAt(0));
          }
        } catch (BadHanyuPinyinOutputFormatCombination e) {
          e.printStackTrace();
        }
      } else {
        pybf.append(arr[i]);
      }
    }
    return pybf.toString().replaceAll("\\W", "").trim().toUpperCase();
  }

  /**
   * 获取汉字串拼音,英文字符不变
   *
   * @param chinese
   * @return
   */
  public static String getFullSpell(String chinese) {
    StringBuffer pybf = new StringBuffer();
    char[] arr = chinese.toCharArray();
    HanyuPinyinOutputFormat defaultFormat = new HanyuPinyinOutputFormat();
    defaultFormat.setCaseType(HanyuPinyinCaseType.LOWERCASE);
    defaultFormat.setToneType(HanyuPinyinToneType.WITHOUT_TONE);
    for (int i = 0; i < arr.length; i++) {
      if (arr[i] > 128) {
        try {
          pybf.append(PinyinHelper.toHanyuPinyinStringArray(arr[i], defaultFormat)[0]);
        } catch (BadHanyuPinyinOutputFormatCombination e) {
          e.printStackTrace();
        }
      } else {
        pybf.append(arr[i]);
      }
    }
    return pybf.toString();
  }

  public static void main(String[] args) {
    String fullSpell = Chines2PingUtils.getFullSpell("aaaaa.txt");
    System.out.println(fullSpell);
  }
}
附上项目源码:springboot-file-upload-download