一键部署java web应用(linux)
先看看部署web应用的步骤
1.本地打包
2.上传压缩包到服务器
3.停止tomcat
4.删除旧版本web应用,解压缩新版本
5.启动tomcat
每次web应用更新,都要重复上面这几个步骤, 重复的步骤,交给计算机去完成就可以了。
1.本地打包
import java.io.File;
import java.io.FileInputStream;
import java.io.FileOutputStream;
import java.io.IOException;
import java.io.InputStream;
import java.util.List;

import org.apache.tools.zip.ZipEntry;
import org.apache.tools.zip.ZipOutputStream;

public class ZipUtil {
	private static byte[] bytes = new byte[1024];

	/**
	 * 压缩zip包
	 *
	 * @param zipFileName
	 *            zip包文件名
	 * @param sourceFiles
	 *            要压缩的文件或目录
	 * @throws IOException
	 */
	public static void zipFile(String zipFileName, List sourceFiles)
			throws IOException {
		if (zipFileName.endsWith(".zip") || zipFileName.endsWith(".ZIP")) {
			ZipOutputStream zipOut = new ZipOutputStream(new FileOutputStream(
					new File(zipFileName)));
			zipOut.setEncoding("GBK");

			for (File file : sourceFiles) {
				handlerFile(zipFileName, zipOut, file, "");
			}

			zipOut.close();
		} else {
			throw new IOException("压缩包后缀名不是.zip");
		}
	}

	/**
	 *
	 * @param zip
	 *            压缩的目的地址
	 * @param zipOut
	 * @param srcFile
	 *            被压缩的文件信息
	 * @param path
	 *            在zip中的相对路径
	 * @throws IOException
	 */
	private static void handlerFile(String zip, ZipOutputStream zipOut,
			File srcFile, String path) throws IOException {
		if (!"".equals(path) && !path.endsWith(File.separator)) {
			path += File.separator;
		}
		if (srcFile.isDirectory()) {
			File[] files = srcFile.listFiles();
			if (files.length == 0) {
				zipOut.putNextEntry(new ZipEntry(path + srcFile.getName()
						+ File.separator));
				zipOut.closeEntry();
			} else {
				for (File file : files) {
					handlerFile(zip, zipOut, file, path + srcFile.getName());
				}
			}
		} else {
			System.out.println("正在压缩  " + srcFile.getName() + "...");
			InputStream in = new FileInputStream(srcFile);
			zipOut.putNextEntry(new ZipEntry(path + srcFile.getName()));
			int len = 0;
			while ((len = in.read(bytes)) > 0) {
				zipOut.write(bytes, 0, len);
			}
			in.close();
			zipOut.closeEntry();
		}
	}

}
2.上传压缩包到服务器
上传服务有两种方法
第一种是在linux上搭建ftp服务端,用java实现上传文件到ftp服务器,ftp服务器搭建详见linux搭建ftp服务器,上传文件百度也能找到教程,本文只介绍第二种方法
第二种:
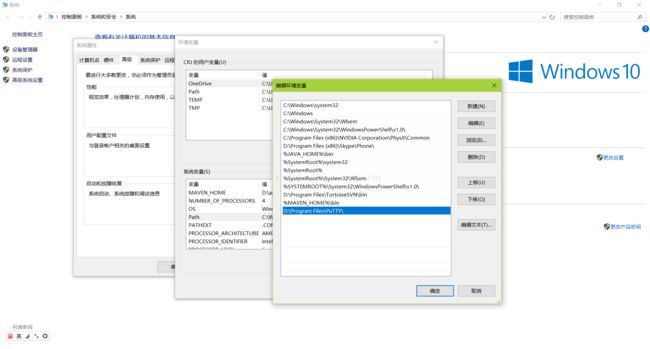
安装putty(下载),环境变量加上putty的安装路径
然后就可以在dos命令窗口使用putty的上传命令
pscp -pw 123456 E:\update.zip [email protected]:/usr/local/apache-tomcat-7.0.82
123456是服务器的登录密码
E:\update.zip 是要上传的文件
root 是服务器的登录用户名
192.168.1.100 是服务器的ip
/usr/local/apache-tomcat-7.0.82 把文件上传到服务器上这个目录下
接下来就是用java调用上传文件命令来上传文件,第一次用要先在dos命令窗口执行一次,会让你输入密码,以后再执行这个命令就可以直接上传文件,就可以用java程序调用
import java.io.BufferedReader;
import java.io.IOException;
import java.io.InputStreamReader;

/**
 * 执行cmd命令
 *
 */
public class CmdExecutor {

	public String runCmd(String cmd) throws IOException {
		Runtime runtime = Runtime.getRuntime();
		String line = null;
		StringBuilder outMsg = new StringBuilder();
		Process process = runtime.exec(cmd);
		BufferedReader reader = new BufferedReader(new InputStreamReader(
				process.getInputStream(), "gbk"));

		while ((line = reader.readLine()) != null) {
			outMsg.append(line + "\n");
		}

		return outMsg.toString();
	}

	public String runCmd(String[] cmds) throws IOException {
		Runtime runtime = Runtime.getRuntime();
		String line = null;
		StringBuilder outMsg = new StringBuilder();
		Process process = runtime.exec(cmds);
		BufferedReader reader = new BufferedReader(new InputStreamReader(
				process.getInputStream(), "gbk"));

		while ((line = reader.readLine()) != null) {
			outMsg.append(line + "\n");
		}

		return outMsg.toString();
	}

}
3.停止tomcat,删除旧版本web应用,解压缩新版本,启动tomcat都要远程执行linux命令
可以在linux上写一个脚本删除旧版本web应用,解压缩新版本,删除压缩包,然后远程执行脚本
reload.sh
rm -rf /usr/local/apache-tomcat-7.0.82/webapps/XPRO/WEB-INF/classes
rm -rf /usr/local/apache-tomcat-7.0.82/webapps/XPRO/WEB-INF/jsp
unzip -n /usr/local/apache-tomcat-7.0.82/update.zip -d /usr/local/apache-tomcat-7.0.82/webapps/XPRO/WEB-INF
rm -rf /usr/local/apache-tomcat-7.0.82/update.zip
import java.io.IOException;
import java.io.InputStream;
import java.io.UnsupportedEncodingException;
import java.nio.charset.Charset;

import ch.ethz.ssh2.ChannelCondition;
import ch.ethz.ssh2.Connection;
import ch.ethz.ssh2.Session;
import ch.ethz.ssh2.StreamGobbler;

/**
 * 远程执行Linux命令
 *
 */
public class RemoteShellExecutor {

	private Connection conn;
	/**
	 * 远程服务器ip
	 */
	private String ip;
	/**
	 * 远程服务器端口
	 */
	private int port;
	/**
	 * 用户名
	 */
	private String userName;
	/**
	 * 密码
	 */
	private String password;
	/**
	 * 是否已登录
	 */
	private boolean isLogin;
	/**
	 * 编码格式
	 */
	private String charset = Charset.defaultCharset().toString();

	private static final int TIME_OUT = 1000 * 5 * 60;

	/**
	 *
	 * @param ip
	 *            服务器ip
	 * @param port
	 *            端口
	 * @param userName
	 *            用户名
	 * @param password
	 *            密码
	 */
	public RemoteShellExecutor(String ip, int port, String userName,
			String password) {
		this.ip = ip;
		this.port = port;
		this.userName = userName;
		this.password = password;
	}

	/**
	 * 登录
	 *
	 * @return true:登录成功 false:登录失败
	 * @throws IOException
	 */
	public boolean login() throws IOException {
		conn = new Connection(ip, port);
		conn.connect();
		isLogin = conn.authenticateWithPassword(userName, password);
		return isLogin;
	}

	/**
	 * 执行命令 如果要执行多条命令,要把这几条命令拼成一个字符串,每条命令后面加回车符"\n",
	 * 因为打开一个Session只能执行一次命令,每次都会从根目录下执行
	 *
	 * @param cmds
	 *            要执行的命令
	 * @return 执行结果
	 * @throws Exception
	 */
	public String exec(String cmds) throws Exception {
		if (!this.isLogin) {
			if (!this.login()) {
				new Exception("登录失败-->" + ip + ":" + port);
			}
		}

		InputStream stdOut = null;
		String outMsg = "";
		try {
			Session session = conn.openSession();
			session.execCommand(cmds);

			session.waitForCondition(ChannelCondition.EXIT_STATUS, TIME_OUT);

			if (session.getExitStatus() == 0) {
				stdOut = new StreamGobbler(session.getStdout());
				outMsg = processStream(stdOut, charset);
			} else {
				stdOut = new StreamGobbler(session.getStderr());
				outMsg = processStream(stdOut, charset);
			}
		} finally {
			if (stdOut != null) {
				stdOut.close();
			}
		}
		return outMsg;
	}

	public void closeConnection() {
		if (conn != null) {
			conn.close();
		}
	}

	/**
	 * @param in
	 * @param charset
	 * @return
	 * @throws IOException
	 * @throws UnsupportedEncodingException
	 */
	private String processStream(InputStream in, String charset)
			throws Exception {
		byte[] buf = new byte[1024];
		StringBuilder sb = new StringBuilder();
		while (in.read(buf) != -1) {
			sb.append(new String(buf, charset));
		}
		return sb.toString();
	}

	public boolean isLogin() {
		return isLogin;
	}

	public void setLogin(boolean isLogin) {
		this.isLogin = isLogin;
	}

}
