spring cloud gateway+nacos+多模块下整合swagger2的接口文档
ps:纯属个人学习笔记记录,加深理解
前言:微服务涉及网关+多个子模块服务,想要经过网关统一访问swagger2界面,不需要一个个在子服务中进行配置,本文默认你已经配置了springcloudgateway+nacos
springcloud 搭建项目略过
项目大体结构
	gateway ——网关服务  端口9000
	order —— 订单服务  端口8086
	product ——商品服务  端口8085
一、简约版
1.引入依赖
            com.spring4all
            swagger-spring-boot-starter
            1.9.0.RELEASE
ps:上面springboot 集成swagger2 的依赖跟如下swagger 2本身的依赖功能上是一样的
            io.springfox
            springfox-swagger2
            2.9.2


            io.springfox
            springfox-swagger-ui
            2.9.2
2.首先先给子服务product模块上配置
(1)如下是给product服务启动类加上@EnableSwagger2Doc注解
@EnableSwagger2Doc
@SpringCloudApplication
public class OrderApplication {

    public static void main(String[] args) {
        SpringApplication.run(OrderApplication.class, args);
    }
}
(2)配置bootstrap.yml文件
如下是product服务bootstrap.yml 文件加上,swagger要扫描到的有swagger Api声明的地方(即有@Api(value = “商品接口”, tags = “商品管理” ))
swagger:
  base-package: com.imooc2.product.controller
(3)创建ProductInfoController
controller层是swagger Api注解部分,就是上面包要扫到的地方,详细可搜索swagger使用
@Api(value = "商品接口", tags = "商品管理" )
@RequestMapping("/product")
@RestController
public class ProductInfoController {

    @Autowired
    private ProductService productService;

    @Autowired
    private CategoryService categoryService;

    @Autowired
    private ProductInfoRepository productInfoRepository;

    //@ApiComment(value = "获取所有产品")
    @ApiOperation(value = "获取所有产品",httpMethod = "Get")
    @GetMapping("/getAll")
    public List getUser() {
       //业务代码
    }
  }
(4)访问http://localhost:8085/swagger-ui.html最终效果图如下

(5) 因为这个是简洁版的swaager配置所以是不需要SwaggerConfig这个类相关的配置的,请配了这个类的同学自行先注释掉,后面会讲到关于使用SwaggerConfig这个类相关怎么配。
3.同理操作子服务order模块
省略…
4.给网关服务gateway配置(重中之重)
(1)注意:
gateway启动类不用上swagger的注解,因为springcloud gateway是基于webflux开发的,swaager目前我用的这个1.9版本是不支持webflux的。
如果配有shiro或者security之类的权限的框架的同学记得给以下几个路径通过权限,以security为例
.antMatchers(
					 "/swagger-ui.html",
					 "/swagger-resources/**",
					 "/v2/api-docs").permitAll()
(2)创建MySwaggerResourceProvider 类
因为Swagger暂不支持webflux,所以Gateway里不能配置SwaggerConfig,可以通过实现 SwaggerResourcesProvider方法获取各个服务的Api-doc文档(即SwaggerResources)
@Component
@Primary
@AllArgsConstructor
public class MySwaggerResourceProvider implements SwaggerResourcesProvider {
    public static final String API_URI = "/v2/api-docs";
    private final RouteLocator routeLocator;
    private final GatewayProperties gatewayProperties;

    @Override
    public List get() {
        List resources = new ArrayList<>();
        List routes = new ArrayList<>();
        //取出gateway的route
        routeLocator.getRoutes().subscribe(route -> routes.add(route.getId()));
         //结合配置的route-路径(Path),和route过滤,只获取有效的route节点
        gatewayProperties.getRoutes().stream().filter(routeDefinition -> routes.contains(routeDefinition.getId()))
                .forEach(routeDefinition -> routeDefinition.getPredicates().stream()
                        .filter(predicateDefinition -> ("Path").equalsIgnoreCase(predicateDefinition.getName()))
                        .forEach(predicateDefinition -> resources.add(swaggerResource(routeDefinition.getId(),
                                predicateDefinition.getArgs().get(NameUtils.GENERATED_NAME_PREFIX + "0")
                                        .replace("/**", API_URI)))));
        return resources;
    }

    private SwaggerResource swaggerResource(String name, String location) {
        SwaggerResource swaggerResource = new SwaggerResource();
        swaggerResource.setName(name);
        swaggerResource.setLocation(location);
        swaggerResource.setSwaggerVersion("2.0");
        return swaggerResource;
    }

}
(3) 创建SwaggerHandler类
Swagger-ui需要依赖的一些接口
@RestController
public class SwaggerHandler {
    @Autowired(required = false)
    private SecurityConfiguration securityConfiguration;
    @Autowired(required = false)
    private UiConfiguration uiConfiguration;
    private final SwaggerResourcesProvider swaggerResources;

    @Autowired
    public SwaggerHandler(SwaggerResourcesProvider swaggerResources) {
        this.swaggerResources = swaggerResources;
    }


    @GetMapping("/swagger-resources/configuration/security")
    public Mono> securityConfiguration() {
        return Mono.just(new ResponseEntity<>(
                Optional.ofNullable(securityConfiguration).orElse(SecurityConfigurationBuilder.builder().build()), HttpStatus.OK));
    }

    @GetMapping("/swagger-resources/configuration/ui")
    public Mono> uiConfiguration() {
        return Mono.just(new ResponseEntity<>(
                Optional.ofNullable(uiConfiguration).orElse(UiConfigurationBuilder.builder().build()), HttpStatus.OK));
    }

    @GetMapping("/swagger-resources")
    public Mono swaggerResources() {
        return Mono.just((new ResponseEntity<>(swaggerResources.get(), HttpStatus.OK)));
    }

    @GetMapping("/")
    public Mono swaggerResourcesN() {
        return Mono.just((new ResponseEntity<>(swaggerResources.get(), HttpStatus.OK)));
    }

    @GetMapping("/csrf")
    public Mono swaggerResourcesCsrf() {
        return Mono.just((new ResponseEntity<>(swaggerResources.get(), HttpStatus.OK)));
    }

}
(4)gateway配置文件
gateway项目上的配置文件bootstrap.yml或者nacos上gateway的配置文件需要加上服务路径,本人是记在nacos的gateway配置文件里,如下所示

spring:
  cloud:
    gateway:
      discovery:
        locator:
          enabled: true
      routes:
        - id: ${imooc.service.imooc-product}
          uri: lb://${imooc.service.imooc-product}
          predicates:
            - Path=/${imooc.service.imooc-product}/**
          filters:
            - name: RequestRateLimiter
              args:
                # 使用SpEL按名称引用bean
                #key-resolver: '#{@remoteAddrKeyResolver}'
                # 允许用户每秒处理多少个请求
                redis-rate-limiter.replenishRate: 10
                # 允许在一秒钟内完成的最大请求数
                redis-rate-limiter.burstCapacity: 20
            - StripPrefix=1
        - id: ${imooc.service.imooc-order}
          uri: lb://${imooc.service.imooc-order}
          predicates:
            - Path=/${imooc.service.imooc-order}/**
          filters:
            - name: RequestRateLimiter
              args:
                # 使用SpEL按名称引用bean
                #key-resolver: '#{@remoteAddrKeyResolver}'
                # 允许用户每秒处理多少个请求
                redis-rate-limiter.replenishRate: 10
                # 允许在一秒钟内完成的最大请求数
                redis-rate-limiter.burstCapacity: 20
            - StripPrefix=1
# 需要配置的服务名
imooc:
  service:
    imooc-product: product
    imooc-order: order
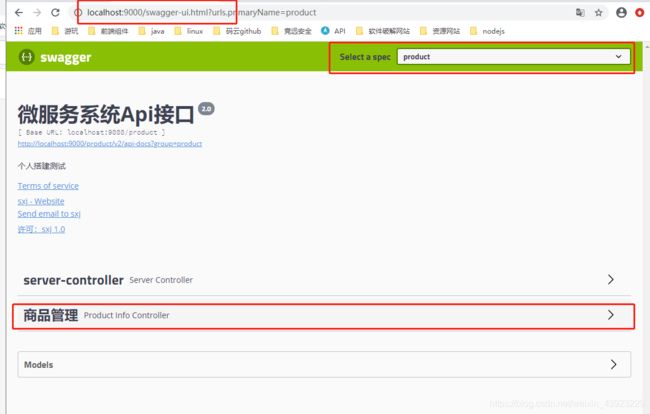
(5) 启动服务,访问网关的 http://localhost:9000/swagger-ui.html 效果如下