9.zabbix学习笔记:zabbix最新版3.0.4安装
zabbix最新版3.0.4安装
1.简介
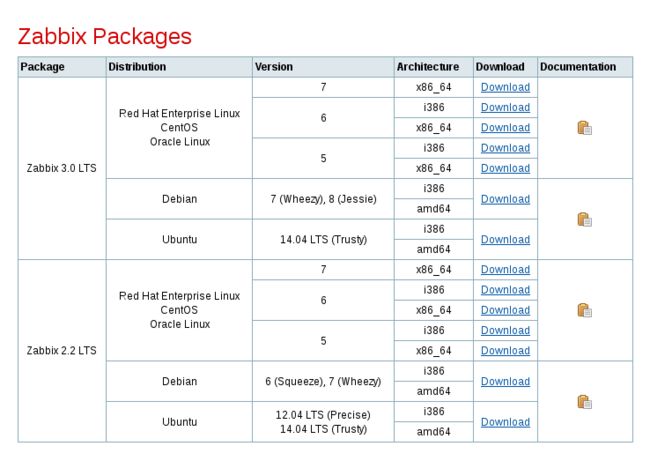
zabbix作为一款非常优秀的开源监控软件,已经成为了很多中小型企业甚至大型企业的监控首选监控系统。zabbix的发展过程也经历了多个版本的更迭。下面列举出了zabbix的版本以及对应操作系统的信息:
相比较zabbix2.x系列,3.x在功能的完善上和前端界面显示上都有了非常明显的提高:
1.全新的前端设计,相比较2.x藏蓝色灰色的界面,深蓝色和白色显然更加具有商业风格。用户还可以自己定义screen,map,可以设置为私有,公共,分享给其他用户。
2.通信认证加密,可以使用ssl进行通信认证。数据的传输更加安全。
3.趋势预测分析,这个算是非常重要的一个功能,根据当前一小时的数据可以预测未来十个小时后的状态。这个可以及时的提醒相关工作人员做好预防工作。
4.进程级别的cpu监控,之前版本对于cpu都是对整个系统进行监控的。3.x细化了颗粒度,可以对进程级别的cpu进行监控。
5.性能优化。改进了history cache回收
2.安装环境:
1.软件组成:
1).httpd或nginx前端服务器;
2).mysqld数据存储;
3).php组件;
4).zabbix源码包;
2.系统信息:
redhat 7.0 64位
关闭防火墙和selinux
[root@localhost sbin]# iptables -F   #关闭防火墙
[root@localhost sbin]# setenforce 0   #关闭selinux
3.具体安装步骤
关于zabbix3.0.4的源码安装步骤如下:
1.安装httpd前端服务器(如果是nginx也可以):
[root@localhost yum.repos.d]# yum install httpd -y2.安装mysqld服务器
在redhat7.0的版本中mysql被替换成了mariadb数据库:
root@localhost yum.repos.d]# yum install mariadb-server -y1.开启mariadb然后进行初始化:
[root@localhost yum.repos.d]# systemctl start mariadb
[root@localhost yum.repos.d]# systemctl status mariadb
mariadb.service - MariaDB database server
   Loaded: loaded (/usr/lib/systemd/system/mariadb.service; disabled)
   Active: active (running) since Tue 2016-08-23 10:37:45 CST; 5s ago
  Process: 42879 ExecStartPost=/usr/libexec/mariadb-wait-ready $MAINPID (code=exited, status=0/SUCCESS)
  Process: 42798 ExecStartPre=/usr/libexec/mariadb-prepare-db-dir %n (code=exited, status=0/SUCCESS)
 Main PID: 42878 (mysqld_safe)
   CGroup: /system.slice/mariadb.service
           ├─42878 /bin/sh /usr/bin/mysqld_safe --basedir=/usr
           └─43035 /usr/libexec/mysqld --basedir=/usr --datadir=/var/lib/mysql --plugin-dir=/usr/lib64...

Aug 23 10:37:43 localhost.localdomain mariadb-prepare-db-dir[42798]: The latest information about Mar....
Aug 23 10:37:43 localhost.localdomain mariadb-prepare-db-dir[42798]: You can find additional informat...:
Aug 23 10:37:43 localhost.localdomain mariadb-prepare-db-dir[42798]: http://dev.mysql.com
Aug 23 10:37:43 localhost.localdomain mariadb-prepare-db-dir[42798]: Support MariaDB development by b...m
Aug 23 10:37:43 localhost.localdomain mariadb-prepare-db-dir[42798]: SkySQL Ab. You can contact us ab....
Aug 23 10:37:43 localhost.localdomain mariadb-prepare-db-dir[42798]: Alternatively consider joining o...:
Aug 23 10:37:43 localhost.localdomain mariadb-prepare-db-dir[42798]: http://mariadb.com/kb/en/contrib.../
Aug 23 10:37:43 localhost.localdomain mysqld_safe[42878]: 160823 10:37:43 mysqld_safe Logging to '/v...'.
Aug 23 10:37:43 localhost.localdomain mysqld_safe[42878]: 160823 10:37:43 mysqld_safe Starting mysql...ql
Aug 23 10:37:45 localhost.localdomain systemd[1]: Started MariaDB database server.
Hint: Some lines were ellipsized, use -l to show in full.
2.mariadb初始化,设置好mysql的初始root密码,其他的选项可以直接回车默认:
[root@localhost yum.repos.d]# mysql_secure_installation
/usr/bin/mysql_secure_installation: line 379: find_mysql_client: command not found

NOTE: RUNNING ALL PARTS OF THIS SCRIPT IS RECOMMENDED FOR ALL MariaDB
      SERVERS IN PRODUCTION USE!  PLEASE READ EACH STEP CAREFULLY!

In order to log into MariaDB to secure it, we'll need the current
password for the root user.  If you've just installed MariaDB, and
you haven't set the root password yet, the password will be blank,
so you should just press enter here.

Enter current password for root (enter for none):
OK, successfully used password, moving on...

Setting the root password ensures that nobody can log into the MariaDB
root user without the proper authorisation.

Set root password? [Y/n] y
New password:
Re-enter new password:
Password updated successfully!
3.登陆mariadb数据库创建zabbix库并且对zabbix-server进行授权操作:
[root@localhost yum.repos.d]# mysql -uroot -p
Enter password:
Welcome to the MariaDB monitor.  Commands end with ; or \g.
Your MariaDB connection id is 10
Server version: 5.5.35-MariaDB MariaDB Server

Copyright (c) 2000, 2013, Oracle, Monty Program Ab and others.

Type 'help;' or '\h' for help. Type '\c' to clear the current input statement.

MariaDB [(none)]> show databases;
+--------------------+
| Database           |
+--------------------+
| information_schema |
| mysql              |
| performance_schema |
+--------------------+
3 rows in set (0.02 sec)

MariaDB [(none)]> create database zabbix;
Query OK, 1 row affected (0.00 sec)

MariaDB [(none)]> grant all privileges on zabbix.* to 'zabbix'@'%' identified by 'zabbix';
Query OK, 0 rows affected (0.02 sec)

MariaDB [(none)]> flush privileges;

MariaDB [(none)]> show databases;
+--------------------+
| Database           |
+--------------------+
| information_schema |
| mysql              |
| performance_schema |
| zabbix             |
+--------------------+
4 rows in set (0.00 sec)注意:这里需要说明mariadb其实是mysql的一种开源版本,并且随着开发力度的增大,mariadb的性能是要稍高于mysql的。对于用户来说,mariadb的操作习惯和mysql是一样的。
3.安装php组件
[root@localhost yum.repos.d]# yum install php* -y这里还需要安装php-bcmath和php-mbstring组件,redhat7的yum源不存在这两个组件。可以在rpmsearch上进行搜索下载:
php-bcmath:
http://rpm.pbone.net/index.php3/stat/4/idpl/26646074/dir/centos_7com/php-bcmath-5.4.16-21.el7.x86_64.rpm.html
php-mbstring:
http://rpm.pbone.net/index.php3/stat/4/idpl/26646085/dir/centos_7/com/php-mbstring-5.4.16-21.el7.x86_64.rpm.html
使用rpm命令安装上述软件包:
[root@localhost tmp]# rpm -ivh php-bcmath-5.4.16-21.el7.x86_64.rpm
[root@localhost tmp]# rpm -ivh php-mbstring-5.4.16-21.el7.x86_64.rpm
修改配置文件/etc/php.ini:
post_max_size = 16M
date.timezone = Asia/Shanghai
4.源码安装zabbix3.0.4
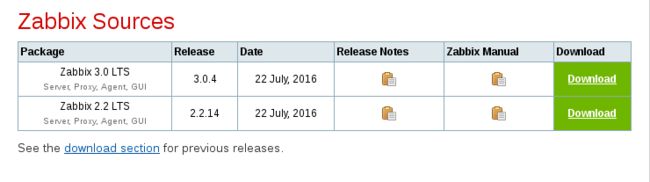
1.在zabbix官方网站下载zabbix源码tar包:
官网下载地址:
http://www.zabbix.com/download.php
安装软件包:
2.解压软件包:
[root@localhost zabbix]# tar xvf zabbix-3.0.4.tar.gz3.创建zabbix用户和组:
[root@localhost zabbix]# groupadd zabbix
[root@localhost zabbix]# useradd -g zabbix zabbix
4.进行配置和安装:
[root@localhost zabbix-3.0.4]# ./configure --enable-server --enable-agent --with-mysql --enable-ipv6 --with-net-snmp --with-libcurl --with-libxml2 --enable-java
这个配置过程中会有很多报错,其实就是缺少了相关的类库,下面列出报错列表以及相关的解决方案:
(1)缺少相关C/C++编译器:
configure: error: in `/zabbix/zabbix-3.0.4':
configure: error: no acceptable C compiler found in $PATH
安装C++编译器:
[root@localhost zabbix-3.0.4]# yum install gcc* -y
(2)缺少mysql的开发库:
configure: error: MySQL library not found
安装mysql-devel:
[root@localhost zabbix-3.0.4]# yum install mysql-devel -y(3)缺少libxml2的开发库:
configure: error: LIBXML2 library not found安装libxml2的开发库:
[root@localhost zabbix-3.0.4]# yum install libxml2-devel -y(4)缺少net-snmp以及其安装库:
configure: error: Invalid Net-SNMP directory - unable to find net-snmp-config安装net-snmp及其安装库:
[root@localhost zabbix-3.0.4]# yum install net-snmp* -y(5)缺少java的开发库:
configure: error: Unable to find "javac" executable in path安装java的开发库:
[root@localhost zabbix-3.0.4]# yum install java* -y(6)缺少curl的开发库:
configure: error: Curl library not found
安装curl的开发库:
[root@localhost zabbix-3.0.4]# yum install curl-devel -y注意:如果上述的库都已经安装,配置则可以顺利进行,zabbix会生成一份配置清单:
Configuration:

  Detected OS:           linux-gnu
  Install path:          /usr/local
  Compilation arch:      linux

  Compiler:              gcc
  Compiler flags:         -g -O2

  Library-specific flags:
    database:               -I/usr/include/mysql -g -pipe -Wp,-D_FORTIFY_SOURCE=2 -fexceptions -fstack-protector-strong --param=ssp-buffer-size=4 -grecord-gcc-switches   -m64 -D_GNU_SOURCE -D_FILE_OFFSET_BITS=64 -D_LARGEFILE_SOURCE -fPIC  -g -static-libgcc -fno-omit-frame-pointer -fno-strict-aliasing  -DMY_PTHREAD_FASTMUTEX=1
    libXML2:               -I/usr/include/libxml2
    Net-SNMP:               -I/usr/local/include -I/usr/lib64/perl5/CORE -I. -I/usr/include

  Enable server:         yes
  Server details:
    With database:         MySQL
    WEB Monitoring:        cURL
    Native Jabber:         no
    SNMP:                  yes
    IPMI:                  no
    SSH:                   no
    TLS:                   no
    ODBC:                  no
    Linker flags:             -L/usr/lib64/mysql        -L/usr/lib64      -rdynamic
    Libraries:               -lmysqlclient      -lxml2    -lnetsnmp      -lcurl -lm -ldl  -lresolv

  Enable proxy:          no

  Enable agent:          yes
  Agent details:
    TLS:                   no
    Linker flags:              -rdynamic
    Libraries:                 -lcurl -lm -ldl  -lresolv

  Enable Java gateway:   yes
  Java gateway details:
    Java compiler:         javac
    Java archiver:         jar

  LDAP support:          no
  IPv6 support:          yes

***********************************************************
*            Now run 'make install'                       *
*                                                         *
*            Thank you for using Zabbix!                  *
*              <http://www.zabbix.com>                    *
***********************************************************
如果需要其他的配合选项则需要重新配置,并且安装相关的开发库。
5.执行make安装
[root@localhost zabbix-3.0.4]# make && make install安装完成后zabbix的配置文件和执行命令以及日志等信息会分布在指定的目录中:
默认配置文件目录:
/usr/local/etc
zabbix服务端和客户端可执行文件目录:
/usr/local/sbin/
zabbix_get采集信息可执行文件目录:
/usr/local/bin/
注意:其他的目录都是可以在zabbix的配置文件中进行设置。
6.将zabbix的数据库sql倒入制定数据库
sql文件的目录在zabbix的tar包解压目录中:
[root@localhost mysql]# pwd
/zabbix/zabbix-3.0.4/database/mysql

[root@localhost mysql]# mysql -uzabbix -p zabbix < schema.sql
Enter password:
[root@localhost mysql]# mysql -uzabbix -p zabbix < images.sql
Enter password:
[root@localhost mysql]# mysql -uzabbix -p zabbix < data.sql
Enter password:
注意:我们没有显式的在-p后添加密码是为了安全考虑,防止其他人看到密码。
可以在mariadb中查看数据表格是否创建成功:
MariaDB [(none)]> show databases;
+--------------------+
| Database           |
+--------------------+
| information_schema |
| mysql              |
| performance_schema |
| php                |
| zabbix             |
+--------------------+
5 rows in set (0.00 sec)

MariaDB [(none)]> use zabbix;
Reading table information for completion of table and column names
You can turn off this feature to get a quicker startup with -A

Database changed
MariaDB [zabbix]> show tables;
+----------------------------+
| Tables_in_zabbix           |
+----------------------------+
| acknowledges               |
| actions                    |
| alerts                     |
| application_discovery      |
| application_prototype      |
| application_template       |
| applications               |
| auditlog                   |
| auditlog_details           |
| autoreg_host               |
| conditions                 |
| config                     |
| dbversion                  |
| dchecks                    |
| dhosts                     |
| drules                     |
| dservices                  |
| escalations                |
| events                     |
| expressions                |
| functions                  |
| globalmacro                |
| globalvars                 |
可以看到表格已经创建成功。
7.修改zabbix_server配置文件
配置文件为/usr/loca/etc/zabbix_server.conf:
[root@localhost etc]# pwd
/usr/local/etc
[root@localhost etc]# vim zabbix_server.conf
设置好数据库的主机IP、数据库主库、用户名和密码(数据库理论上可以和zabbix_server分开搭建):
DBHost=localhost
DBName=zabbix
DBUser=zabbix
DBPassword=zabbix
8.将zabbix的php文件放在httpd的默认发布目录下:
[root@localhost php]# mkdir /var/www/html/zabbix
[root@localhost php]# pwd
/zabbix/zabbix-3.0.4/frontends/php
[root@localhost php]# cp -a . /var/www/html/zabbix/
4.开启相关服务
1.启动zabbix-server服务:
[root@localhost sbin]# pwd
/usr/local/sbin
[root@localhost sbin]# ls
zabbix_agentd  zabbix_java  zabbix_server
[root@localhost sbin]# ./zabbix_server
查看zabbix_server的服务是否开启:
zabbix 18038 0.0 0.1 217400 2896 ? S 17:22 0:00 ./zabbix_server2.启动httpd服务:
[root@localhost mysql]# systemctl start httpd注意:这里需要注意的事,一旦修改了php的配置文件,我们则需要重新启动httpd服务。
查看httpd服务状态:
[root@localhost mysql]# systemctl status httpd
httpd.service - The Apache HTTP Server
   Loaded: loaded (/usr/lib/systemd/system/httpd.service; disabled)
   Active: active (running) since Tue 2016-08-23 16:38:21 CST; 42min ago
 Main PID: 4689 (httpd)
   Status: "Total requests: 18; Current requests/sec: 0; Current traffic:   0 B/sec"
   CGroup: /system.slice/httpd.service
           ├─4689 /usr/sbin/httpd -DFOREGROUND
           ├─4691 /usr/sbin/httpd -DFOREGROUND
           ├─4695 /usr/sbin/httpd -DFOREGROUND
           ├─4696 /usr/sbin/httpd -DFOREGROUND
           ├─4697 /usr/sbin/httpd -DFOREGROUND
           ├─4698 /usr/sbin/httpd -DFOREGROUND
           ├─4746 /usr/sbin/httpd -DFOREGROUND
           └─5114 /usr/sbin/httpd -DFOREGROUND

Aug 23 16:38:21 localhost.localdomain httpd[4689]: AH00558: httpd: Could not reliably determine the...age
Aug 23 16:38:21 localhost.localdomain systemd[1]: Started The Apache HTTP Server.
Hint: Some lines were ellipsized, use -l to show in full.
3.启动mariadb服务:
[root@localhost mysql]# systemctl start mariadb查看mariadb服务状态:
[root@localhost mysql]# systemctl status mariadb
mariadb.service - MariaDB database server
   Loaded: loaded (/usr/lib/systemd/system/mariadb.service; enabled)
   Active: active (running) since Tue 2016-08-23 17:19:38 CST; 37s ago
  Process: 17786 ExecStartPost=/usr/libexec/mariadb-wait-ready $MAINPID (code=exited, status=0/SUCCESS)
  Process: 17757 ExecStartPre=/usr/libexec/mariadb-prepare-db-dir %n (code=exited, status=0/SUCCESS)
 Main PID: 17785 (mysqld_safe)
   CGroup: /system.slice/mariadb.service
           ├─17785 /bin/sh /usr/bin/mysqld_safe --basedir=/usr
           └─17942 /usr/libexec/mysqld --basedir=/usr --datadir=/var/lib/mysql --plugin-dir=/usr/lib64...

Aug 23 17:19:36 localhost.localdomain mysqld_safe[17785]: 160823 17:19:36 mysqld_safe Logging to '/v...'.
Aug 23 17:19:36 localhost.localdomain mysqld_safe[17785]: 160823 17:19:36 mysqld_safe Starting mysql...ql
Aug 23 17:19:38 localhost.localdomain systemd[1]: Started MariaDB database server.
Hint: Some lines were ellipsized, use -l to show in full.
5.访问zabbix页面进行初始化
1.登陆页面:http://127.0.0.1/zabbix/
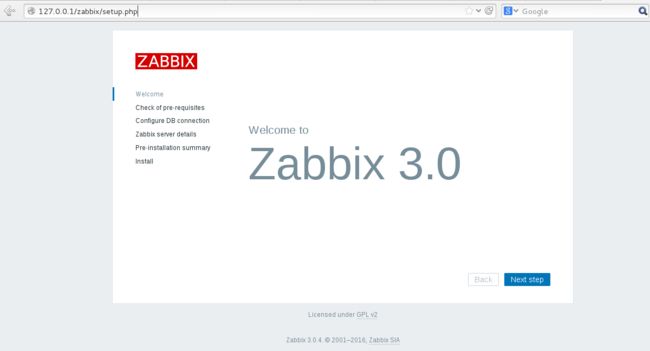
2.进入后发现报错
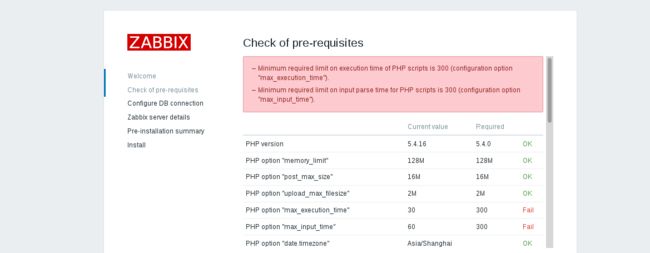
提示php的参数值设置的不符合要求,在/etc/php.ini配置文件中修改相关参数后,重新启动httpd。
修改参数如下:
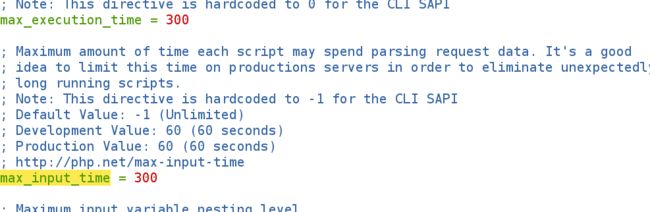
重新启动httpd:
[root@localhost sbin]# systemctl restart httpd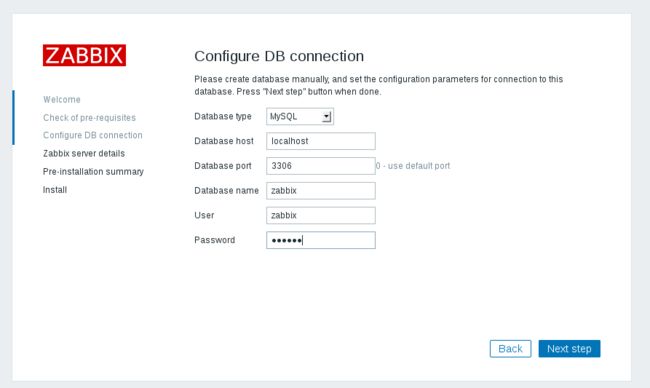
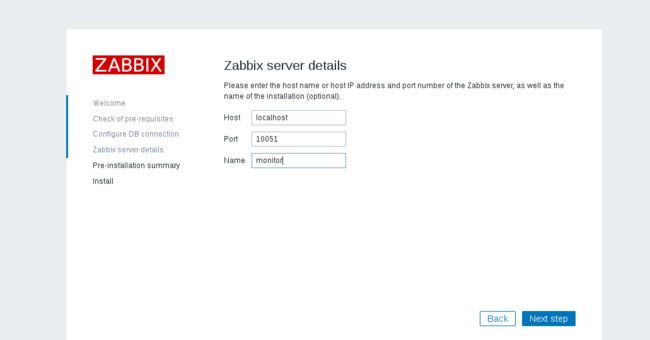
设置zabbix名称:
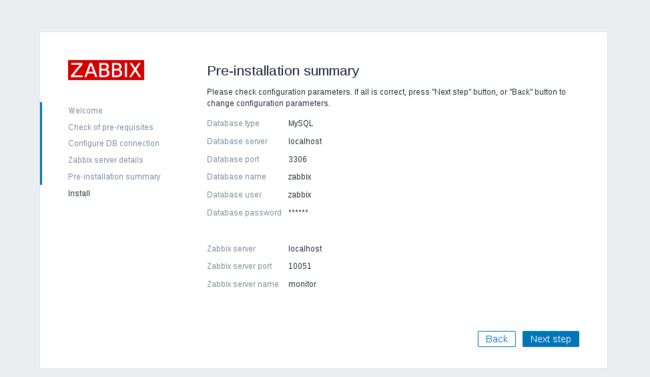
生成配置列表:
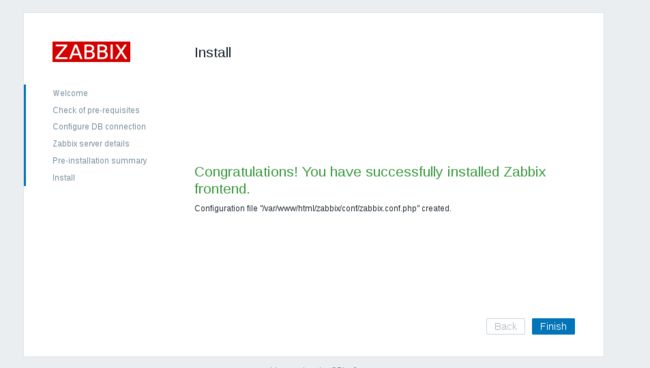
下载配置文件,把它放到/var/www/html/zabbix/conf目录下,文件名为zabbix.conf.php:
// Zabbix GUI configuration file.
global $DB;

$DB['TYPE']     = 'MYSQL';
$DB['SERVER']   = 'localhost';
$DB['PORT']     = '3306';
$DB['DATABASE'] = 'zabbix';
$DB['USER']     = 'zabbix';
$DB['PASSWORD'] = 'zabbix';

// Schema name. Used for IBM DB2 and PostgreSQL.
$DB['SCHEMA'] = '';

$ZBX_SERVER      = 'localhost';
$ZBX_SERVER_PORT = '10051';
$ZBX_SERVER_NAME = 'monitor';

$IMAGE_FORMAT_DEFAULT = IMAGE_FORMAT_PNG;
刷新页面配置成功:
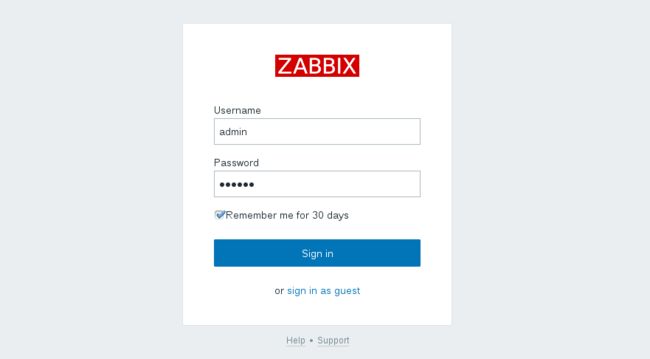
进行登陆,用户名为:admin,密码为:zabbix。
进入后的控制台如下所示:
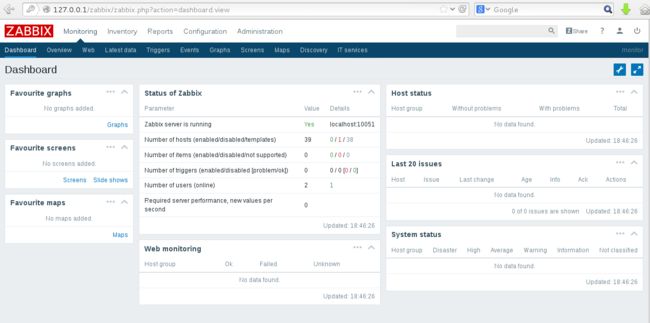
至此,关于zabbix服务端的配置完成,需要安装的软件有:mariadb(mysql)、httpd(nginx)、php5和zabbix源码包。
希望大家可以实践一下!