SpringBoot+vue信息管理系统(2)
Spring Boot基础配置
1、spring-boot-starter-parent提供默认的配置:
- Java版本默认使用1.8
- 编码格式默认使用utf-8
- 提供Dependency Management 进行项目依赖的版本管理
- 默认的资源过滤与插件配置
spring-boot-starter-parent 虽然方便,但是在公司开发微服务项目或者多模块项目时一般需要使用公司自己的parent,这时候的parent,这时候如果想进行项目依赖版本的统一管理,就需要使用到Dependency Management ,在pom.xml添加:
此时,就不用继承spring-boot-starter-parent,但是Java版本、编码的格式等都需要开发者手动配置,只需要在pom.xml添加plugin
                org.springframework.boot
                spring-boot-maven-plugin
                3.1

                    1.8
                    1.8
至于编码格式,如果项目是springBoot项目,那么编码会默认加上;但是如果项目只是简单的maven项目,就需要在pom.xml加入:
        UTF-8
        UTF-8
2、注解SpringBootApplication解析
SpringBootApplication实际上是一个组合注解:
@SpringBootConfiguration
@EnableAutoConfiguration
@ComponentScan(excludeFilters = {
		@ComponentScan.Filter(type = FilterType.CUSTOM,classes = TypeExcludeFilter.class),
		@ComponentScan.Filter(type = FilterType.CUSTOM,classes = AutoConfigurationExcludeFilter.class)
})
public class Charpter012Application {

	public static void main(String[] args) {
		SpringApplication.run(Charpter012Application.class, args);
	}

}
这个注解由三个注解(SpringBootConfiguration,EnableAutoConfiguration、ComponentScan)组成:
(1)SpringBootConfiguration定义:
@Target({ElementType.TYPE})
@Retention(RetentionPolicy.RUNTIME)
@Documented
@Configuration
public @interface SpringBootConfiguration {
    @AliasFor(
        annotation = Configuration.class
    )
    boolean proxyBeanMethods() default true;
}
SpringBootConfiguration的功能就是表面这是一个配置类,开发者可以在这个类中配置bean。从这个角度来讲,这个类所扮演的角色类似于Spring中ApplicationContext.xml文件中的角色
(2)EnableAutoConfiguration:表示开启自动化配置。Spring Boot中的自动化配置是非扫描侵入式的,在任意时刻,开发者都可以使用自定义配置代替自动化中的某一个配置
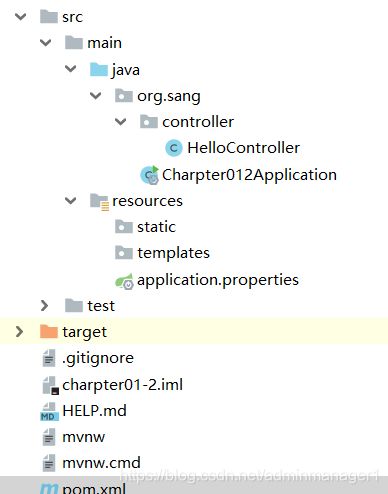
(3)ComponentScan:完成包的扫描,也是Spring的功能。由于ComponentScan注解默认扫描的类都位于当前类所在包的下面,因此建议在实际项目开发中把项目启动类放在根包中,如图所示:
虽然项目的启动类中包含了Configuration注解,但是开发者可以创建一个新的类专门用来配置Bean,这样便于配置的管理。但是这个类需要加上Configuration注解,代码如下:
@Configuration
public class MyConfig{
}
项目的启动类中的Configuration注解,除了扫描Service、Repository、Component、Controller、RestController,也会扫描Configuration注解的类
3、定制banner
项目启动的时候控制台会显示如下:
这就是banner配置,所以banner也是可以自定义的
自定义banner步骤:
(1)在resources目录下创建一个banner.txt
(2)banner文件内容可以参考一下完整:
- http://www.network-science.de/ascii/
- http://www.kammerl.de/ascii/AsciiSignature.php
- http://patorjk.com/software/taag
将内容复制到banner.txt文件中
(3)结果:
(4)关闭banner:修改项目启动类的main方法
@SpringBootConfiguration
@EnableAutoConfiguration
@ComponentScan(excludeFilters = {
		@ComponentScan.Filter(type = FilterType.CUSTOM,classes = TypeExcludeFilter.class),
		@ComponentScan.Filter(type = FilterType.CUSTOM,classes = AutoConfigurationExcludeFilter.class)
})
public class Charpter012Application {

	public static void main(String[] args) {

		//SpringApplication.run(Charpter012Application.class, args);
		SpringApplicationBuilder builder=new SpringApplicationBuilder(Charpter012Application.class);
		builder.bannerMode(Banner.Mode.OFF).run(args);
	}

}
通过SpringApplicationBuilder来设置bannerMode为OFF,这样启动banner就会消失
2.4、Web容器配置
1、Tomcat配置,
(1)常规配置:SpringBoot项目中可以内嵌Tomcat、Jetty、Undertow、Netty等容器。当开发者添加了spring-boot-starter-web依赖之后,默认会使用Tomcat作为web容器如果需要对Tomcat做进一步的配置,可以在Application.properties进行配置,如何:
server.port=8081
server.error.path=/error
server.servlet.session.timeout=30m
server.servlet.context-path=/chapter02
server.tomcat.uri-encoding=utf-8
server.tomcat.max-threads=500
server.tomcat.basedir=/home/sang/tmp
配置解析:
- server.port:项目发布的端口号
- server.error.path:项目出错的跳转页面
- server.servlet.session.timeout:session失效时间,30m表示30分钟,如果不写单位,默认单位为秒,由于Tomcat中配置的session过期时间是以分钟为单位,因此如果单位是秒的话,该时间会被转换为一个不超过所配置秒数的最大分钟数;例如:这里配置了119,默认单位为秒,实际session过期时间为1分钟
- server.servlet.context-path:表示项目名称,如果不配置默认为“/”;如果配置就在"/"后面加上配置的名称
- server.tomcat.uri-encoding:配置Tomcat请求编码
- server.tomcat.max-threads:Tomcat最大线程数
- server.tomcat.basedir:basedir是一个存放Tomcat运行日志和临时文件的目录,若不配置,则默认使用系统的临时目录
当然配置不止如此,只是列举一些平常的配置,完整的配置可以参考:Appendix A.Common application properties 一节
2、HTTPS配置
由于HTTPS具有良好的安全性,在开发中得以广泛的应用,例如微信公众号、小程序等的开发都要使用HTTPS完成。对于个人开发者而言,一个HTTPS证书的价格还是有点贵,国内有一些云服务器厂商提供了一些免费的HTTPS证书,一个账号可以申请多个。不过在jdk中提供了一个Java数字证书管理工具keytool,在\jdk\bin目录下,通过这个工具可以自己生成一个数字证书,命令如下:
keytool -genkey -alias tomcathttps -keyalg RSA -keysize 2048 -keystore sang.p12 -validity 365命令解释
- -genkey:创建一个新的密钥
- -alias:keystore的别名
- -keyalg:使用的加密算法是RSA,一种非对称加密算法
- -keysize:密钥的长度
- -keystore:生成的密钥存放的地址
- -validity:密钥有效的时间,单位为天
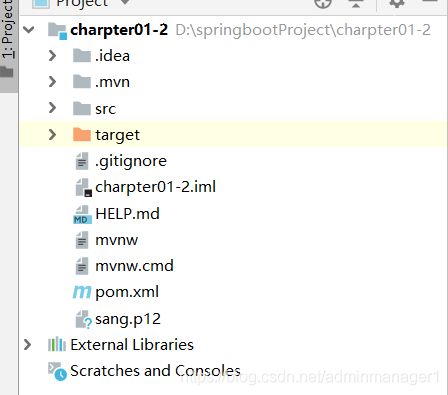
在jdk/bin目录下执行该命令,需要输入密钥命令等信息,根据提示输入即可;命令完成之后会在jdk/bin目录下创建一个sang.p12的文件,将该文件放入到项目目录下,然后在Application.properties中配置:
server.ssl.key-store=sang.p12
server.ssl.key-alias=tomcathttps
server.ssl.key-store-password=123456
配置解析:
- key-store:密钥文件名
- key-alias:密钥别名
- key-store-password:在cmd命令中输入的密钥命令
结果如下:
如果以http的方式访问接口,会访问失败:
这是因为SpringBoot不支持同时在配置中启动 http和https,这时候可以配置请求重定向,将http请求重定向为https,配置的方式如下:
package org.sang.config;

import org.apache.catalina.Context;
import org.apache.catalina.connector.Connector;
import org.apache.tomcat.util.descriptor.web.SecurityCollection;
import org.apache.tomcat.util.descriptor.web.SecurityConstraint;
import org.springframework.boot.web.embedded.tomcat.TomcatServletWebServerFactory;
import org.springframework.context.annotation.Bean;
import org.springframework.context.annotation.Configuration;

@Configuration
public class TomcatConfig {

	@Bean
	TomcatServletWebServerFactory tomcatServletWebServerFactory(){
		TomcatServletWebServerFactory factory=new TomcatServletWebServerFactory(){
			@Override
			protected  void postProcessContext(Context context){
				SecurityConstraint constraint = new SecurityConstraint();
				constraint.setUserConstraint("CONFIDENTIAL");
				SecurityCollection collection = new SecurityCollection();
				collection.addPattern("/*");
				constraint.addCollection(collection);
				context.addConstraint(constraint);

			}

		};
		factory.addAdditionalTomcatConnectors(httpConnector());
		return factory;

	}
	private Connector httpConnector(){
		Connector connector = new Connector("org.apache.coyote.http11.Http11NioProtocol");
		connector.setScheme("http");
		//Connector监听的http的端口号
		connector.setPort(8080);
		connector.setSecure(false);
		//监听到http的端口号后转向到的https的端口号
		connector.setRedirectPort(8081);
		return connector;
	}
}
这个首先配置一个TomcatServletWebServerFactory,然后添加一个Tomcat中的Connector(监听8080端口),然后把请求发送到8081上
配置完成后,在浏览器输入“http://localhost:8080/chapter02/hello”,就回自动重定向到“https://localhost:8081/chapter02/hello”
2、Jetty配置
除了Tomcat外,也可以在Spring Boot中嵌入Jetty,配置如下:
            org.springframework.boot
            spring-boot-starter-web


                    org.springframework.boot
                    spring-boot-starter-tomcat


            org.springframework.boot
            spring-boot-starter-jetty
但是如果使用这个配置Configuration类中的https的重定向就不能用了,因为这些类都是引用于Tomcat
3、Undertow配置
Undertow和Jetty很相似,是一个红帽公司开发的开源的Java服务器,具有非常好的性能,在SpringBoot项目中也得到了很好的支持,配置如下:
            org.springframework.boot
            spring-boot-starter-web


                    org.springframework.boot
                    spring-boot-starter-tomcat


            org.springframework.boot
spring-boot-starter-undertow 4、Properties配置
SpringBoot项目中application.properties配置文件一般放在四个位置:
- 项目根目录下的config文件夹中
- 项目根目录下
- classpath下的config文件夹下
- classpath下
如果以上四个地方都有配置文件,那么加载的级别就是从1到4,依次降低,springboot会根据级别查找配置文件,并且加载到Spring Environment中,如图:
如果开发者在开发中没使用application.properties,而是使用application.yml作为配置文件,优先级也是如此
假如开发者不想使用Application.properties要自己定义,可以使用以下方法:
在resources目录下创建一个app.properties配置文件,将项目打成jar包,使用如下命令:
jar -jar chapter02-2-0.0.1-SNAPSHOT.jar --spring.config.name=app在运行时再指向配置文件的名字。使用spring.config.location 可以指定配置文件所在的目录(注意:需要用/结束),命令如下:
java -jar chapter02-2-0.0.1-SNAPSHOT.jar --spring.config.name=app
-- spring.config.location=classpath:/
5、类似安全配置属性
无论是通过YAML配置还是Properties配置,最终都会被加载到Spring Environment中。Spring提供了@Value注解以及EnvironmentAware接口来配置Spring Environment中的数据注入到属性上,Spring boot则进一步的提出了类型安全配置属性(Type-safe Configuration Properties),这样即使在数据量非常庞大的情况下,也可以更加方便的将配置文件的数据注入到Bean中。
考虑在application.properties中加入如下配置:
book.name=三国演义
book.author=罗贯中
book.price=30
将这一段你代码配置数据注入到如下Bean中:
@Component
@COnfigurationProperties(perfix="book")
public class Book {
	private String name;
	private String author;
	private Float Pricel
	//省略getter/setter
}
代码分析:
ConfigurationProperties中的prefix属性描述了要加载的配置文件前缀
如果配置文件是一个YAML文件,那么可以将数据注入的集合中(后面再讲)
SpringBoot采用了一种宽松的规则来进行属性绑定,如果Bean中的属性名为authorName,那么配置文件中的属性就是book.authorName、book.author-name、book.authorName或者book.AUTHORNAME
注意:以上配置可能为乱码,只需要在idea中的setting中配置即可
最后创建BookController进行简单的测试:
import org.sang.model.Book;
import org.springframework.beans.factory.annotation.Autowired;
import org.springframework.boot.autoconfigure.EnableAutoConfiguration;
import org.springframework.web.bind.annotation.GetMapping;
import org.springframework.web.bind.annotation.RestController;

@RestController
public class HelloController {

	@Autowired
	Book book;

	@GetMapping("/book")
	public String hello(){
		System.out.println(book);
		return book.toString();
	}
}
6、YAML配置
(1)常规配置
YAML是JSON的超集,简洁而且强大,是一种专门用来书写配置文件的语言,可以代替application.properties.在创建springBoot项目时引入的spring-boot-starter-web依赖简接地引入了snakeyaml依赖,snakeyaml会实现对yaml配置的解析。YAML的使用非常简单,利用缩进来表示层级关系,并且大小写敏感。在springBoot下中使用YAML只需要在resources目录下创建
application.yml文件即可,然后在文件中加入如下配置
server:
  port: 8081
  servlet
    context-path: /chapter02
  tomcat
    uri-encoding: utf-8
这个等同于application.properties中的:
#端口号
server.port=8081
#访问路径添加项目别名
server.servlet.context-path=/chapter02
#项目编码
server.tomcat.uri-encoding=utf-8
(2)复杂配置
YAML除了一些常规属性,也可以配置复杂属性,例如:
my:
    name: 千城墨白
    address: China
和properties配置文件一样,这段配置也可以注入一个bean中,代码如下:
@Component
@ConfigurationProperties(prefix = "my")
public class User {
	private String name;
	private String address;

//省略 get set方法
}
YAML还能支撑列表的配置,例如:
my:
    name: 千城墨白
    address: China
    favorites:
        -- 足球
        -- 徒步
        -- Coding
同时这组配置也可以注入到bean中:
@Component
@ConfigurationProperties(prefix = "my")
public class User {
	private String name;
	private String address;
	private List favoriter;

//省略 get set方法
}
YAML还可以支持更复杂的配置,即集合中也可以是个对象
my:
    users:
        - name: 千城墨白
          address: China
          favorites:
            - 足球
            - 徒步
            - Coding
        - name:sang
          address: GZ
          favorites:
            - 阅读
            - 吉他
这组配置的集合中放的是一个对象:因此
@Component
@ConfigurationProperties(prefix = "my")
public class User {

	private List users;

//省略 get set方法
}


public class User {
	private String name;
	private String address;
	private List favoriter;

//省略 get set方法
}
虽然SpringBoot项目中使用YAML挺方便的,但是YAML有个缺陷就是无法使用@PropertySource注解加载YAML
7、Profile
通常用于开发者切换工作环境(开发环境、测试环境、生成环境)使用的,SpringBoot中约定的不同环境文件规则为:application-{profile}.properties,properties占位符表示当前环境的名称,步骤如下:
(1)创建配置文件:application-dev.properties、application-prod.properties
#端口号
server.port=8081
#错误路径
server.error.path=/error
#session过期时间
server.servlet.session.timeout=30m
#访问路径添加项目别名
server.servlet.context-path=/chapter02
#项目编码
server.tomcat.uri-encoding=utf-8
#线程最大数
server.tomcat.max-threads=500
#项目临时存储文件地址
server.tomcat.basedir=/home/sang/tmp
#https密钥文件名
server.ssl.key-store=sang.p12
server.ssl.key-alias=tomcathttps
#密钥密码
server.ssl.key-store-password=123456
#是否开启缓存,开发时可设置成false,默认为TRUE
spring.thymeleaf.cache=true
#检验模板是否存在,默认为true
spring.thymeleaf.check-template=true
#检验模板位置是否存在,默认为TRUE
spring.thymeleaf.check-template-location=true
#模板文件编码
spring.thymeleaf.encoding=UTF-8
#模板文件地址
spring.thymeleaf.prefix=classpath:/templates/
#Content-Type 配置
spring.thymeleaf.servlet.content-type=text/html
#模板文件后缀
spring.thymeleaf.suffix=.html
#对象属性值
book.name=三国演义
book.author=罗贯中
book.price=30
#端口号
server.port=8082
#错误路径
server.error.path=/error
#session过期时间
server.servlet.session.timeout=30m
#访问路径添加项目别名
server.servlet.context-path=/chapter02
#项目编码
server.tomcat.uri-encoding=utf-8
#线程最大数
server.tomcat.max-threads=500
#项目临时存储文件地址
server.tomcat.basedir=/home/sang/tmp
#https密钥文件名
server.ssl.key-store=sang.p12
server.ssl.key-alias=tomcathttps
#密钥密码
server.ssl.key-store-password=123456
#是否开启缓存,开发时可设置成false,默认为TRUE
spring.thymeleaf.cache=true
#检验模板是否存在,默认为true
spring.thymeleaf.check-template=true
#检验模板位置是否存在,默认为TRUE
spring.thymeleaf.check-template-location=true
#模板文件编码
spring.thymeleaf.encoding=UTF-8
#模板文件地址
spring.thymeleaf.prefix=classpath:/templates/
#Content-Type 配置
spring.thymeleaf.servlet.content-type=text/html
#模板文件后缀
spring.thymeleaf.suffix=.html
#对象属性值
book.name=三国演义
book.author=罗贯中
book.price=30
(2)配置application.properties(用于切换工作环境)
spring.profiles.active=dev这表示正在使用application-dev.properties配置文件,切换环境只需要把dev改成prod
(3)在代码中配置(在启动类中的main方法中添加)
@SpringBootConfiguration
@EnableAutoConfiguration
@ComponentScan(excludeFilters = {
		@ComponentScan.Filter(type = FilterType.CUSTOM,classes = TypeExcludeFilter.class),
		@ComponentScan.Filter(type = FilterType.CUSTOM,classes = AutoConfigurationExcludeFilter.class)
})
public class Charpter012Application {

	public static void main(String[] args) {

		//SpringApplication.run(Charpter012Application.class, args);
		SpringApplicationBuilder builder=new SpringApplicationBuilder(Charpter012Application.class);
		builder.application().setAdditionalProfiles("prod");
		builder.run(args)
		builder.bannerMode(Banner.Mode.OFF).run(args);
	}

}
如果使用命令行启动项目,则命令如下:
java -jar chapter01-3-0.0.1-SNAPSHOT.jar --spring.profiles.active=prod


