Activiti 快速入门教程:SpringBoot 集成 Activiti6 + Activiti Modeler 流程配置可视化
Activiti 快速入门教程:SpringBoot 集成 Activiti6 + Activiti Modeler 流程配置可视化
- 7大服务与核心表
- 23张表概览
- 7大核心服务(重要)
- 加依赖
- 内部日志
- 初始化 ProcessEngine
- 代码初始化
- activiti.cfg.xml 初始化
- 我的初始化示例
- 集成 Activiti Modeler
- 下载源码
- 新增依赖
- 代码集成
- 前端代码集成
- 后端代码集成
- 结构
- 代码修改
- RepositoryService 注入问题
- 启动器注解修改
- 请求路径调整
- 修改 ModelSaveRestResource.java
- 新增 createModel 接口
- 访问页面
- 汉化
- 参考
7大服务与核心表
转载:Activiti 23张表及7大服务详解
23张表概览
Activiti使用到的表都是ACT_开头的。
PS:表中参数具体意思,请直接看转载
ACT_RE_*:
RE 表示repository(存储),RepositoryService接口所操作的表。带此前缀的表包含的是静态信息,如,流程定义,流程的资源(图片,规则等)。
ACT_RU_*:
RU 表示runtime,运行时表-RuntimeService。这是运行时的表存储着流程变量,用户任务,变量,职责(job)等运行时的数据。Activiti只存储实例执行期间的运行时数据,当流程实例结束时,将删除这些记录。这就保证了这些运行时的表小且快。
ACT_ID_*:
ID 表示identity (组织机构),IdentityService接口所操作的表。用户记录,流程中使用到的用户和组。这些表包含标识的信息,如用户,用户组,等等。
ACT_HI_*:
HI 表示history,历史数据表,HistoryService。就是这些表包含着流程执行的历史相关数据,如结束的流程实例,变量,任务,等等
ACT_GE_*:
全局通用数据及设置(general),各种情况都使用的数据。
| 序号 | 表名 | 说明 |
|---|---|---|
| 1 | act_ge_bytearray | 二进制数据表 |
| 2 | act_ge_property | 二属性数据表存储整个流程引擎级别的数据,初始化表结构时,会默认插入三条记录数据表 |
| 3 | act_hi_actinst | 历史节点表 |
| 4 | act_hi_attachment | 历史附件表 |
| 5 | act_hi_comment | 历史意见表 |
| 6 | act_hi_identitylink | 历史流程人员表 |
| 7 | act_hi_detail | 历史详情表,提供历史变量的查询 |
| 8 | act_hi_procinst | 历史流程实例表 |
| 9 | act_hi_taskinst | 历史任务实例表 |
| 10 | act_hi_varinst | 历史变量表 |
| 11 | act_id_group | 用户组信息表 |
| 12 | act_id_info | 用户扩展信息表 |
| 13 | act_id_membership | 用户与用户组对应信息表 |
| 14 | act_id_user | 用户信息表 |
| 15 | act_re_deployment | 部署信息表 |
| 16 | act_re_model | 流程设计模型部署表 |
| 17 | act_re_procdef | 流程定义数据表 |
| 18 | act_ru_event_subscr | throwEvent、catchEvent时间监听信息表 |
| 19 | act_ru_execution | 运行时流程执行实例表 |
| 20 | act_ru_identitylink | 运行时流程人员表,主要存储任务节点与参与者的相关信息 |
| 21 | act_ru_job | 运行时定时任务数据表 |
| 22 | act_ru_task | 运行时任务节点表 |
| 23 | act_ru_variable | 运行时流程变量数据表 |
7大核心服务(重要)
所谓核心服务,就是通过调用服务中开放的接口,去获取自己所需要的数据,甚至改变流程
| 服务名称 | 描述 |
|---|---|
| RepositoryService | Activiti 中每一个不同版本的业务流程的定义都需要使用一些定义文件,部署文件和支持数据 ( 例如 BPMN2.0 XML 文件,表单定义文件,流程定义图像文件等 ),这些文件都存储在 Activiti 内建的 Repository 中。Repository Service 提供了对 repository 的存取服务。 |
| RuntimeService | 在 Activiti 中,每当一个流程定义被启动一次之后,都会生成一个相应的流程对象实例。Runtime Service 提供了启动流程、查询流程实例、设置获取流程实例变量等功能。此外它还提供了对流程部署,流程定义和流程实例的存取服务。 |
| TaskService | 在 Activiti 中业务流程定义中的每一个执行节点被称为一个 Task,对流程中的数据存取,状态变更等操作均需要在 Task 中完成。Task Service 提供了对用户 Task 和 Form 相关的操作。它提供了运行时任务查询、领取、完成、删除以及变量设置等功能。 |
| HistoryService | History Service 用于获取正在运行或已经完成的流程实例的信息,与 Runtime Service 中获取的流程信息不同,历史信息包含已经持久化存储的永久信息,并已经被针对查询优化。 |
| IdentityService | Activiti 中内置了用户以及组管理的功能,必须使用这些用户和组的信息才能获取到相应的 Task。Identity Service 提供了对 Activiti 系统中的用户和组的管理功能。 |
| FormService | Activiti 中的流程和状态 Task 均可以关联业务相关的数据。通过使用 Form Service 可以存取启动和完成任务所需的表单数据并且根据需要来渲染表单。 |
| ManagementService | Management Service 提供了对 Activiti 流程引擎的管理和维护功能,这些功能不在工作流驱动的应用程序中使用,主要用于 Activiti 系统的日常维护。 |
加依赖
<dependency>
    <groupId>org.activitigroupId>
    <artifactId>activiti-engineartifactId>
    <version>6.0.0version>
dependency>
内部日志
Activiti 使用 SLF4J 作为内部日志框架。在这个例子中,我们使用 log4j 作为 SLF4J 的实现。
加依赖
<dependency>
    <groupId>org.slf4jgroupId>
    <artifactId>slf4j-apiartifactId>
    <version>1.7.21version>
dependency>
<dependency>
    <groupId>org.slf4jgroupId>
    <artifactId>slf4j-log4j12artifactId>
    <version>1.7.21version>
dependency>
resource 目录下新建文件 log4j.properties
log4j.rootLogger=DEBUG, ACT
log4j.appender.ACT=org.apache.log4j.ConsoleAppender
log4j.appender.ACT.layout=org.apache.log4j.PatternLayout
log4j.appender.ACT.layout.ConversionPattern= %d{hh:mm:ss,SSS} [%t] %-5p %c %x - %m%n
初始化 ProcessEngine
代码初始化
// 流程引擎配置
ProcessEngineConfiguration cfg = new StandaloneProcessEngineConfiguration()
                    .setJdbcUrl(url)
                    .setJdbcUsername(username)
                    .setJdbcPassword(password)
                    .setJdbcDriver(driverClassName)
                    // 初始化基础表,不需要的可以改为 DB_SCHEMA_UPDATE_FALSE
                    .setDatabaseSchemaUpdate(ProcessEngineConfiguration.DB_SCHEMA_UPDATE_TRUE);
// 初始化流程引擎对象
ProcessEngine processEngine = cfg.buildProcessEngine();
activiti.cfg.xml 初始化
代码部分
// 流程引擎配置
ProcessEngineConfiguration cfg = ProcessEngineConfiguration
	// 根据文件名获取配置文件
        //.createProcessEngineConfigurationFromResource("activiti.cfg.xml");
        // 获取默认配置文件,默认的就是 activiti.cfg.xml
        .createProcessEngineConfigurationFromResourceDefault()
        // 初始化基础表,不需要的可以改为 DB_SCHEMA_UPDATE_FALSE
        .setDatabaseSchemaUpdate(ProcessEngineConfiguration.DB_SCHEMA_UPDATE_TRUE);
// 初始化流程引擎对象
ProcessEngine processEngine = cfg.buildProcessEngine();
新建 activiti.cfg.xml
<beans xmlns="http://www.springframework.org/schema/beans"
       xmlns:xsi="http://www.w3.org/2001/XMLSchema-instance"
       xsi:schemaLocation="http://www.springframework.org/schema/beans   http://www.springframework.org/schema/beans/spring-beans.xsd">

    <bean id="processEngineConfiguration" class="org.activiti.engine.impl.cfg.StandaloneProcessEngineConfiguration">
        <property name="jdbcUrl" value="jdbc:mysql://127.0.0.1:3306/test"/>
        <property name="jdbcDriver" value="com.mysql.jdbc.Driver"/>
        <property name="jdbcUsername" value="root"/>
        <property name="jdbcPassword" value="123456"/>
        <property name="databaseSchemaUpdate" value="true"/>
    bean>
beans>
我的初始化示例
我的配置文件 ProcessEngineConfig.java
依赖
spring-boot-configuration-processor加载配置文件lomok简化 java 代码
<dependency>
     <groupId>org.springframework.bootgroupId>
     <artifactId>spring-boot-configuration-processorartifactId>
 dependency>

<dependency>
    <groupId>org.projectlombokgroupId>
    <artifactId>lombokartifactId>
    <version>1.18.0version>
    <scope>providedscope>
dependency>
核心的 7 大服务在这里注册成 bean 后,之后就可以直接使用了
/**
 * 流程引擎配置文件
 * @author: linjinp
 * @create: 2019-10-21 16:49
 **/
@Configuration
@ConfigurationProperties(prefix = "spring.datasource")
@Data
public class ProcessEngineConfig {

    private Logger logger = LoggerFactory.getLogger(DruidDatsSourceConfig.class);
	// 从 yml 配置文件中获取 mysql 配置信息
    @Value("${spring.datasource.url}")
    private String url;

    @Value("${spring.datasource.driver-class-name}")
    private String driverClassName;

    @Value("${spring.datasource.username}")
    private String username;

    @Value("${spring.datasource.password}")
    private String password;

    @Value("${spring.datasource.publicKey}")
    private String publicKey;

    /**
     * 初始化流程引擎
     * @return
     */
    @Primary
    @Bean
    public ProcessEngine initProcessEngine() {
        logger.info("=============================ProcessEngineBegin=============================");

        // 流程引擎配置
        ProcessEngineConfiguration cfg = null;

        try {
            cfg = new StandaloneProcessEngineConfiguration()
                    .setJdbcUrl(url)
                    .setJdbcUsername(username)
                    // 对密码进行解密
                    .setJdbcPassword(ConfigTools.decrypt(publicKey, password))
                    .setJdbcDriver(driverClassName)
                    // 初始化基础表,不需要的可以改为 DB_SCHEMA_UPDATE_FALSE
                    .setDatabaseSchemaUpdate(ProcessEngineConfiguration.DB_SCHEMA_UPDATE_TRUE)
                    // 默认邮箱配置
                    // 发邮件的主机地址,先用 QQ 邮箱
                    .setMailServerHost("smtp.qq.com")
                    // POP3/SMTP服务的授权码
                    .setMailServerPassword("xxxxxxx")
                    // 默认发件人
                    .setMailServerDefaultFrom("[email protected]")
                    // 设置发件人用户名
                    .setMailServerUsername("管理员");
        } catch (Exception e) {
            e.printStackTrace();
        }
        // 初始化流程引擎对象
        ProcessEngine processEngine = cfg.buildProcessEngine();
        logger.info("=============================ProcessEngineEnd=============================");
        return processEngine;
    }

    //八大接口
    // 业务流程的定义相关服务
	@Bean
	public RepositoryService repositoryService(ProcessEngine processEngine){
	    return processEngine.getRepositoryService();
	}

	// 流程对象实例相关服务
	@Bean
	public RuntimeService runtimeService(ProcessEngine processEngine){
	    return processEngine.getRuntimeService();
	}

	// 流程任务节点相关服务
	@Bean
	public TaskService taskService(ProcessEngine processEngine){
	    return processEngine.getTaskService();
	}

	// 流程历史信息相关服务
	@Bean
	public HistoryService historyService(ProcessEngine processEngine){
	    return processEngine.getHistoryService();
	}

	// 表单引擎相关服务
	@Bean
	public FormService formService(ProcessEngine processEngine){
	    return processEngine.getFormService();
	}

	// 用户以及组管理相关服务
	@Bean
	public IdentityService identityService(ProcessEngine processEngine){
	    return processEngine.getIdentityService();
	}

	// 管理和维护相关服务
	@Bean
	public ManagementService managementService(ProcessEngine processEngine){
	    return processEngine.getManagementService();
	}

	// 动态流程服务
	@Bean
	public DynamicBpmnService dynamicBpmnService(ProcessEngine processEngine){
	    return processEngine.getDynamicBpmnService();
	}
    //八大接口 end
}
成功生成表

这个时候,就已经可以通过 7 大服务提供的接口来操作 Activiti 了
集成 Activiti Modeler
下载源码
我这里选用的是 Activiti 5.23.0 版本的页面,下载 zip,解压
Activiti 5.23.0 源码
新增依赖
下面 3 个是为了兼容 Activiti6 新增的 jar 包,如果是 Activiti5 的版本就不需要了
<dependency>
    <groupId>org.activitigroupId>
    <artifactId>activiti-modelerartifactId>
    <version>5.23.0version>
dependency>


<dependency>
    <groupId>org.apache.xmlgraphicsgroupId>
    <artifactId>batik-transcoderartifactId>
    <version>1.8version>
dependency>
<dependency>
    <groupId>org.apache.xmlgraphicsgroupId>
    <artifactId>batik-codecartifactId>
    <version>1.8version>
dependency>
<dependency>
    <groupId>org.activitigroupId>
    <artifactId>activiti-json-converterartifactId>
    <version>6.0.0version>
dependency>
代码集成
前端代码集成
在项目中的 resource 文件夹下新建一个 static 文件夹
SpringBoot 能自动读取 static 目录下的静态文件,因此文件夹名称不可随意更改
找到 activiti-webapp-explorer2 包
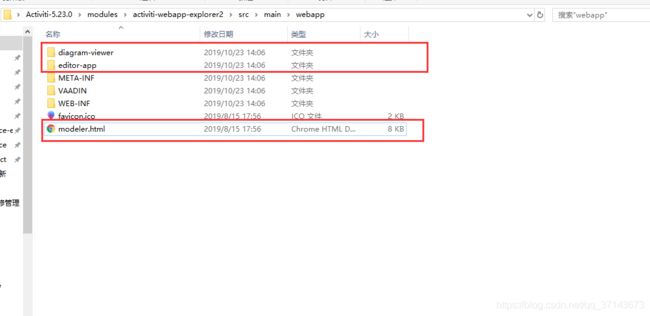
将 webapp 下的 diagram-viewer 文件夹,editor-app 文件夹,modeler.html 文件复制到 static 下
- diagram-viewer:流程图跟踪组件
- editor-app:目录中包含设计器里面所有的资源:angular.js、oryx.js以及配套的插件及css
- modeler.html:流程设计器的主页面,用来引入各种web资源
路径:Activiti-5.23.0\modules\activiti-webapp-explorer2\src\main\webapp

后端代码集成
将 Activit 5.23.0 项目中 resource 文件夹下的 stencilset.json 放到自己项目的 resource 目录下
这个文件的作用就是国际化翻译,但是只有英文版的
路径:Activiti-5.23.0\modules\activiti-webapp-explorer2\src\main\resources
将里面的 StencilsetRestResource.java,ModelEditorJsonRestResource.java,ModelSaveRestResource.java 文件放到自己的项目里
- StencilsetRestResource.java:用于读取
stencilset.json文件 - ModelEditorJsonRestResource.java:用户获取流程数据
- ModelSaveRestResource.java:用于保存流程数据
路径:Activiti-5.23.0\modules\activiti-modeler\src\main\java\org\activiti\rest\editor


结构
代码修改
RepositoryService 注入问题
ModelEditorJsonRestResource.java 与 ModelSaveRestResource.java 都是通过 @Autowired 注解注入的 RepositoryService 服务
配置文件中直接对7大服务进行 @Bean 注册,一个是为了节省后续开发
同时也是为了解决 @Autowired 无法注入,找不到 bean 问题
启动器注解修改
@SpringBootApplication 注解修改,不加载身份认证配置
// 去除身份验证
@SpringBootApplication(exclude = {SecurityAutoConfiguration.class})
public class ActivitiApplication {
    public static void main(String[] args) {
        SpringApplication.run(ActivitiApplication.class, args);
    }
}
请求路径调整
看 editor-app/app-cfg.js 文件
这个是接口的请求前缀配置

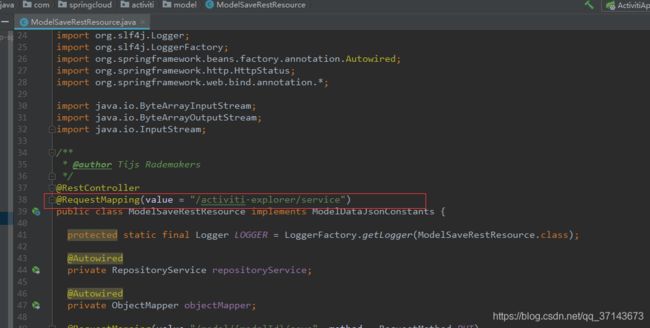
因此在 StencilsetRestResource.java,ModelEditorJsonRestResource.java,ModelSaveRestResource.java 文件上加上 @RequestMapping(value = "/activiti-explorer/service")
以 ModelSaveRestResource.java 为例:

修改 ModelSaveRestResource.java
只需将 saveModel 接口入参做下修改,然后对下方对应的参数做下修改即可
/**
 * @author Tijs Rademakers
 */
@RestController
@RequestMapping(value = "/activiti-explorer/service")
public class ModelSaveRestResource implements ModelDataJsonConstants {

  protected static final Logger LOGGER = LoggerFactory.getLogger(ModelSaveRestResource.class);

  @Autowired
  private RepositoryService repositoryService;

  @Autowired
  private ObjectMapper objectMapper;

  @RequestMapping(value="/model/{modelId}/save", method = RequestMethod.PUT)
  @ResponseStatus(value = HttpStatus.OK)
  public void saveModel(@PathVariable String modelId, String name, String description, String json_xml, String svg_xml) {
    try {

      Model model = repositoryService.getModel(modelId);

      ObjectNode modelJson = (ObjectNode) objectMapper.readTree(model.getMetaInfo());

      modelJson.put(MODEL_NAME, name);
      modelJson.put(MODEL_DESCRIPTION, description);
      model.setMetaInfo(modelJson.toString());
      model.setName(name);

      repositoryService.saveModel(model);

      repositoryService.addModelEditorSource(model.getId(), json_xml.getBytes("utf-8"));

      InputStream svgStream = new ByteArrayInputStream(svg_xml.getBytes("utf-8"));
      TranscoderInput input = new TranscoderInput(svgStream);

      PNGTranscoder transcoder = new PNGTranscoder();
      // Setup output
      ByteArrayOutputStream outStream = new ByteArrayOutputStream();
      TranscoderOutput output = new TranscoderOutput(outStream);

      // Do the transformation
      transcoder.transcode(input, output);
      final byte[] result = outStream.toByteArray();
      repositoryService.addModelEditorSourceExtra(model.getId(), result);
      outStream.close();

    } catch (Exception e) {
      LOGGER.error("Error saving model", e);
      throw new ActivitiException("Error saving model", e);
    }
  }
}
新增 createModel 接口
可以理解为流程页面访问的入口,对流程进行初始化
/**
 * 工作流代码示例
 * @author: linjinp
 * @create: 2019-10-22 10:13
 **/
@RestController
@RequestMapping("/activiti-explorer/model")
public class ActivitiController {

    /**
     * 创建基本模型
     * @param request
     * @param response
     */
    @RequestMapping("/create")
    public void createModel(HttpServletRequest request, HttpServletResponse response){
        try{
            String modelName = "modelName";
            String modelKey = "modelKey";
            String description = "description";

            ProcessEngine processEngine = ProcessEngines.getDefaultProcessEngine();

            RepositoryService repositoryService = processEngine.getRepositoryService();

            ObjectMapper objectMapper = new ObjectMapper();
            ObjectNode editorNode = objectMapper.createObjectNode();
            editorNode.put("id", "canvas");
            editorNode.put("resourceId", "canvas");
            ObjectNode stencilSetNode = objectMapper.createObjectNode();
            stencilSetNode.put("namespace", "http://b3mn.org/stencilset/bpmn2.0#");
            editorNode.put("stencilset", stencilSetNode);
            // 定义新模型
            Model modelData = repositoryService.newModel();

            ObjectNode modelObjectNode = objectMapper.createObjectNode();
            modelObjectNode.put(ModelDataJsonConstants.MODEL_NAME, modelName);
            modelObjectNode.put(ModelDataJsonConstants.MODEL_REVISION, 1);
            modelObjectNode.put(ModelDataJsonConstants.MODEL_DESCRIPTION, description);
            modelData.setMetaInfo(modelObjectNode.toString());
            modelData.setName(modelName);
            modelData.setKey(modelKey);

            //保存模型
            repositoryService.saveModel(modelData);
            repositoryService.addModelEditorSource(modelData.getId(), editorNode.toString().getBytes("utf-8"));
            response.sendRedirect(request.getContextPath() + "/modeler.html?modelId=" + modelData.getId());
        }catch (Exception e){
        }
    }
}
访问页面
https://localhost:8086/activiti-explorer/model/create
之后页面就会被自动重定向到 modeler.html
create 后初始化的数据

简单配个流程

保存,save

看数据表 ACT_RE_MODEL,数据已更新

汉化
下载我上传的 stencilset.json 文件替换掉即可
建议原文件先备份
参考
Activiti-Dmo 模块


