数据挖掘组队学习打卡——Task4:建模调参
文章目录
- Task4 建模调参
-
- 1 学习目标
- 2 内容介绍
- 3 代码示例
-
- 3.1 读取数据,定义函数reduce_mem_usage来调整数据类型,帮助我们减少数据在内存中占用的空间
- 3.2 线性回归&五折交叉验证&模拟真实业务情况
-
- 3.2.1 简单建模
- 3.2.2 五折交叉验证
- 3.2.3 模拟真实业务情况
- 3.2.4 绘制学习率曲线与验证曲线
- 3.3 多种模型对比
-
- 3.3.1 线性模型&嵌入式特征选择
- 3.3.2 非线性模型
- 3.4 模型调参
-
- 3.4.1 贪心调参
-
- 3.4.1.1 贪心算法的基本思路
- 3.4.1.2 贪心算法存在的问题
- 3.4.1.3 贪心算法适用的问题
- 3.4.2 网格调参
-
- 3.4.2.1 网格调参存在的问题及解决方法
- 3.4.3 贝叶斯调参
- 4 总结
Task4 建模调参
详细代码放在了GitHub上。
赛题:零基础入门数据挖掘-二手车交易价格预测
地址:
https://tianchi.aliyun.com/competition/entrance/231784/introduction?spm=5176.12281957.1004.1.38b02448ausjSX
1 学习目标
- 了解常用的机器学习模型并掌握机器学习模型的建模与调参流程
2 内容介绍
1、线性回归模型
- 线性回归模型对于特征的要求
- 处理长尾分布
- 理解线性回归模型
2、模型性能验证
- 评价函数与目标函数
- 交叉验证方法
- 留一验证方法
- 针对时间序列问题的验证
- 绘制学习率曲线
- 绘制验证曲线
3、嵌入式特征选择
- Lasso回归
- Ridge回归
- 决策树
4、模型对比
- 常用线性模型
- 常用非线性模型
5、模型调参
- 贪心调参方法
- 网格调参方法
- 贝叶斯调参方法
3 代码示例
3.1 读取数据,定义函数reduce_mem_usage来调整数据类型,帮助我们减少数据在内存中占用的空间
import pandas as pd
import numpy as np
import warnings
warnings.filterwarnings('ignore')
定义函数reduce_mem_usage,通过调整数据类型来减少数据在内存中占用的空间
def reduce_mem_usage(df):
    '''iterable through all the columns of a dataframe and modify the data type to reduce memory usage.
    '''
    start_mem = df.memory_usage().sum()
    print('Memory usage of dataframe is {:.2f} MB'.format(start_mem))

    for col in df.columns:
        col_type = df[col].dtype

        if col_type != object:
            c_min = df[col].min()
            c_max = df[col].max()
            if str(col_type)[:3] == 'int':
                if c_min > np.iinfo(np.int8).min and c_max < np.iinfo(np.int8).max:
                    df[col] = df[col].astype(np.int8)
                elif c_min > np.iinfo(np.int16).min and c_max < np.iinfo(np.int16).max:
                    df[col] = df[col].astype(np.int16)
                elif c_min > np.iinfo(np.int32).min and c_max < np.iinfo(np.int32).max:
                    df[col] = df[col].astype(np.int32)
                elif c_min > np.iinfo(np.int64).min and c_max < np.iinfo(np.int64).max:
                    df[col] = df[col].astype(np.int64)
            else:
                if c_min > np.finfo(np.float16).min and c_max < np.finfo(np.float16).max:
                    df[col] = df[col].astype(np.float16)
                elif c_min > np.finfo(np.float32).min and c_max < np.finfo(np.float32).max:
                    df[col] = df[col].astype(np.float32)
                else:
                    df[col] = df[col].astype(np.float64)
        else:
            df[col] = df[col].astype('category')

    end_mem = df.memory_usage().sum()
    print('Memory usage after optimization is: {:.2f} MB'.format(end_mem))
    print('Decreased by {:.1f}%'.format(100 * (start_mem - end_mem) / start_mem))
    return df
sample_feature = reduce_mem_usage(pd.read_csv('E:/Git-repository/data_mining/二手车价格预测组队学习/Task3 特征工程/data_for_tree.csv'))
输出:
Memory usage of dataframe is 62099672.00 MB
Memory usage after optimization is: 16520303.00 MB
Decreased by 73.4%
continuous_feature_names = [x for x in sample_feature.columns if x not in ['price', 'brand', 'model', 'brand']]
3.2 线性回归&五折交叉验证&模拟真实业务情况
sample_feature = sample_feature.dropna().replace('-', 0).reset_index(drop=True)
sample_feature['notRepairedDamage'] = sample_feature['notRepairedDamage'].astype(np.float32)
train = sample_feature[continuous_feature_names + ['price']]

train_X = train[continuous_feature_names]
train_y = train['price']
3.2.1 简单建模
from sklearn.linear_model import LinearRegression
model = LinearRegression(normalize=True)
model = model.fit(train_X, train_y)
查看模型的截距和斜率
'intercept:' + str(model.intercept_)
输出:
'intercept:-110670.68277253002'
sorted(dict(zip(continuous_feature_names, model.coef_)).items(), key=lambda x:x[1], reverse=True)
输出:
[('v_6', 3367064.3416418773),
 ('v_8', 700675.5609398658),
 ('v_9', 170630.27723220887),
 ('v_7', 32322.66193201985),
 ('v_12', 20473.6707969639),
 ('v_3', 17868.079541497777),
 ('v_11', 11474.938996701725),
 ('v_13', 11261.764560015463),
 ('v_10', 2683.9200906023975),
 ('gearbox', 881.8225039247513),
 ('fuelType', 363.9042507215941),
 ('bodyType', 189.60271012070683),
 ('city', 44.94975120523033),
 ('power', 28.553901616752416),
 ('brand_price_median', 0.5103728134078794),
 ('brand_price_std', 0.4503634709263301),
 ('brand_amount', 0.14881120395065628),
 ('brand_price_max', 0.0031910186703119504),
 ('SaleID', 5.355989919853205e-05),
 ('train', 2.7008354663848877e-07),
 ('offerType', -2.230750396847725e-06),
 ('seller', -3.391294740140438e-06),
 ('brand_price_sum', -2.1750068681875342e-05),
 ('name', -0.0002980012713119153),
 ('used_time', -0.002515894332887234),
 ('brand_price_average', -0.4049048451011269),
 ('brand_price_min', -2.2467753486885997),
 ('power_bin', -34.42064411726994),
 ('v_14', -274.78411807763786),
 ('kilometer', -372.89752666071104),
 ('notRepairedDamage', -495.19038446277233),
 ('v_0', -2045.0549573548044),
 ('v_5', -11022.986240560502),
 ('v_4', -15121.731109857172),
 ('v_2', -26098.299920528138),
 ('v_1', -45556.18929726618)]
绘制v_9与标签price的散点图
import matplotlib.pyplot as plt
subsample_index = np.random.randint(low=0, high=len(train_y), size=50)
plt.scatter(train_X['v_9'][subsample_index], train_y[subsample_index], color='black')
plt.scatter(train_X['v_9'][subsample_index], model.predict(train_X.loc[subsample_index]), color='blue')
plt.xlabel('v_9')
plt.ylabel('price')
plt.legend(['True Price', 'Predicted Price'], loc='upper right')
print('The predicted price is obvious different from true price')
plt.show()
从图中可以发现,模型预测结果(蓝色点)与真实标签(黑色点)的分布差异较大,且部分预测值出现了小于0的情况,说明模型存在问题
作图观察数据的标签price的分布
import seaborn as sns
print('It is clear to see the price shows a typical exponential distribution')
plt.figure(figsize=(15,5))
plt.subplot(1,2,1)
sns.distplot(train_y)
plt.subplot(1,2,2)
sns.distplot(train_y[train_y < np.quantile(train_y, 0.9)])
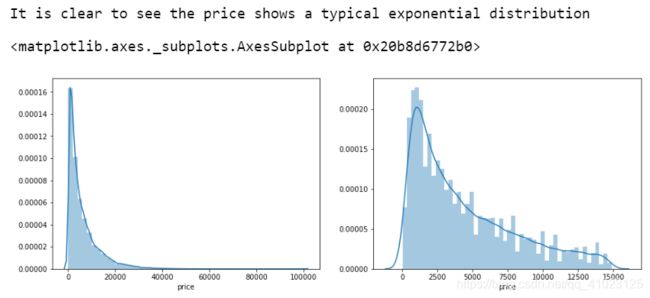
由图可知,price呈现长尾分布(右偏),不符合经典假定,不能直接建模,需要进行处理。对其进行取对数变换 l o g ( x + 1 ) log(x+1) log(x+1),使得price接近正态分布。
train_y_ln = np.log(train_y + 1)
import seaborn as sns
print('The transformed price seems like normal distribution')
plt.figure(figsize=(15,5))
plt.subplot(1,2,1)
sns.distplot(train_y_ln)
plt.subplot(1,2,2)
sns.distplot(train_y_ln[train_y_ln < np.quantile(train_y_ln, 0.9)])
取对数以后的price近似是正态分布。对对数数据建模并查看模型截距和系数。
model = model.fit(train_X, train_y_ln)

print('intercept:' + str(model.intercept_))
sorted(dict(zip(continuous_feature_names, model.coef_)).items(), key=lambda x:x[1], reverse=True)
输出:
intercept:18.750749465570607
[('v_9', 8.052409900567602),
 ('v_5', 5.764236596652759),
 ('v_12', 1.6182081236784163),
 ('v_1', 1.4798310582944711),
 ('v_11', 1.1669016563622117),
 ('v_13', 0.9404711296030676),
 ('v_7', 0.713727308356542),
 ('v_3', 0.6837875771076573),
 ('v_0', 0.008500518010093529),
 ('power_bin', 0.008497969302892117),
 ('gearbox', 0.007922377278335285),
 ('fuelType', 0.006684769706828693),
 ('bodyType', 0.004523520092703198),
 ('power', 0.0007161894205358566),
 ('brand_price_min', 3.334351114743061e-05),
 ('brand_amount', 2.8978797042777754e-06),
 ('brand_price_median', 1.2571172873027632e-06),
 ('brand_price_std', 6.659176363436127e-07),
 ('brand_price_max', 6.194956307517733e-07),
 ('brand_price_average', 5.999345965043507e-07),
 ('SaleID', 2.1194170039647818e-08),
 ('train', 1.8189894035458565e-12),
 ('offerType', -5.3287152468328713e-11),
 ('seller', -1.1784173636897322e-10),
 ('brand_price_sum', -1.5126504215929971e-10),
 ('name', -7.015512588871499e-08),
 ('used_time', -4.12247937235175e-06),
 ('city', -0.0022187824810422333),
 ('v_14', -0.004234223418099023),
 ('kilometer', -0.013835866226884243),
 ('notRepairedDamage', -0.27027942349846473),
 ('v_4', -0.8315701200992444),
 ('v_2', -0.9470842241623264),
 ('v_10', -1.6261466689797768),
 ('v_8', -40.3430074876164),
 ('v_6', -238.7903638550661)]
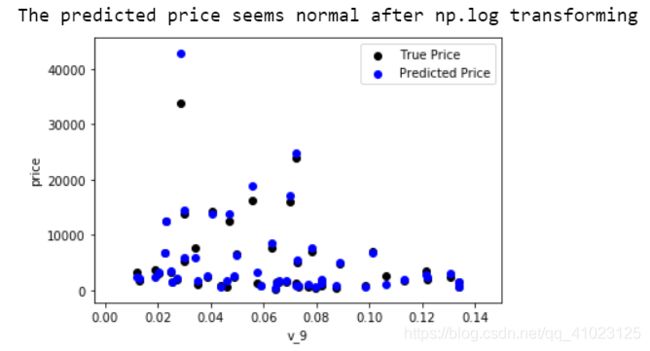
再次进行可视化,观察预测结果与真实值的接近情况。
plt.scatter(train_X['v_9'][subsample_index], train_y[subsample_index], color='black')
plt.scatter(train_X['v_9'][subsample_index], np.exp(model.predict(train_X.loc[subsample_index])), color='blue')
plt.xlabel('v_9')
plt.ylabel('price')
plt.legend(['True Price', 'Predicted Price'], loc='upper right')
print('The predicted price seems normal after np.log transforming')
plt.show()
3.2.2 五折交叉验证
from sklearn.model_selection import cross_val_score
from sklearn.metrics import mean_absolute_error, make_scorer

def log_transfer(func):
    def wrapper(y, yhat):
        result = func(np.log(y), np.nan_to_num(np.log(yhat)))
        return result
    return wrapper
(1) 使用线性回归模型,对未处理标签的特征数据进行五折交叉验证
scores = cross_val_score(model, X=train_X, y=train_y, verbose=1, cv=5, scoring=make_scorer(log_transfer(mean_absolute_error)))
输出:
[Parallel(n_jobs=1)]: Using backend SequentialBackend with 1 concurrent workers.
[Parallel(n_jobs=1)]: Done   5 out of   5 | elapsed:    1.9s finished
print('AVG:', np.mean(scores))
输出:
AVG: 1.3658023920314537
(2) 使用线性回归模型,对处理过标签的特征数据进行五折交叉验证
scores = cross_val_score(model, X=train_X, y=train_y_ln, verbose=1, cv=5, scoring=make_scorer(mean_absolute_error))
输出:
[Parallel(n_jobs=1)]: Using backend SequentialBackend with 1 concurrent workers.
[Parallel(n_jobs=1)]: Done   5 out of   5 | elapsed:    1.2s finished
print('AVG:', np.mean(scores))
输出:
AVG: 0.1932530183704744
scores = pd.DataFrame(scores.reshape(1,-1))
scores.columns = ['cv' + str(x) for x in range(1,6)]
scores.index = ['MAE']
scores
3.2.3 模拟真实业务情况
五折交叉验证在某些与时间相关的数据集上反而反映了不真实的情况,例如将2018年的数据作为训练集,将2017年的数据作为测试集,这显然是不合理的。因此,还可以采用时间顺序对数据集进行分隔。
在本例中,选择靠前时间的4/5样本作为训练集,靠后时间的1/5当作验证集,最终结果与五折交叉验证差距不大。
import datetime
sample_feature = sample_feature.reset_index(drop=True)
split_point = len(sample_feature) // 5 * 4
train = sample_feature.loc[:split_point].dropna()
val = sample_feature.loc[split_point:].dropna()

train_X = train[continuous_feature_names]
train_y_ln = np.log(train['price'] + 1)
val_X = val[continuous_feature_names]
val_y_ln = np.log(val['price'] + 1)

model = model.fit(train_X, train_y_ln)

mean_absolute_error(val_y_ln, model.predict(val_X))
输出:
0.19577667270301025
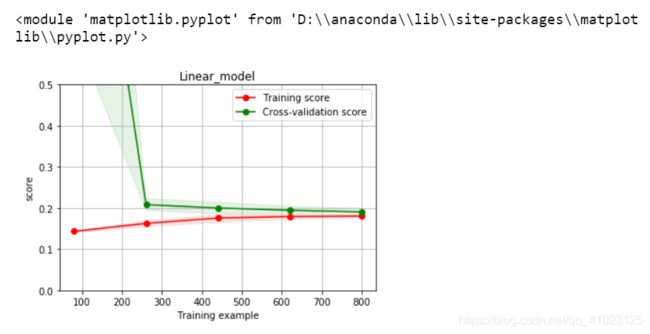
3.2.4 绘制学习率曲线与验证曲线
from sklearn.model_selection import learning_curve, validation_curve
? learning_curve
输出:
Signature:
 learning_curve(
    estimator,
    X,
    y,
    groups=None,
    train_sizes=array([0.1  , 0.325, 0.55 , 0.775, 1.   ]),
    cv=None,
    scoring=None,
    exploit_incremental_learning=False,
    n_jobs=None,
    pre_dispatch='all',
    verbose=0,
    shuffle=False,
    random_state=None,
    error_score=nan,
    return_times=False,
)
Docstring:
Learning curve.

Determines cross-validated training and test scores for different training
set sizes.

A cross-validation generator splits the whole dataset k times in training
and test data. Subsets of the training set with varying sizes will be used
to train the estimator and a score for each training subset size and the
test set will be computed. Afterwards, the scores will be averaged over
all k runs for each training subset size.

Read more in the :ref:`User Guide `.

Parameters
----------
estimator : object type that implements the "fit" and "predict" methods
    An object of that type which is cloned for each validation.

X : array-like, shape (n_samples, n_features)
    Training vector, where n_samples is the number of samples and
    n_features is the number of features.

y : array-like, shape (n_samples) or (n_samples, n_features), optional
    Target relative to X for classification or regression;
    None for unsupervised learning.

groups : array-like, with shape (n_samples,), optional
    Group labels for the samples used while splitting the dataset into
    train/test set. Only used in conjunction with a "Group" :term:`cv`
    instance (e.g., :class:`GroupKFold`).

train_sizes : array-like, shape (n_ticks,), dtype float or int
    Relative or absolute numbers of training examples that will be used to
    generate the learning curve. If the dtype is float, it is regarded as a
    fraction of the maximum size of the training set (that is determined
    by the selected validation method), i.e. it has to be within (0, 1].
    Otherwise it is interpreted as absolute sizes of the training sets.
    Note that for classification the number of samples usually have to
    be big enough to contain at least one sample from each class.
    (default: np.linspace(0.1, 1.0, 5))

cv : int, cross-validation generator or an iterable, optional
    Determines the cross-validation splitting strategy.
    Possible inputs for cv are:

    - None, to use the default 5-fold cross validation,
    - integer, to specify the number of folds in a `(Stratified)KFold`,
    - :term:`CV splitter`,
    - An iterable yielding (train, test) splits as arrays of indices.

    For integer/None inputs, if the estimator is a classifier and ``y`` is
    either binary or multiclass, :class:`StratifiedKFold` is used. In all
    other cases, :class:`KFold` is used.

    Refer :ref:`User Guide ` for the various
    cross-validation strategies that can be used here.

    .. versionchanged:: 0.22
        ``cv`` default value if None changed from 3-fold to 5-fold.

scoring : string, callable or None, optional, default: None
    A string (see model evaluation documentation) or
    a scorer callable object / function with signature
    ``scorer(estimator, X, y)``.

exploit_incremental_learning : boolean, optional, default: False
    If the estimator supports incremental learning, this will be
    used to speed up fitting for different training set sizes.

n_jobs : int or None, optional (default=None)
    Number of jobs to run in parallel.
    ``None`` means 1 unless in a :obj:`joblib.parallel_backend` context.
    ``-1`` means using all processors. See :term:`Glossary `
    for more details.

pre_dispatch : integer or string, optional
    Number of predispatched jobs for parallel execution (default is
    all). The option can reduce the allocated memory. The string can
    be an expression like '2*n_jobs'.

verbose : integer, optional
    Controls the verbosity: the higher, the more messages.

shuffle : boolean, optional
    Whether to shuffle training data before taking prefixes of it
    based on``train_sizes``.

random_state : int, RandomState instance or None, optional (default=None)
    If int, random_state is the seed used by the random number generator;
    If RandomState instance, random_state is the random number generator;
    If None, the random number generator is the RandomState instance used
    by `np.random`. Used when ``shuffle`` is True.

error_score : 'raise' or numeric
    Value to assign to the score if an error occurs in estimator fitting.
    If set to 'raise', the error is raised.
    If a numeric value is given, FitFailedWarning is raised. This parameter
    does not affect the refit step, which will always raise the error.

return_times : boolean, optional (default: False)
    Whether to return the fit and score times.

Returns
-------
train_sizes_abs : array, shape (n_unique_ticks,), dtype int
    Numbers of training examples that has been used to generate the
    learning curve. Note that the number of ticks might be less
    than n_ticks because duplicate entries will be removed.

train_scores : array, shape (n_ticks, n_cv_folds)
    Scores on training sets.

test_scores : array, shape (n_ticks, n_cv_folds)
    Scores on test set.

fit_times : array, shape (n_ticks, n_cv_folds)
    Times spent for fitting in seconds. Only present if ``return_times``
    is True.

score_times : array, shape (n_ticks, n_cv_folds)
    Times spent for scoring in seconds. Only present if ``return_times``
    is True.

Notes
-----
See :ref:`examples/model_selection/plot_learning_curve.py
`
File:      d:\python\lib\site-packages\sklearn\model_selection\_validation.py
Type:      function
def plot_learning_curve(estimator, title, X, y, ylim=None, cv=None, n_jobs=1, train_size=np.linspace(.1, 1.0, 5 )):
    plt.figure()
    plt.title(title)
    if ylim is not None:
        plt.ylim(*ylim)
    plt.xlabel('Training example')
    plt.ylabel('score')
    train_sizes, train_scores, test_scores = learning_curve(estimator, X, y, cv=cv, n_jobs=n_jobs, train_sizes=train_size, scoring=make_scorer(mean_absolute_error))
    train_scores_mean = np.mean(train_scores, axis=1)
    train_scores_std = np.std(train_scores, axis=1)
    test_scores_mean = np.mean(test_scores, axis=1)
    test_scores_std = np.std(test_scores, axis=1)
    plt.grid() # 区域
    plt.fill_between(train_sizes, train_scores_mean - train_scores_std, train_scores_mean + train_scores_std, alpha=0.1, color='r')
    plt.fill_between(train_sizes, test_scores_mean - test_scores_std, test_scores_mean + test_scores_std, alpha=0.1, color='g')
    plt.plot(train_sizes, train_scores_mean, 'o-', color='r', label='Training score')
    plt.plot(train_sizes, test_scores_mean, 'o-', color='g', label='Cross-validation score')
    plt.legend(loc='best')
    return plt
plot_learning_curve(LinearRegression(), 'Linear_model', train_X[:1000], train_y_ln[:1000], ylim=(0.0, 0.5), cv=5, n_jobs=1)
3.3 多种模型对比
train = sample_feature[continuous_feature_names + ['price']].dropna()

train_X = train[continuous_feature_names]
train_y = train['price']
train_y_ln = np.log(train_y + 1)
3.3.1 线性模型&嵌入式特征选择
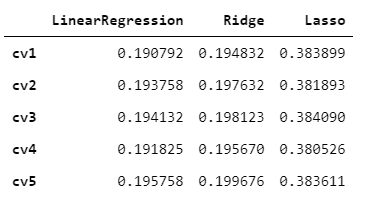
在过滤式和包裹式特征选择方法中,特征选择过程与学习器训练过程有明显的分别。而嵌入式特征选择在学习器训练过程中自动地进行特征选择。嵌入式选择最常用的是L1正则化与L2正则化。在对线性回归模型加入两种正则化方法后,他们分别变成了岭回归与Lasso回归。
from sklearn.linear_model import LinearRegression
from sklearn.linear_model import Ridge
from sklearn.linear_model import Lasso

models = [LinearRegression(), Ridge(), Lasso()]

result = dict()

for model in models:
    model_name = str(model).split('(')[0]
    scores = cross_val_score(model, X=train_X, y=train_y_ln, verbose=0, cv=5, scoring=make_scorer(mean_absolute_error))
    result[model_name] = scores
    print(model_name + ' is finished')
输出:
LinearRe
gression is finished
Ridge is finished
Lasso is finished
对三种方法的效果对比
result = pd.DataFrame(result)
result.index = ['cv' + str(x) for x in range(1,6)]
result
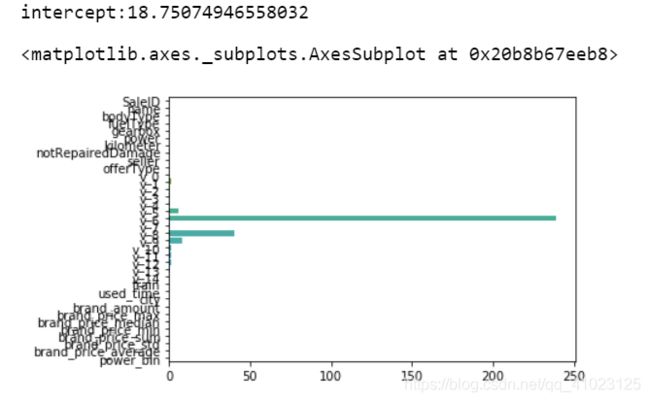
model = LinearRegression().fit(train_X, train_y_ln)
print('intercept:' + str(model.intercept_))
sns.barplot(abs(model.coef_), continuous_feature_names)
L2正则化在拟合过程中通常都倾向于让权值尽可能小,最后构造一个所有参数都比较小的模型。因为一般认为参数值小的模型比较简单,能适应不同的数据集,也在一定程度上避免了过拟合现象。可以设想一下对于一个线性回归方程,若参数很大,那么只要数据偏移一点点,就会对结果造成很大的影响;但如果参数足够小,数据偏移得多一点也不会对结果造成什么影响,专业一点的说法是『抗扰动能力强』
model = Ridge().fit(train_X, train_y_ln)
print('intercept:' + str(model.intercept_))
sns.barplot(abs(model.coef_), continuous_feature_names)
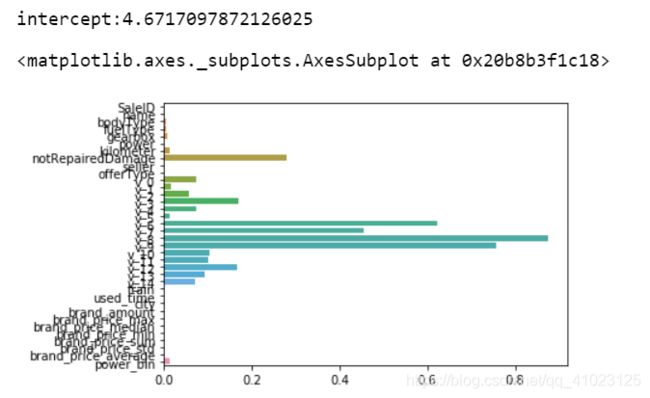
L1正则化有助于生成一个稀疏权值矩阵,进而可以用于特征选择。如下图,我们发现power
与userd_time特征非常重要。
model = Lasso().fit(train_X, train_y_ln)
print('intercept:' + str(model.intercept_))
sns.barplot(abs(model.coef_), continuous_feature_names)

除此之外,决策树通过信息熵或GINI指数选择分裂节点时,优先选择的分裂特征也更加重要,这同样是一种特征选择的方法。XGBoost与LightGBM模型中的model_importance指标正是基于此计算的
3.3.2 非线性模型
from sklearn.linear_model import LinearRegression
from sklearn.svm import SVC
from sklearn.tree import DecisionTreeRegressor
from sklearn.ensemble import RandomForestRegressor
from sklearn.ensemble import GradientBoostingRegressor
from sklearn.neural_network import MLPRegressor
from xgboost.sklearn import XGBRegressor
from lightgbm.sklearn import LGBMRegressor
models = [LinearRegression(), DecisionTreeRegressor(), RandomForestRegressor(), GradientBoostingRegressor(), MLPRegressor(solver='lbfgs', max_iter=100), XGBRegressor(n_estimators=100, objective='reg:squarederror'), LGBMRegressor(n_estimators=100)]
result = dict()
for model in models:
    model_name = str(model).split('(')[0]
    scores = cross_val_score(model, X=train_X, y=train_y_ln, verbose=0, cv=5, scoring=make_scorer(mean_absolute_error))
    result[model_name] = scores
    print(model_name + ' is finished')
LinearRegression is finished
DecisionTreeRegressor is finished
RandomForestRegressor is finished
GradientBoostingRegressor is finished
MLPRegressor is finished
XGBRegressor is finished
LGBMRegressor is finished
result = pd.DataFrame(result)
result.index = ['cv' + str(x) for x in range(1,6)]
result
3.4 模型调参
## LGB的参数集合:

objective = ['regression', 'regression_l1', 'mape', 'huber', 'fair']

num_leaves = [3,5,10,15,20,40, 55]
max_depth = [3,5,10,15,20,40, 55]
bagging_fraction = []
feature_fraction = []
drop_rate = []
3.4.1 贪心调参
贪心算法是指,在对问题求解时,总是做出在当前看来是最好的选择,即局部最优解。
注意:贪心算法并不是对所有问题都能得到整体最优解,选择的贪心策略必须具备无后效性(即某个状态以后的过程不会影响以前的状态,只与当前状态有关。)
3.4.1.1 贪心算法的基本思路
- 建立数学模型来描述问题
- 把求解的问题分成若干个子问题
- 对每个子问题求解,得到子问题的局部最优解
- 把子问题的解局部最优解合成原来问题的一个解
3.4.1.2 贪心算法存在的问题
- 不能保证求得的最后解是最佳的
- 不能用来求最大值或最小值的问题
- 只能求满足某些约束条件的可行解的范围
3.4.1.3 贪心算法适用的问题
局部最优策略能导致产生全局最优解。
best_obj = dict()
for obj in objective:
    model = LGBMRegressor(objective=obj)
    score = np.mean(cross_val_score(model, X=train_X, y=train_y_ln, verbose=0, cv = 5, scoring=make_scorer(mean_absolute_error)))
    best_obj[obj] = score

best_leaves = dict()
for leaves in num_leaves:
    model = LGBMRegressor(objective=min(best_obj.items(), key=lambda x:x[1])[0], num_leaves=leaves)
    score = np.mean(cross_val_score(model, X=train_X, y=train_y_ln, verbose=0, cv = 5, scoring=make_scorer(mean_absolute_error)))
    best_leaves[leaves] = score

best_depth = dict()
for depth in max_depth:
    model = LGBMRegressor(objective=min(best_obj.items(), key=lambda x:x[1])[0],
                          num_leaves=min(best_leaves.items(), key=lambda x:x[1])[0],
                          max_depth=depth)
    score = np.mean(cross_val_score(model, X=train_X, y=train_y_ln, verbose=0, cv = 5, scoring=make_scorer(mean_absolute_error)))
    best_depth[depth] = score
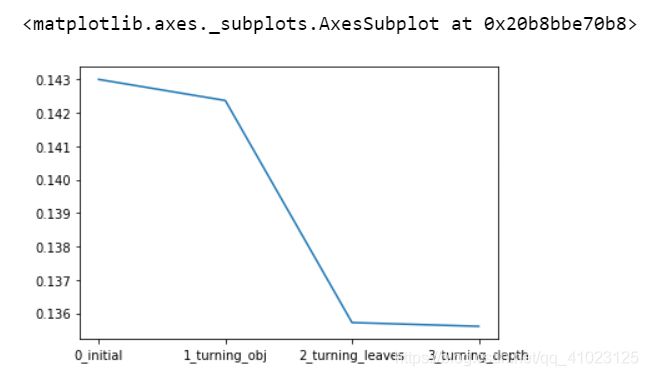
sns.lineplot(x=['0_initial','1_turning_obj','2_turning_leaves','3_turning_depth'], y=[0.143 ,min(best_obj.values()), min(best_leaves.values()), min(best_depth.values())])
3.4.2 网格调参
通过循环遍历,尝试每一种参数组合,返回最好的得分值的参数组合
3.4.2.1 网格调参存在的问题及解决方法
存在的问题:
原来的数据集分割为训练集和测试集之后,其中测试集起到的作用有两个,一个是用来调整参数,一个是用来评价模型的好坏,这样会导致评分值会比实际效果要好。(因为我们将测试集送到了模型里面去测试模型的好坏,而我们目的是要将训练模型应用在没使用过的数据上。)
解决方法:
把数据集划分三份,一份是训练集(训练数据),一份是验证集(调整参数),一份是测试集(测试模型)。
进一步改进:
交叉验证
from sklearn.model_selection import GridSearchCV

parameters = {
     'objective': objective , 'num_leaves': num_leaves, 'max_depth': max_depth}
model = LGBMRegressor()
clf = GridSearchCV(model, parameters, cv=5)
clf = clf.fit(train_X, train_y)

clf.best_params_
输出:
{'max_depth': 15, 'num_leaves': 55, 'objective': 'regression'}
model = LGBMRegressor(objective='regression', num_leaves=55, max_depth=15)
np.mean(cross_val_score(model, X=train_X, y=train_y_ln, verbose=0, cv = 5, scoring=make_scorer(mean_absolute_error)))
输出:
0.13754833106731224
3.4.3 贝叶斯调参
基于目标函数的过去评估结果建立替代函数(概率模型),来找到最小化目标函数的值。贝叶斯方法与随机或网格搜索的不同之处在于,它在尝试下一组超参数时,会参考之前的评估结果,因此可以省去很多无用功。
贝叶斯优化问题有四个部分:
- 目标函数:我们想要最小化的内容,在这里,目标函数是机器学习模型使用该组超参数在验证集上的损失。
- 域空间:要搜索的超参数的取值范围
- 优化算法:构造替代函数并选择下一个超参数值进行评估的方法。
- 结果历史记录:来自目标函数评估的存储结果,包括超参数和验证集上的损失。
参考:https://blog.csdn.net/linxid/article/details/81189154
注意:安装bayes_opt时代码是pip install bayesian-optimization
from bayes_opt import BayesianOptimization
def rf_cv(num_leaves, max_depth, subsample, min_child_samples):
    val = cross_val_score(
        LGBMRegressor(objective = 'regression_l1',
            num_leaves=int(num_leaves),
            max_depth=int(max_depth),
            subsample = subsample,
            min_child_samples = int(min_child_samples)
        ),
        X=train_X, y=train_y_ln, verbose=0, cv = 5, scoring=make_scorer(mean_absolute_error)
    ).mean()
    return 1 - val
rf_bo = BayesianOptimization(
    rf_cv,
    {

    'num_leaves': (2, 100),
    'max_depth': (2, 100),
    'subsample': (0.1, 1),
    'min_child_samples' : (2, 100)
    }
)
rf_bo.maximize()
输出:
|   iter    |  target   | max_depth | min_ch... | num_le... | subsample |
-------------------------------------------------------------------------
|  1        |  0.8344   |  24.34    |  74.73    |  8.491    |  0.3154   |
|  2        |  0.8611   |  89.8     |  69.78    |  40.74    |  0.1787   |
|  3        |  0.8575   |  27.09    |  68.54    |  31.62    |  0.8848   |
|  4        |  0.8576   |  90.63    |  77.76    |  31.26    |  0.7619   |
|  5        |  0.8671   |  82.08    |  22.69    |  74.48    |  0.2662   |
|  6        |  0.8671   |  85.13    |  20.08    |  75.15    |  0.4367   |
|  7        |  0.8252   |  3.163    |  96.66    |  98.41    |  0.5254   |
|  8        |  0.8119   |  97.99    |  4.623    |  4.422    |  0.4356   |
|  9        |  0.8406   |  4.365    |  3.205    |  94.66    |  0.7153   |
|  10       |  0.869    |  99.44    |  99.87    |  95.25    |  0.6397   |
|  11       |  0.8642   |  63.93    |  99.93    |  54.82    |  0.7661   |
|  12       |  0.8692   |  68.1     |  63.35    |  99.82    |  0.9299   |
|  13       |  0.8691   |  98.39    |  53.18    |  95.09    |  0.9908   |
|  14       |  0.8659   |  51.37    |  38.89    |  64.43    |  0.8853   |
|  15       |  0.869    |  88.02    |  2.4      |  99.21    |  0.8957   |
|  16       |  0.8674   |  84.96    |  81.31    |  77.36    |  0.9548   |
|  17       |  0.8692   |  95.46    |  54.46    |  93.15    |  0.3872   |
|  18       |  0.8693   |  67.01    |  14.53    |  99.91    |  0.4595   |
|  19       |  0.8695   |  94.95    |  29.31    |  99.99    |  0.8439   |
|  20       |  0.8642   |  99.98    |  99.05    |  54.31    |  0.7391   |
|  21       |  0.8672   |  53.27    |  70.22    |  75.66    |  0.1003   |
|  22       |  0.8692   |  78.18    |  44.64    |  98.83    |  0.1092   |
|  23       |  0.8692   |  76.7     |  22.91    |  99.41    |  0.9466   |
|  24       |  0.8692   |  96.01    |  83.84    |  99.89    |  0.8283   |
|  25       |  0.869    |  98.86    |  13.91    |  98.8     |  0.129    |
|  26       |  0.8685   |  69.93    |  40.62    |  90.86    |  0.9824   |
|  27       |  0.869    |  74.62    |  5.823    |  99.72    |  0.1114   |
|  28       |  0.8692   |  98.71    |  79.88    |  99.92    |  0.4378   |
|  29       |  0.869    |  99.52    |  2.095    |  99.26    |  0.9853   |
|  30       |  0.8692   |  97.7     |  44.04    |  99.84    |  0.1654   |
=========================================================================
1 - rf_bo.max['target']
输出:
0.13052894587373443
查看模型的提升度
plt.figure(figsize=(13,5))
sns.lineplot(x=['0_origin', '1_log_transfer', '2_L1_&_L2', '3_change_model', '4_parameter_turning'], y=[1.36, 0.19, 0.19, 0.14, 0.13] )
4 总结
1、在安装xgboost和lightgbm时,cmd里安装成功了,但是import的时候报错,卸载重装依然是这样,我用的是vscode编辑器,试了一下换成anaconda自带的jupyter notebook也不行。在群里问大家,猜想可能是版本的问题,在jupyter里新建文件,发现有两种选项,一个是python3,另一个是python3.7.6,分别试了一下,发现只有在python3文件中import xgboost才不会报错,应该就是版本匹配的问题。在vscode中将解释器由python3.7.6换成3.7.3就解决了。可能是电脑里有多个版本的python,导致出错。
2、这几天事情比较多,距离上一篇特征工程过去了很久,有点忘了前面的内容,数据分析需要对数据比较熟悉,后续分析才不会一头雾水。

