Speeding up Gradle builds
Speeding up Gradle builds
A common complaint among Android developers that switch to Gradle is that the build time for their projects increases significantly. Gradle provides a lot of flexibility, but this power comes at the cost of a slower build process. Luckily there are several ways to speed things up.
Maven Central vs. JCenter
Quick fix: change every occurrence of mavenCentral() to jcenter()
For a long time, Android Studio would download the indices for Maven Central specifically when running the first build. These indices could use up several gigabytes and downloading this amount of data obviously takes a long time. This download process was hidden from developers, so it seemed like Android Studio was just stuck during the build.
This issue has since been solved, and the latest versions of Android Studio should not have this behavior anymore. But you might as well play it safe and just use jcenter(), as there are no disadvantages at all. You can read up on this bug (or was it a feature?) on Google’s issue tracker.
Get the latest version of Gradle
Quick fix: update the version of Gradle used in your projects
The guys at Gradleware (the company that is driving the development of Gradle) are spending a lot of time on improving the experience for developers, and making Gradle faster is a high priority. The latest versions have seen some improvement in speed and upgrading can shave a few seconds off your build times.
Since Android Studio 1.3, Gradle version 2.4 is the default. But you might not have upgraded your projects yet. There are two ways to get started with Gradle version 2.4: Manually editing the Gradle wrapper properties file or using an Android Studio dialog.
The properties file for the Gradle wrapper can be found in your project folder under gradle/wrapper/and is called gradle-wrapper.properties. The content of that file might look like this:
#Wed Apr 10 15:27:10 PDT 2013
distributionBase=GRADLE_USER_HOME
distributionPath=wrapper/dists
zipStoreBase=GRADLE_USER_HOME
zipStorePath=wrapper/dists
distributionUrl=https\://services.gradle.org/distributions/gradle-2.2.1-all.zip
You can manually change the version number 2.2.1 to 2.4 and the next time you run the wrapper, the new version is downloaded automatically.
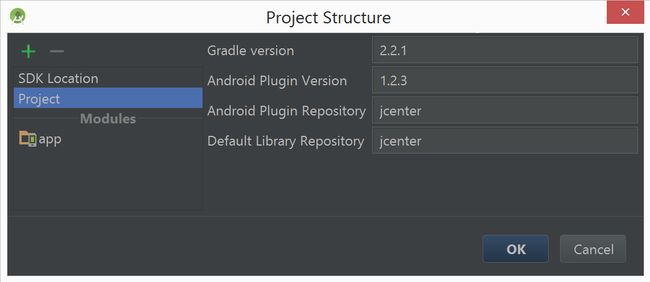
Using Android Studio is even easier! Open the Project Structure dialog and click on Project to see the Gradle settings for your project. Here you can change the version number, again, to 2.4, and Android Studio will take care of the rest.
Gradle properties
Quick fix: Change your Gradle properties
There are a few Gradle properties that can speed up your builds a bit.
org.gradle.parallel=true
org.gradle.daemon=true
org.gradle.jvmargs=-Xms256m -Xmx1024m
Enabling parallel builds with org.gradle.parallel is only useful if your project has multiple modules. You might, for example, have an Android app, a Java library, an Android project library, and an Android Wear module in the same project. When you enable parallel builds, some of the modules can be built at the same time, making use of all the cores in your machine.
The Gradle daemon is a background process that is started the first time you run the build. Subsequent builds will reuse that background process. This means that the startup cost for any build is a lot lower and Gradle will start a lot faster. You can find more information on the daemon in the Gradle documentation. Android Studio enables the daemon by default, so this setting only affects builds triggered from the command line interface.
Finally, you can tweak the parameters of the Java Virtual Machine. This will speed up the build itself. You can find a nice explanation on these settings in this StackOverflow answer.
How to use Gradle properties
You can set these properties locally in your project by creating a file called gradle.properties in the project root, or you can set them globally for all your projects by creating the same file in your home directory (%UserProfile%\.gradle on Windows, ~/.gradle on Linux and Mac OS X). It is a good practice to set the properties in your home directory, rather than on a project level. On a build server, you usually want to keep memory consumption low, and the duration of the build is not that important. Setting these settings on a project level would change the build server behavior as well. (You are using a build server, right?)
Speeding up multi-module builds
Building modules separately
If you have several modules in your project and you make changes to the app, but not the rest, you can manually make sure that Gradle only builds the app. You can run gradlew :app:build (dependening on the names of your modules) to build the app and not have Gradle touch the other modules.
In case you want to build several modules, but not all, you can just combine the build tasks: gradlew :app:build :moduledirectoryname:build. That way you can avoid going through Gradle’s configuration phase twice.
Excluding modules from the build
To extend on the previous tip, you can also exclude certain tasks by using the command-line option -xor --exclude-task. For example, if you want to build all your modules, except for one, you can run a command like this: gradlew assemble -x :libraryproject:assemble. If the task you exclude has any dependencies, then those dependencies are also exluded from the build.
Profiling
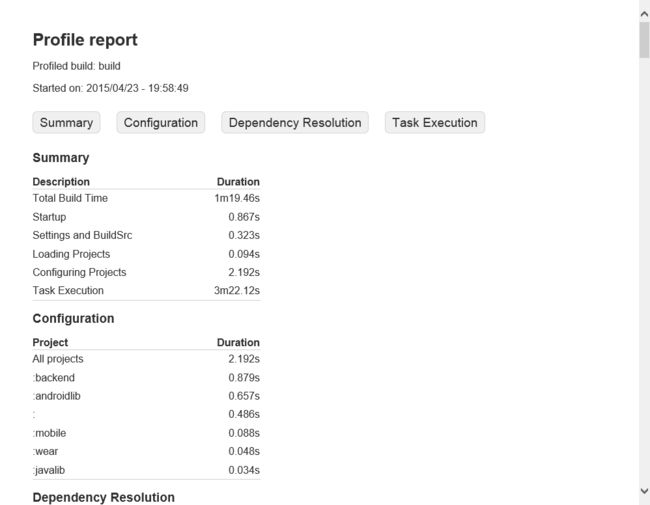
If your builds are extremely slow and you want to figure out the cause for this, you can try profiling your build process. You can add the --profile flag to any Gradle task. Adding this flag will create a report under build/reports/profile.
This report shows an overview of where time is spent when running a certain task.
By the way…
I wrote a book! It is titled “Gradle for Android” and will be available in June. (You can already order it onPackt’s website.) I got a lot of inspiration and ideas while I was writing, and there are a few things that I had to leave out of the book, but would still like to get out there. This means that I will be doing some more Gradle posts the coming weeks. So stay tuned for more Gradle goodness!


