Linux下 MemCache 部署以及介绍 ;
一 、 MemCache 简介 ;
memcached 是一款开源的、高性能的纯内存缓存服务软件,mem 是内存的意思 ,cache 是缓存的意思 , d 是 daemon 的意思
memcache 是项目的名字,诞生于 2003 年,memcached 服务分为 客户端和服务端两部分,C/S 架构 ;
缓存数据库包含 ; memcache redis ,它们的 数据是存储在内存中,而内存的速度远远快于磁盘加快网页响应速度 ;
NOSQL 数据库;not only SQL ( 非关系型数据库 ) ;
memcache缓存数据库的并发 ; --->> 10w
memcache的缺点就是内存的缺点 ---->> 断点数据丢失
企业中常用的memcache 架构 : MySQL + memcache (互补一下 )
这里说一下 Redis 优点 ;
Redis 工作区域在内存,但是会定时的将内存的数据保存到磁盘中 。
二 、MemCache 原理以及优点 ;
再启动 memcache 的时候 ,需要指定内存大小,根据指定的内存大小会被分配一个内存空间,当我们读取数据库的各类业务数据后,数据会同时放入到memcache 缓存中,当用户下一次请求同样的数据时,程序直接去memcache 缓存中取数据,直接返回给用户 。
优点 :
① 、 对于用户而言,用户访问网页更快了,体验好
② 、对于网站来说,数据库的压力降低了,只有当内存没有数据的时候才会去请求数据库,第一次写入数据是会请求数据库。
因为 memcached 是直接从内存读取数据的很快 ,而MySQL是从磁盘取数据的,上面也说了内存的响应速度比磁盘快很多 。
还有就是一般公司会有 “预热” 就是先把MySQL 中的数据放到 memcache 中 。
③ 、提升了网站的并发访问,减少服务器数量 ;
三 、MySQL + MemCache 工作场景 ;
数据读取流程 ;
步骤① 、memcache 中没有发现用户需要的数据,程序只能到MySQL中读取,优先会把数据返回给用户,其次会将这个数据缓存到 memcache中 。
步骤② 、程序会优先判断这个数据是否存在 memcache 中,如果在直接从memcache 中返回给用户,如果不在重复步骤①
memcache 可以作为数据库的前端缓存应用 ;
1 , 完整缓存 ;
例如京东的商品分类,就可以事先放到 memcache 中 , 然后在对外提供数据的访问,这个叫 “ 预热 ” 就是先把数据放到memcache中提供用户访问,所以数据库的压力就降低了 。
2 ,热点缓存 ;
热点缓存一般是指由用户更新商品,列如淘宝卖家,卖家新增商品后需要保证数据中和缓存中的数据一致 ;
完整缓存: 缺点是需要消耗大量的内存空间 ;
热点缓存:将重要的数据缓存到 memcache 中,但是要注意数据一致性的问题 ,需要保证memcache的数据和mysql一致
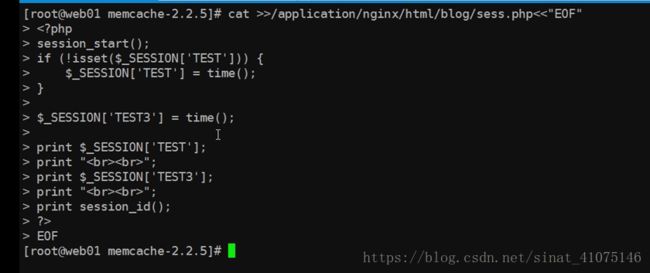
四 、 cookie 与 session 了解 ;
企业案例 ;
五 、 部署安装memcache ;
一 、环境检查
[root@web01 ~]# cat /etc/redhat-release
CentOS release 6.9 (Final)
[root@web01 ~]# uname -r
2.6.32-696.el6.x86_64
[root@web01 ~]# getenforce
Disabled
[root@web01 ~]# /etc/init.d/iptables status
iptables:未运行防火墙。
[root@web01 ~]# ip a
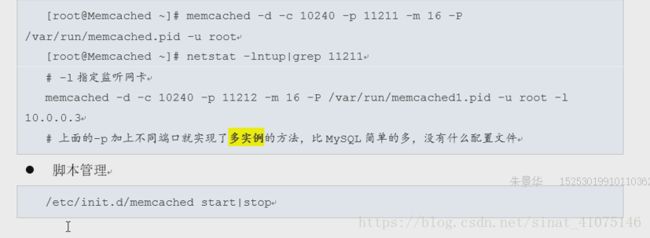
[root@web01 ~]# yum -y install memcached ---->> 使用 yum 安装memcache
总下载量:69 k
下载软件包:
memcached-1.4.4-5.el6.x86_64.rpm | 69 kB 00:00
已安装:
memcached.x86_64 0:1.4.4-5.el6
完毕!
5.1 、memcache 基本参数 ;
-p 监听的端口
-l 连接的IP地址, 默认是本机
-d start 启动memcached服务
-d restart 重起memcached服务
-d stop|shutdown 关闭正在运行的memcached服务
-d install 安装memcached服务
-d uninstall 卸载memcached服务
-u 以的身份运行 (仅在以root运行的时候有效)
-m 最大内存使用,单位MB。默认64MB
-M 内存耗尽时返回错误,而不是删除项
-c 最大同时连接数,默认是1024
-f 块大小增长因子,默认是1.25
-n 最小分配空间,key+value+flags默认是48
-h 显示帮助
5.2 ,memcache 启动的两种方式 ;
[root@web01 ~]# /etc/init.d/memcached start
正在启动 memcached: [确定]
[root@web01 ~]# netstat -lntup | grep memcached
tcp 0 0 0.0.0.0:11211 0.0.0.0:* LISTEN 1815/memcached
tcp 0 0 :::11211 :::* LISTEN 1815/memcached
udp 0 0 0.0.0.0:11211 0.0.0.0:* 1815/memcached
udp 0 0 :::11211 :::* 1815/memcached
[root@web01 ~]#
[root@web01 ~]# vim /etc/init.d/memcached
--->> 这个脚本可以直接启动memcache ,如果想做memcache 多实例的话直接把这个脚本在复制一份变更一下端口即可 。
六 ,管理使用memcache ;
memcache 存数据使用 set 查数据库 get 删除 delete
通过 “ nc ” 写入 ;
[root@web01 ~]# printf "set key008 0 0 10\r\noldboy0987\r\n"
set key008 0 0 10
oldboy0987
printf --->> 命令可以识别出换行符 所以就直接换行了 。
set --->> 设置一个键值 叫 key008
第二个 0 --->> 表示超时时间,key的超时时间 0 就表示永不超时永不死亡
10 表示 --->> 插入的数据有多少个字符
注 : 生产环境中这些是开发写程序来直接运算的,这里只大概了解每个参数即可
==================================================================================
[root@web01 ~]# printf "set key008 0 0 10\r\noldboy0987\r\n"|nc 127.0.0.1 11211
STORED ---->> 表示数据存储成功
[root@web01 ~]# printf "get key008\r\n"|nc 127.0.0.1 11211 ---->> 查看数据
VALUE key008 0 10
oldboy0987
END
[root@web01 ~]#
[root@web01 ~]# printf "set key009 0 10 9\r\nmemca0987\r\n"|nc 127.0.0.1 11211
STORED
[root@web01 ~]# printf "get key009\r\n"|nc 127.0.0.1 11211
VALUE key009 0 9
memca0987
END
[root@web01 ~]#
10 表示 10 秒之后就自动删除
memcache 状态信息 ;
[root@web01 ~]# telnet 10.0.0.8 11211
Trying 10.0.0.8...
Connected to 10.0.0.8.
Escape character is '^]'.
stats
STAT pid 1815
STAT uptime 3848
STAT time 1537111092
STAT version 1.4.4
STAT pointer_size 64
STAT rusage_user 0.129980
STAT rusage_system 0.107983
STAT curr_connections 10
STAT total_connections 19
STAT connection_structures 11
STAT cmd_get 2
STAT cmd_set 3
STAT cmd_flush 0
STAT get_hits 2
STAT get_misses 0
STAT delete_misses 0
STAT delete_hits 0
STAT incr_misses 0
STAT incr_hits 0
STAT decr_misses 0
STAT decr_hits 0
STAT cas_misses 0
STAT cas_hits 0
STAT cas_badval 0
STAT auth_cmds 0
STAT auth_errors 0
STAT bytes_read 214
STAT bytes_written 122
STAT limit_maxbytes 67108864
STAT accepting_conns 1
STAT listen_disabled_num 0
STAT threads 4
STAT conn_yields 0
STAT bytes 162
STAT curr_items 2
STAT total_items 2
STAT evictions 0
END
监控 memcache 参数 ;
可以监控以下的几项来进行监控 memcache 是否正常 ;
① , 监听端口 11211 或者 进程 ;
② ,可以模拟用户先 set 后 get,对比get内容是不是 set 的,crond 、nginx 、zabbix ;
③ ,监控命中百分比 ;
④ ,也可以监控响应时间以及需要的状态 ;
可以用 gnuplot rrdtool 等绘图工具出图 。
七 、 memcache 客户端安装 ;
[root@web01 ~]# wget http://pecl.php.net/get/memcache-2.2.5.tgz
[root@web01 ~]# tar zxvf memcache-2.2.5.tgz
[root@web01 ~]# cd memcache-2.2.5
[root@m01 memcache-2.2.5]# /application/php/bin/phpize ----->> 告诉php 新装了个模块过来认识一下
Configuring for:
PHP Api Version: 20121113
Zend Module Api No: 20121212
Zend Extension Api No: 220121212
[root@m01 memcache-2.2.5]#
[root@web01 memcache-2.2.5]# ./configure --enable-memcache --with-php-config=/application/php/bin/php-congig --with-zlib-dir
注意 ; 这里是需要 php 作为基础环境的,根据自己配置的 PHP 来安装 ;
[root@web01 memcache-2.2.5]# make && make install --->> 出现以下结果表示安装成功 ;
Installing shared extensions: /application/php-5.5.32/lib/php/extensions/no-debug-non-zts-20121212/
让模块生效,因为默认的是安装完后不生效的 ;
[root@m01 memcache-2.2.5]# sed -i '$a extension=memcache.so' /application/php/lib/php.ini
[root@m01 memcache-2.2.5]# ll /application/php-5.5.32/lib/php/extensions/no-debug-non-zts-20121212/
总用量 252
-rwxr-xr-x 1 root root 257920 9月 5 05:37 memcache.so
[root@m01 memcache-2.2.5]#
重启 ;
[root@m01 memcache-2.2.5]# pkill php
[root@m01 memcache-2.2.5]# /application/php/sbin/php-fpm -t
[05-Sep-2018 05:50:46] NOTICE: configuration file /application/php-5.5.32/etc/php-fpm.conf test is successful
[root@m01 memcache-2.2.5]# /application/php/sbin/php-fpm
[root@m01 memcache-2.2.5]# /application/php/bin/php -m |grep memcache
memcache
[root@m01 memcache-2.2.5]#


