Win10+PyCharm+Anaconda安装face_recognition全过程
1. Anaconda 的安装教程
Anaconda 官网下载地址:https://www.continuum.io/downloads
目前已经更新到支持python3.8,但是dlib库和face_recognition库没有支持这么新的,所以最好选择Python3.6+Anaconda5.1及之前版本。
Anaconda官方下载地址:https://repo.continuum.io/archive/
当然,也可以在官网下载最新版本的 Anaconda3,然后根据自己需要设置成 python 3.6。
安装Anaconda请参考https://blog.csdn.net/u012318074/article/details/77075209/
安装完成后 进入cmd 输入python 出现如下图所示 则安装成功!
2.安装PyCharm
请参考https://www.runoob.com/w3cnote/pycharm-windows-install.html
安装版本无要求,我装的是最新的
3.anconda 使用
打开 cmd
查看软件版本号
Python --version #查看Python版本
conda --version #查看conda的版

更新conda
conda upgrade --all

查看当前的编译环境
conda info --e

查看已经安装的packages
conda list
(3)创建新的环境:conda create -n env_name python=python_version

(4)激活某个环境:activate env_name (source activate env_name)
           例:  activate py36 #切换Python编译环境至py36
(5)退出某个环境:deactivate (source deactivate)

(6)复制某个环境:conda create -n env_name –clone clone_env_name

(7)删除某个环境:conda remove -n env_name –all

(8)安装包:
conda install package_name  or conda install -n env_name package_name
例 :conda install scipy #安装scipy,安装在默认的Python环境中
        conda install -n python2 numpy #在Python2编译环境中安装numpy包
(9)移除包:
conda remove package_name   or  conda remove -n env_name package_name
带*的是root默认的Python环境
利用conda 创建一个python3.6的环境:
conda create -n py36 python=3.6
然后激活py36:
activate py36
此时会在Anaconda的安装目录下的envs目录中多出一个工作环境:D:\Conda\envs\py36
4.Pycharm应用Anaconda
File -> setting
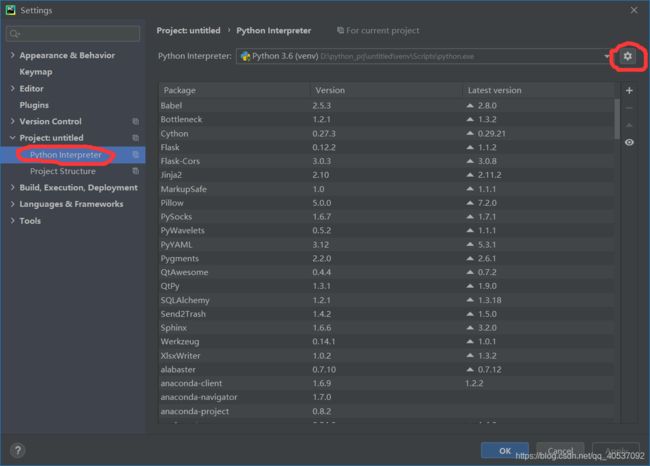
点开设置的图标后选择show all,然后点+号然后选择之前安装的Anaconda安装目录下的python.exe,然后选择下面两个勾号,最后选择OK,如果电脑配置不好的话可能会经过一段漫长的等待,不勾那两个对号会快一点:

5.添加国内镜像
conda config --add channels https://mirrors.tuna.tsinghua.edu.cn/anaconda/pkgs/free/
conda config --add channels https://mirrors.tuna.tsinghua.edu.cn/anaconda/pkgs/main/
conda config --set show_channel_urls yes
此时,目录 C:\Users<你的用户名> 下就会生成配置文件.condarc
删除上述配置文件 .condarc 中的第三行 (- default),然后保存,最终版本文件如下:
查看是否生效,通过命令 conda info 查看当前配置信息,内容如下,即修改成功,关注 channel URLs 字段内容
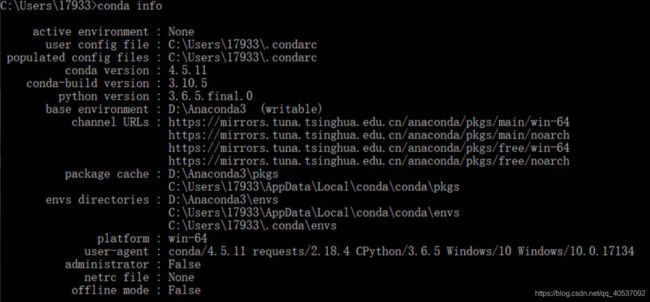
6.正式开始安装face_recognition相关库
去https://pypi.org/project/dlib/#history 直接下一个支持python3.6 且版本号大于19.4的dlib,格式为whl
去https://pypi.org/project/face_recognition/1.2.2/#files 下载 最新版的 face_recognition 格式为whl
懒得搜索的可以直接在我的博客里下载链接:
[dlib+face_recognition+opencv_python下载连接]
然后可以在pycharm中直接操作跟CMD一样效果,点击pycharm左下角的Terminal如下图所示: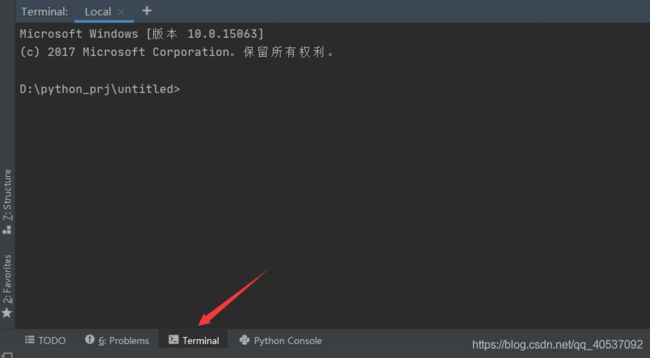
安装dlib:
跳转命令: 切换c盘d盘: C: 和 D:
切换目录: cd D:\python_prj\untitled
跳转到下载dlib文件的目录,然后执行下面代码:
pip install dlib-19.6.0-cp36-cp36m-win_amd64.whl
可能会遇到的问题:
dlib-19.6.0-cp36-cp36m-win_amd64.whl is not a supported wheel on this platform.
遇到这种问题应该是python的版本和此安装包的版本不对应,或者系统和安装包的系统支持不对应,如果是python3.6*应该是cp36可以用以下命令查看你python的版本:
输入:
python									//进入到python控制台
import pip								//导入pip包
print(pip.pep425tags.get_supported())	//打印环境信息
下载对应版本即可解决问题。
然后直接安装face_recognition会出现提示需要先安装Visual Studio for C++
所以开始安装Visual Studio for C++:
官方下载地址:https://visualstudio.microsoft.com/zh-hans/vs/features/cplusplus/

下载之后安装Visual Studio for C++参考官方安装教程:
https://docs.microsoft.com/zh-cn/cpp/build/vscpp-step-0-installation?view=vs-2019
最后开始安装face_recognition:
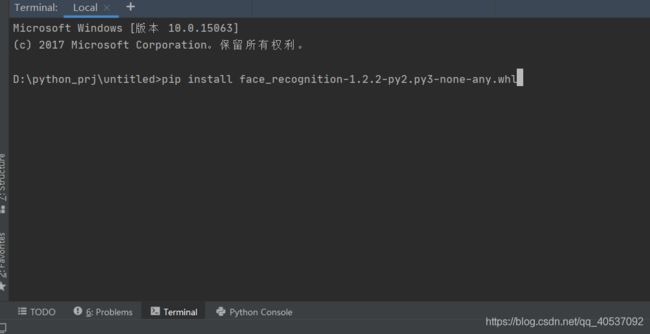

最后出现Successfully就成功了。
7.简单应用
想要实现效果最好安装opencv
方法一:
在pycharm中:File -> setting

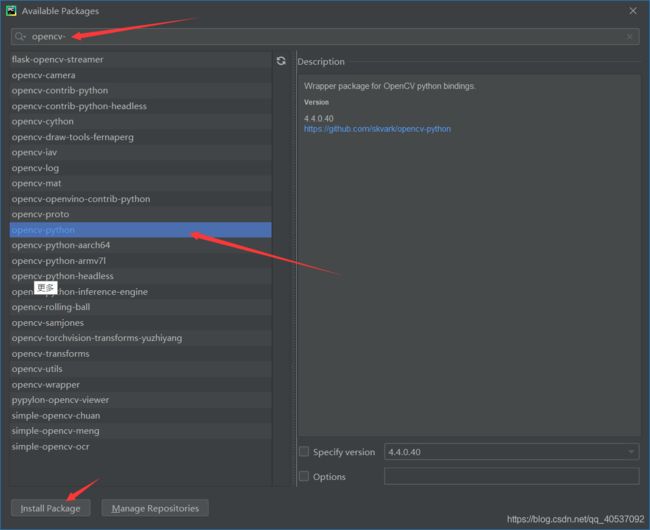
方法二:opencv安装方式和之前安装dlib库一样:
非官方下载地址:https://www.lfd.uci.edu/~gohlke/pythonlibs/#opencv
因为我的python版本是3.6所以选择:
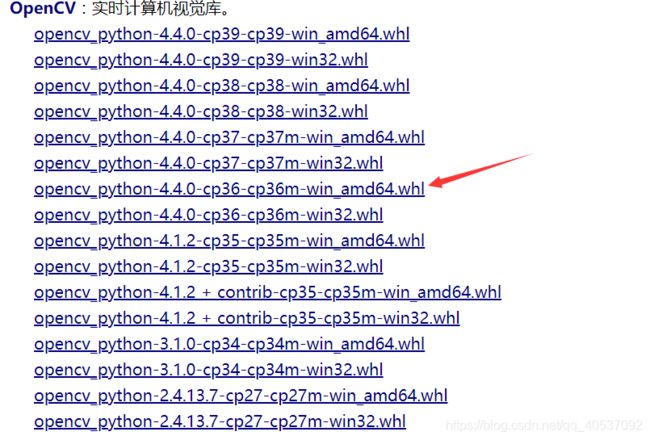
然后pip install opencv_python-4.4.0-cp36-cp36m-win_amd64.whl
实时视频采集检测图像:
需要有摄像头,如果是笔记本自带摄像头需要修改cv2.VideoCapture(0)为cv2.VideoCapture(1)
然后将奥巴马和郭富城的图片放到指定位置即可识别出来:
import face_recognition
import cv2
import numpy as np

# This is a demo of running face recognition on live video from your webcam. It's a little more complicated than the
# other example, but it includes some basic performance tweaks to make things run a lot faster:
#   1. Process each video frame at 1/4 resolution (though still display it at full resolution)
#   2. Only detect faces in every other frame of video.

# PLEASE NOTE: This example requires OpenCV (the `cv2` library) to be installed only to read from your webcam.
# OpenCV is *not* required to use the face_recognition library. It's only required if you want to run this
# specific demo. If you have trouble installing it, try any of the other demos that don't require it instead.

# Get a reference to webcam #0 (the default one)
video_capture = cv2.VideoCapture(0)

# Load a sample picture and learn how to recognize it.
obama_image = face_recognition.load_image_file("D:/Obama.jpg")
obama_face_encoding = face_recognition.face_encodings(obama_image)[0]

# Load a second sample picture and learn how to recognize it.
biden_image = face_recognition.load_image_file("D:/fucheng.jpg")
biden_face_encoding = face_recognition.face_encodings(biden_image)[0]

# Create arrays of known face encodings and their names
known_face_encodings = [
    obama_face_encoding,
    biden_face_encoding
]
known_face_names = [
    "Obama",
    "fucheng"
]

# Initialize some variables
face_locations = []
face_encodings = []
face_names = []
process_this_frame = True

while True:
    # Grab a single frame of video
    ret, frame = video_capture.read()

    # Resize frame of video to 1/4 size for faster face recognition processing
    small_frame = cv2.resize(frame, (0, 0), fx=0.25, fy=0.25)

    # Convert the image from BGR color (which OpenCV uses) to RGB color (which face_recognition uses)
    rgb_small_frame = small_frame[:, :, ::-1]

    # Only process every other frame of video to save time
    if process_this_frame:
        # Find all the faces and face encodings in the current frame of video
        face_locations = face_recognition.face_locations(rgb_small_frame)
        face_encodings = face_recognition.face_encodings(rgb_small_frame, face_locations)

        face_names = []
        for face_encoding in face_encodings:
            # See if the face is a match for the known face(s)
            matches = face_recognition.compare_faces(known_face_encodings, face_encoding)
            name = "Unknown"

            # # If a match was found in known_face_encodings, just use the first one.
            # if True in matches:
            #     first_match_index = matches.index(True)
            #     name = known_face_names[first_match_index]

            # Or instead, use the known face with the smallest distance to the new face
            face_distances = face_recognition.face_distance(known_face_encodings, face_encoding)
            best_match_index = np.argmin(face_distances)
            if matches[best_match_index]:
                name = known_face_names[best_match_index]

            face_names.append(name)

    process_this_frame = not process_this_frame


    # Display the results
    for (top, right, bottom, left), name in zip(face_locations, face_names):
        # Scale back up face locations since the frame we detected in was scaled to 1/4 size
        top *= 4
        right *= 4
        bottom *= 4
        left *= 4

        # Draw a box around the face
        cv2.rectangle(frame, (left, top), (right, bottom), (0, 0, 255), 2)

        # Draw a label with a name below the face
        cv2.rectangle(frame, (left, bottom - 35), (right, bottom), (0, 0, 255), cv2.FILLED)
        font = cv2.FONT_HERSHEY_DUPLEX
        cv2.putText(frame, name, (left + 6, bottom - 6), font, 1.0, (255, 255, 255), 1)

    # Display the resulting image
    cv2.imshow('Video', frame)

    # Hit 'q' on the keyboard to quit!
    if cv2.waitKey(1) & 0xFF == ord('q'):
        break

# Release handle to the webcam
video_capture.release()
cv2.destroyAllWindows()
感谢博客https://www.jianshu.com/p/f4b0c8837790
