3-(3) Spring之解析xml文件与BeanDefinition
Spring中有2个很重要的类,在分析Spring源码之前,我们先来了解几个Spring中的核心类。
一、DefaultListableBeanFactory
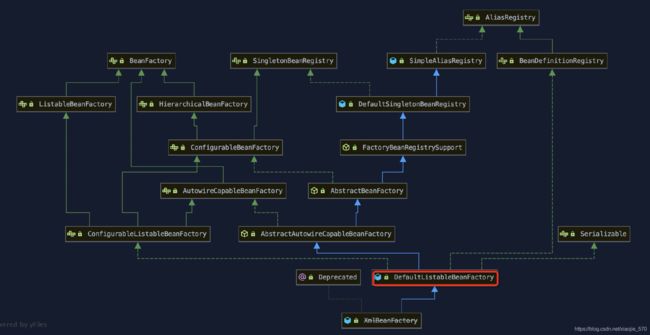
我们从上面的图中可以看出,XmlBeanFactory 继承自 DefaultListableBeanFactory,而DefaultListableBeanFactory是整个Bean 加载的核心部分,是Spring注册和加载 bean的默认实现,而对于 XmlBeanFactory 与 DefaultListableBeanFactory 不同的地方其实是在 XmlBeanFactory 中使用了自定义的XML读取器 XmlBeanDefinitionReader,实现了个性化的 BeanDefinitionReader 读取。
我们先看一下这个类XmlBeanFactory的具体实现。
public class XmlBeanFactory extends DefaultListableBeanFactory {


	private final XmlBeanDefinitionReader reader = new XmlBeanDefinitionReader(this);

	public XmlBeanFactory(Resource resource) throws BeansException {

		this(resource, null);
	}

	public XmlBeanFactory(Resource resource, BeanFactory parentBeanFactory) throws BeansException {

		super(parentBeanFactory);
		this.reader.loadBeanDefinitions(resource);
	}

}
二、XmlBeanDefinitionReader
XmlBeanFactory 对 DefaultListableBeanFactory 类进行了扩展,主要用于从 XML 文档中读取 BeanDefinition,对于注册及获取 Bean 都是使用从父类 DefaultListableBeanFactory 继承的方法去实现,而唯独与父类不同的个性化实现就是增加了 XmlBeanDefinitionReader 类型的 reader 属性。在 XmlBeanFactory 中主要使用 reader 属性对资源文件进行读取和注册。
- EnvironmentCapable
- 定于获取 Environment方法
BeanDefinitionReader- 主要定义资源文件读取并转换为BeanDefinition 的各个功能
- AbstractBeanDefinitionReader
- 对EnvironmentCapable、BeanDefinitionReader类定义的功能实现
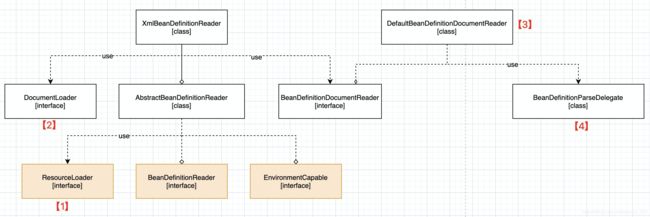
xml 配置文件的读取流程
- 【1】通过继承自
AbstractBeanDefinitionReader中的方法,来使用ResoureLoader将资源文件路径转换为对应的Resource文件。 - 【2】通过
DocumentLoader对Resource文件进行转换,将Resource文件转换为Document文件。 - 【3】通过实现接口
BeanDefinitionDocumentReader的DefaultBeanDefinitionDocumentReader类对Document进行解析,并使用BeanDefinitionParserDelegate对Element进行解析。
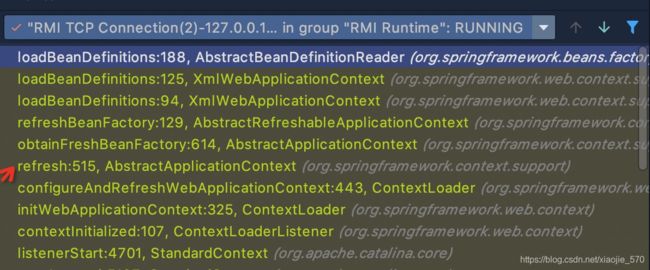
以上配置文件的读取过程是单纯使用Spring的方式去加载web.xml文件。如果我们使用spring-mvc的方式去读取配置文件,那么我们的调用过程如下。

在讲解 Spring功能扩展时,我会详细讲解Spring是如何找到的配置文件。这里继续分析他是如何解析配置文件applicationContext.xml的。
本文使用的是Spring-mvc的方式启动应用程序。因此这里解析配置文件时,使用的是AbstractBeanDefinitionReader类
	public int loadBeanDefinitions(String location, Set<Resource> actualResources) throws BeanDefinitionStoreException {

		// 此时的resourceLoader是 Root WebApplicationContext
		ResourceLoader resourceLoader = getResourceLoader();
		if (resourceLoader == null) {

			throw new BeanDefinitionStoreException(
					"Cannot import bean definitions from location [" + location + "]: no ResourceLoader available");
		}

		if (resourceLoader instanceof ResourcePatternResolver) {

			// Resource pattern matching available.
			try {

				// 获取资源xml文件
				Resource[] resources = ((ResourcePatternResolver) resourceLoader).getResources(location);
				// 解析xml文件
				int loadCount = loadBeanDefinitions(resources);
				if (actualResources != null) {

					for (Resource resource : resources) {

						actualResources.add(resource);
					}
				}
				if (logger.isDebugEnabled()) {

					logger.debug("Loaded " + loadCount + " bean definitions from location pattern [" + location + "]");
				}
				return loadCount;
			}
			catch (IOException ex) {

				throw new BeanDefinitionStoreException(
						"Could not resolve bean definition resource pattern [" + location + "]", ex);
			}
		}
		else {

			// Can only load single resources by absolute URL.
			Resource resource = resourceLoader.getResource(location);
			int loadCount = loadBeanDefinitions(resource);
			if (actualResources != null) {

				actualResources.add(resource);
			}
			if (logger.isDebugEnabled()) {

				logger.debug("Loaded " + loadCount + " bean definitions from location [" + location + "]");
			}
			return loadCount;
		}
	}
	public int loadBeanDefinitions(Resource... resources) throws BeanDefinitionStoreException {

		Assert.notNull(resources, "Resource array must not be null");
		int counter = 0;
		// 一个一个解析资源文件
		for (Resource resource : resources) {

			// 这个方法是调用子类XmlBeanDefinitionReader的方法
			counter += loadBeanDefinitions(resource);
		}
		return counter;
2.1 加载Bean
【代码 # 1】
	@Override
	public int loadBeanDefinitions(Resource resource) throws BeanDefinitionStoreException {

		return loadBeanDefinitions(new EncodedResource(resource));
	}

	public EncodedResource(Resource resource) {

		this(resource, null, null);
	}

	private EncodedResource(Resource resource, String encoding, Charset charset) {

		super();
		Assert.notNull(resource, "Resource must not be null");
		this.resource = resource;
		this.encoding = encoding;
		this.charset = charset;
	}
这一步是对 resource 资源文件使用EncodedResource类进行封装。
【代码 # 2】
	public int loadBeanDefinitions(EncodedResource encodedResource) throws BeanDefinitionStoreException {

		Assert.notNull(encodedResource, "EncodedResource must not be null");
		if (logger.isInfoEnabled()) {

			logger.info("Loading XML bean definitions from " + encodedResource.getResource());
		}
		// ------------------------【步骤一】------------------------
		// 通过属性来记录已经加载的资源
		Set<EncodedResource> currentResources = this.resourcesCurrentlyBeingLoaded.get();
		if (currentResources == null) {

			currentResources = new HashSet<EncodedResource>(4);
			this.resourcesCurrentlyBeingLoaded.set(currentResources);
		}
		if (!currentResources.add(encodedResource)) {

			throw new BeanDefinitionStoreException(
					"Detected cyclic loading of " + encodedResource + " - check your import definitions!");
		}
		try {

			// ------------------------【步骤二】------------------------
			// 从encodeResource中获取已经封装的Resource对象并再次从Rescource中获取其中的inputStream
			InputStream inputStream = encodedResource.getResource().getInputStream();
			try {

				// ------------------------【步骤三】------------------------
				// org.xml.sax
				InputSource inputSource = new InputSource(inputStream);
				if (encodedResource.getEncoding() != null) {

					inputSource.setEncoding(encodedResource.getEncoding());
				}
				// ------------------------【步骤四】代码# 3 讲解------------------------
				// 真正进入了逻辑核心部分
				return doLoadBeanDefinitions(inputSource, encodedResource.getResource());
			}
			finally {

				inputStream.close();
			}
		}
		catch (IOException ex) {

			throw new BeanDefinitionStoreException(
					"IOException parsing XML document from " + encodedResource.getResource(), ex);
		}
		finally {

			currentResources.remove(encodedResource);
			if (currentResources.isEmpty()) {

				this.resourcesCurrentlyBeingLoaded.remove();
			}
		}
	}
数据准备阶段的逻辑
- 【步骤一】
- 通过属性来记录已经加载的资源
- 【步骤二】
- 对传入的 resource 参数做封装
- 【步骤三】
- 通过 SAX 读取 XML 文件的方式来准备 InputSource对象
- 【步骤四】
- 最后将准备的数据通过参数传入真正的核心处理部分。
【代码 # 3】
	protected int doLoadBeanDefinitions(InputSource inputSource, Resource resource)
			throws BeanDefinitionStoreException {

		try {

			// 代码#4 讲解
			Document doc = doLoadDocument(inputSource, resource);
			// ---------2.1.3 节详细介绍
			// 根据返回的 Document 注册 bean 信息
			return registerBeanDefinitions(doc, resource);
		}
		catch (BeanDefinitionStoreException ex) {

			throw ex;
		}
		catch (SAXParseException ex) {

			throw new XmlBeanDefinitionStoreException(resource.getDescription(),
					"Line " + ex.getLineNumber() + " in XML document from " + resource + " is invalid", ex);
		}
		catch (SAXException ex) {

			throw new XmlBeanDefinitionStoreException(resource.getDescription(),
					"XML document from " + resource + " is invalid", ex);
		}
		catch (ParserConfigurationException ex) {

			throw new BeanDefinitionStoreException(resource.getDescription(),
					"Parser configuration exception parsing XML from " + resource, ex);
		}
		catch (IOException ex) {

			throw new BeanDefinitionStoreException(resource.getDescription(),
					"IOException parsing XML document from " + resource, ex);
		}
		catch (Throwable ex) {

			throw new BeanDefinitionStoreException(resource.getDescription(),
					"Unexpected exception parsing XML document from " + resource, ex);
		}
	}
【代码 # 4】
	protected Document doLoadDocument(InputSource inputSource, Resource resource) throws Exception {

		// 加载 XML 文件,并得到对应的 Document
		return this.documentLoader.loadDocument(
				inputSource,
				getEntityResolver(),
				this.errorHandler,
				// 获取对 XML 文件的验证模式 代码#5 具体讲解
				getValidationModeForResource(resource),
				isNamespaceAware());
	}
2.1.1 获取 XML 的验证模式
XML 文件的验证模式保证了 XML 文件的正确性,比较常用的验证模式有2种:DTD 和 XSD。较为常用的是 XSD模式,因此我们这里只介绍 XSD的模式。
XML Schema 语言就是 XSD(XML Schemas Definition)。XML Schema 描述了XML文档的结构。可以用一个指定的XML Schema 来验证某个XML文档,以检查该XML文档是否符合其要求。文档设计者通过 XML Schema指定一个XML文档所允许的结构和内容,并可以据此检查一个XML文档是否是有效的。
下面举个例子来说明XML文件是如何引用XSD来验证的。
<?xml version="1.0" encoding="UTF-8"?>

<beans xmlns="http://www.springframework.org/schema/beans"
		xmlns:xsi="http://www.w3.org/2001/XMLSchema-instance"
		xmlns:context="http://www.springframework.org/schema/context"
		xsi:schemaLocation="http://www.springframework.org/schema/beans
		http://www.springframework.org/schema/beans/spring-beans-3.0.xsd
        http://www.springframework.org/schema/context
        http://www.springframework.org/schema/context/spring-context-3.0.xsd">

    <context:component-scan base-package="com.huanjie"></context:component-scan>

</beans>
- 名称空间
xmlns="http://www.springframework.org/schema/beans"
- 名称空间对应的 XML Schema文档的存储位置
- 名称空间的URI
xmlns:xsi="http://www.w3.org/2001/XMLSchema-instance"
- 名称空间对应的Xml Schema文档存储位置
xsi:schemaLocation="http://www.springframework.org/schema/beans
- 名称空间的URI
【代码# 5】
下面来具体讲解XSD是如何对XML文件进行验证的。
从【代码# 4】可知Spring 通过 getValidationModeForResource(resource) 方法来获取对应资源的验证模式。
	protected int getValidationModeForResource(Resource resource) {

		int validationModeToUse = getValidationMode();
		// 如果手动指定了验证模式则使用指定的验证模式
		if (validationModeToUse != VALIDATION_AUTO) {

			return validationModeToUse;
		}
		// 如果没有手动指定则使用自动检测
		int detectedMode = detectValidationMode(resource);
		if (detectedMode != VALIDATION_AUTO) {

			return detectedMode;
		}
		// Hmm, we didn't get a clear indication... Let's assume XSD,
		// since apparently no DTD declaration has been found up until
		// detection stopped (before finding the document's root tag).
		return VALIDATION_XSD;
	}
这里我们的applicationContext.xml里面只有一个包扫描的语句,没有手动指定验证模式,因此走入代码段detectValidationMode(resource);自动检测的地方。
【代码# 6】
	protected int detectValidationMode(Resource resource) {

		if (resource.isOpen()) {

			throw new BeanDefinitionStoreException(
					"Passed-in Resource [" + resource + "] contains an open stream: " +
					"cannot determine validation mode automatically. Either pass in a Resource " +
					"that is able to create fresh streams, or explicitly specify the validationMode " +
					"on your XmlBeanDefinitionReader instance.");
		}

		InputStream inputStream;
		try {

			inputStream = resource.getInputStream();
		}
		catch (IOException ex) {

			throw new BeanDefinitionStoreException(
					"Unable to determine validation mode for [" + resource + "]: cannot open InputStream. " +
					"Did you attempt to load directly from a SAX InputSource without specifying the " +
					"validationMode on your XmlBeanDefinitionReader instance?", ex);
		}

		try {

			return this.validationModeDetector.detectValidationMode(inputStream);
		}
		catch (IOException ex) {

			throw new BeanDefinitionStoreException("Unable to determine validation mode for [" +
					resource + "]: an error occurred whilst reading from the InputStream.", ex);
		}
	}
上面的代码很多,但是实际上都是try catch 语句,实际上有用的只有三句话。它主要是将自动检测验证模式的工作委托给了专门处理的类 XmlValidationModeDetector 来做验证。
【代码# 7】
	public int detectValidationMode(InputStream inputStream) throws IOException {

		// Peek into the file to look for DOCTYPE.
		BufferedReader reader = new BufferedReader(new InputStreamReader(inputStream));
		try {

			boolean isDtdValidated = false;
			String content;
			while ((content = reader.readLine()) != null) {

				// 读取一行,只会返回非注释行
				content = consumeCommentTokens(content);
				// 因为是一行一行读取的,所以要跳过空行
				if (this.inComment || !StringUtils.hasText(content)) {

					continue;
				}
				// 这里判断是否是DOCTYPE开头,如果是,需要更新DTD的标识位,同时说明到达了验证模式的头
				if (hasDoctype(content)) {

					isDtdValidated = true;
					break;
				}
				// 如果不是验证模式,当读取到< 开始富豪,说明到达了验证模式的头。因为验证模式一定会在开始符号之前
				if (hasOpeningTag(content)) {

					// End of meaningful data...
					break;
				}
			}
			return (isDtdValidated ? VALIDATION_DTD : VALIDATION_XSD);
		}
		catch (CharConversionException ex) {

			// Choked on some character encoding...
			// Leave the decision up to the caller.
			return VALIDATION_AUTO;
		}
		finally {

			reader.close();
		}
	}
2.1.2 获取Document
经过了验证模式准备的步骤就可以进行 Document的加载了,XmlBeanFactoryReader 类对于文档的读取没有亲力亲为,而是委托给了 DocumentLoader 去执行。
【代码# 8】
	public Document loadDocument(InputSource inputSource, EntityResolver entityResolver,
			ErrorHandler errorHandler, int validationMode, boolean namespaceAware) throws Exception {


		DocumentBuilderFactory factory = createDocumentBuilderFactory(validationMode, namespaceAware);
		if (logger.isDebugEnabled()) {

			logger.debug("Using JAXP provider [" + factory.getClass().getName() + "]");
		}
		DocumentBuilder builder = createDocumentBuilder(factory, entityResolver, errorHandler);
		return builder.parse(inputSource);
	}
通过 SAX 解析XML 文档,首先创建DocumentBuilderFactory,再通过 DocumentBuilderFactory 创建 DocumentBuilder ,进而解析 inputSource 来返回 Document对象。
2.1.3 解析及注册 BeanDefinitions
当把文件转换为 Document 之后,接下来就进行到了 解析Document 和注册 BeanDefinitions 步骤了。
【代码# 9】
	public int registerBeanDefinitions(Document doc, Resource resource) throws BeanDefinitionStoreException {

		BeanDefinitionDocumentReader documentReader = createBeanDefinitionDocumentReader();
		int countBefore = getRegistry().getBeanDefinitionCount();
		// 重点
		documentReader.registerBeanDefinitions(doc, createReaderContext(resource));
		return getRegistry().getBeanDefinitionCount() - countBefore;
	}
- 使用
DefaultBeanDefinitionDocumentReader实例化BeanDefinitionDocumentReader - 记录统计前 BeanDefinition 的加载个数
- 加载及注册Bean
- 记录本次加载的 BeanDefinition 个数
【代码# 10】
	protected BeanDefinitionDocumentReader createBeanDefinitionDocumentReader() {

		return BeanDefinitionDocumentReader.class.cast(BeanUtils.instantiateClass(this.documentReaderClass));
	}
通过【代码# 10】可以看到 BeanDefinitionDocumentReader 的类型已经是 DefaultBeanDefinitionDocumentReader了。实例化 BeanDefinitionDocumentReader 后,我们进入重头戏,加载和注册bean 的阶段。
【代码# 11】
	public void registerBeanDefinitions(Document doc, XmlReaderContext readerContext) {

		this.readerContext = readerContext;
		logger.debug("Loading bean definitions");
		Element root = doc.getDocumentElement();
		// 核心
		doRegisterBeanDefinitions(root);
	}
终于到了 doXXX 方法,Spring 中只有到了 doXXX 方法才算找到了真正实现的核心。【代码# 12】来详细看看doRegisterBeanDefinitions方法的具体情况。
【代码# 12】
protected void doRegisterBeanDefinitions(Element root) {

		// 专门处理解析
		BeanDefinitionParserDelegate parent = this.delegate;
		this.delegate = createDelegate(getReaderContext(), root, parent);

		if (this.delegate.isDefaultNamespace(root)) {

			// 处理profile 属性
			String profileSpec = root.getAttribute(PROFILE_ATTRIBUTE);
			if (StringUtils.hasText(profileSpec)) {

				String[] specifiedProfiles = StringUtils.tokenizeToStringArray(
						profileSpec, BeanDefinitionParserDelegate.MULTI_VALUE_ATTRIBUTE_DELIMITERS);
				if (!getReaderContext().getEnvironment().acceptsProfiles(specifiedProfiles)) {

					if (logger.isInfoEnabled()) {

						logger.info("Skipped XML bean definition file due to specified profiles [" + profileSpec +
								"] not matching: " + getReaderContext().getResource());
					}
					return;
				}
			}
		}
		// 解析前处理,留给子类实现
		preProcessXml(root);
		// 核心【代码# 13】
		parseBeanDefinitions(root, this.delegate);
		// 解析后处理,留给子类实现
		postProcessXml(root);

		this.delegate = parent;
	}
【代码# 13】
	protected void parseBeanDefinitions(Element root, BeanDefinitionParserDelegate delegate) {

		// 对beans的处理
		if (delegate.isDefaultNamespace(root)) {

			NodeList nl = root.getChildNodes();
			for (int i = 0; i < nl.getLength(); i++) {

				Node node = nl.item(i);
				if (node instanceof Element) {

					Element ele = (Element) node;
					if (delegate.isDefaultNamespace(ele)) {

						parseDefaultElement(ele, delegate);
					}
					else {

						// Spring中使用包扫描的方式时,走这个方法
						delegate.parseCustomElement(ele);
					}
				}
			}
		}
		else {

			delegate.parseCustomElement(root);
		}
	}
我们可以看到,parseBeanDefinitions 方法中有两种解析方法。因为Spring 的 XML配置里面有2大类 Bean 声明。一种是默认的,另一种是自定义的。
例子:
- 默认
- 自定义
判断是否默认命名空间主要是使用 delegate.isDefaultNamespace(ele) 方法。
【代码# 14】
	public boolean isDefaultNamespace(Node node) {

		return isDefaultNamespace(getNamespaceURI(node));
	}

	public boolean isDefaultNamespace(String namespaceUri) {

		return (!StringUtils.hasLength(namespaceUri) || BEANS_NAMESPACE_URI.equals(namespaceUri));
	}

	public static final String BEANS_NAMESPACE_URI = "http://www.springframework.org/schema/beans";
与Spring 中固定的命名空间"http://www.springframework.org/schema/beans" 进行比对,如果一致就认为是默认,否则就认为是自定义。
2.1.4 自定义标签解析
org.springframework.beans.factory.xml.BeanDefinitionParserDelegate# parseCustomElement
【代码# 15】
	public BeanDefinition parseCustomElement(Element ele) {

		return parseCustomElement(ele, null);
	}
【代码# 16】
	public BeanDefinition parseCustomElement(Element ele, BeanDefinition containingBd) {

		// 获取命名空间
		String namespaceUri = getNamespaceURI(ele);
		// 根据命名空间找到对应的 NamespaceHandler
		NamespaceHandler handler =
				this.readerContext.getNamespaceHandlerResolver().resolve(namespaceUri);
		if (handler == null) {

			error("Unable to locate Spring NamespaceHandler for XML schema namespace ["
					+ namespaceUri + "]", ele);
			return null;
		}
		// 【代码# 19】解析
		return handler.parse(
				ele,
				new ParserContext(this.readerContext, this, containingBd)
			);
	}
根据对应的bean获取对应的命名空间,根据命名空间解析对应的处理器,然后根据用户自定义的处理器进行解析。
2.4.1.1 获取标签的命名空间
标签的解析是从命名空间的获取开始的,无论是区分 Spring 中默认标签和自定义标签还是区分自定义标签中不同标签的处理器都是以标签所提供的命名空间为基础。
String namespaceUri = getNamespaceURI(ele);中提供获取标签的命名空间的方法。
【代码# 17】
	public String getNamespaceURI(Node node) {

		return node.getNamespaceURI();
	}
获取命名空间的动作是由org.w3c.dom提供的。我们只需要直接调用即可。
2.4.1.2 提供自定义标签处理器
有了命名空间,就可以进行 NamespaceHandler 的提取了。
【代码# 18】
	public NamespaceHandler resolve(String namespaceUri) {

		// 获取所有已经配置的 handler 映射
		Map<String, Object> handlerMappings = getHandlerMappings();
		// 根据命名空间找到对应的信息
		Object handlerOrClassName = handlerMappings.get(namespaceUri);
		if (handlerOrClassName == null) {

			return null;
		}
		else if (handlerOrClassName instanceof NamespaceHandler) {

			// 已经做过解析的情况,直接从缓存读取
			return (NamespaceHandler) handlerOrClassName;
		}
		else {

			// 没有做过解析,则返回的是类路径
			String className = (String) handlerOrClassName;
			try {

				// 使用反射,将类路径转化为类
				Class<?> handlerClass = ClassUtils.forName(className, this.classLoader);
				if (!NamespaceHandler.class.isAssignableFrom(handlerClass)) {

					throw new FatalBeanException("Class [" + className + "] for namespace [" + namespaceUri +
							"] does not implement the [" + NamespaceHandler.class.getName() + "] interface");
				}
				// 初始化类
				NamespaceHandler namespaceHandler = (NamespaceHandler) BeanUtils.instantiateClass(handlerClass);
				// 调用自定义的 NamespaceHandler 的初始化方法
				namespaceHandler.init();
				// 记录在缓存
				handlerMappings.put(namespaceUri, namespaceHandler);
				return namespaceHandler;
			}
			catch (ClassNotFoundException ex) {

				throw new FatalBeanException("NamespaceHandler class [" + className + "] for namespace [" +
						namespaceUri + "] not found", ex);
			}
			catch (LinkageError err) {

				throw new FatalBeanException("Invalid NamespaceHandler class [" + className + "] for namespace [" +
						namespaceUri + "]: problem with handler class file or dependent class", err);
			}
		}
	}
得到了解析器以及要分析的元素后,Spring就可以将解析工作委托给自定义解析器去解析了。
三、 ClassPathBeanDefinitionScanner包扫描
在IOC 容器初始化阶段(调用beanFactoryPostProcessor阶段),会采用ClassPathBeanDefinitionScanner进行扫描包(BeanDefinition 然后注册到IOC 容器内
【代码# 19】
public BeanDefinition parse(Element element, ParserContext parserContext) {
// 寻找解析器并进行解析操作
return findParserForElement(element, parserContext).parse(element, parserContext);
}
public BeanDefinition parse(Element element, ParserContext parserContext) {
// 获取 【代码# 20】
	protected Set<BeanDefinitionHolder> doScan(String... basePackages) {

		Assert.notEmpty(basePackages, "At least one base package must be specified");
		Set<BeanDefinitionHolder> beanDefinitions = new LinkedHashSet<BeanDefinitionHolder>();
		for (String basePackage : basePackages) {

			// 核心 【代码# 21】 讲解
			Set<BeanDefinition> candidates = findCandidateComponents(basePackage);
			for (BeanDefinition candidate : candidates) {

				ScopeMetadata scopeMetadata = this.scopeMetadataResolver.resolveScopeMetadata(candidate);
				candidate.setScope(scopeMetadata.getScopeName());
				String beanName = this.beanNameGenerator.generateBeanName(candidate, this.registry);
				if (candidate instanceof AbstractBeanDefinition) {

					postProcessBeanDefinition((AbstractBeanDefinition) candidate, beanName);
				}
				if (candidate instanceof AnnotatedBeanDefinition) {

					AnnotationConfigUtils.processCommonDefinitionAnnotations((AnnotatedBeanDefinition) candidate);
				}
				if (checkCandidate(beanName, candidate)) {

					BeanDefinitionHolder definitionHolder = new BeanDefinitionHolder(candidate, beanName);
					definitionHolder =
							AnnotationConfigUtils.applyScopedProxyMode(scopeMetadata, definitionHolder, this.registry);
					beanDefinitions.add(definitionHolder);
					// 详细讲解 【代码# 22】
					registerBeanDefinition(definitionHolder, this.registry);
				}
			}
		}
		return beanDefinitions;
	}
【代码# 21】
	public Set<BeanDefinition> findCandidateComponents(String basePackage) {

		Set<BeanDefinition> candidates = new LinkedHashSet<BeanDefinition>();
		try {

			// 1.根据指定包名 生成包搜索路径
			String packageSearchPath = ResourcePatternResolver.CLASSPATH_ALL_URL_PREFIX +
					resolveBasePackage(basePackage) + '/' + this.resourcePattern;
			//2. 资源加载器 加载搜索路径下的 所有class 转换为 Resource[]
			Resource[] resources = this.resourcePatternResolver.getResources(packageSearchPath);
			boolean traceEnabled = logger.isTraceEnabled();
			boolean debugEnabled = logger.isDebugEnabled();
			// 3. 循环 处理每一个 resource
			for (Resource resource : resources) {

				if (traceEnabled) {

					logger.trace("Scanning " + resource);
				}
				if (resource.isReadable()) {

					try {

						// 读取类的 注解信息 和 类信息 ,信息储存到  MetadataReader
						MetadataReader metadataReader = this.metadataReaderFactory.getMetadataReader(resource);
						// 执行判断是否符合 过滤器规则,函数内部用过滤器 对metadataReader 过滤
						if (isCandidateComponent(metadataReader)) {

							//把符合条件的 类转换成 BeanDefinition
							ScannedGenericBeanDefinition sbd = new ScannedGenericBeanDefinition(metadataReader);
							sbd.setResource(resource);
							sbd.setSource(resource);
							// 再次判断 如果是实体类 返回true,如果是抽象类,但是抽象方法 被 @Lookup 注解注释返回true
							if (isCandidateComponent(sbd)) {

								if (debugEnabled) {

									logger.debug("Identified candidate component class: " + resource);
								}
								candidates.add(sbd);
							}
							else {

								if (debugEnabled) {

									logger.debug("Ignored because not a concrete top-level class: " + resource);
								}
							}
						}
						else {

							if (traceEnabled) {

								logger.trace("Ignored because not matching any filter: " + resource);
							}
						}
					}
					catch (Throwable ex) {

						throw new BeanDefinitionStoreException(
								"Failed to read candidate component class: " + resource, ex);
					}
				}
				else {

					if (traceEnabled) {

						logger.trace("Ignored because not readable: " + resource);
					}
				}
			}
		}
		catch (IOException ex) {

			throw new BeanDefinitionStoreException("I/O failure during classpath scanning", ex);
		}
		return candidates;
	}
【代码# 22】
	protected void registerBeanDefinition(BeanDefinitionHolder definitionHolder, BeanDefinitionRegistry registry) {

		BeanDefinitionReaderUtils.registerBeanDefinition(definitionHolder, registry);
	}

	public static void registerBeanDefinition(
			BeanDefinitionHolder definitionHolder, BeanDefinitionRegistry registry)
			throws BeanDefinitionStoreException {


		// Register bean definition under primary name.
		String beanName = definitionHolder.getBeanName();
		// 核心,这里面会将对应的bean 放到beanFactory 的 beanDefinitionMap
		registry.registerBeanDefinition(beanName, definitionHolder.getBeanDefinition());

		// Register aliases for bean name, if any.
		String[] aliases = definitionHolder.getAliases();
		if (aliases != null) {

			for (String alias : aliases) {

				registry.registerAlias(beanName, alias);
			}
		}
	}
【代码# 23】
	public void registerBeanDefinition(String beanName, BeanDefinition beanDefinition)
			throws BeanDefinitionStoreException {


		if (beanDefinition instanceof AbstractBeanDefinition) {

			try {

				((AbstractBeanDefinition) beanDefinition).validate();
			}
			catch (BeanDefinitionValidationException ex) {

				throw new BeanDefinitionStoreException(beanDefinition.getResourceDescription(), beanName,
						"Validation of bean definition failed", ex);
			}
		}

		BeanDefinition oldBeanDefinition;

		oldBeanDefinition = this.beanDefinitionMap.get(beanName);
		if (oldBeanDefinition != null) {

			if (!isAllowBeanDefinitionOverriding()) {

				throw new BeanDefinitionStoreException(beanDefinition.getResourceDescription(), beanName,
						"Cannot register bean definition [" + beanDefinition + "] for bean '" + beanName +
						"': There is already [" + oldBeanDefinition + "] bound.");
			}
			else if (oldBeanDefinition.getRole() < beanDefinition.getRole()) {

				// e.g. was ROLE_APPLICATION, now overriding with ROLE_SUPPORT or ROLE_INFRASTRUCTURE
				if (this.logger.isWarnEnabled()) {

					this.logger.warn("Overriding user-defined bean definition for bean '" + beanName +
							"' with a framework-generated bean definition: replacing [" +
							oldBeanDefinition + "] with [" + beanDefinition + "]");
				}
			}
			else if (!beanDefinition.equals(oldBeanDefinition)) {

				if (this.logger.isInfoEnabled()) {

					this.logger.info("Overriding bean definition for bean '" + beanName +
							"' with a different definition: replacing [" + oldBeanDefinition +
							"] with [" + beanDefinition + "]");
				}
			}
			else {

				if (this.logger.isDebugEnabled()) {

					this.logger.debug("Overriding bean definition for bean '" + beanName +
							"' with an equivalent definition: replacing [" + oldBeanDefinition +
							"] with [" + beanDefinition + "]");
				}
			}
			this.beanDefinitionMap.put(beanName, beanDefinition);
		}
		else {

			if (hasBeanCreationStarted()) {

				// Cannot modify startup-time collection elements anymore (for stable iteration)
				synchronized (this.beanDefinitionMap) {

					this.beanDefinitionMap.put(beanName, beanDefinition);
					List<String> updatedDefinitions = new ArrayList<String>(this.beanDefinitionNames.size() + 1);
					updatedDefinitions.addAll(this.beanDefinitionNames);
					updatedDefinitions.add(beanName);
					this.beanDefinitionNames = updatedDefinitions;
					if (this.manualSingletonNames.contains(beanName)) {

						Set<String> updatedSingletons = new LinkedHashSet<String>(this.manualSingletonNames);
						updatedSingletons.remove(beanName);
						this.manualSingletonNames = updatedSingletons;
					}
				}
			}
			else {

				// Still in startup registration phase
				// 核心
				this.beanDefinitionMap.put(beanName, beanDefinition);
				this.beanDefinitionNames.add(beanName);
				this.manualSingletonNames.remove(beanName);
			}
			this.frozenBeanDefinitionNames = null;
		}

		if (oldBeanDefinition != null || containsSingleton(beanName)) {

			resetBeanDefinition(beanName);
		}
	}
上面代码中,主要关注代码片段:this.beanDefinitionMap.put(beanName, beanDefinition); 和 this.beanDefinitionNames.add(beanName);。这段代码的意思是将xml中的所有bean信息放到 beanDefinitionMap 和 beanDefinitionNames 中。
执行完以上步骤,所有的bean都会存储在beanFactory中。
applicationContext.xml
<?xml version="1.0" encoding="UTF-8"?>

<beans xmlns="http://www.springframework.org/schema/beans"
		xmlns:xsi="http://www.w3.org/2001/XMLSchema-instance"
		xmlns:context="http://www.springframework.org/schema/context"
		xsi:schemaLocation="http://www.springframework.org/schema/beans
			http://www.springframework.org/schema/beans/spring-beans-3.0.xsd
			http://www.springframework.org/schema/context
			http://www.springframework.org/schema/context/spring-context-3.0.xsd">


    <context:component-scan base-package="com.huanjie"/>


</beans>

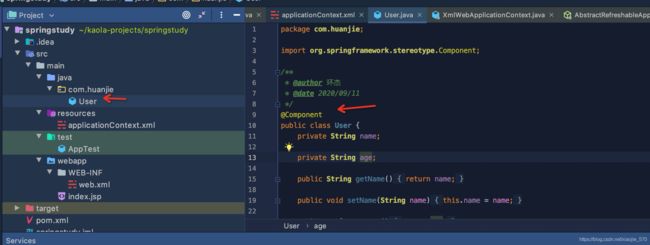
以上只有一个User类是我们新加入Spring中的bean。因此beanDefinitionMap中只有7个,其中一个是我们加入Spring中的bean, 其他的类是Spring自己加入的。
四、总结
本篇文章主要讲解的是如何将 applicationContext.xml 中的bean 转换为 BeanDefinition,并将其存储在beanFactory中。


