gradle构建带三方依赖jar的普通项目
gradle构建springboot项目,有默认的插件,帮助我们做了很多工作,我们只需要按照start.spring.io的步骤来构建一个项目即可。项目中的配置都自动帮助我们生成好了,无需关心最后的启动类,依赖关系。我们先看看springboot项目的构建文件build.gradle:
plugins {
	id 'org.springframework.boot' version '2.2.0.RELEASE'
	id 'io.spring.dependency-management' version '1.0.8.RELEASE'
	id 'java'
}

group = 'com.xxx'
version = '0.0.1-SNAPSHOT'
sourceCompatibility = '1.8'

repositories {
	maven { url 'http://maven.aliyun.com/nexus/content/groups/public/'}
	//mavenCentral()
}

dependencies {
	implementation 'org.springframework.boot:spring-boot-starter-web'
	testImplementation('org.springframework.boot:spring-boot-starter-test') {
		exclude group: 'org.junit.vintage', module: 'junit-vintage-engine'
	}
}

test {
	useJUnitPlatform()
}
构建是要生成jar包的,但是配置文件里面没有jar的关键字,这是因为springboot的插件帮我们做好了,当我们换成了一般的项目,比如一个jetty server的项目,或者一个带三方依赖的 可执行程序,我们需要做这样的工作:
1、编写jar任务,
2、指定manifest
3、指定依赖,也就是指定classpath。
下面通过一个简单的示例,来感受一下gradle构建的过程:我们新建一个项目,加入依赖org.web3j:core:4.5.5,然后编写相关代码:
package com.xxx.web3j;

import org.web3j.protocol.Web3j;
import org.web3j.protocol.http.HttpService;

public class Web3jApp {
	public static void main(String[] args) throws Exception {
		Web3j web3j = Web3j.build(new HttpService("http://localhost:8545"));
		String v = web3j.web3ClientVersion().send().getWeb3ClientVersion();
		System.out.println(v);
	}
}
默认的build.gradle文件如下:
/*
 * This file was generated by the Gradle 'init' task.
 *
 * This generated file contains a sample Java Library project to get you started.
 * For more details take a look at the Java Libraries chapter in the Gradle
 * User Manual available at https://docs.gradle.org/5.6.3/userguide/java_library_plugin.html
 */

plugins {
    // Apply the java-library plugin to add support for Java Library
    id 'java-library'
}

repositories {
    // Use jcenter for resolving dependencies.
    // You can declare any Maven/Ivy/file repository here.
    jcenter()
}

dependencies {
    // This dependency is exported to consumers, that is to say found on their compile classpath.
    api 'org.apache.commons:commons-math3:3.6.1'
    // This dependency is used internally, and not exposed to consumers on their own compile classpath.
    implementation 'com.google.guava:guava:28.0-jre'

    // Use JUnit test framework
    testImplementation 'junit:junit:4.12'
}
为了让项目支持org.web3j,我们加入dependencies:compile 'org.web3j:core:4.5.5' ,并使用aliyun maven构建。
plugins {
    // Apply the java-library plugin to add support for Java Library
    id 'java-library'
    id 'java'
}

repositories {
    maven { url 'http://maven.aliyun.com/nexus/content/groups/public' }
    mavenCentral()
}

dependencies {
    // This dependency is exported to consumers, that is to say found on their compile classpath.
    api 'org.apache.commons:commons-math3:3.6.1'
    compile 'org.web3j:core:4.5.5'
    compile 'ch.qos.logback:logback-core:1.2.3'
	compile 'ch.qos.logback:logback-classic:1.2.3'
    // This dependency is used internally, and not exposed to consumers on their own compile classpath.
    implementation 'com.google.guava:guava:28.0-jre'

    // Use JUnit test framework
    testImplementation 'junit:junit:4.12'
}
默认,我们不做设置,可以构建一个jar包,但是当我们运行的时候,发现提示jar包中没有指定主清单属性。
当我们写上jar manifest Main-Class,发现会缺少依赖。我们在build.gradle文件中加入jar { manifest {attributes ()}},如下所示:
jar {
	manifest {
		attributes (
			'Manifest-Version': 1.0,
			'Main-Class' : 'com.xxx.web3j.Web3jApp',
			'Implementation-Title': 'Gradle'
		)
	}
}
生成的jar包中MANIFEST.MF内容如下,相对任何都不设置的情况下,多了Main-Class:
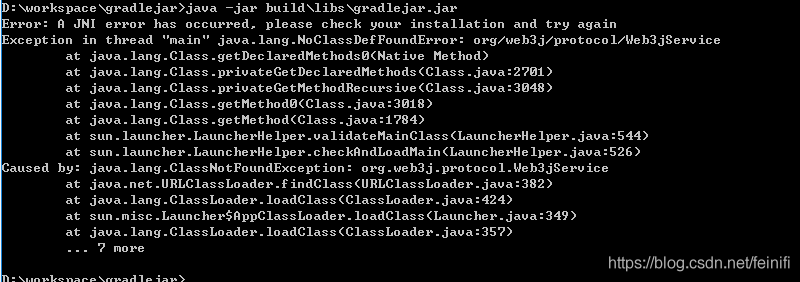
这种情况之下,运行还是会出现问题,会报错:ClassNotFoundException
原因就是我们的项目依赖没有或者没有打入到jar包中。
下面就是本文要讲述的重点了,怎么将依赖打入jar包中,是以源码的形式打,还是以lib/jar源码和依赖分开的方式,一般来说,我们是希望将三方依赖也打入jar包中,所以会选择第一种方式,但是,我们也有这样的场景,需要将我们自己的jar包和依赖分开。
第一种方式是将三方依赖打入我们的jar包,因此运行的时候直接就能找到类,无需再指定classpath,修改jar任务的内容,如下所示:
jar {
	manifest {
		attributes (
			'Manifest-Version': 1.0,
			'Main-Class' : 'com.xxx.web3j.Web3jApp',
			'Implementation-Title': 'Gradle'
		)
	}


	from {
		configurations.compile.collect { it.isDirectory()? it:zipTree(it) }
	}
}
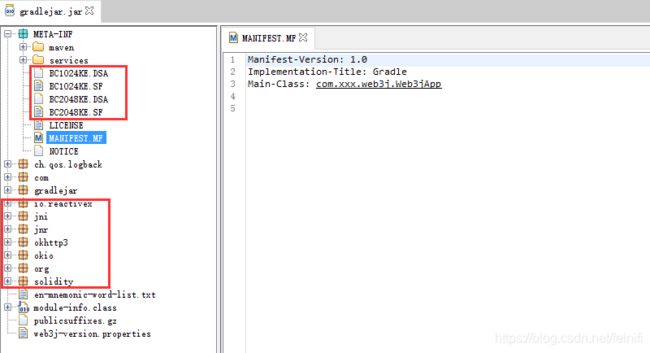
运行构建,通过反编译软件查看打包的内容,我们欣喜的发现,确实将三方jar包也打入了我们自己的jar中,如下所示:
文件中META-INF目录下,多了几个DSA,SF等后缀结尾的签名文件。
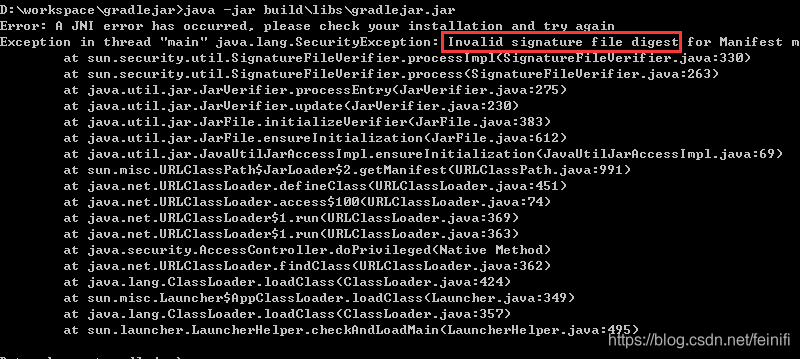
然后来运行,结果,还是一个莫名其妙的错误,这时候是报无效的签名文件摘要的错误:
出错的原因就是多了DSA,SF文件,解决办法就是去掉这些文件,打包的时候排除即可,再次修改我们的jar任务:
jar {
	manifest {
		attributes (
			'Manifest-Version': 1.0,
			'Main-Class' : 'com.xxx.web3j.Web3jApp',
			'Implementation-Title': 'Gradle'
		)
	}

	from {
		configurations.compile.collect { it.isDirectory()? it:zipTree(it) }
	}

	exclude 'META-INF/*.RSA','META-INF/*.SF','META-INF/*.DSA'
}
再次构建,运行,正常。
最后介绍一下,将依赖和我们得jar包分开的打包方式,这里需要将依赖加入一个文件夹如当前文件夹lib中保存,然后再在manifest中指定Class-Path属性,需要分两步走,这里直接给出配置。
task copyDependencies(type: Copy){
	from configurations.runtime
	into 'build/libs/lib'
}

jar.dependsOn(copyDependencies)

jar {
	manifest {
		attributes (
			'Manifest-Version': 1.0,
			'Main-Class' : 'com.xxx.web3j.Web3jApp',
			'Implementation-Title': 'Gradle'
		)
	}
	if(!configurations.runtime.isEmpty()){
		manifest.attributes('Class-Path': '. lib/'+ configurations.runtime.collect {
                 it.name }.join(' lib/') )
	}
}
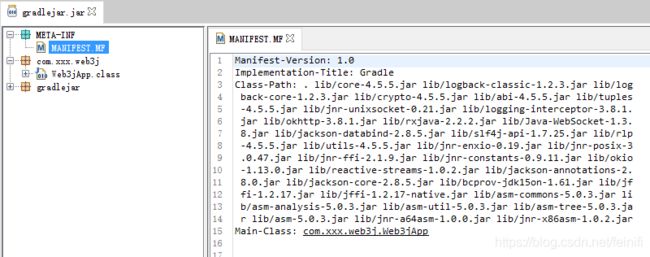
拷贝程序运行所需要的jar到一个目录lib中,另外一定要设置 manifest的Class-Path属性。这里通过构建一个Copy类型的任务,最后再将lib/*.jar加入到Class-Path中。执行构建生成的文件结构如下所示:
使用反编译工具打开jar,查看MANIFEST.MF内容:
这种构建因为运行jar包和依赖jar包是分开的,使用起来也不是很方便,尤其是部署的时候。


