Windows 10 YOLO v3 Deep_Sort多目标跟踪实验环境搭建成功手记
上周在HP 暗影精灵5笔记本(Windows10,GPU:NVIDIA GeForce GTX 1060 with Max-Q Design)上做了YOLO v3和Dlib19.17的运算速度与多目标检测的对比测试,具体测试情况请见:
运算速度对比测试:
https://blog.csdn.net/weixin_41943311/article/details/92793426
多目标检测对比测试:
https://blog.csdn.net/weixin_41943311/article/details/92839175
其实,目标检测只是诸多实际应用的第一步。那么,我们稍微拓展一点,基于一个视频,如果我们关心其中一个或几个目标的运动轨迹,那么怎么搭建一个实验环境快速地测试和验证一下呢?
网上有不少同学建议使用YOLO v3+Deep_Sort,但逐一看过去,对初学者来说,许多文章都语焉不详,下载下来的资源也往往不能直接使用。
经过反复验证和实验,我们成功搭建了一套YOLO v3+Deep_Sort多目标跟踪实验环境,实际运行时,YOLO v3+Deep_Sort多目标跟踪的运算速度大约为9-10fps。过程如下:
(1)安装必要的软件环境
我们使用Anaconda3来安装所有必要的软件环境:
(1.1)安装opencv: conda install opencv
(1.2)安装mingw libpython: conda install mingw libpython
(1.3)安装theano: conda install theano
(1.4)安装tensorflow-gpu: conda install tensorflow-gpu
(1.5)安装sklearn: conda install scikit-learn
(1.6)安装matplotlib: conda install matplotlib
(1.7)安装keras: conda install keras
(2)下载代码
(2.1)下载地址:https://github.com/EYHN/deep_sort_yolov3/tree/eyhn
请把这个分支代码clone下来:

把下载的文件解压缩存放在本地硬盘上。
(2.2)下载yolov3.weights
下载地址:https://pjreddie.com/media/files/yolov3.weights
文件:yolo3.weights
将yolo3.weights复制到解压缩后的项目代码的目录下(如:F:\AI\deep_sort_yolov3-eyhn)。
(2.3)把weights转化成keras格式
在项目代码的目录下 (如:F:\AI\deep_sort_yolov3-eyhn),执行以下命令:
python convert.py yolov3.cfg yolov3.weights model_data/yolo.h5
(3)测试实验环境
(3.1)取一段视频,放到项目代码的目录下;
(3.2)修改demo.py,将
videoReader = VideoReader("./******.mp4")
中的文件名改为你的视频的文件名。
(3.3)执行以下命令:
python demo.py
(3.4)查看输出文件
点击工作目录下的output.avi,即可看到YOLO v3+Deep_Sort实现的多目标跟踪的效果。
(3.4.1)我们首先选用的是一段用手机拍摄的青少年足球比赛的短视频,视频的规格为:

实验效果如下图:
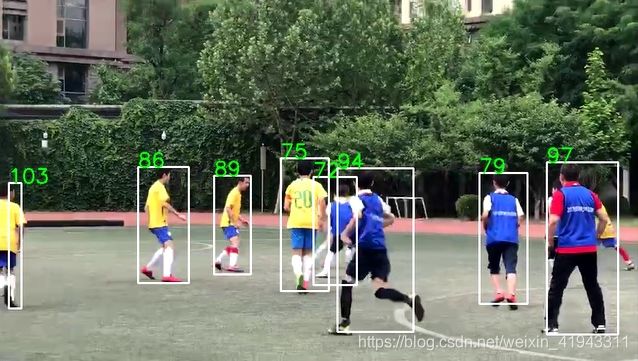

根据运行日志,此时YOLO v3+Deep_Sort多目标跟踪的运算速度大约为9-10fps。
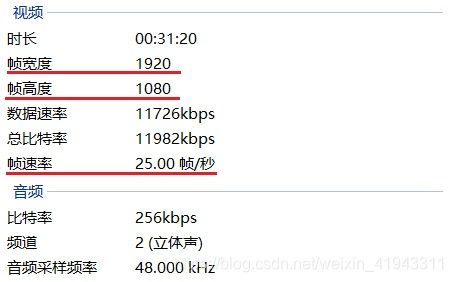
(3.4.2)我们接着选用的是一段用高清摄像机拍摄的标准足球场上的比赛视频,视频的规格为:
实验效果如下图:


根据运行日志,此时YOLO v3+Deep_Sort多目标跟踪的运算速度大约为4-5fps。
同时,在测试中也发现,当有队员从画面中反复进出时,相同球员不能识别为同一人,跟踪轨迹会重新计算,原有轨迹逐渐淡化、消失。
由于本项目同时运用了Keras,Tensorflow,YOLO v3,Deep_Sort等多个技术,因此详细的技术分析稍后再谈。
如果想了解YOLO v3的darknet53的网络是什么样的,或者说,是怎样在Keras+Tensorflow环境中一步步构造出这个darknet53网络的,请参考:
https://blog.csdn.net/weixin_41943311/article/details/94436404
.\video\_init_.py中的内容如下:
import threading
from video import video_synth_base
import cv2

class VideoReader:
    def __init__(self, path, cache_length=5):
        self.path = path
        self.cache_length = cache_length
        self.cache = []

        self._read_threading = threading.Thread(target=self._read_thread, name='readThread')
        self._read_event = threading.Event()
        self._pop_event = threading.Event()
        self._read_end = False
        self.video_capture = video_synth_base.create_capture(self.path)

        self._read_threading.setDaemon(True)
        self._read_threading.start()

    def _read_thread(self):
        while True:
            ret, frame = self.video_capture.read()
            if ret != True:
                self._read_end = True
                self.video_capture.release()
                break
            else:
                self.cache.append(frame)

            self._read_event.set()

            if len(self.cache) >= self.cache_length:
                self._pop_event.clear()
                self._pop_event.wait()

    def read(self):
        if len(self.cache) != 0:
            data = self.cache.pop(0)
            self._pop_event.set()
            return (True, data)
        elif self._read_end:
            return (False, None)
        else:
            self._read_event.clear()
            self._read_event.wait()
            return self.read()

    @property
    def width(self):
        return self.video_capture.get(cv2.CAP_PROP_FRAME_WIDTH)

    @property
    def height(self):
        return self.video_capture.get(cv2.CAP_PROP_FRAME_HEIGHT)

    @property
    def fps(self):
        return self.video_capture.get(cv2.CAP_PROP_FPS)

    @property
    def const_frame(self):
        return self.video_capture.get(cv2.CAP_PROP_FRAME_COUNT)
参考:
本文引用的源代码项目:
https://blog.csdn.net/weixin_42357472/article/details/91305530
较早期的项目介绍:
https://blog.csdn.net/zziahgf/article/details/85344859
https://blog.csdn.net/weixin_42755375/article/details/85723239
(完)