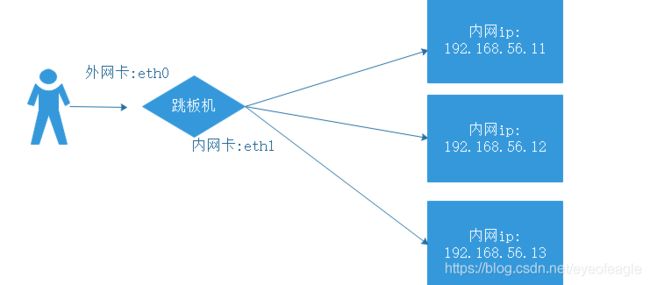
跳板机: jumpserver安装使用
文章目录
- 1, 官网安装指南(docker版)
- 2, 简化后的通用脚本(无docker版)
-
- 使用nginx整合各组件
- 安装后页面
1, 官网安装指南(docker版)
快速安装脚本:https://github.com/jumpserver/jumpserver/releases
简化后:
if [ ! -d "/opt/setuptools" ]; then
    wget -qO /opt/setuptools.tar.gz http://demo.jumpserver.org/download/setuptools.tar.gz
    tar -xf /opt/setuptools.tar.gz -C /opt
    rm -rf /opt/setuptools.tar.gz
fi

cd /opt/setuptools
git pull

if [ ! -f "/opt/setuptools/config.conf" ]; then
    cp config_example.conf config.conf
fi

./jmsctl.sh install
执行脚本后的下载目录:
[root@c7-docker ~]# tree /opt/setuptools/
/opt/setuptools/
├── config.conf
├── config_example.conf
├── jmsctl.sh
├── LICENSE
├── README.md
├── scripts
│   ├── check_install_env.sh
│   ├── docker
│   │   └── daemon.json
│   ├── install_core.sh
│   ├── install_docker.sh
│   ├── install_guacamole.sh
│   ├── install_koko.sh
│   ├── install_mariadb.sh
│   ├── install_nginx.sh
│   ├── install_py3.sh
│   ├── install_redis.sh
│   ├── install.sh
│   ├── install_status.sh
│   ├── nginx
│   │   ├── jumpserver.conf
│   │   ├── nginx-1.18.0-1.el7.ngx.x86_64.rpm
│   │   └── nginx.repo
│   ├── pypi
│   │   └── pip.conf
│   ├── reset.sh
│   ├── service
│   │   └── jms_core.service
│   ├── set_firewall.sh
│   ├── start.sh
│   ├── stop.sh
│   ├── uninstall.sh
│   └── upgrade.sh
└── v2.1.1
    ├── jumpserver-v2.1.1.tar.gz
    ├── lina-v2.1.1.tar.gz
    └── luna-v2.1.1.tar.gz
[root@c7-docker ~]# egrep '[0-9]+' /etc/nginx/conf.d/jumpserver.conf
    listen 80;
    client_max_body_size 1024m;  # 录像及文件上传大小限制
        proxy_pass       http://localhost:5000;
        proxy_http_version 1.1;
        proxy_pass       http://localhost:8081/;
        proxy_http_version 1.1;
              proxy_pass http://localhost:8070;
        proxy_http_version 1.1;
        proxy_pass http://localhost:8080;
        proxy_pass http://localhost:8080;
        rewrite ^/(.*)$ /ui/$1 last;

[root@c7-docker ~]# docker ps
CONTAINER ID  IMAGE                             COMMAND          STATUS       PORTS
55366973b62f  jumpserver/jms_guacamole:v2.1.1  "./entrypoint.sh"  Up 5 hours   127.0.0.1:8081->8080/tcp
ca6e0e1eed9c  jumpserver/jms_koko:v2.1.1       "./entrypoint.sh"  Up 5 hours   0.0.0.0:2222->2222/tcp, 127.0.0.1:5000->5000/tcp

#服务之间关系:jms_koko --> 注册到jumpserver服务中
	#jms_koko:
	# Jumpserver项目的url, api请求注册会使用
	CORE_HOST: http://127.0.0.1:8080
	# Bootstrap Token, 预共享秘钥, 用来注册coco使用的service account和terminal
	# 请和jumpserver 配置文件中保持一致,注册完成后可以删除
	BOOTSTRAP_TOKEN: <PleasgeChangeSameWithJumpserver>


[root@c7-docker ~]# grep -Ev '^$|^#' /opt/jumpserver/config.yml
SECRET_KEY: xuQWZoZtMEFhqnzBd0FIbmNOXkarJL56Q4fri3p6KyFszHZrXr
BOOTSTRAP_TOKEN: 0mXVwHOHcMhulfij
DEBUG: false
LOG_LEVEL: ERROR
SESSION_EXPIRE_AT_BROWSER_CLOSE: true
DB_ENGINE: mysql
DB_HOST: 127.0.0.1
DB_PORT: 3306
DB_USER: jumpserver
DB_PASSWORD: BP2nllZj2AtaUjkn1dw0y7Oj
DB_NAME: jumpserver
HTTP_BIND_HOST: 0.0.0.0
HTTP_LISTEN_PORT: 8080
WS_LISTEN_PORT: 8070
REDIS_HOST: 127.0.0.1
REDIS_PORT: 6379
REDIS_PASSWORD: bsw4OxzvWY1qynVKQpzHB9wA
WINDOWS_SKIP_ALL_MANUAL_PASSWORD: True
[root@c7-docker ~]# ss -nltp |grep 8080
LISTEN     0      128          *:8080                     *:*                   users:(("gunicorn",pid=1733,fd=5),("gunicorn",pid=1731,fd=5),("gunicorn",pid=1729,fd=5),("gunicorn",pid=1728,fd=5),("gunicorn",pid=1725,fd=5))
[root@c7-docker ~]# ps -ef |grep "gunicorn"
root      1725     1  0 06:19 ?        00:00:05 /opt/py3/bin/python3.6 /opt/py3/bin/gunicorn jumpserver.wsgi -b 0.0.0.0:8080 -k gthread --threads 10 -w 4 --max-requests 4096 --access-logformat %(h)s %(t)s "%(r)s" %(s)s %(b)s  --access-logfile -
root      1728  1725  0 06:19 ?        00:00:40 /opt/py3/bin/python3.6 /opt/py3/bin/gunicorn jumpserver.wsgi -b 0.0.0.0:8080 -k gthread --threads 10 -w 4 --max-requests 4096 --access-logformat %(h)s %(t)s "%(r)s" %(s)s %(b)s  --access-logfile -
2, 简化后的通用脚本(无docker版)
########安装指南
0, 环境准备
wget -qO /etc/yum.repos.d/CentOS-Base.repo https://mirrors.aliyun.com/repo/Centos-6.repo
        sed -i -e '/mirrors.cloud.aliyuncs.com/d' -e '/mirrors.aliyuncs.com/d' /etc/yum.repos.d/CentOS-Base.repo
 wget -qO /etc/yum.repos.d/epel.repo https://mirrors.aliyun.com/repo/epel-6.repo
        sed -i -e '/mirrors.cloud.aliyuncs.com/d' -e '/mirrors.aliyuncs.com/d' /etc/yum.repos.d/epel.repo
yum clean all


1,依赖包
yum -y install gcc krb5-devel libtiff-devel libjpeg-devel libzip-devel freetype-devel lcms2-devel libwebp-devel tcl-devel tk-devel sshpass \
	openldap-devel mariadb-devel mysql-devel mysql libffi-devel openssh-clients telnet openldap-clients

#mysql,redis, python3x #mysql源,
echo -e "
[mysql]
name=mysql
baseurl=https://mirrors.tuna.tsinghua.edu.cn/mysql/yum/mysql57-community-el6/
gpgcheck=0
enabled=1
" > /etc/yum.repos.d/mysql.repo
yum -y install mysql-server redis


service mysql start
[root@test-c62 ~]# grep 'temporary password' /var/log/mysqld.log
2020-08-17T03:33:17.515374Z 1 [Note] A temporary password is generated for root@localhost: aQU8hOdaJk+s

[root@test-c62 ~]# mysqladmin -uroot -paQU8hOdaJk+s password '123456'
mysqladmin: [Warning] Using a password on the command line interface can be insecure.

mysql -uroot -p123456 -e "create database jumpserver  default charset 'utf8' collate 'utf8_bin';"
mysql -uroot -p123456 -e "drop user 'jumpserver'@'127.0.0.1';"
mysql -uroot -p123456 -e "grant all on jumpserver.* to 'jumpserver'@'127.0.0.1' identified by '123456';flush privileges;"


sed -i "481i requirepass 123456" /etc/redis.conf
service redis start


2, 创建 Python 虚拟环境
#centos6只有python34: 3.6x需要手动编译,yum install -y python36 python36-devel
python3 -m venv /opt/py3
source /opt/py3/bin/activate #每次操作 JumpServer 都需要先载入 py3 虚拟环境

#pip源
mkdir ~/.pip
cat > ~/.pip/pip.conf < ~/.pydistutils.cfg <
使用nginx整合各组件
7, 下载&&解压 Lina 组件,  Luna 组件
chown -R nginx:nginx /opt/luna
chown -R nginx:nginx /opt/lina

8,使用nginx整合各项服务
[root@test-c62 ~]# cat /etc/nginx/conf.d/jumpserver.conf
	server {

	    listen 80;
	    client_max_body_size 1024m;  # 录像及文件上传大小限制
	    ##### 静态资源 /opt/{lina,luna,jumpserver}
	    location /ui/ {

		try_files $uri / /index.html;
		alias /opt/lina/;
		expires 24h;
	    }
	    location /luna/ {

		try_files $uri / /index.html;
		alias /opt/luna/;
		expires 24h;
	    }
	    location /media/ {

		add_header Content-Encoding gzip;
		root /opt/jumpserver/data/;
	    }
	    location /static/ {

		root /opt/jumpserver/data/;
		expires 24h;
	    }
	    location / {

		 rewrite ^/(.*)$ /ui/$1 last;
	    }


	    #####/opt/py3/bin/python3 /opt/py3/bin/daphne jumpserver.asgi:application -b 0.0.0.0 -p 8070
	    location /ws/ {

		      proxy_pass http://localhost:8070;
		      proxy_buffering off;
		proxy_http_version 1.1;
		      proxy_request_buffering off;
		proxy_set_header Upgrade $http_upgrade;
		proxy_set_header Connection "upgrade";
		proxy_set_header X-Real-IP $remote_addr;
		proxy_set_header Host $host;
		proxy_set_header X-Forwarded-For $proxy_add_x_forwarded_for;
		proxy_set_header Host $host;
		proxy_set_header X-Forwarded-For $proxy_add_x_forwarded_for;
	    }

	    #####/opt/py3/bin/python3 /opt/py3/bin/gunicorn jumpserver.wsgi -b 0.0.0.0:8080
	    location /api/ {

		proxy_pass http://localhost:8080;
		  proxy_set_header X-Real-IP $remote_addr;
		  proxy_set_header Host $host;
		  proxy_set_header X-Forwarded-For $proxy_add_x_forwarded_for;
	    }
	    location /core/ {

		proxy_pass http://localhost:8080;
		      proxy_set_header X-Real-IP $remote_addr;
		  proxy_set_header Host $host;
		  proxy_set_header X-Forwarded-For $proxy_add_x_forwarded_for;
	    }


	    ##### 容器jumpserver/jms_koko:v2.1.1服务
	    location /koko/ {

		proxy_pass       http://localhost:5000;
		proxy_buffering off;
		proxy_http_version 1.1;
		      proxy_request_buffering off;
		proxy_set_header Upgrade $http_upgrade;
		proxy_set_header Connection "upgrade";
		proxy_set_header X-Real-IP $remote_addr;
		proxy_set_header Host $host;
		proxy_set_header X-Forwarded-For $proxy_add_x_forwarded_for;
		access_log off;
	    }

	   ##### 容器jumpserver/jms_guacamole:v2.1.1
	   #/etc/init.d/guacd start; /config/tomcat9/bin/startup.sh
	   location /guacamole/ {

		proxy_pass       http://localhost:8081/;
		proxy_buffering off;
		proxy_http_version 1.1;
		      proxy_request_buffering off;
		proxy_set_header Upgrade $http_upgrade;
		proxy_set_header Connection $http_connection;
		proxy_set_header X-Real-IP $remote_addr;
		proxy_set_header Host $host;
		proxy_set_header X-Forwarded-For $proxy_add_x_forwarded_for;
		access_log off;
	    }
	}


