SpringBoot+SpringCloud零基础搭建分布式订餐系统+全程记录(一)
文章目录
-
-
- 一、创建父工程
- 二、创建注册中心EurekaServer
-
-
- 1、工程创建步骤
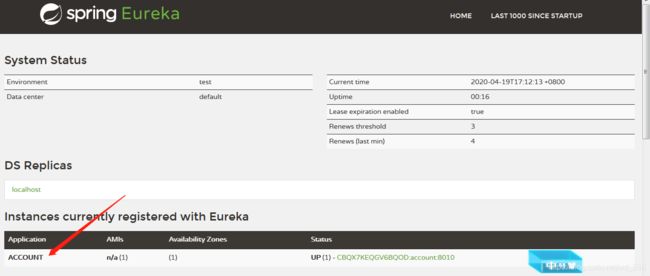
- 2、注册中心效果测试
-
- 三、创建account用户模块
-
-
- 1、工程创建步骤
- 2、效果测试
-
-
学完一个知识应用到项目中才是最佳实践方法!
整个工程的目录如下图:

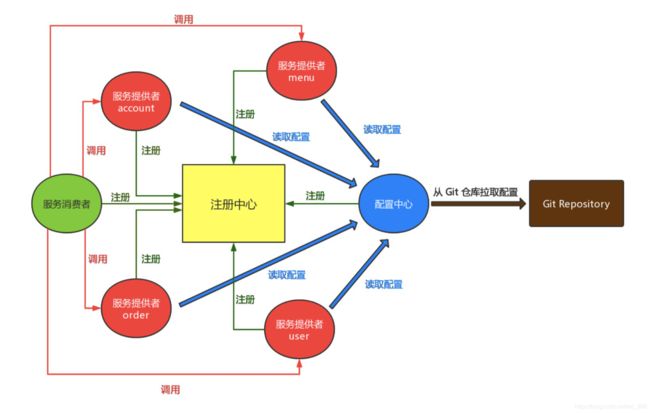
项目整体架构是这样:
 主要分为四个模块,account、user、menu、order,每个模块都是一个独立的服务。
主要技术:SpringBoot+SpringCloud、Feign声明式接口调用(并带有负载均衡的功能)、config远程配置。
一、创建父工程
pom.xml
    4.0.0

    org.example
    orderdemo
    1.0-SNAPSHOT


        org.springframework.boot
        spring-boot-starter-parent
        2.0.7.RELEASE


            org.springframework.boot
            spring-boot-starter-web


            org.projectlombok
            lombok


                org.springframework.cloud
                spring-cloud-dependencies
                pom
                import
如果出现了下面的错误,那就是插件起冲突了,把你本地maven中对应的文件删掉,在项目中重新导入就可以了。
Error: Plugin org.apache.maven.plugins:maven-clean-plugin:2.5 or one of its dependencies could not
二、创建注册中心EurekaServer
1、工程创建步骤
(1)在父工程下创建一个Moudle,取名EurekaServer
(2)pom如下:
        orderdemo
        org.example
        1.0-SNAPSHOT

    4.0.0

    eurekaserver


            org.springframework.cloud
            spring-cloud-starter-netflix-eureka-server
            2.0.2.RELEASE
(3)java文件下创建一个启动类
package com.gosang;

import org.springframework.boot.SpringApplication;
import org.springframework.boot.autoconfigure.SpringBootApplication;
import org.springframework.cloud.netflix.eureka.server.EnableEurekaServer;

/**
 * @Author: gosang
 * @DateTime: 2020/4/19 14:47
 * @Description: TODO
 */
@SpringBootApplication
@EnableEurekaServer
public class Application {
    public static void main(String[] args) {
        SpringApplication.run(Application.class,args);
    }
}
(4)resources文件下创建配置文件
application.yml
server:
  port: 8761
eureka:
  client:
    register-with-eureka: false
    fetch-registry: false
    service-url:
      defaultZone: http://localhost:8761/eureka/
注册中心完成。
2、注册中心效果测试
(1)启动刚才写好的启动类
(2)访问http://localhost:8761
(3)如果出现了如下的错误,不用慌。把你本地的servlet-api文件删掉就好了,因为自带的和本地的起冲突了。文件位置一般在:C:\Users\Administrator.m2\repository\javax\servlet。看你的Maven仓库在哪里了。
Failed to start component [StandardEngine[Tomcat].StandardHost[localhost].StandardContext[]]
三、创建account用户模块
1、工程创建步骤
(1)pom
        orderdemo
        org.example
        1.0-SNAPSHOT

    4.0.0

    account


            org.springframework.cloud
            spring-cloud-starter-netflix-eureka-client
            2.0.0.RELEASE


            org.springframework.boot
            spring-boot-starter-jdbc


            org.mybatis.spring.boot
            mybatis-spring-boot-starter
            1.3.1


            mysql
            mysql-connector-java
            8.0.16
(2)yml配置
server:
  port: 8010
spring:
  application:
    name: account
  datasource:
    name: orderingsystem
    url: jdbc:mysql://localhost:3306/orderingsystem?useUnicode=true&characterEncoding=UTF-8&serverTimezone=UTC
    username: root
    password: XXX数据库配你自己的。数据库文件在我的github里面有。
eureka:
  client:
    service-url:
      defaultZone: http://localhost:8761/eureka/
  instance:
    prefer-ip-address: true
mybatis:
  mapper-locations: classpath:mapping/*.xml
  type-aliases-package: com.gosang.entity
(3)创建实体类
Acount类
package com.gosang.entity;

import lombok.Data;

import java.util.Date;

/**
 * @Author: gosang
 * @DateTime: 2020/4/19 16:12
 * @Description: TODO
 */
@Data
public class Account {
    private Integer id;
    private String username;
    private String password;
    private String nickname;
    private String gender;
    private String telephone;
    private Date registerdate;
    private String address;
}
User类
package com.gosang.entity;

/**
 * @Author: gosang
 * @DateTime: 2020/4/19 16:13
 * @Description: TODO
 */
public class User extends Account{
}
Admin类
package com.gosang.entity;

/**
 * @Author: gosang
 * @DateTime: 2020/4/19 16:13
 * @Description: TODO
 */
public class Admin extends Account{
}
用多态的方式定义,这样返回数据的时候就直接用Acount接收就好了。
(4)创建repository,数据层
AdminRepository接口
package com.gosang.repository;

import com.gosang.entity.Account;
import com.gosang.entity.Admin;
import org.springframework.stereotype.Repository;

/**
 * @Author: gosang
 * @DateTime: 2020/4/19 16:16
 * @Description: TODO
 */
@Repository
public interface AdminRepository {
    public Admin login(String username, String password);
}
UserRepository接口
package com.gosang.repository;

import com.gosang.entity.Account;
import com.gosang.entity.User;
import org.springframework.stereotype.Repository;

/**
 * @Author: gosang
 * @DateTime: 2020/4/19 16:16
 * @Description: TODO
 */
@Repository
public interface UserRepository {
    public User login(String username, String password);
}
(5)maping映射
AdminRepository.xml
UserRepository.xml
(6)controller
AccountHandler
package com.gosang.controller;

import com.gosang.entity.Account;
import com.gosang.entity.User;
import com.gosang.repository.AdminRepository;
import com.gosang.repository.UserRepository;
import org.springframework.beans.factory.annotation.Autowired;
import org.springframework.web.bind.annotation.GetMapping;
import org.springframework.web.bind.annotation.PathVariable;
import org.springframework.web.bind.annotation.RequestMapping;
import org.springframework.web.bind.annotation.RestController;

/**
 * @Author: gosang
 * @DateTime: 2020/4/19 16:27
 * @Description: TODO
 */
@RestController
@RequestMapping("/account")
public class AccountHandler {

    @Autowired
    public UserRepository userRepository;

    @Autowired
    public AdminRepository adminRepository;

    @GetMapping("/login/{username}/{password}/{type}")
    public Account login(@PathVariable("username") String username,@PathVariable("password") String password,@PathVariable("type") String type){

        Account account = new Account();

        switch (type){
            case "user":
                account = userRepository.login(username,password);
                break;
            case "admin":
                account = adminRepository.login(username,password);
                break;
        }
        return account;

    }
}
(7)启动类
package com.gosang;

import org.mybatis.spring.annotation.MapperScan;
import org.springframework.boot.SpringApplication;
import org.springframework.boot.autoconfigure.SpringBootApplication;

/**
 * @Author: gosang
 * @DateTime: 2020/4/19 16:38
 * @Description: TODO
 */
@SpringBootApplication
@MapperScan("com.gosang.repository")
public class Application {
        public static void main(String[] args) {
            SpringApplication.run(Application.class,args);
        }
}
2、效果测试
(1)先启动注册中心
(2)启动Acount模块,效果如下,已经把Acount服务加到注册中心
 (3)数据文件去这里拿:https://github.com/DawsonOne/orderdemo
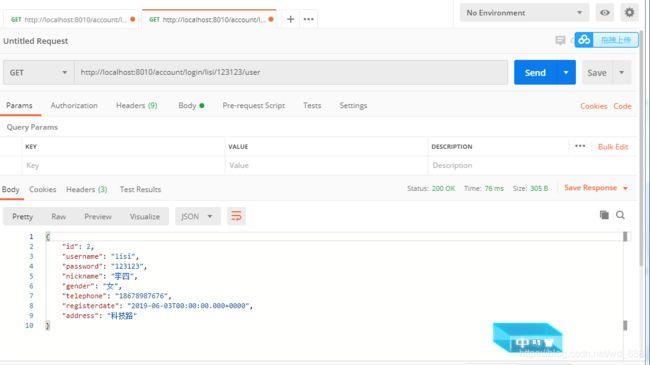
(4)访问http://localhost:8010/account/login/lisi/123123/user或者http://localhost:8010/account/login/admin1/123123/admin
有数据出来就说明这部分就完成了。


