从源码角度理解HandlerThread和IntentService
-
基础:需要对于消息机制的四大部分有一定了解,可以参考此篇。
-
HandlerThread.
public class HandlerThread extends Thread {

    int mPriority;
    int mTid = -1;
    Looper mLooper;
    private @Nullable Handler mHandler;

    public HandlerThread(String name) {

        super(name);
        mPriority = Process.THREAD_PRIORITY_DEFAULT;
    }


    public HandlerThread(String name, int priority) {

        super(name);
        mPriority = priority;
    }


    protected void onLooperPrepared() {

    }

    @Override
    public void run() {

        mTid = Process.myTid();
        Looper.prepare();
        synchronized (this) {

            mLooper = Looper.myLooper();
            notifyAll();
        }
        Process.setThreadPriority(mPriority);
        onLooperPrepared();
        Looper.loop();
        mTid = -1;
    }

    public Looper getLooper() {

        if (!isAlive()) {

            return null;
        }

        // If the thread has been started, wait until the looper has been created.
        synchronized (this) {

            while (isAlive() && mLooper == null) {

                try {

                    wait();
                } catch (InterruptedException e) {

                }
            }
        }
        return mLooper;
    }


    @NonNull
    public Handler getThreadHandler() {

        if (mHandler == null) {

            mHandler = new Handler(getLooper());
        }
        return mHandler;
    }


    public boolean quit() {

        Looper looper = getLooper();
        if (looper != null) {

            looper.quit();
            return true;
        }
        return false;
    }


    public boolean quitSafely() {

        Looper looper = getLooper();
        if (looper != null) {

            looper.quitSafely();
            return true;
        }
        return false;
    }


    public int getThreadId() {

        return mTid;
    }
}
关于HandlerThread注意两点就好:
- 继承自Thread类,即是一个线程类
- 在run方法里,为当前线程指定了Looper对象,不需要使用者显示的调用Looper.prepare()以及Looper.loop()方法
-
IntentService

- 抽象类,在使用时需要继承该类,并且重写其中的 protected abstract void onHandleIntent(@Nullable Intent intent);
- 是一个服务类
由于是Service,所以我们需要关注其对应的几个生命周期方法的实现:
- onCreate()方法
@Override
public void onCreate() {

    // TODO: It would be nice to have an option to hold a partial wakelock
    // during processing, and to have a static startService(Context, Intent)
    // method that would launch the service & hand off a wakelock.

    super.onCreate();
    HandlerThread thread = new HandlerThread("IntentService[" + mName + "]");
    thread.start();

    mServiceLooper = thread.getLooper();
    mServiceHandler = new ServiceHandler(mServiceLooper);
}

private final class ServiceHandler extends Handler {

        public ServiceHandler(Looper looper) {

            super(looper);
        }

        @Override
        public void handleMessage(Message msg) {

            onHandleIntent((Intent)msg.obj);
            stopSelf(msg.arg1);
        }
    }
一些初始化工作,创建了我们前面提到的HandlerThread对象以及ServiceHandler对象。
- onBind()方法
@Override
@Nullable
public IBinder onBind(Intent intent) {

    return null;
}
没啥子逻辑,直接返回了null,也就意味着默认只支持start方式启动该IntentService。当然我们也可以重写该方法,让其支持bind方式启动从而实现相关功能。
- onStartCommand()方法
@Override
public int onStartCommand(@Nullable Intent intent, int flags, int startId) {

    onStart(intent, startId);
    return mRedelivery ? START_REDELIVER_INTENT : START_NOT_STICKY;
}

@Override
public void onStart(@Nullable Intent intent, int startId) {

       Message msg = mServiceHandler.obtainMessage();
       msg.arg1 = startId;
       msg.obj = intent;
       mServiceHandler.sendMessage(msg);
}
这块主要的逻辑就是通过ServiceHandler发送了一条Message,并在Message中携带了intent和startId。
- onDestroy()方法
@Override
public void onDestroy() {

    mServiceLooper.quit();
}
让HandlerThread中对应的Looper退出。
最后,我们再关注下ServiceHandler的实现:
private final class ServiceHandler extends Handler {

    public ServiceHandler(Looper looper) {

        super(looper);
    }

    @Override
    public void handleMessage(Message msg) {

        onHandleIntent((Intent)msg.obj);
        stopSelf(msg.arg1);
    }
}
在handleMessage方法里:调用了抽象方法onHandleIntent(),并把Message中携带的Intent取出来,最后调用了stopSelf方法。
public final void stopSelf() {

    stopSelf(-1);
}

/**
 * Old version of {@link #stopSelfResult} that doesn't return a result.
 *
 * @see #stopSelfResult
 */
public final void stopSelf(int startId) {

    if (mActivityManager == null) {

        return;
    }
    try {

        mActivityManager.stopServiceToken(
                new ComponentName(this, mClassName), mToken, startId);
    } catch (RemoteException ex) {

    }
}
这俩方法的区别也就是startId的值不同,导致的效果就是:
startId = -1时,也就是调用不带参数的stopSelf方法,它会立即停止服务;stopSelft(int startId)则会等待所有的消息都处理完毕后才终止服务(也就是多次调用了startService()方法)
- 测试IntentService
class TestIntentService : IntentService("TestIntentService") {


     override fun onCreate() {

        super.onCreate()
        Log.e(TAG, "onCreate():currentInstance = $this")
    }

    override fun onHandleIntent(intent: Intent?) {

        val name = intent?.getStringExtra(NAME)
        Log.e(TAG, "onHandleIntent -> $name, ${
       Thread.currentThread()}")
        SystemClock.sleep(3000)
    }

    override fun onDestroy() {

        super.onDestroy()
        Log.e(TAG, "onDestroy()..." )
    }

    companion object {


        private const val NAME = "name"
        private val TAG = TestIntentService::class.java.simpleName

        fun start(context: Context, name: String) {

            Intent(context, TestIntentService::class.java)
                .putExtra(NAME, name)
                .run {
      context.startService(this) }

        }
    }
}
在MainActivity里:
class MainActivity : AppCompatActivity(), CoroutineScope by MainScope() {


  override fun onCreate(savedInstanceState: Bundle?) {

        super.onCreate(savedInstanceState)
        setContentView(R.layout.activity_main)

        launch {

            repeat(3) {

                delay(2000)
                TestIntentService.start(this@MainActivity, "MainActivity-0$it")
            }
        }
    }
}
每隔2s,启动一次Service;而在TestIntentService的onHandleIntent方法里,固定休眠了3s。这样最后的日志输出为:
onCreate():currentInstance = com.xlh.test.TestIntentService@7b7159c
onHandleIntent -> MainActivity-00, Thread[IntentService[TestIntentService],5,main]
onHandleIntent -> MainActivity-01, Thread[IntentService[TestIntentService],5,main]
onHandleIntent -> MainActivity-02, Thread[IntentService[TestIntentService],5,main]
onDestroy()…
现在我们改成每隔4s启动一次Service:
launch {

    repeat(3) {

        delay(4000)
        TestIntentService.start(this@MainActivity, "MainActivity-0$it")
    }
}
此时日志输出为:
onCreate():currentInstance = com.visionblue.haiyou.cd.TestIntentService@79a8a04
onHandleIntent -> MainActivity-00, Thread[IntentService[TestIntentService],5,main]
onDestroy()…
onCreate():currentInstance = com.visionblue.haiyou.cd.TestIntentService@7cd1a22
onHandleIntent -> MainActivity-01, Thread[IntentService[TestIntentService],5,main]
onDestroy()…
onCreate():currentInstance = com.visionblue.haiyou.cd.TestIntentService@6384270
onHandleIntent -> MainActivity-02, Thread[IntentService[TestIntentService],5,main]
onDestroy()…
对比两次的结果,我们可以得出结论:
- 对于client端来的请求,IntentService是顺序处理的
- 一个请求处理完毕,如果此时没有新的请求,那么IntentService会进行销毁;一个请求还在处理过程中,如果有新的请求,那么IntentService会在本次请求处理完成后接着去处理新的请求,此时不会销毁。待所有请求处理完毕后,再进行销毁
- onHandleIntent()在子线程中运行
- startId
要想理解这里的startId以及两个重载的stopSelf()方法,这块我们需要对Service的start方式的启动流程熟悉。我们这里只简单梳理一下:
Context.startService() -> ContextWrapper.startService() -> ContextImpl.startServiceCommon() -> ActivityManager.getService().startService() -> ActivityManagerService.startService() -> ActivityServices.startServiceLocked()
到这里我们就可以停一下了:
r.pendingStarts.add(new ServiceRecord.StartItem(r, false, r.makeNextStartId(),
        service, neededGrants, callingUid))
这里的r就是ServiceRecord,我们来看其makeNextStartId()的实现:
public int makeNextStartId() {

    lastStartId++;
    if (lastStartId < 1) {

        lastStartId = 1;
    }
    return lastStartId;
}
每start一次,startId就会自增1,而且从这里可以得知:startId >= 1。
如果要再往下分析的话:
ActivityServices.startServiceInnerLocked() -> ActivityServices.bringUpServiceLocked() -> ActivityServices.realStartServiceLocked()
在realStartServiceLocked()方法里:
app.thread.scheduleCreateService(r, r.serviceInfo,
                    mAm.compatibilityInfoForPackage(r.serviceInfo.applicationInfo),
                    app.getReportedProcState())
这行代码最终会导致Service对象的创建以及onCreate()生命周期方法的回调,具体实现可阅读ApplicationThread以及ActivityThread类源码。
sendServiceArgsLocked(r, execInFg, true); -> r.app.thread.scheduleServiceArgs(r, slice);
最终会导致onStartCommand的回调,从而将startId带了过去。至此,启动的流程我们就告一段落。我们接下来看stopSelf(int startId)的实现:
public final void stopSelf(int startId) {

    if (mActivityManager == null) {

        return;
    }
    try {

        mActivityManager.stopServiceToken(
                new ComponentName(this, mClassName), mToken, startId);
    } catch (RemoteException ex) {

    }
}
@Override
public boolean stopServiceToken(ComponentName className, IBinder token,
        int startId) {

    synchronized(this) {

        return mServices.stopServiceTokenLocked(className, token, startId);
    }
}
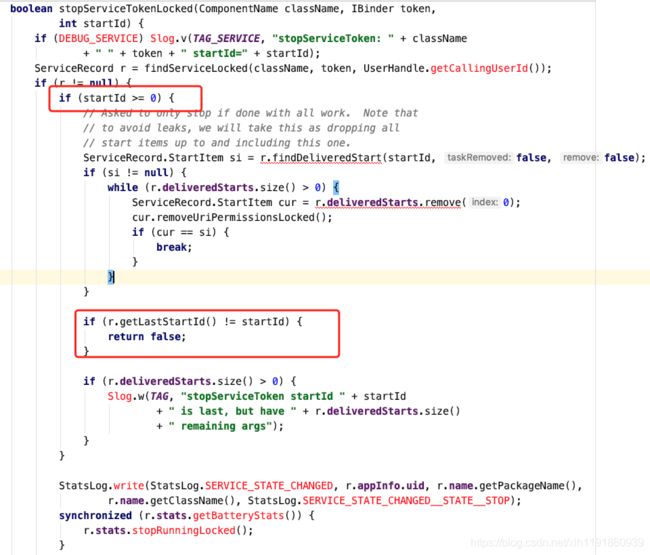
注意红框中的代码,如果startId大于0,而且当ServiceRecord中的lastStartId和传入startId不相等时,直接return回去,接下来的停止逻辑就没有执行了,只有相等时,才会继续往下走。
r.startRequested = false;
if (r.tracker != null) {

    r.tracker.setStarted(false, mAm.mProcessStats.getMemFactorLocked(),
            SystemClock.uptimeMillis());
}
r.callStart = false;
final long origId = Binder.clearCallingIdentity();
bringDownServiceIfNeededLocked(r, false, false);
Binder.restoreCallingIdentity(origId);
return true;
这就是下面的代码,重点就是bringDownServiceIfNeededLocked(),这里就不再往下分析了。实际上到这里,我们已经能够总结出stopSelf(int startId)的特点了:
- startId < 0:stopSelf()方法会直接停止Service
- startId > 0 && startId != ServiceRecord.lastStartId:不会停止Service,代码流程直接返回
- startId > 0 && startId == ServiceRecord.lastStartId: 直接停止Service。
如果我们此时再回头去看我们上面的示例代码时,一切就都了然于心了。