android x86 Download、 Buildnig and Running
转载来自:
1,https://sourceforge.net/p/android-x86/wiki/Downloading%20and%20Building/
2,https://sourceforge.net/p/android-x86/wiki/Installation/
Download and Buildnig
Introduction
-
This page has (hopefully) the latest information about how to build Android for x86 platforms . The built images runs well on a real hardware as well as virtual machines (qemu or virtual-box or vmware-workstation).
-
Now it is very easy to compile Android for x86 platform from our girepositories. You need not to apply any patch. Just follow the below instructions.
Establishing a Build Environment
Some Requirements
The Android-x86 and Android build is routinely tested in-house on recent versions of Ubuntu LTS (14.04 or 15.10), but most other distributions(fedora ..) should have the required build tools available.
Before you download and build the Android-x86 source code, ensure your system meets the following requirements:
- A Linux or Mac OS system(maybe). Certianly it is also possible to build Android-x86 in a virtual machine(not recomend) on a unsupported systems such as Windows. If you are running Linux in a virtual machine, you need at least 16GB of RAM/swap and 100GB or more of disk space in order to build the Android-x86 tree. See disk size requirements below.
- A 64-bit environment is required for Gingerbread (2.3.x) and newer versions, including the master branch. You can compile older versions on 32-bit systems.
- At least 100GB of free disk space for a checkout, 150GB for a single build, and 200GB or more for multiple builds. If you employ ccache, you will need even more space.
- Python 2.6 -- 2.7, which you can download from python.org.
- GNU Make 3.81 -- 3.82, which you can download from gnu.org,
- JDK 7 to build the master branch of Android in the Android Open Source Project (AOSP); JDK 6 to build Gingerbread through KitKat; JDK 5 for Cupcake through Froyo. See Initializing a Build Environment for installation instructions by operating system.
- Git 1.7 or newer. You can find it at git-scm.com.
Choosing a Branch on Android-x86 Tree
Some of the requirements for your build environment are determined by which version of the source code you plan to compile. A listing of branches you may choose as below.
- marshmallow-x86
Based on Android 6.0 release (Marshmallow ). - lollipop-x86
Based on Android 5.0 release (Lollipop). - kitkat-x86
Based on Android 4.4 release (KitKat). - jb-x86
Based on Android 4.3 release (Jelly Bean). - ics-x86
Based on Android 4.0 release (Ice Cream Sandwich). - honeycomb-x86
Based on Android 3.2 release (Honeycomb). - gingerbread-x86
Based on Android 2.3 release (Gingerbread). - froyo-x86
Based on Android 2.2 release (Froyo). - eclair-x86
Based on Android 2.1 release (Eclair). - donut-x86
Based on Android 1.6 release (Donut). - cupcake-x86 (aka android-x86-v0.9)
Based on Android 1.5 release (Cupcake).
Once you have selected a branch, follow the appropriate instructions below to set up your build environment. Good luck !!!
Setting up a Linux build environment
These instructions apply to all branches.
The Android-x86 build is routinely tested in house on recent versions of Ubuntu LTS (14.04 or newer version), but most distributions(fedora20 or newer) should have the required build tools available. Reports of successes or failures on other distributions are welcome.
For gingerbread-x86 or higher versioin, Note a 64-bit environment is required. Older versions can be compiled on 32-bit systems.
NOTEThe complete list of hardware and software requirements see above Some Requirementssection.
- Installing the JDK
The Android Open Source Project (AOSP) requires Java 7 and Android-x86 also require . On Ubuntu, use OpenJDK.
Java 7:
    $ sudo apt-get update
    $ sudo apt-get install openjdk-7-jdk
If you encounter version errors for Java, set its path as described in the Wrong Java Version section below.
To develop older versions of Android-x86, download and install the corresponding version of the Java JDK and see Install-Oracle-Java-JDK-on-Ubuntu-Linux.
Java 6: for Gingerbread-x86 through KitKat-x86
Java 5: for Cupcake-x86 through Froyo-x86
- Installing required packages (Ubuntu 14.04)
You will need a 64-bit version of Ubuntu. Ubuntu 14.04 is recommended.
  $ sudo apt-get install git-core gnupg flex bison gperf build-essential \
   zip curl zlib1g-dev gcc-multilib g++-multilib libc6-dev-i386 \
   lib32ncurses5-dev x11proto-core-dev libx11-dev lib32z-dev ccache \
   libgl1-mesa-dev libxml2-utils xsltproc unzip squashfs-tools python-mako
Downloading the Source
Note The source tree you will download include 2 part, the first part is the projects created or modified by android-x86 on our git server and all the other projects still point to AOSP. some details about projects information can be find in 'default.xml' file .repo/manifests/default.xml.
Now the Android-x86 source tree is located in a Git repository on sourceforge. The Git repository includes metadata for the Android-x86 source, including those related to changes to the source and the date they were made. This document describes how to download the source tree for a specific Android-x86 branch.
Installing Repo
Repo is a tool that makes it easier to work with Git in the context of Android. For more information about Repo, see the Developingsection from google websit.
To install Repo:
1. Make sure you have a bin/ directory in your home directory and that it is included in your path:
$ mkdir ~/bin
$ PATH=~/bin:$PATH
- Download the Repo tool and ensure that it is executable:
$ curl https://storage.googleapis.com/git-repo-downloads/repo > ~/bin/repo
$ chmod a+x ~/bin/repo
Initializing a Repo client
- After installing Repo, create an empty directory to hold your working files,Give it any name you like:
$ mkdir android-x86
$ cd android-x86
- Run repo init to download the latest version of Repo with all its most recent bug fixes.
$ repo init -u git://gitscm.sf.net/gitroot/android-x86/manifest -b $branch
For example:
repo init -u git://gitscm.sf.net/gitroot/android-x86/manifest -b marshmallow-x86
Where $branch is any branch name described in the previous section. This will point the projects created or modified by android-x86 to our git server. All the other projects still point to AOSP.
Downloading the Android-x86 Source Tree
To pull down the Android-x86 source tree to your working directory from the repositories, run:
$ repo sync
How to build a image see below.
Building the image
==
The following instructions to build the Android-x86 source tree apply to all branches. The basic sequence of build commands is as follows:
Set up environment
Initialize the environment with the envsetup.sh script. Note that replacing source with . (a single dot) saves a few characters, and the short form is more commonly used in documentation.
$ source build/envsetup.sh
or
$ . build/envsetup.sh`
Choose a target
You need to choose a target for the x86 device you want to use/test. We provides several targets for different branches:
- lollipop-x86 / marshmallow-x86
- android_x86: for 32-bit x86 platform
- android_x86_64: for 64-bit x86_64 platform
- jb-x86 / kitkat-x86
- android_x86: for x86 platform
- honeycomb-x86 / ics-x86
- generic_x86: for generic x86 PC/notebook
- amd_brazos: for AMD Brazos platform
- eeepc: for ASUS EeePC family only
- asus_laptop: for some ASUS laptops
- tegav2: for Tegatech Tegav2 (may work with other Atom N45x based tablets)
- froyo-x86 / gingerbread-x86
- generic_x86: for generic x86 PC/notebook
- eeepc: for ASUS EeePC family only
- asus_laptop: for some ASUS laptops
- tegav2: for Tegatech Tegav2 (may work with other Atom N45x based tablets)
- sparta: for Dell Inspiron Mini Duo platform
- vm: for virtual machine (virtual box, qemu, vmware)
- motion_m1400: for Motion M1400 (Intel Centrino M based with Intel PRO/Wireless)
- eclair-x86
- generic_x86: for generic x86 PC/notebook
- eeepc: for ASUS EeePC family only
- q1u: for Samsung Q1U
- s5: for Viliv S5
- donut-x86
- eeepc: for ASUS EeePC family
- q1u: for Samsung Q1U
- s5: for Viliv S5
Actually, for historical reason, you have to use eeepc for a generic x86 PC, notebook or netbook before (includes) donut-x86 branch. Since eclair-x86 branch, eeepc is changed to serve ASUS EeePC family only. Do not use it if you are not using an EeePC.
In short, if you don't know how to choose, use eeepc for donut-x86 branch, and use generic_x86 for eclair-x86 to ics-x86 branches. But note generic_x86 is just a base for other targets. It doesn't have some advanced features like hardware acceleration.
Since jb-x86 we tried to use android_x86 as a universal target for all x86 devices. However, it may not optimized for a particular target device. If you are a developer, you can create a target based on android_x86 for your device.
If you want to add new target for your x86 device, refer to the article.
Using lunch command (recommended)
Now you can select a target by lunch command:
$ lunch $TARGET_PRODUCT-$TARGET_BUILD_VARIANT
where $TARGET_PRODUCT is any target described in the previous section, and possible values of $TARGET_BUILD_VARIANT are eng, user, userdebug. For example:
$ lunch android_x86-userdebug
Then you can build by m command( m command is equivalent to make, but you can use it in any subdirectory of the android-x86 tree.
Note:there are 2 types of images we can build using make (iso_img or efi_img):
$ m -jX iso_img
iso_img: Creates an ISO9660 image, which can be write on cd/dvd medium / USB flashdrive.This is bootable by machines supporting legacy BIOS.
$ m -jX efi_img
efi_img: Creates an image bootable on EFI machines (some new devices like tablets only support this booting method currently)
Since froyo-x86, we also add menu selection to lunch command. Just type lunch, and you will get a list of available targets. Choose a target by inputting its number. Alternatively, just type lunch $number.
Building directly
To build a live cdrom iso image for target android_x86, type:
$ make iso_img TARGET_PRODUCT=android_x86
To generate a live cdrom iso for tegav2, type
$ make iso_img TARGET_PRODUCT=tegav2
Then you will get an iso file out/target/product/x86/android_x86.iso, etc.
If the computer you build on has more then one processor or core, you can take advantage of multiprocessing (or make jobs) by adding -jX to the beginning of your make command:
$ make -jX iso_img TARGET_PRODUCT=android_x86
Replace X by the number of processors you have. For example, if you have a quad core CPU, replace X with 4:
$ make -j4 iso_img TARGET_PRODUCT=android_x86
Using buildspec.mk
You can create a buildspec.mk in your android-x86 directory to remember a particular target product you build often:
TARGET_PRODUCT:=android_x86
TARGET_BUILD_VARIANT:=userdebug
TARGET_BUILD_TYPE:=release
TARGET_KERNEL_CONFIG:=android-x86_defconfig
With your buildspec.mk file in your android-x86 directory, you can just make by
$ make -jX iso_img
Build smaller image
If you have squashfs-tools 4.0 (older version will not work) installed in your host, the generated Android core filesystem will be compressed by squashfs. So the iso file is very small (only about 30-40%). If you hope to disable it, add USE_SQUASHFS=0 to make. You can put it to buildspec.mk:
USE_SQUASHFS := 0
Before froyo-x86 (included), If you hope to get a more smaller image, you may remove the debugging symbols by adding
TARGET_STRIP := 1
Since gingerbread-x86, the debugging symbols are stripped by default. Do not use this option anymore.
Testing
The generated image is located at
out/target/product/$TARGET_PRODUCT/$TARGET_PRODUCT.iso
You can easily test the iso file by a virtual box, vmware workstation or qemu.
Of course you can burn the iso to a CD disk and test it on a real hardware. On booting it will automatically detect your hardware and load necessary modules. If you have problem with the default frame buffer driver, you may try the VESA mode (select second item on boot screen).
Since honeycomb-x86, we supports the hybrid iso format. That is, the iso could be dumped to a usb disk directly. You may create a bootable USB disk by
$ dd if=out/target/product/x86/android_x86.iso of=/dev/sdX
where /dev/sdX is the device name of your USB disk. This feature is only available for iso files released after 2011/12/25. Note usb_img is deprecated. Do not use it anymore.
Please see Installation page to know details about installation.
Installation
Introduction
Android-x86 includes an option to install to harddisk via easy installer. The supported filesystems are:
- ext4
- ext3
- ext2
- ntfs
- fat32
You can install Android-x86 to an NTFS filesystem to co-exist with Windows. See the Advanced section below for details.
Step By Step
-
Burn the iso image to cdrom or you can create a bootble USB stick(recommended- you known it is environmental protection).see the Advanced section below for details.
-
Boot OS from the Android-x86 installation CD/USB, Choose the 'Install Android to harddisk' item as show below:

-
After seconds of booting, you will see a partition selection dialog. You can choose an existing partition to install Android-x86, or you can create or modify partitions by choosing 'Create/Modify partitions'(here use cfdisk tools). Note you can install Android-x86 to an external disk like USB drive. If the target drive is not shown, try 'Detect devices'.

-
Android-x86 can co-exist with other operating system or data in the chosen partition. If the partition is formatted, you may choose 'Do not format' to keep existing data. Otherwise, choose a filesystem type to format.
Note: The type you chosen must match the partition ID or the boot loader will fail to boot.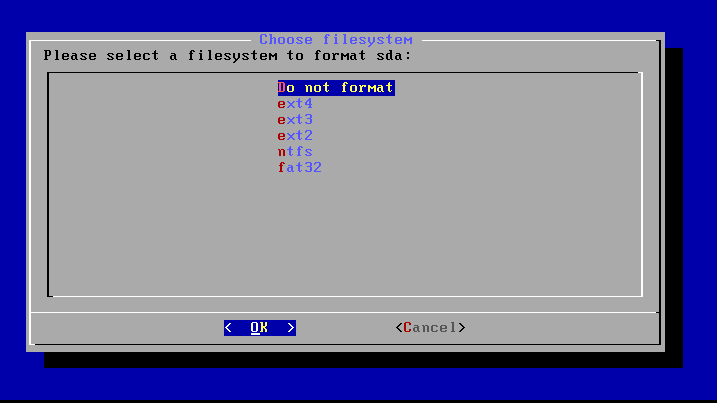
-
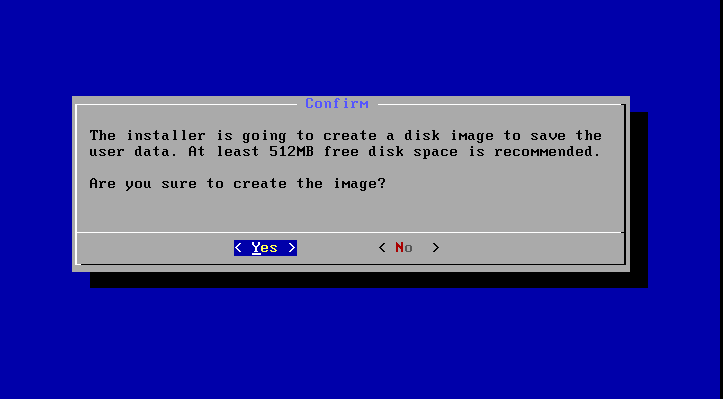
Also note if you choose to format to fat32, you will see a warning that android cannot save data to fat32. You can still proceed to install, but the installed android system will work like a live cd system. That is, all data will lose after power off. But it has been improved to save data to fat32 or ntfs since 2010. The installer will ask to create a data.img to save data when fat32 or ntfs is chosen.
-
Next question is whether to install boot loader Grub. Usually you should answer yes, unless you want to install boot loader by hand yourself. Note the installer only creates boot items for Android-x86. If you hope to boot other operating systems, you need to add the item to
/grub/menu.lstmanually. See the Advanced Section below for how to do this.
-
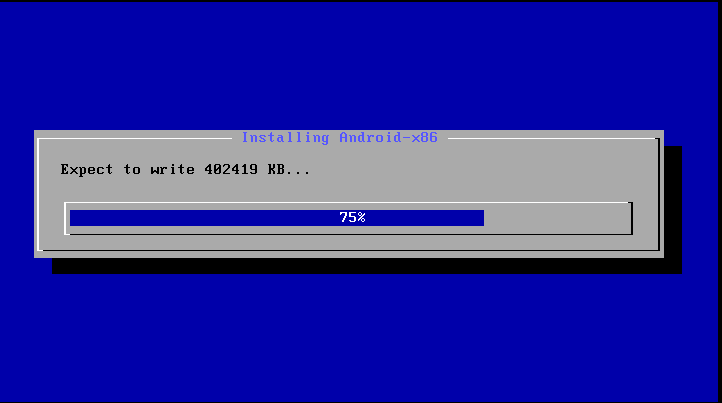
If you are lucky, the installation will begin, and you will see the progress bar.
-
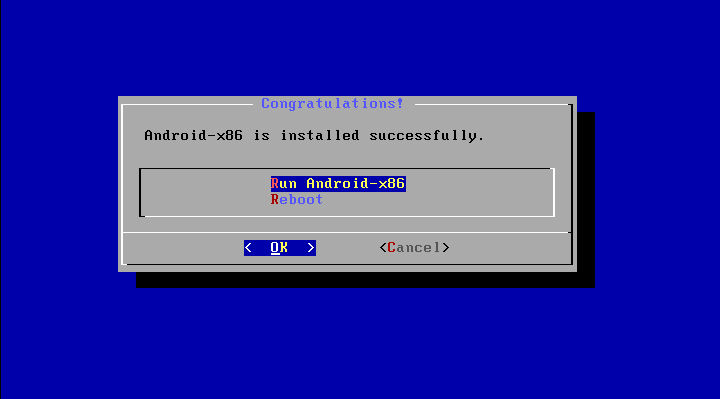
While you see this screen, the installation is complete. Congratulations! Now you can run Andrond-x86 directly, or you can reboot and run it.
Advanced
Create a bootable USB stick for Android-x86
- Use the USB image
Download the compressed USB image, uncompress and dump it to a USB stick.
On a Linux host, you can use the command:
  *for 64bit*
  dd if=out/target/product/x86_64/android_x86_64.iso of=/dev/sdc
  *for 32bit*
  dd if=out/target/product/x86/android_x86.iso of=/dev/sdc
Note where /dev/sdc is the device name of the target USB disk. However, some broken BIOS may fail to boot such a USB disk.
On a Windows host, you have sevral choices like Win32DiskImager or USBImageTool , and what you want.
-
Create a bootable USB stick by ISO file
There are some open source tools that can convert an iso into a bootable USB disk:
- Linux Live USB Creator ( LiLi ) -- Officially Support Android-x86
- UNetbootin -- see the demo video. -- Provided Linux/MacOS/Windows
Multi-boot
- To boot other operating systems, you have to add boot items for them to
/grub/menu.lst. For example, to boot Windows, add the following:
title Windows`
`  rootnoverify (hd0,0)`
  `brchainloader +1`
- This assumes the Windows is installed to the first partition of the first hard disk. Or you need to change rootnoverify to the appropriate value. See Grub Manual for details.
Issues
VMware
When using Android-x86 as a VMware guest OS you must change your virtual disk type to be IDE. The default type in VMware is SCSI, and Android-x86 kernel is not configured to support SCSI.
You can follow these steps:
- Create a virtual machine.
- Edit virtual machine settings after the virtual machine created.
- Choose the hard disk and remove it.
- Add a hard disk to create a new virtual disk, then you can choose IDE as your virtual disk type.
When finished, you can install Android-x86 normally.