SpringCloudAlibab Nacos服务治理和配置中心和集群搭建
SpringCloudAlibab Nacos服务治理和配置中心和集群搭建
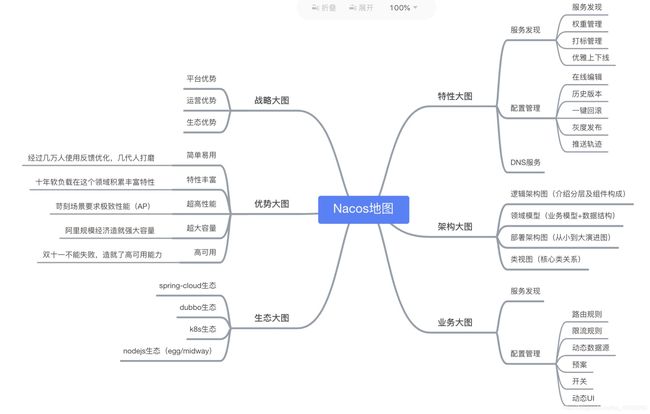
一、什么是 Nacos
Nacos 致力于发现、配置和管理微服务。提供了一组简单易用的特性集,帮助快速实现动态服务发现、服务配置、服务元数据及流量管理。
可以更敏捷和容易地构建、交付和管理微服务平台。 Nacos 是构建以“服务”为中心的现代应用架构 (例如微服务范式、云原生范式) 的服务基础设施。

二、Nacos、Eureka、Zookeeper之间的区别
- 分布式架构CAP定律
一致性(Consistency) (所有节点在同一时间具有相同的数据)
可用性(Availability) (保证每个请求不管成功或者失败都有响应)
分隔容忍(Partition tolerance) (系统中任意信息的丢失或失败不会影响系统的继续运作) - Zookeeper采用CP保证数据的一致性的问题,原理采用(ZAP原子广播协议),当我们ZK领导者因为某种情况下部分节点出现了故障,会自动重新实现选举新的领导角色,整个选举的过程中为了保证数据一致性的问题,客户端暂时无法使用我们的Zookeeper,那么这以为着整个微服务无法实现通讯。
- Eureka采用AP设计思想实现分布式注册中心,完全去中心化、每个节点都是相等,采用你中有我、我中有你相互注册设计思想, 只要最后有一台Eureka节点存在整个微服务就可以实现通讯。
- Nacos从1.0版本选择Ap和CP混合形式实现注册中心,默认情况下采用Ap,CP则采用Raft协议实现保持数据的一致性。
如果选择为Ap模式,注册服务的实例仅支持临时模式,在网络分区的的情况允许注册服务实例,选择CP模式可以支持注册服务的实例为持久模式,在网络分区的产生了抖动情况下不允许注册服务实例。
三、Nacos的环境搭建
官方地址:
https://nacos.io/zh-cn/docs/quick-start.html
可以先选择下载window版的,下面会讲解在CenterOS下如何搭建集群。
127.0.0.1:8848/nacos
即可看到nacos的登录页面,用户名和密码都为nacos。

其中:配置管理只要为动态config配置的一些操作(上面有三行是我创建的yaml配置,下面会讲解)。服务管理就是服务注册方面的操作。集群管理为nacos集群的状态。
四、搭建服务提供者
这里服务提供者,开启两个服务作为集群
分别为127.0.0.1:8091和127.0.0.1:8092
1. pom
这里这里注意springboot和alibaba.cloud的版本,alibaba.cloud指定的版本为2.1.0,具体换其他版本,可参考官网。
                org.springframework.boot
                spring-boot-dependencies
                2.3.0.RELEASE
                pom
                import


                com.alibaba.cloud
                spring-cloud-alibaba-dependencies
                2.1.0.RELEASE
                pom
                import
            com.alibaba.cloud
            spring-cloud-starter-alibaba-nacos-discovery
2. application.yml
server:
  port: 8091

spring:
  application:
    name: nacos-provider
  cloud:
    nacos:
      discovery:
        server-addr: 127.0.0.1:8848
3. 服务接口
@RestController
@Slf4j
public class ServerController {
    @Value("${server.port}")
    private String port;

    @GetMapping("/GetTest")
    public String GetTest(){
        return "无参-服务提供者port:="+port;
    }

    @GetMapping("/GetTest2")
    public String GetTest2(String param){
        return "get有参-服务提供者port:="+port+", param:="+param;
    }

    @GetMapping("/GetTest3/{param}")
    public String GetTest3(@PathVariable("param") String param){
        return "get restful 有参数-服务提供者port:="+port+", param:="+param;
    }

    @PostMapping("/PostTest")
    public String PostTest(String param){
        return "post string参数,服务提供者port:="+port+", param:="+param;
    }

    @PostMapping("/PostTest2")
    public UserEntity PostTest2(@RequestBody UserEntity entity){
        log.info(entity.toString());
        entity.setUsername("success");
        return entity;
    }
}
4. 启动
启动8091后,然后修改端口号为8092,再此启动服务,然后查看nacos网页下的信息情况。
如果再服务列表中出现nacos-provider服务,并实例数和健康实例数都为2,则证明服务提供者已经注册到了nacos注册中心上。

五、搭建服务消费者
1. pom
加载nacos依赖和服务提供者一样,这里添加下openfeign客户端,方便消费服务。
               org.springframework.cloud
               spring-cloud-dependencies
               Hoxton.SR1
               pom
               import
            org.springframework.cloud
            spring-cloud-starter-openfeign
2. application.yml
server:
  port: 8081
spring:
  application:
    name: nacos-consumer
  cloud:
    nacos:
      discovery:
        server-addr: 127.0.0.1:8848
3. Feign接口
@Component
@FeignClient(name = "nacos-provider")
public interface Serverclient {

    @GetMapping("/GetTest")
    String GetTest();

    @GetMapping("/GetTest2")
    String GetTest2(@RequestParam("param")String param);

    @GetMapping("/GetTest3/{param}")
    String GetTest3(@PathVariable("param") String param);

    @PostMapping("/PostTest")
    String PostTest(@RequestParam("param") String param);

    @PostMapping("/PostTest2")
    UserEntity PostTest2(@RequestBody UserEntity entity);
}
4. Controller
@RestController
@Slf4j
public class TestFeignController {
    @Autowired
    Serverclient serverclient;

    @GetMapping("/GetTest")
    public String GetTest(){
        return serverclient.GetTest();
    }

    @GetMapping("/GetTest2")
    public String GetTest2(String param){
        return serverclient.GetTest2(param);
    }

    @GetMapping("/GetTest3/{param}")
    public String GetTest3(@PathVariable("param") String param){
        return serverclient.GetTest3(param);
    }

    @GetMapping("/PostTest")
    public String PostTest(String param){
        return serverclient.PostTest(param);
    }

    @GetMapping("/PostTest2")
    public UserEntity PostTest2(){
        UserEntity entity = new UserEntity();
        entity.setId(2);
        entity.setUsername("admin");
        entity.setPasswd("123");
        return serverclient.PostTest2(entity);
    }
}
5. 启动
@SpringBootApplication
@EnableFeignClients
public class NacosConsumeApplication {
    public static void main(String[] args) {
        SpringApplication.run(NacosConsumeApplication.class, args);
    }
}
再打开nacos网站,查看服务列表:

然后去浏览器,访问上面controller中的接口,即可访问远程服务了。
六、配置中心
1. 创建配置
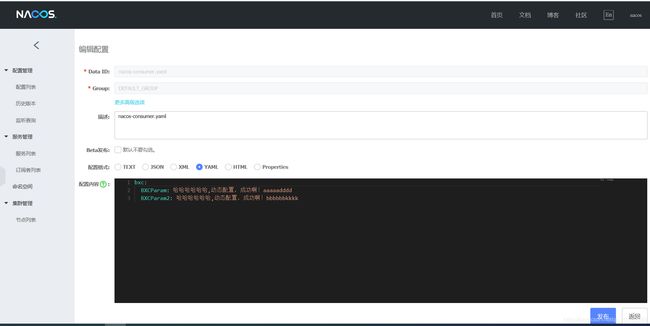
再nacos的网页中有配置管理菜单,其中有个配置列表,可点击右边的加号添加配置。

下面创建一个nacos-consumer.yaml配置文件,或nacos-consumer-dev.yaml、nacos-consumer-pro.yaml形式配置可切换的。

最后点击发布,即可在配置列表中看到新增一条数据。
2. 客户端引用配置
- pom
            com.alibaba.cloud
            spring-cloud-starter-alibaba-nacos-config
- 建立bootstrap.yml
因为application.yml 中的配置现在要放在nacos上管理,所以配置nacos就需要写在bootstrap中,项目启动时先加载。
server:
  port: 8081
spring:
  application:
    name: nacos-consumer
  cloud:
    nacos:
      discovery:
        server-addr: 127.0.0.1:8848
      config:
        server-addr: 127.0.0.1:8848
        group: DEFAULT_GROUP
        file-extension: yaml
  profiles:
    active: pro
- 在代码中读取配置文件的内容:
其中@RefreshScope注解作用为实时刷新,当nacos中的配置发生变化时会及时更新到程序中。
@RestController
@RefreshScope
public class ConfigTestController {
    @Value("${bxc.BXCParam}")
    private String BXCParam;

    @GetMapping("/GetParam")
    public String GetParam(){
        return "param:="+BXCParam;
    }
}
3. 将配置存储到数据库中
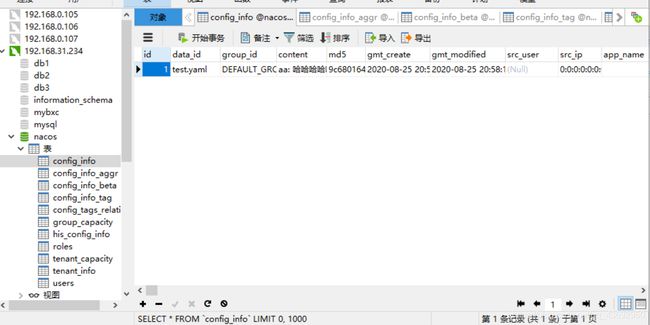
默认的情况下,分布式配置中心的数据存放到本地data目录下,但是这种情况如果nacos集群的话无法保证数据的同步性。从0.7版本增加了支持mysql数据源能力。具体配置如下:
- 导入数据库
在nacos的文件夹下conf目录下,有nacos-mysql.sql和schema.sql文件,便是nacos提供的数据库的资料。
首先创建数据库nacos,然后运行SQL文件。

- 修改conf/application.properties
在conf/application.properties中加入如下程序,然后重启nacos。
spring.datasource.platform=mysql
db.num=1
db.url.0=jdbc:mysql://127.0.0.1:3306/nacos?characterEncoding=utf8&connectTimeout=1000&socketTimeout=3000&autoReconnect=true
db.user=root
db.password=root
七、nacos集群搭建
三台服务器:
| 主机 |
|---|
| 192.168.31.232 |
| 192.168.31.232 |
| 192.168.31.232 |
未完待续!


